This paper mainly describes how to use STM32F103C8T6 to transplant uCOSIII operating system, build three tasks, control the LED on-off in 1s and 3s, and send "hello uc/OS! Welcome to RTOS multitasking environment" through serial port in 2s cycle. In addition to mastering the Keil simulation and debugging code function, SaleaeLogic16 is used to capture the waveform of LED and serial communication.
Experimental software: Keil μ Vision5,STM32CubeMX,Logic 1.1.20
1, Introduction to uCOSIII
uCOS-III, provided by Micrium, is a portable, curable, tailorable, preemptive multitasking real-time kernel, which is suitable for a variety of applications microprocessor,micro controller And digital processing chip. μ C/OS-III is a commercial embedded real-time operating system kernel with open source μ Developed from C/OS-II. μ For the new generation CPtJ represented by ARM Cortex, C/OS-III is for embedded applications of CPU s with hardware instructions (such as leading zero calculation instructions) that can be used for priority table lookup. Baidu Encyclopedia ucos ii The explanation can be used as a reference.
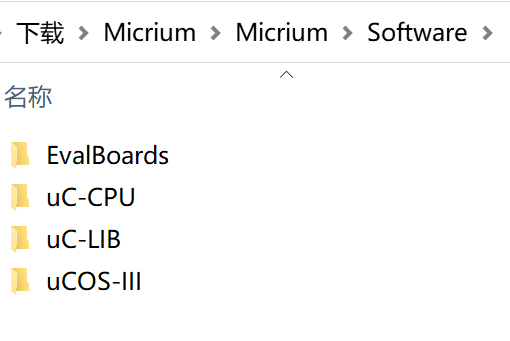
Enter Micrium's official website download center
Micrium Software and Documentation - Silicon Labs (silabs.com)
Select the chip, register according to the prompt, log in to the account and download. The download speed of the official website is relatively slow. You can also download it from the blog link in the resources of this article.
In addition to downloading on the official website, you can also download the source code on Github.
https://github.com/weston-embedded/uC-OS2
Because uCOSIII is applicable to many chips, corresponding code modifications need to be made according to different chips, so the code above Guthub will be different from this one.
Or you can use Baidu online disk to download, which has the source code on Github and the source code of this experiment
Link: https://pan.baidu.com/s/16RfDGC2orYDTk_0OU2oo8A
Extraction code: 1234
There are many Chinese materials about uCOSIII. You can refer to relevant blogs and materials to learn by yourself. This article will not explain too much. You can refer to the official migration manual, the link is as follows.
Link: https://pan.baidu.com/s/1O8XIPic_MsgGmmR5nj3KpA
Extraction code: 1234
2, Create project
The creation method can refer to
Installation and simple application of STM32CubeMX_ Jiangnan smoke and rain blog - CSDN blog
STM32F103 serial communication USART small test bull knife_ Jiangnan smoke and rain blog - CSDN blog
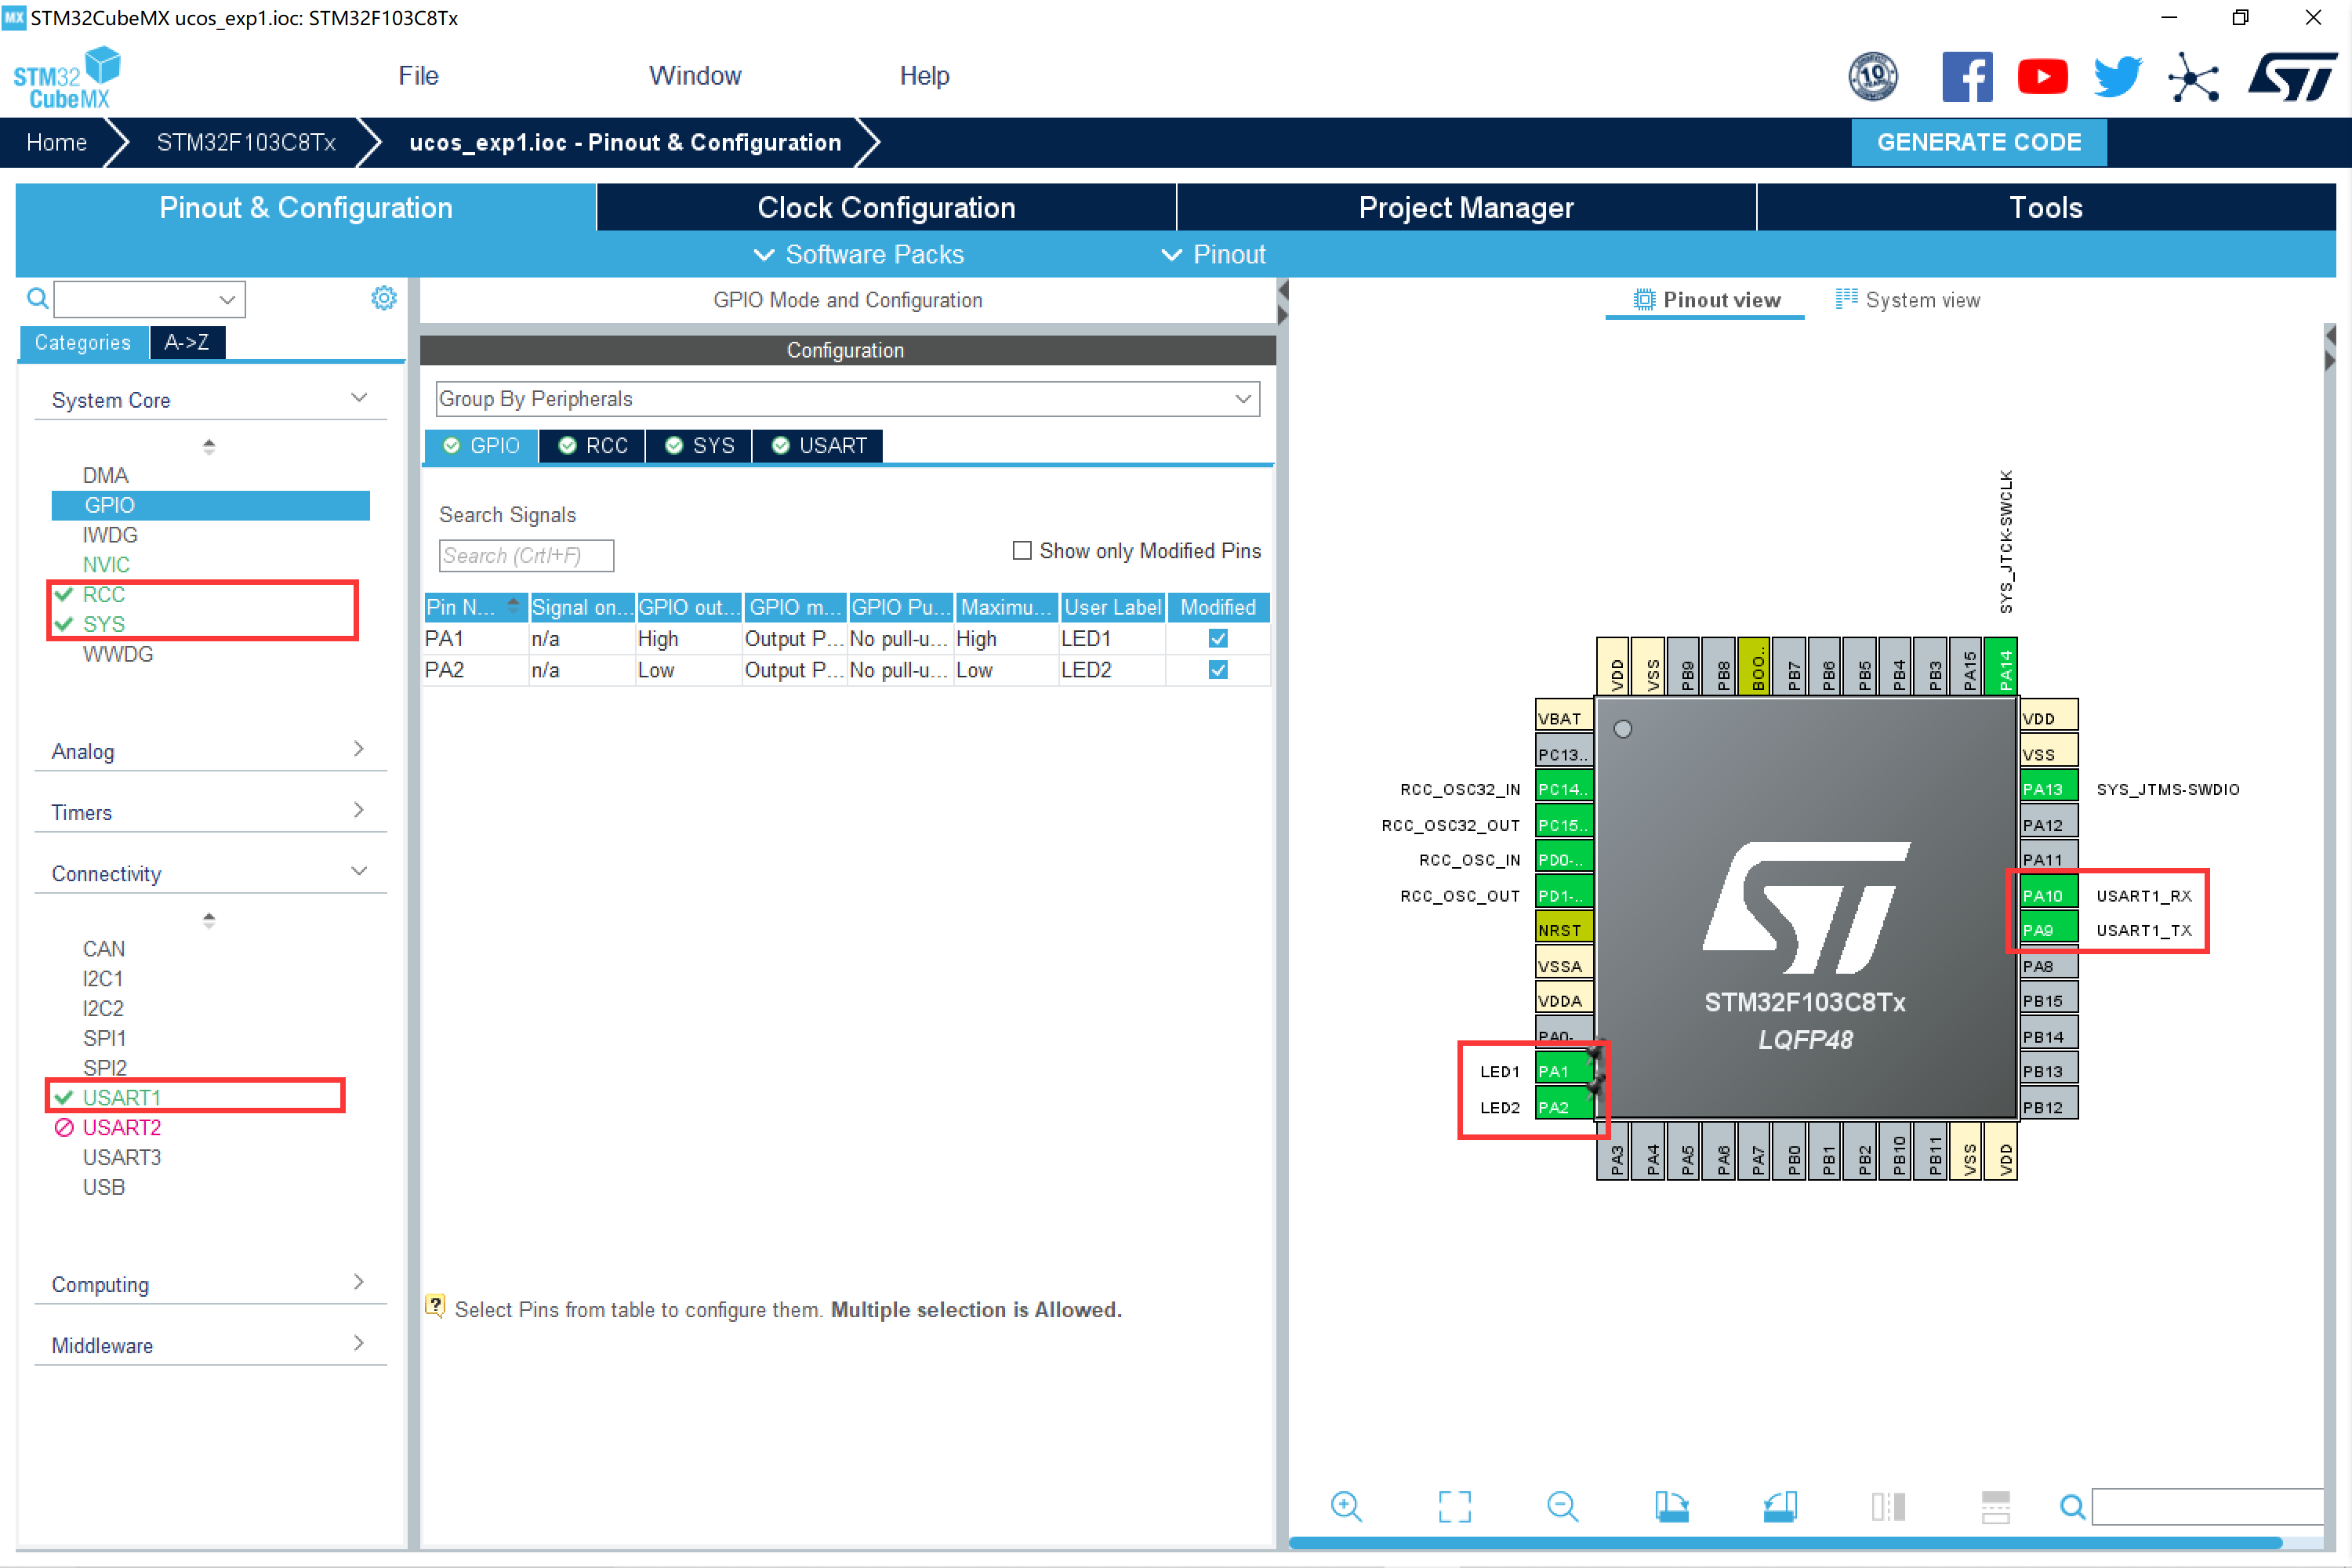
This experiment does not use interrupts, so there is no need to configure interrupts. The relevant configuration is shown in the figure below.
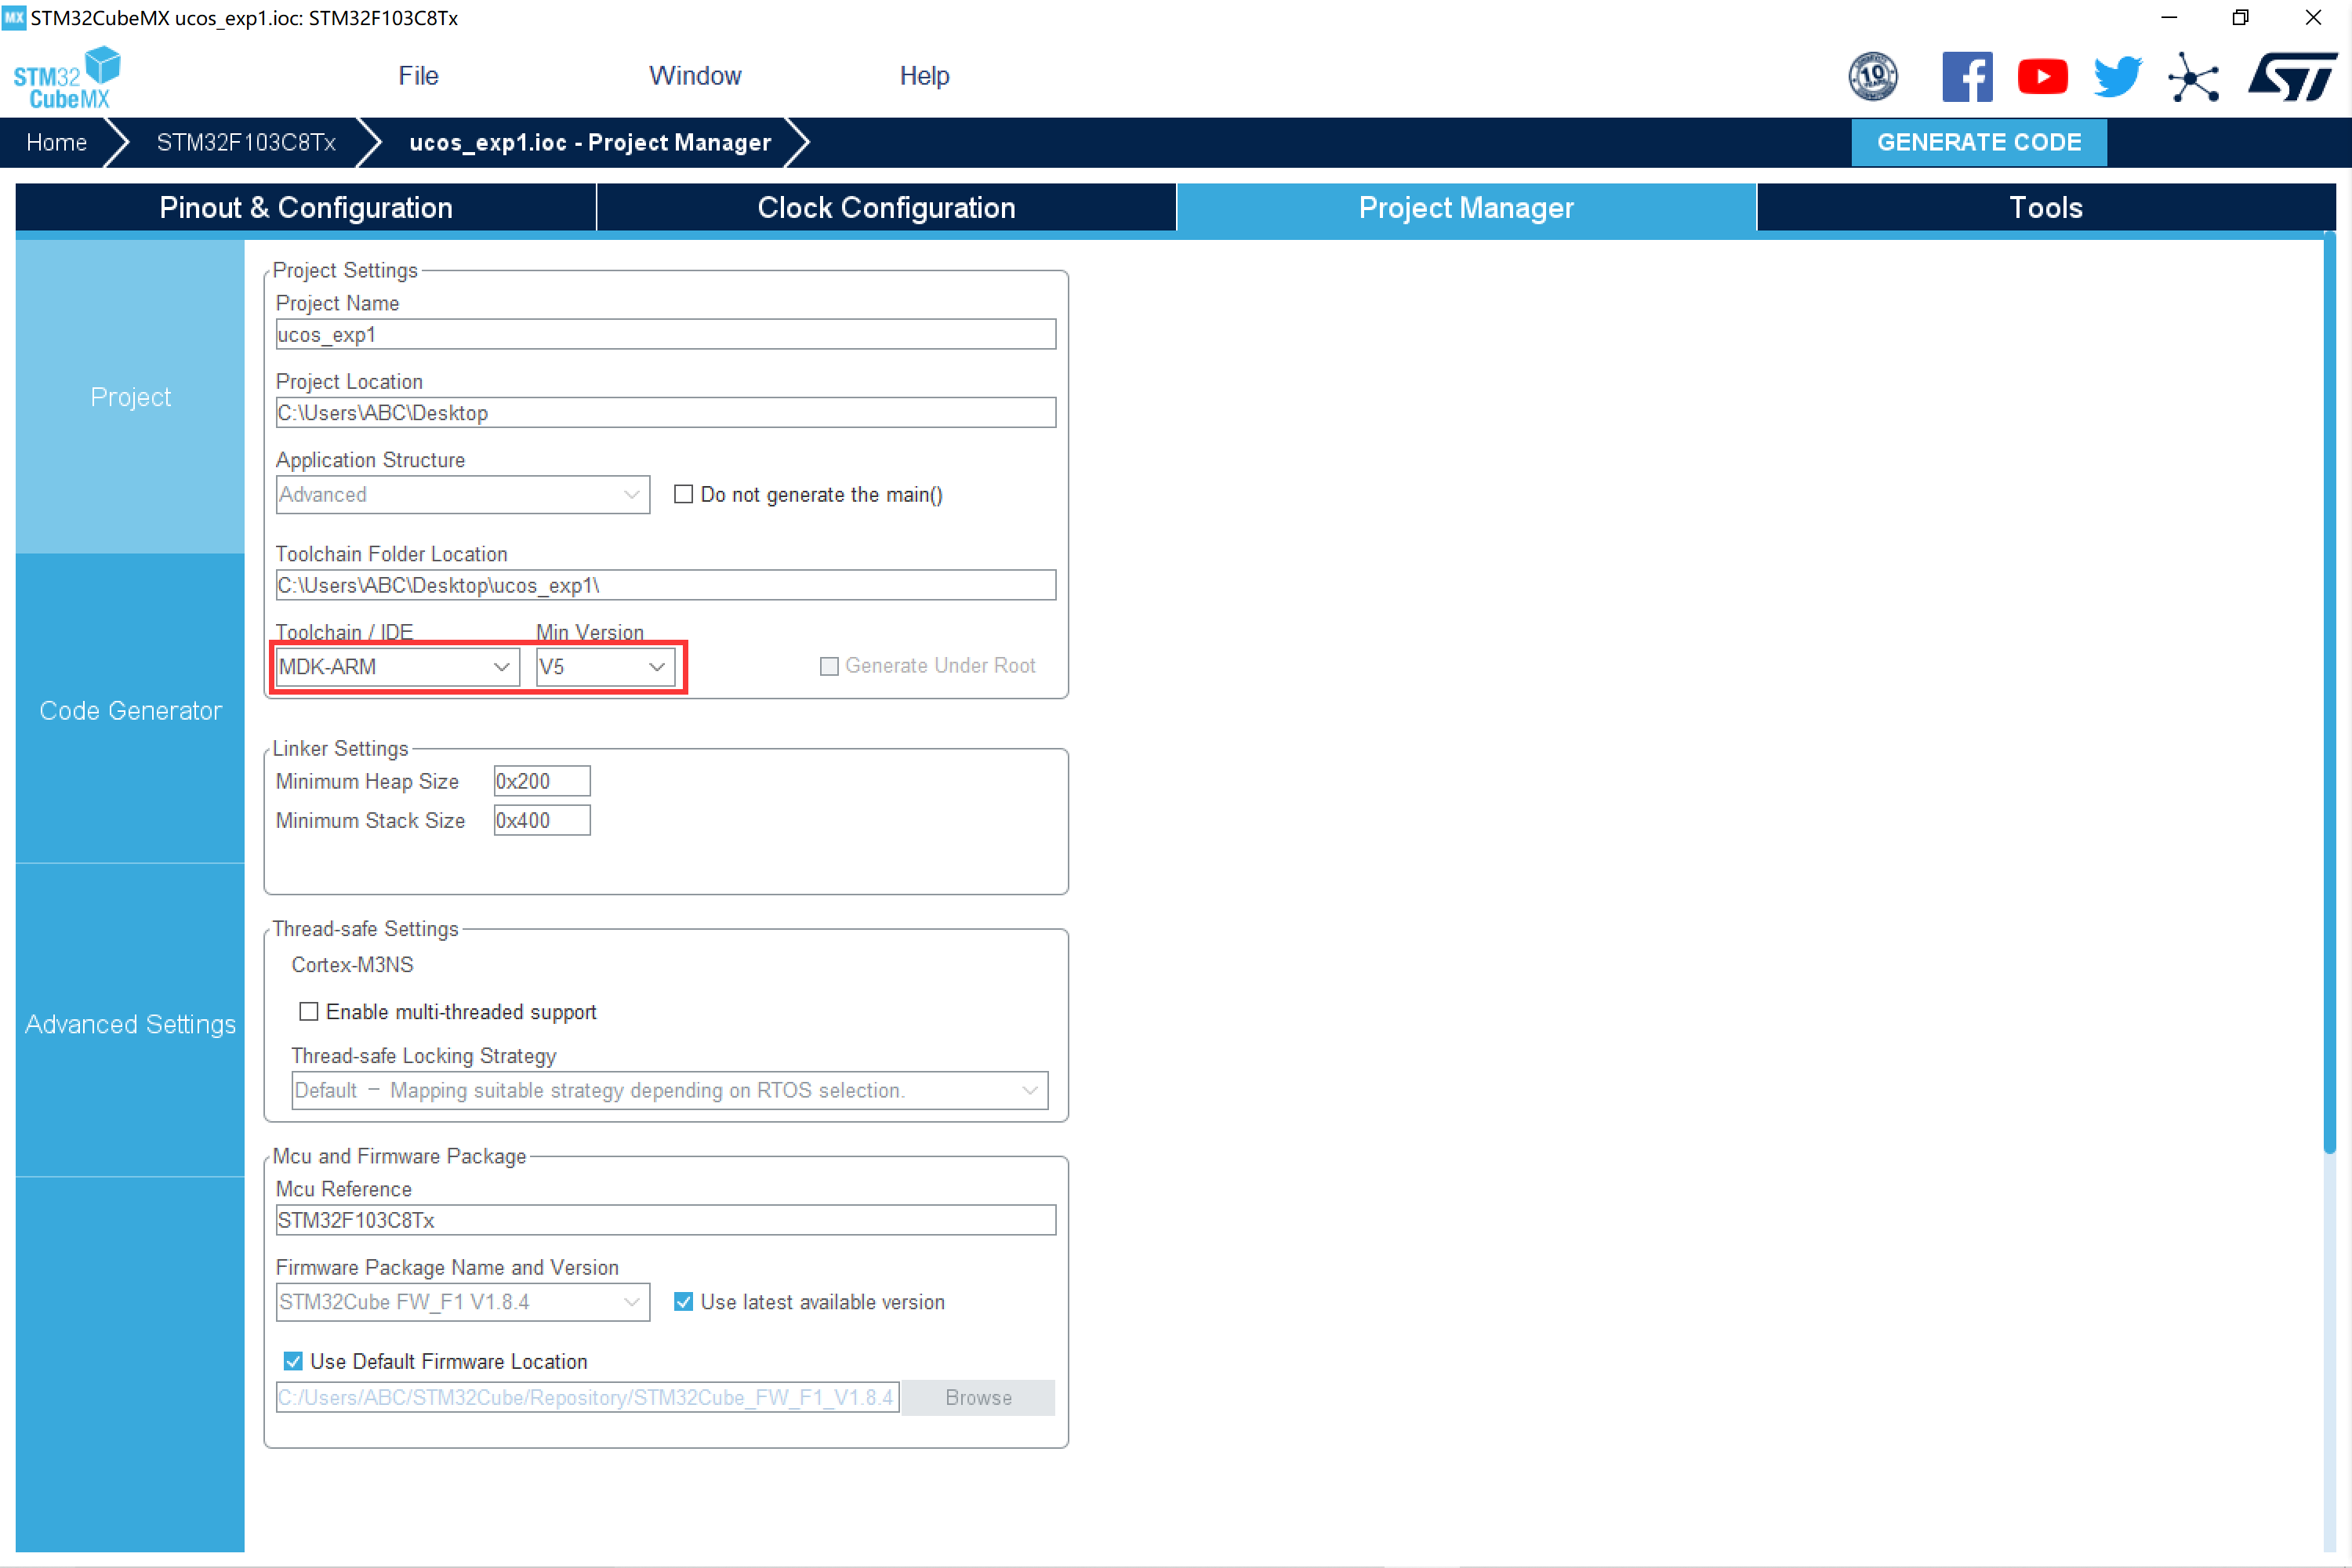
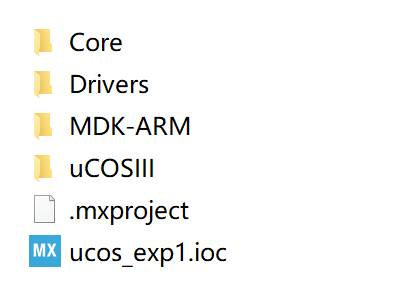
Note: the file structure of different MDK versions is slightly different
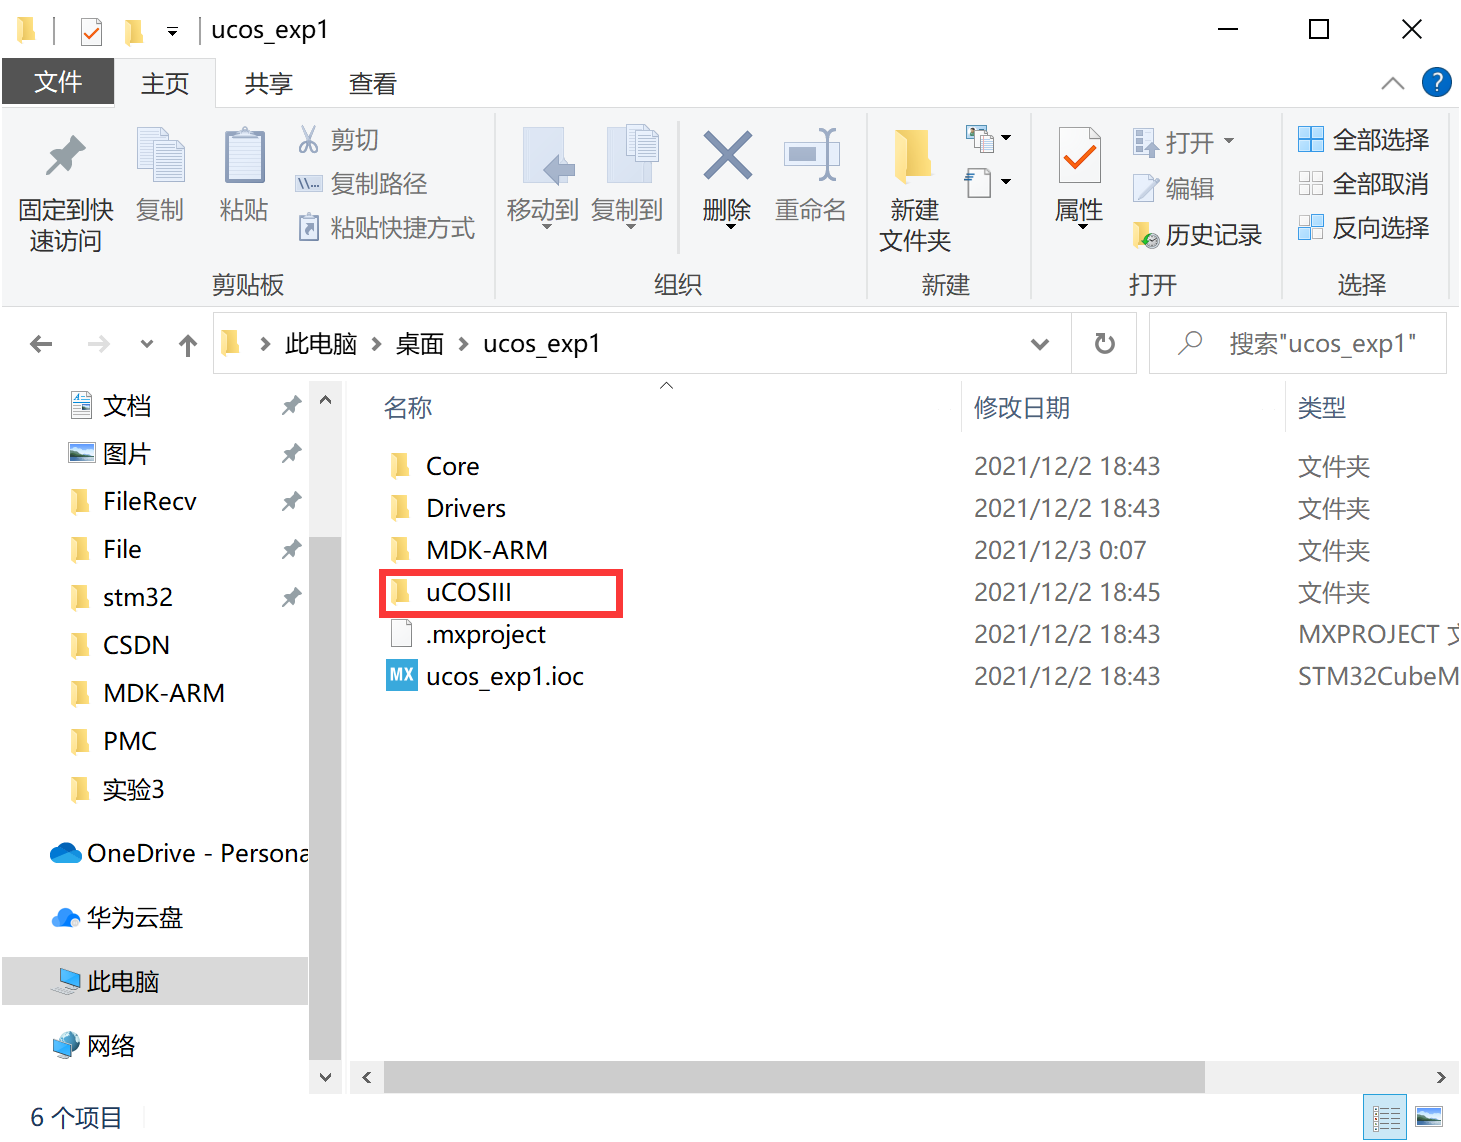
The author selects V5 version, and the file structure is as follows (uCOSIII folder is added):
3, Transplantation Engineering
1. Add a file to the project file
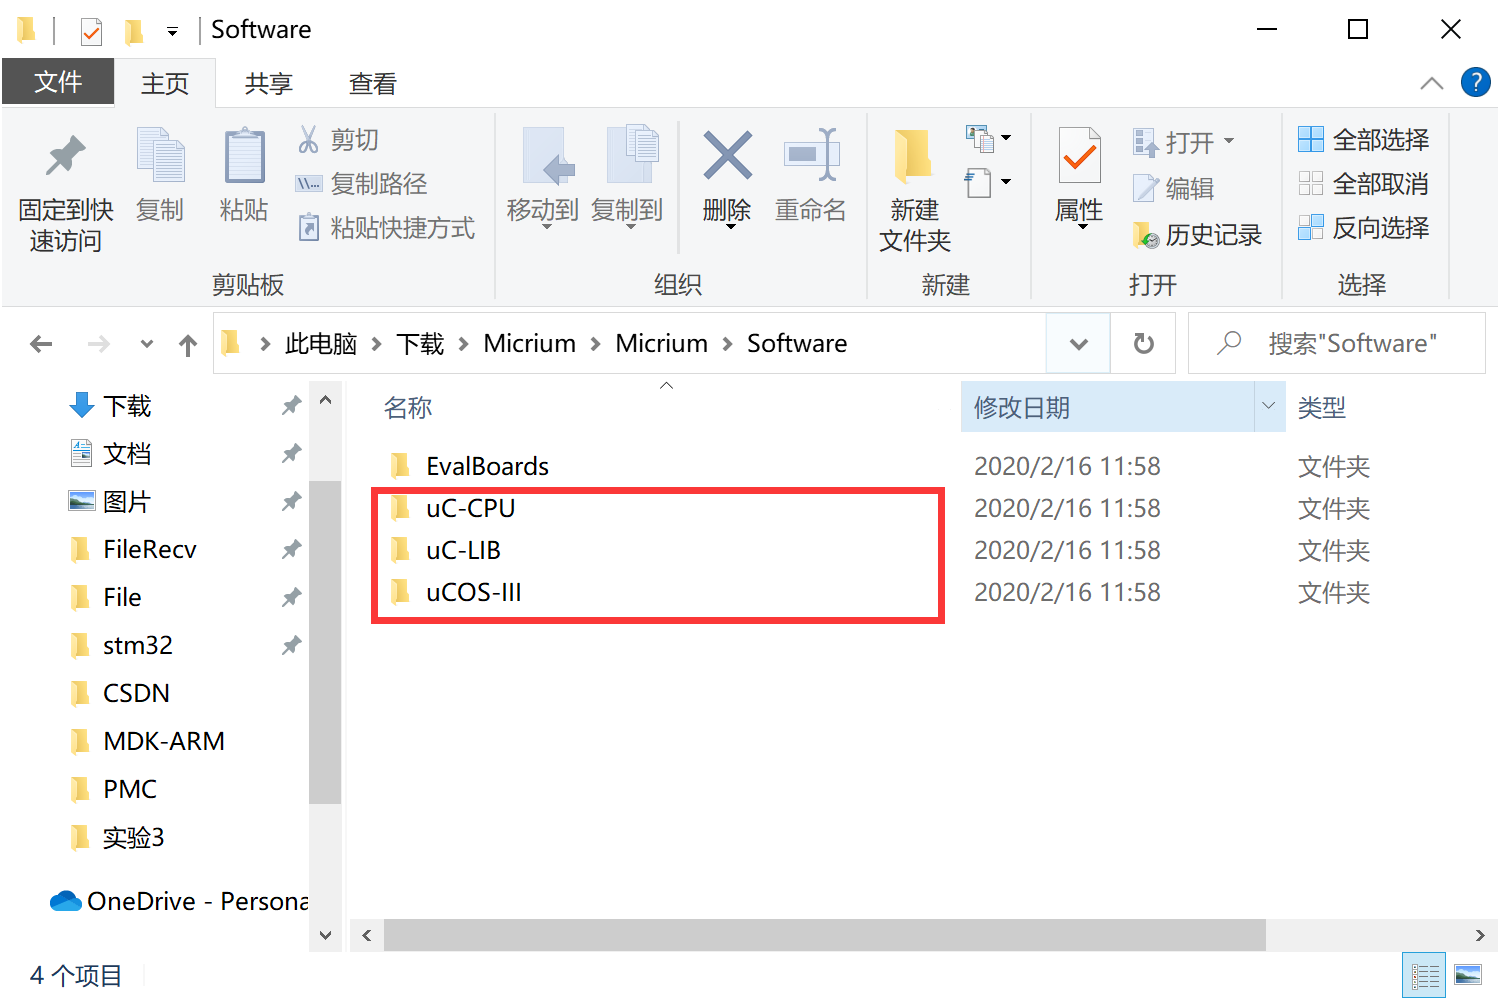
Create a folder named uCOSIII under the created HAL project file directory, and copy and paste the UC CPU, UC lib and UCOS III folders into this folder.
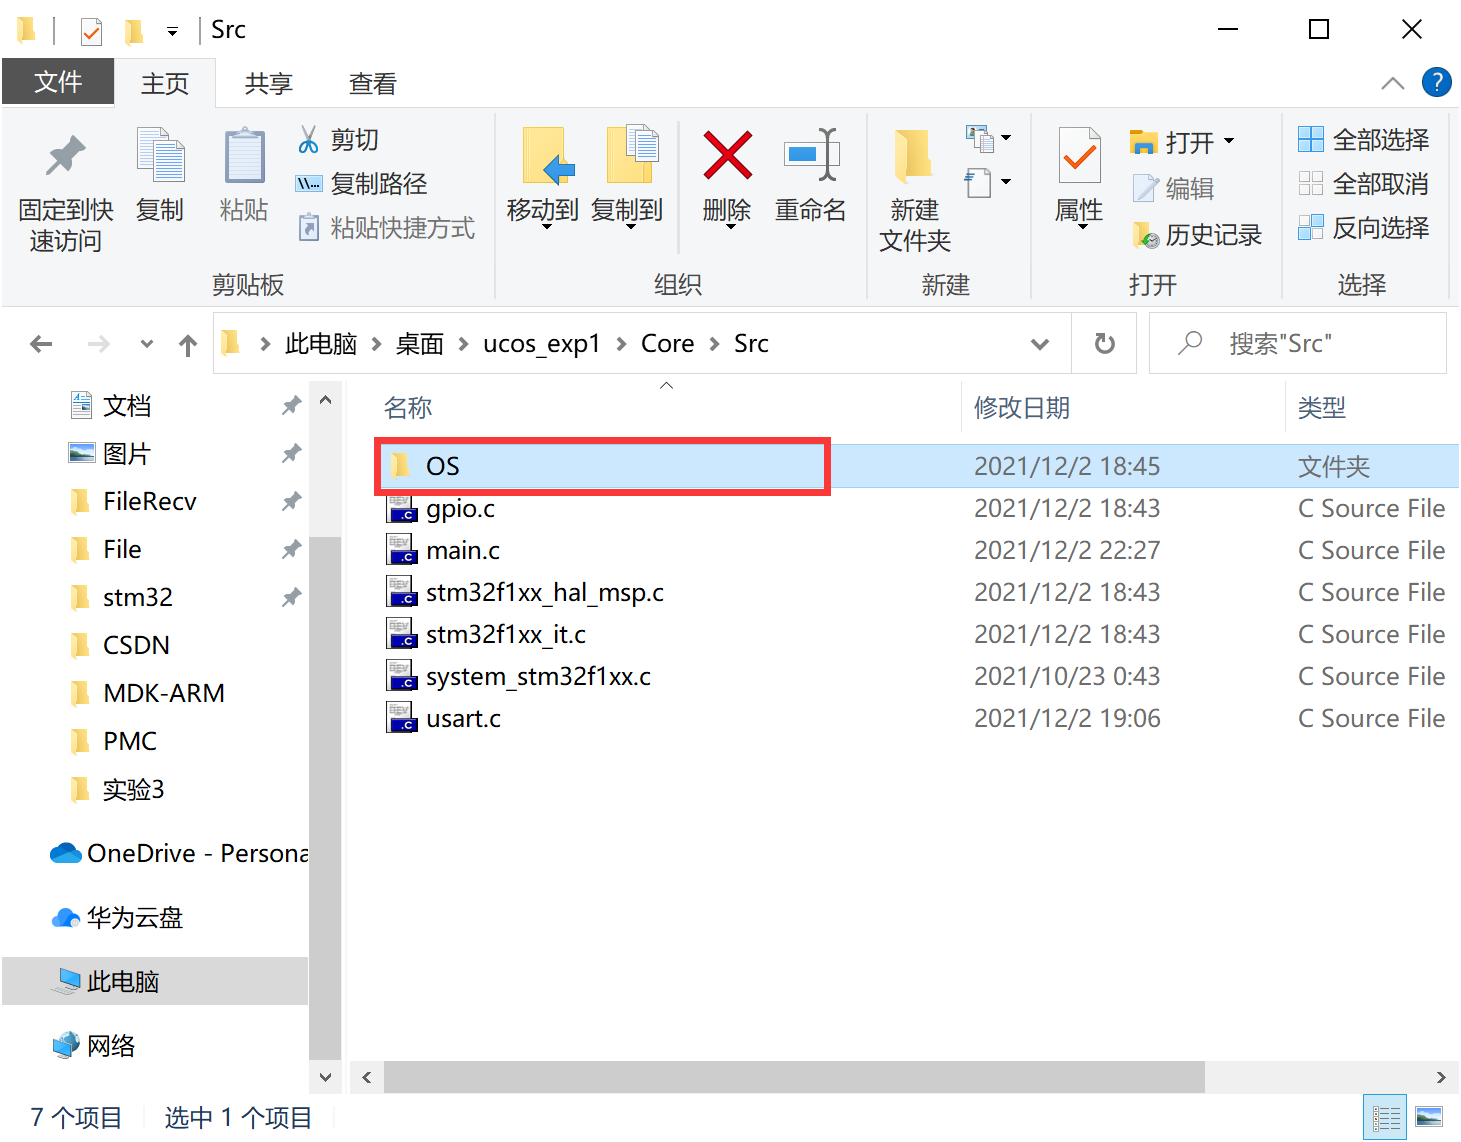
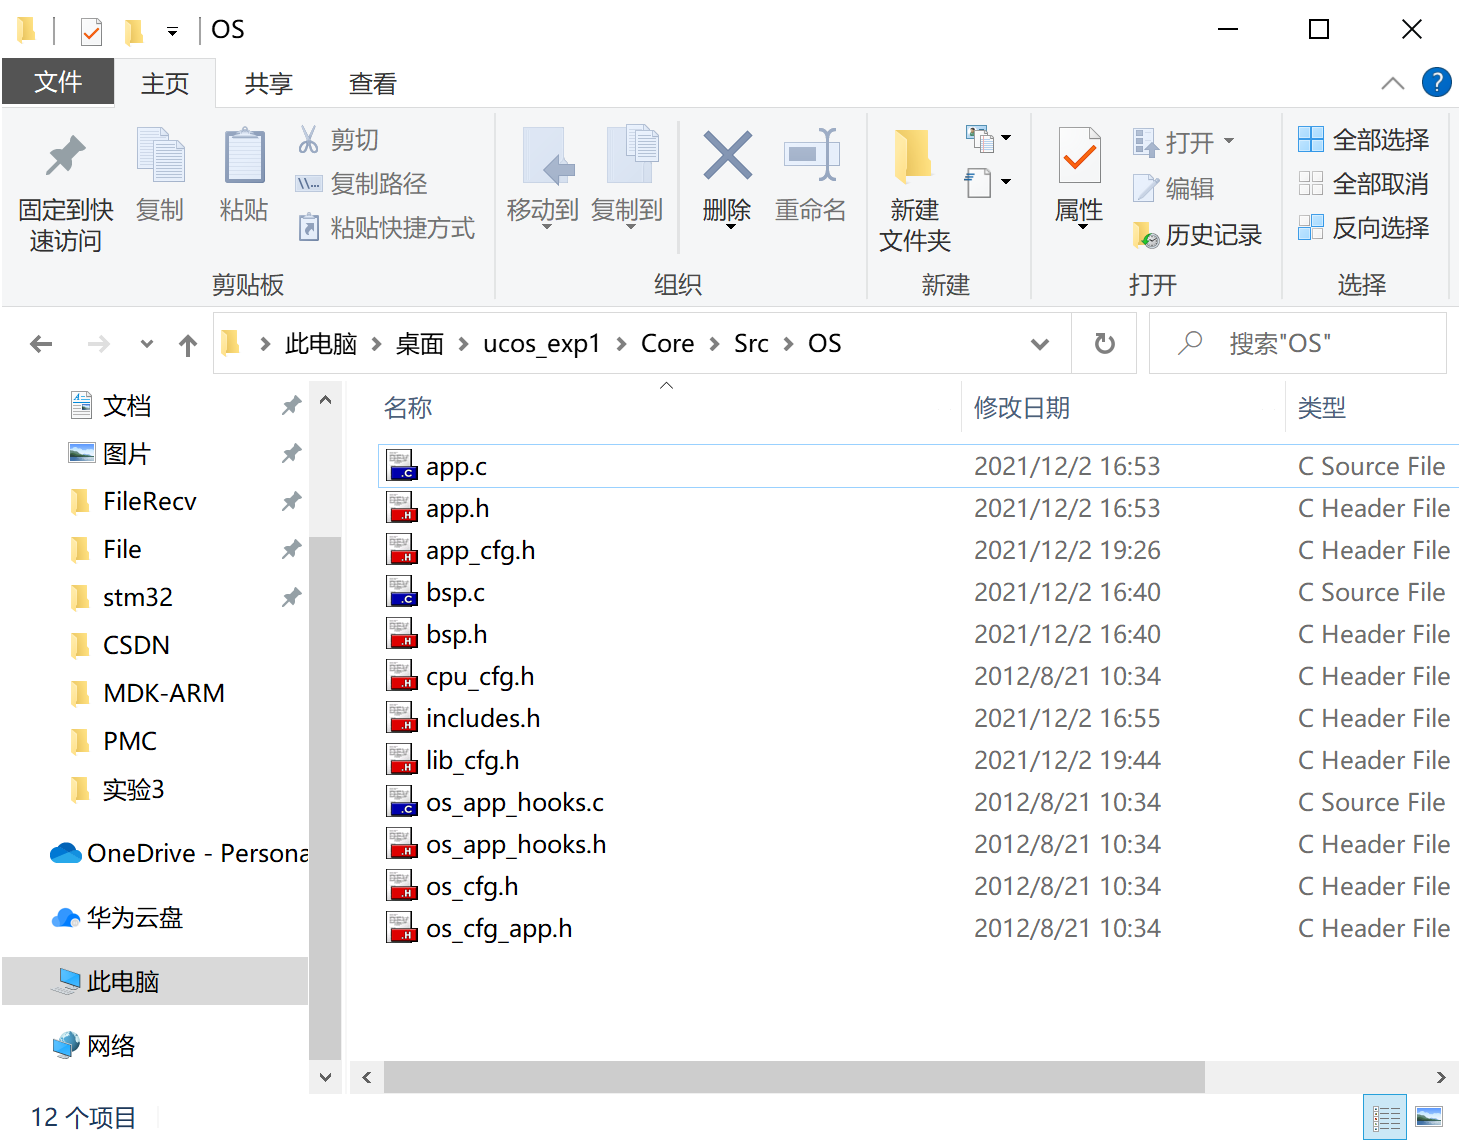
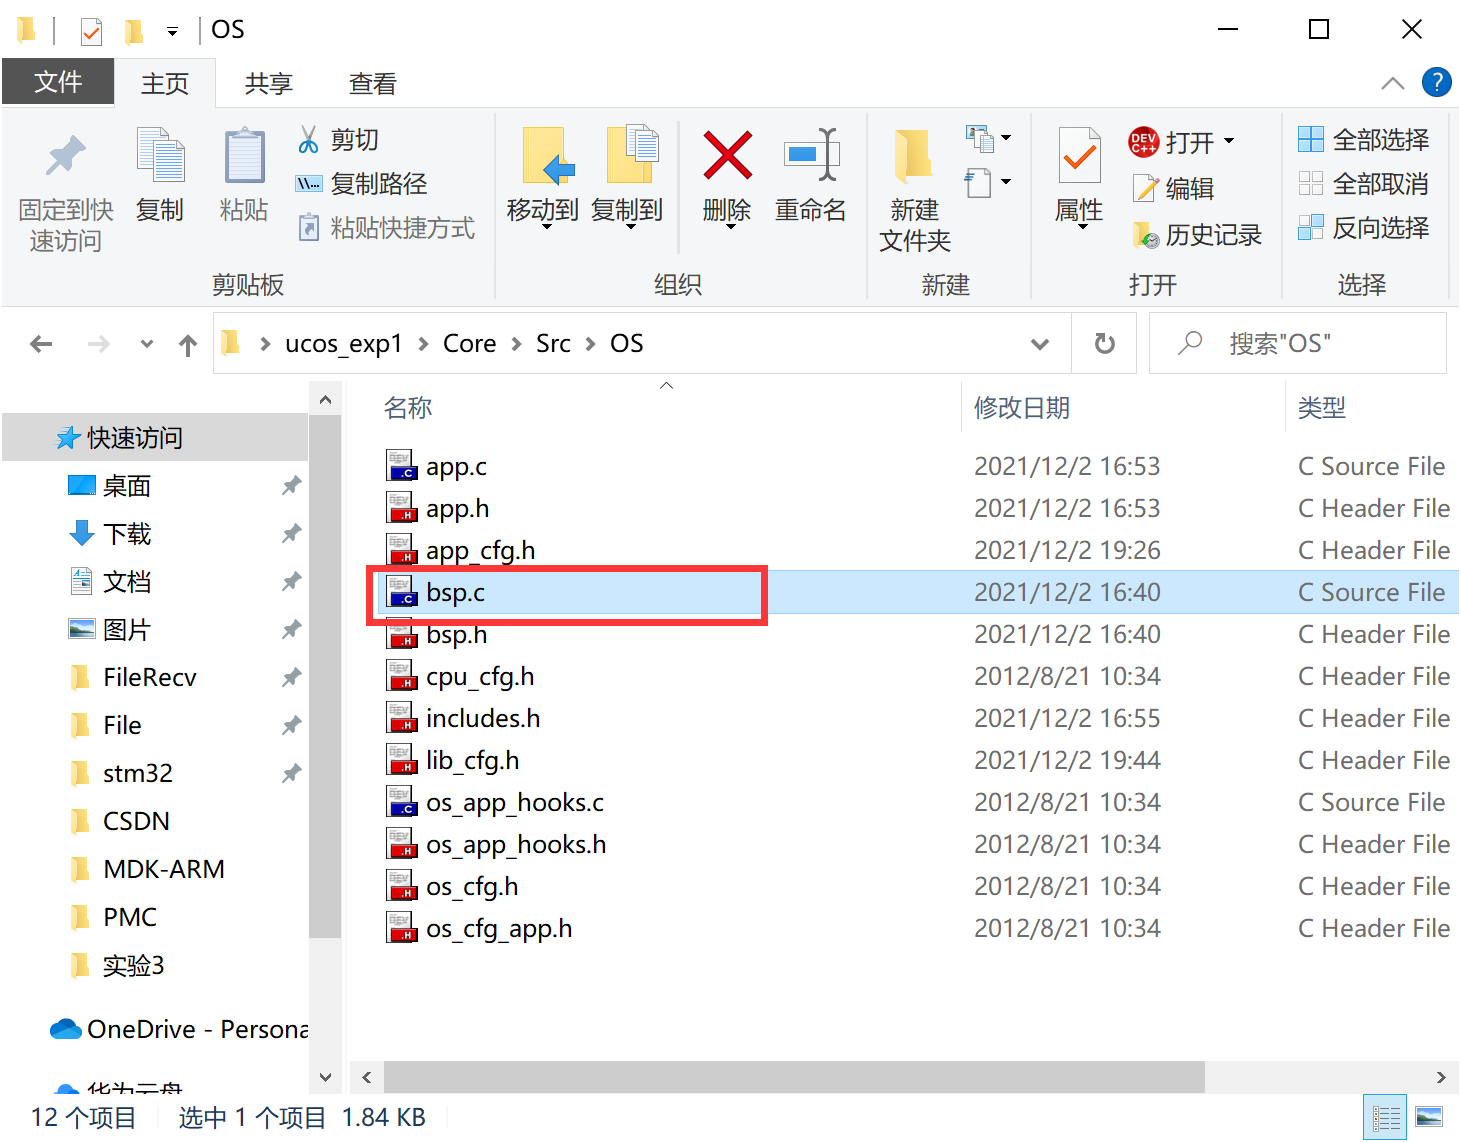
Then create a new OS folder in the / Core/Src directory
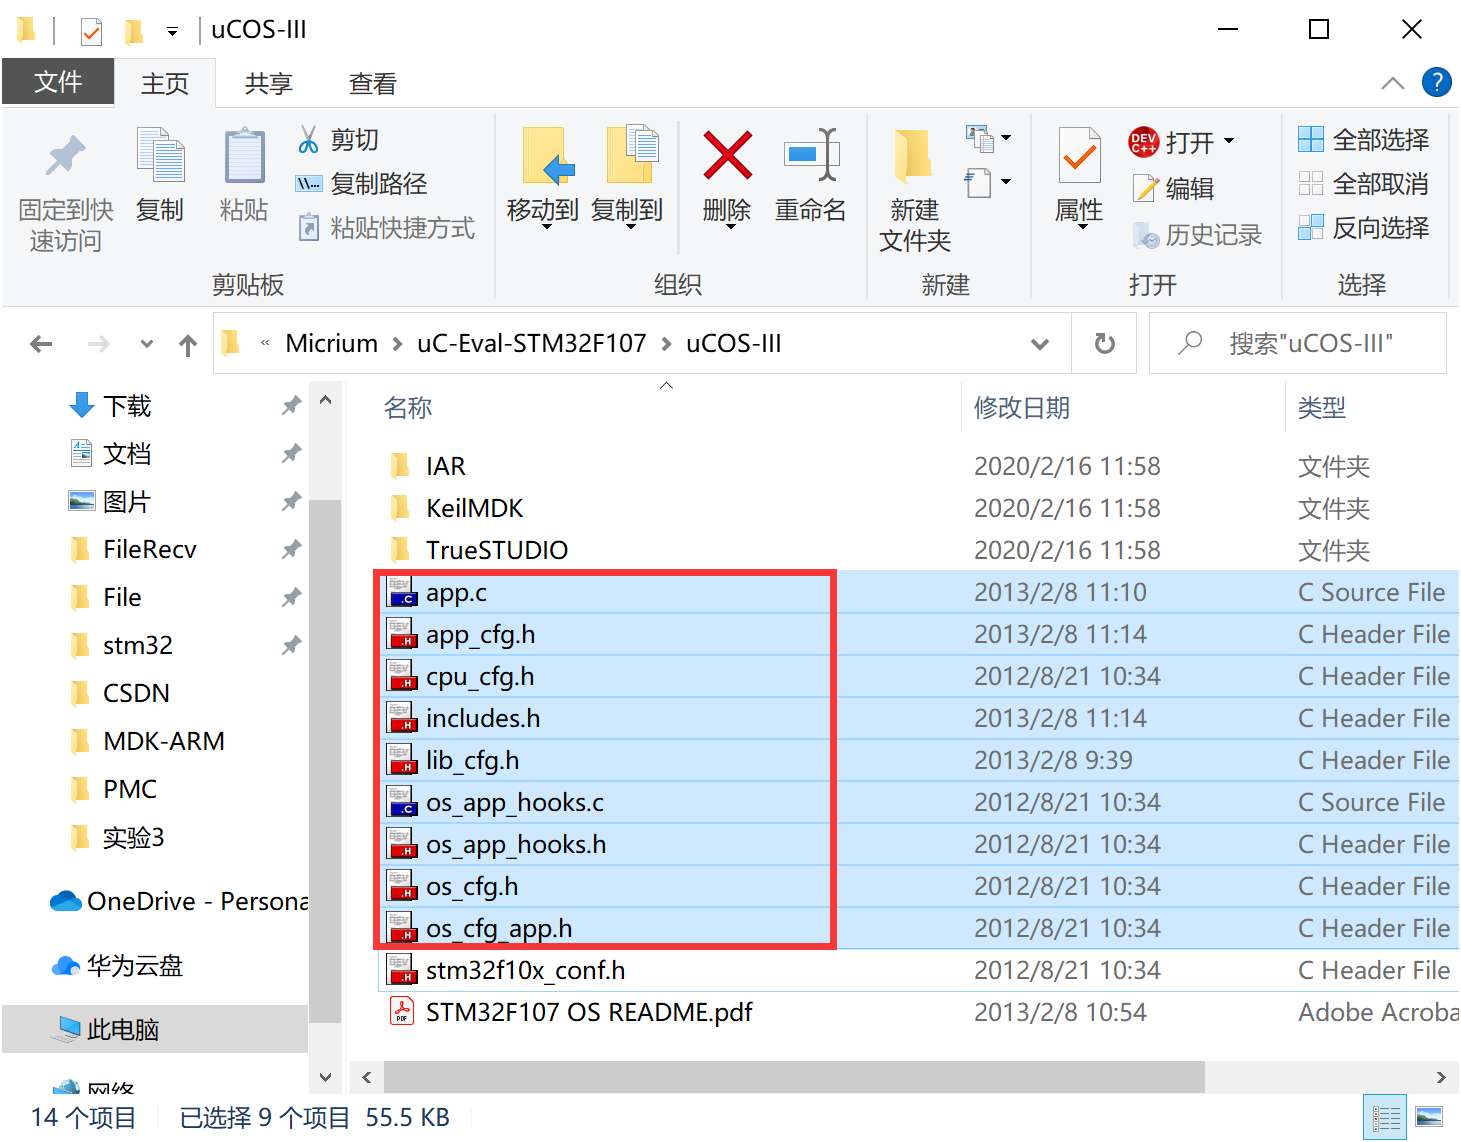
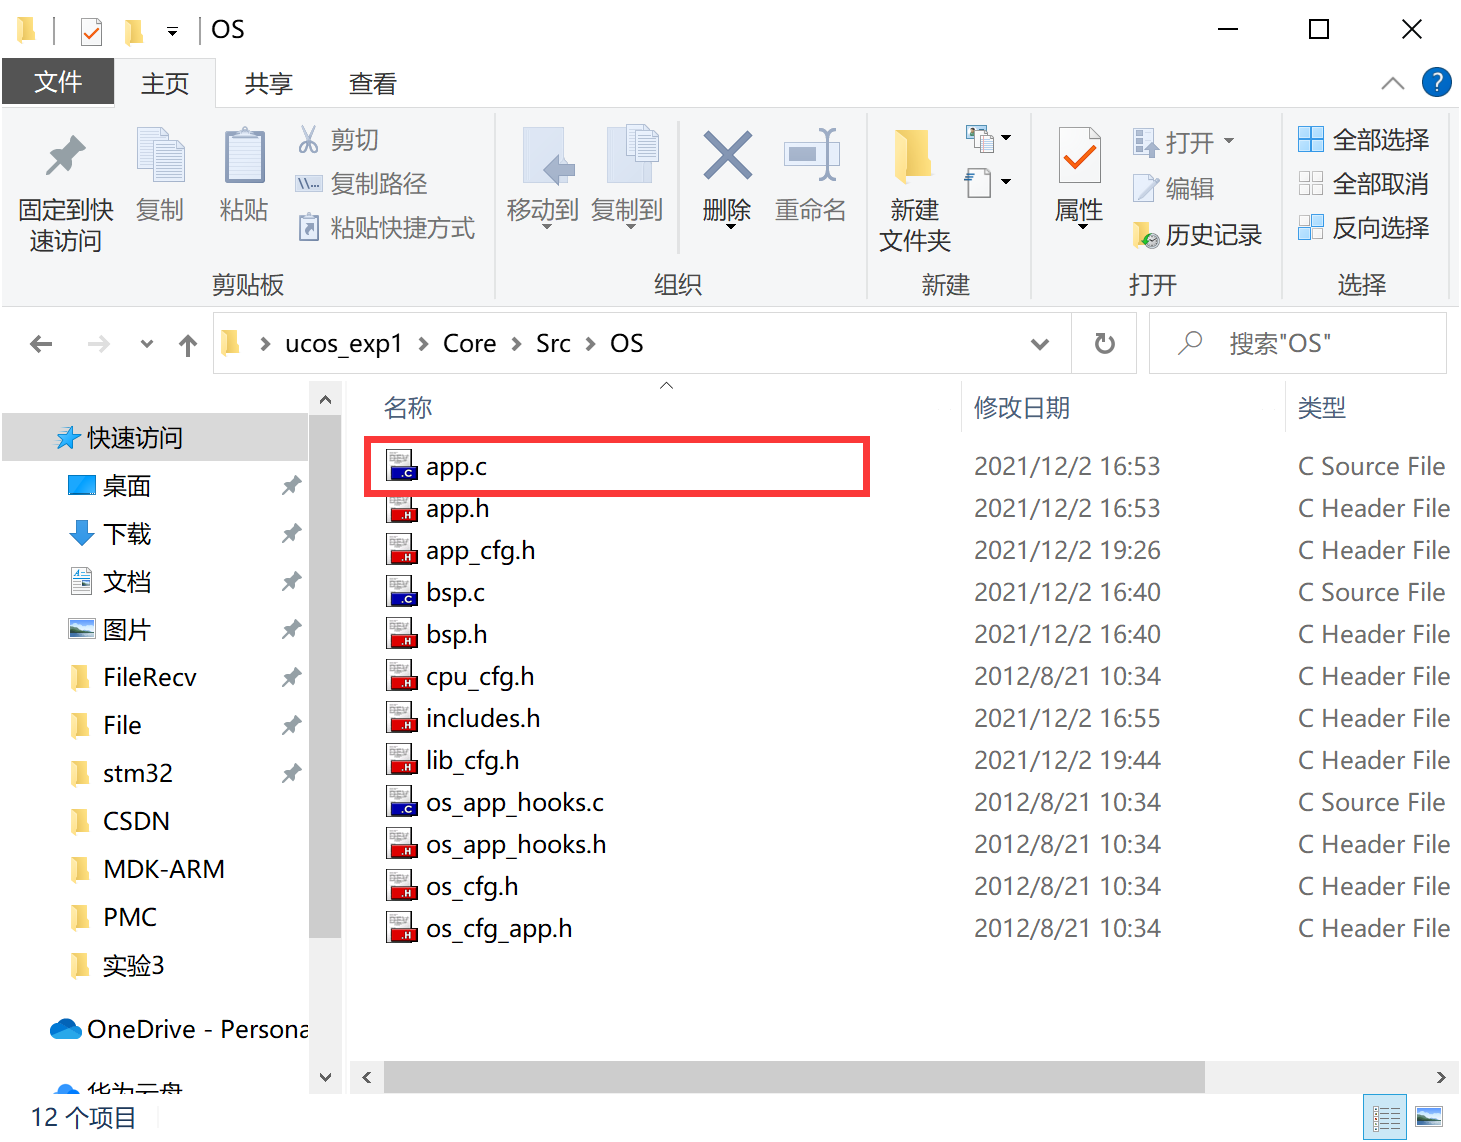
Open the downloaded source code and the files under the path / Micrium / Micrium / software / evalboards / Micrium / UC eval-stm32f107 / ucos-iii: app.c, app_cfg.h,cpu_cfg.h,includes.h,lib_cfg.h,os_app_hooks.c,os_app_hook.h,os_cfg.h,os_ cfg_ Copy app.h to the OS folder and create three new blank files: bsp.c, bsp.h and app.h
2. Add files to Keil
For information on how to add C files and header files, please refer to STM32F103 turns on the LED water lamp_ Jiangnan smoke and rain blog - CSDN blog . In order to facilitate management and easy understanding of the file system of uCOSIII, grouping is usually set according to the following methods (so it can be placed in the project directory in theory)
Click the Manage Project Items... Button.

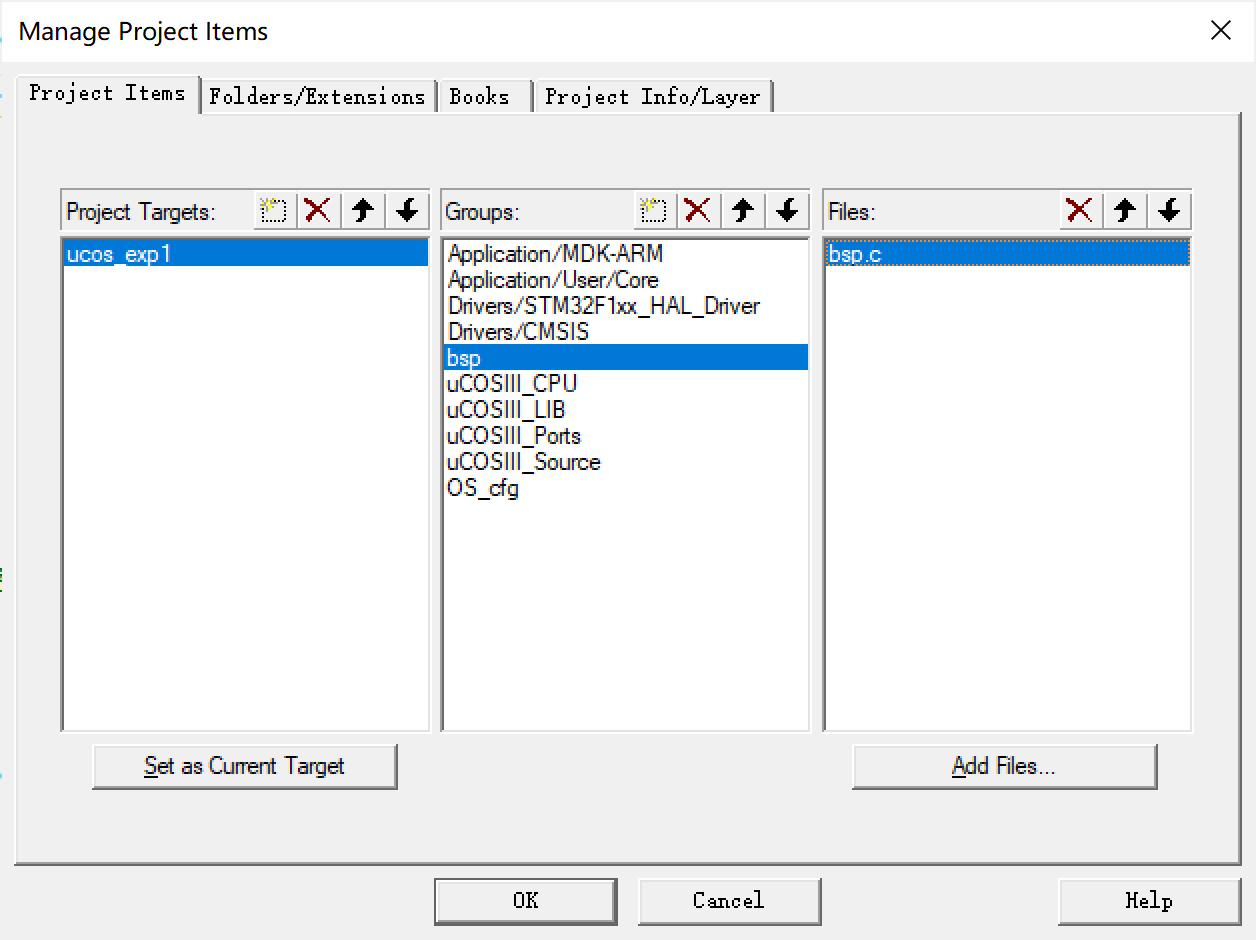
Then create the following groups bsp, uCOSIII_CPU,uCOSIII_LIB,uCOSIII_Ports,uCOSIII_Source,OS_cfg.
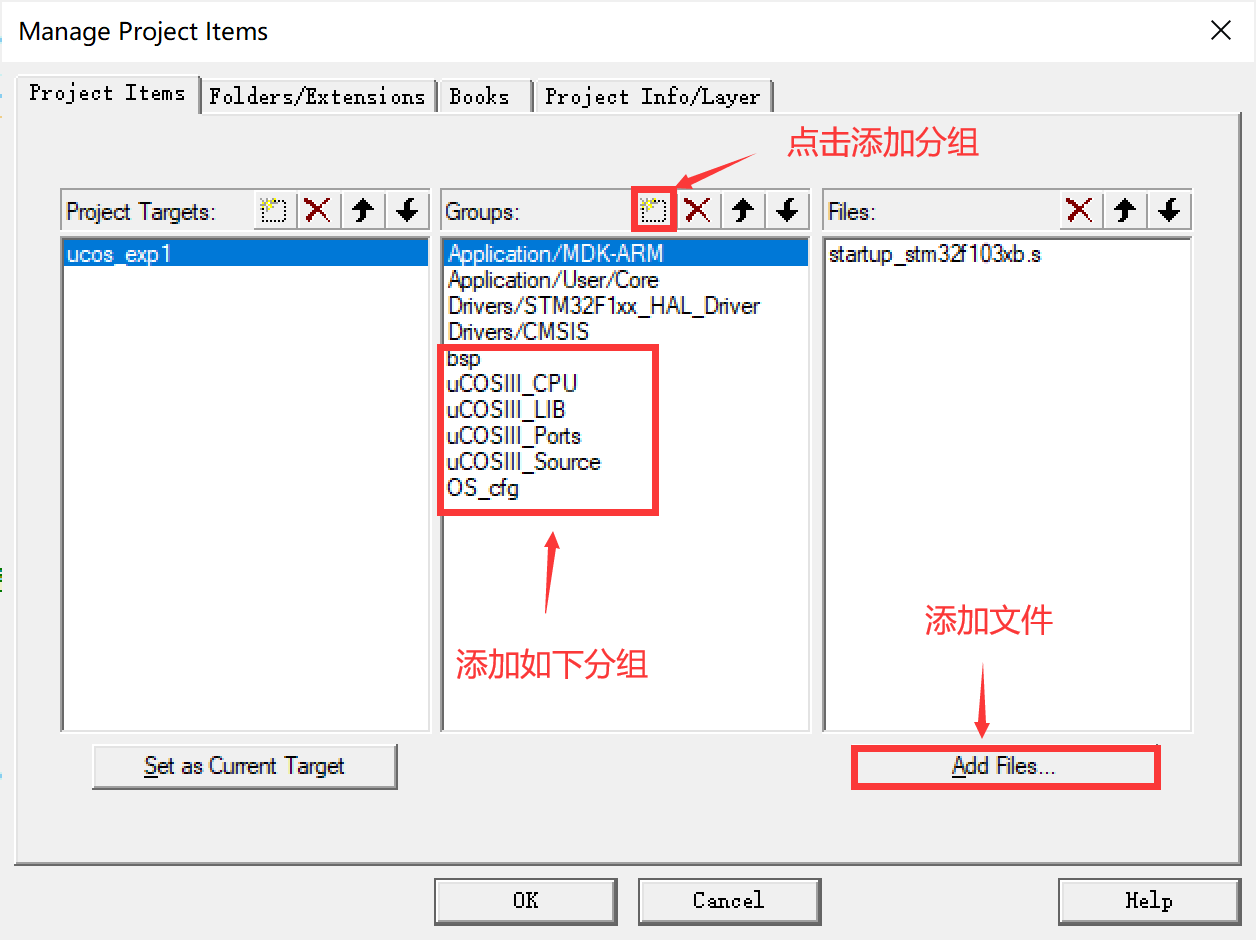
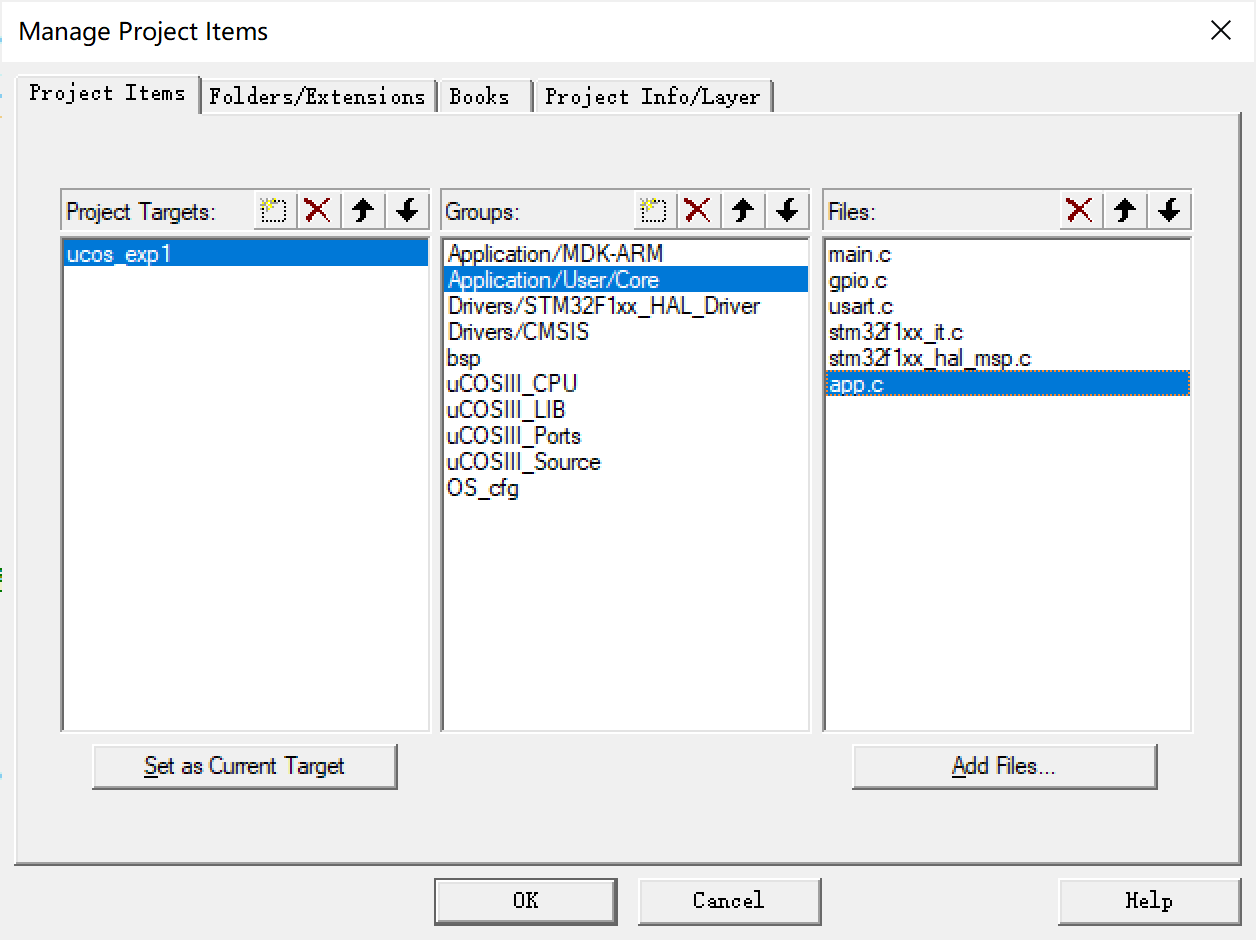
Add the app.c file in the Application/User/Core group, and app.c is in the / Core/Src/OS directory
Add the bsp.c file to the bsp group, and bsp.c is in the / Core/Src/OS directory
In ucosiii_ Add the following files to the CPU group_ core.c,cpu_a.asm,cpu_c.c

The file locations are shown in the table below
| file name | position |
|---|---|
| cpu_core.c | \uCOSIII\uC-CPU |
| cpu_a.asm | \uCOSIII\uC-CPU\ARM-Cortex-M3\RealView |
| cpu_c.c | \uCOSIII\uC-CPU\ARM-Cortex-M3\RealView |
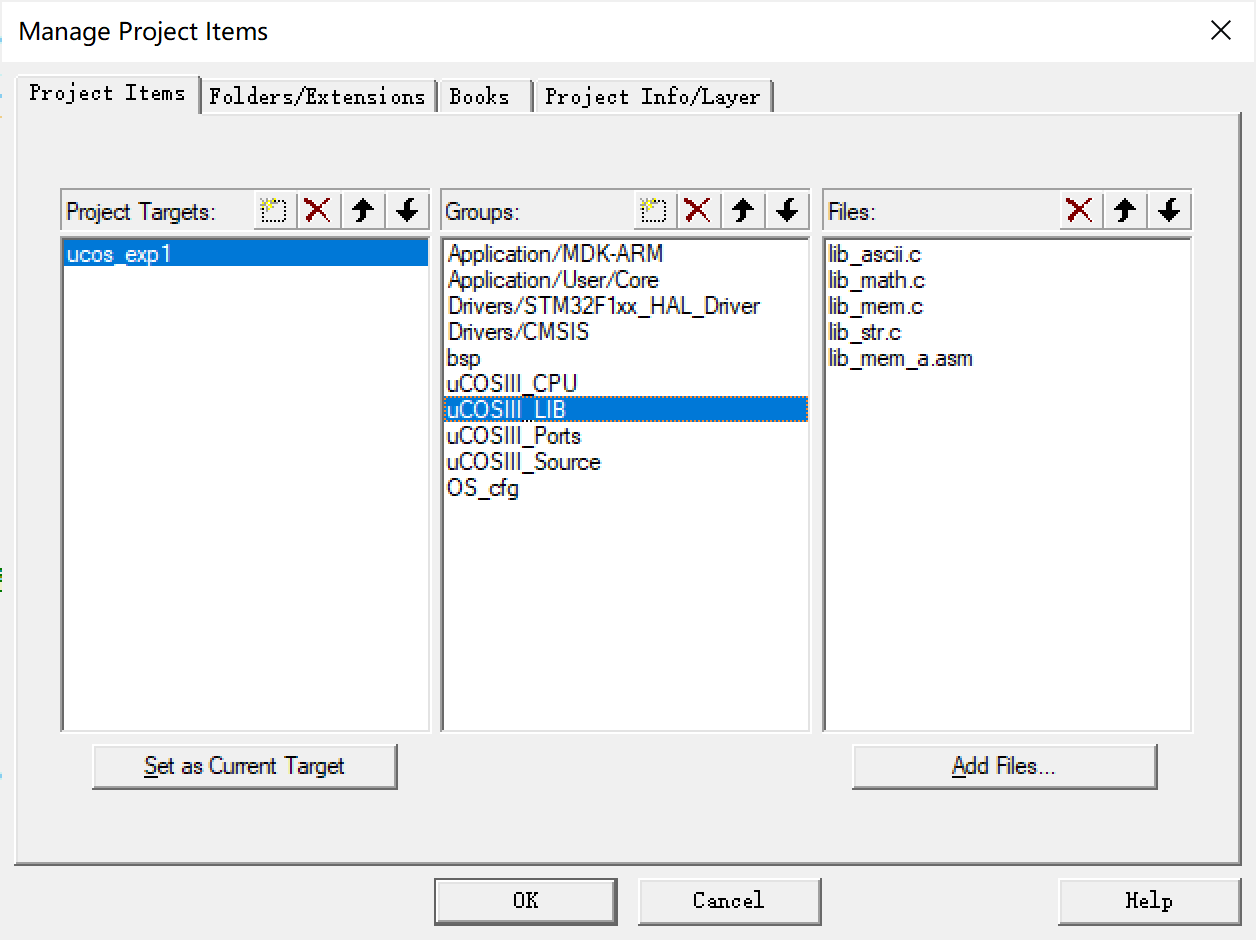
In ucosiii_ Add the following file lib to the Lib group_ ascii.c,lib_math.c,lib_mem.c,lib_str.c,lib_mem_a.sam
The file locations are shown in the table below
| file name | position |
|---|---|
| *.c | \uCOSIII\uC-LIB |
| lib_mem_a.asm | \uCOSIII\uC-LIB\Ports\ARM-Cortex-M3\RealView |
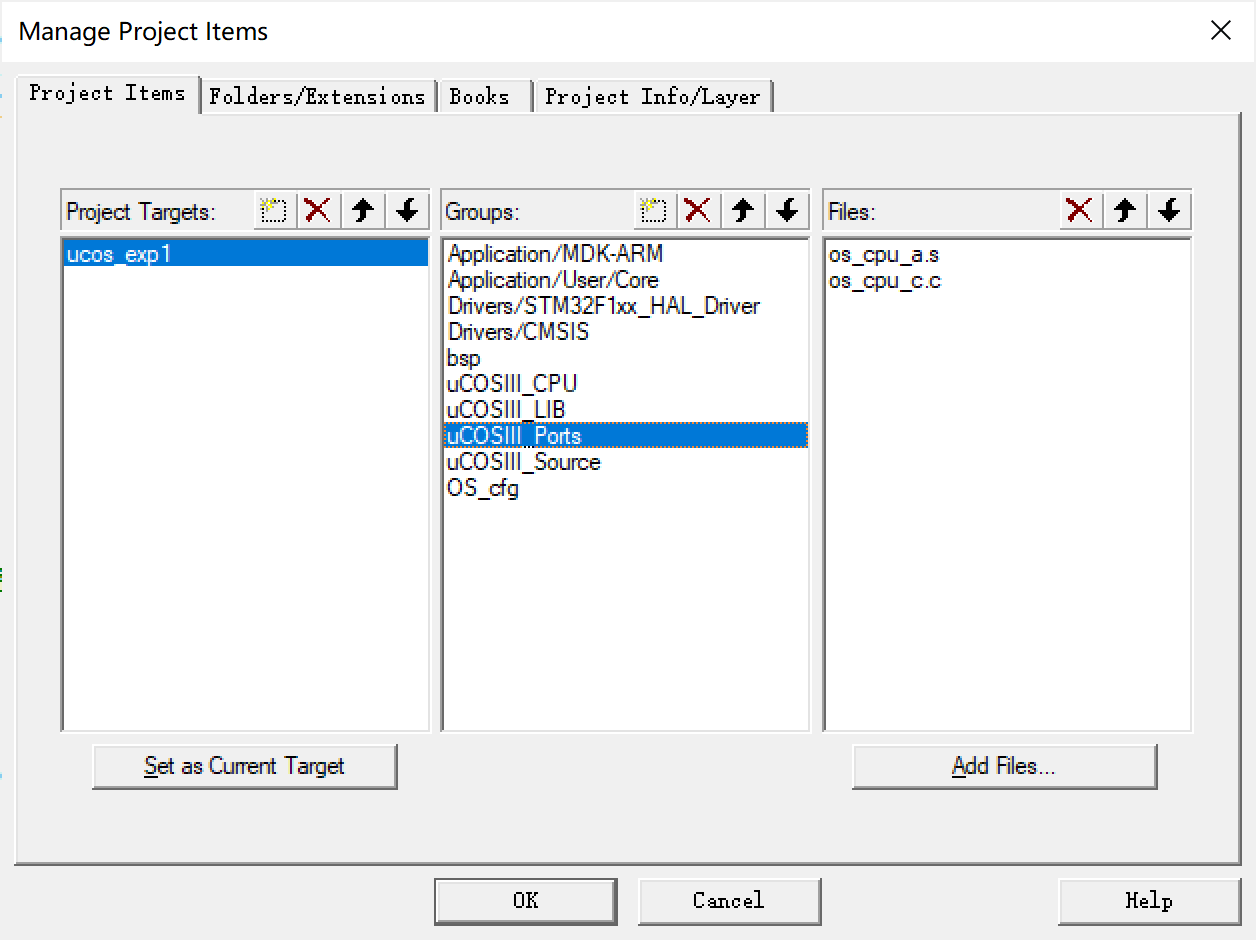
In ucosiii_ Add OS to ports group_ cpu_ a.s,os_cpu_c.c, located in \ uCOSIII\uCOS-III\Ports\ARM-Cortex-M3\Generic\RealView directory
In ucosiii_ Add the following files to the source group
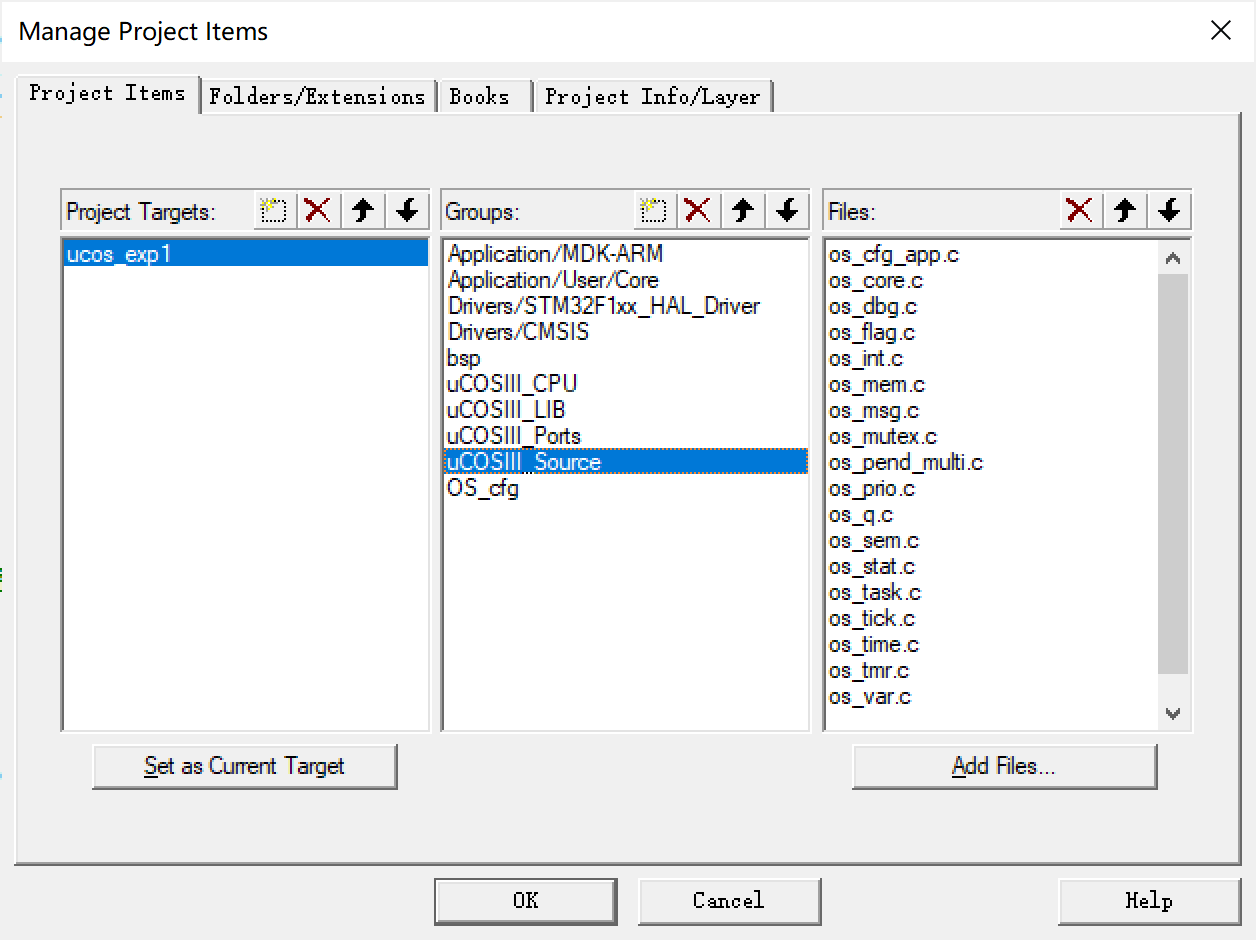
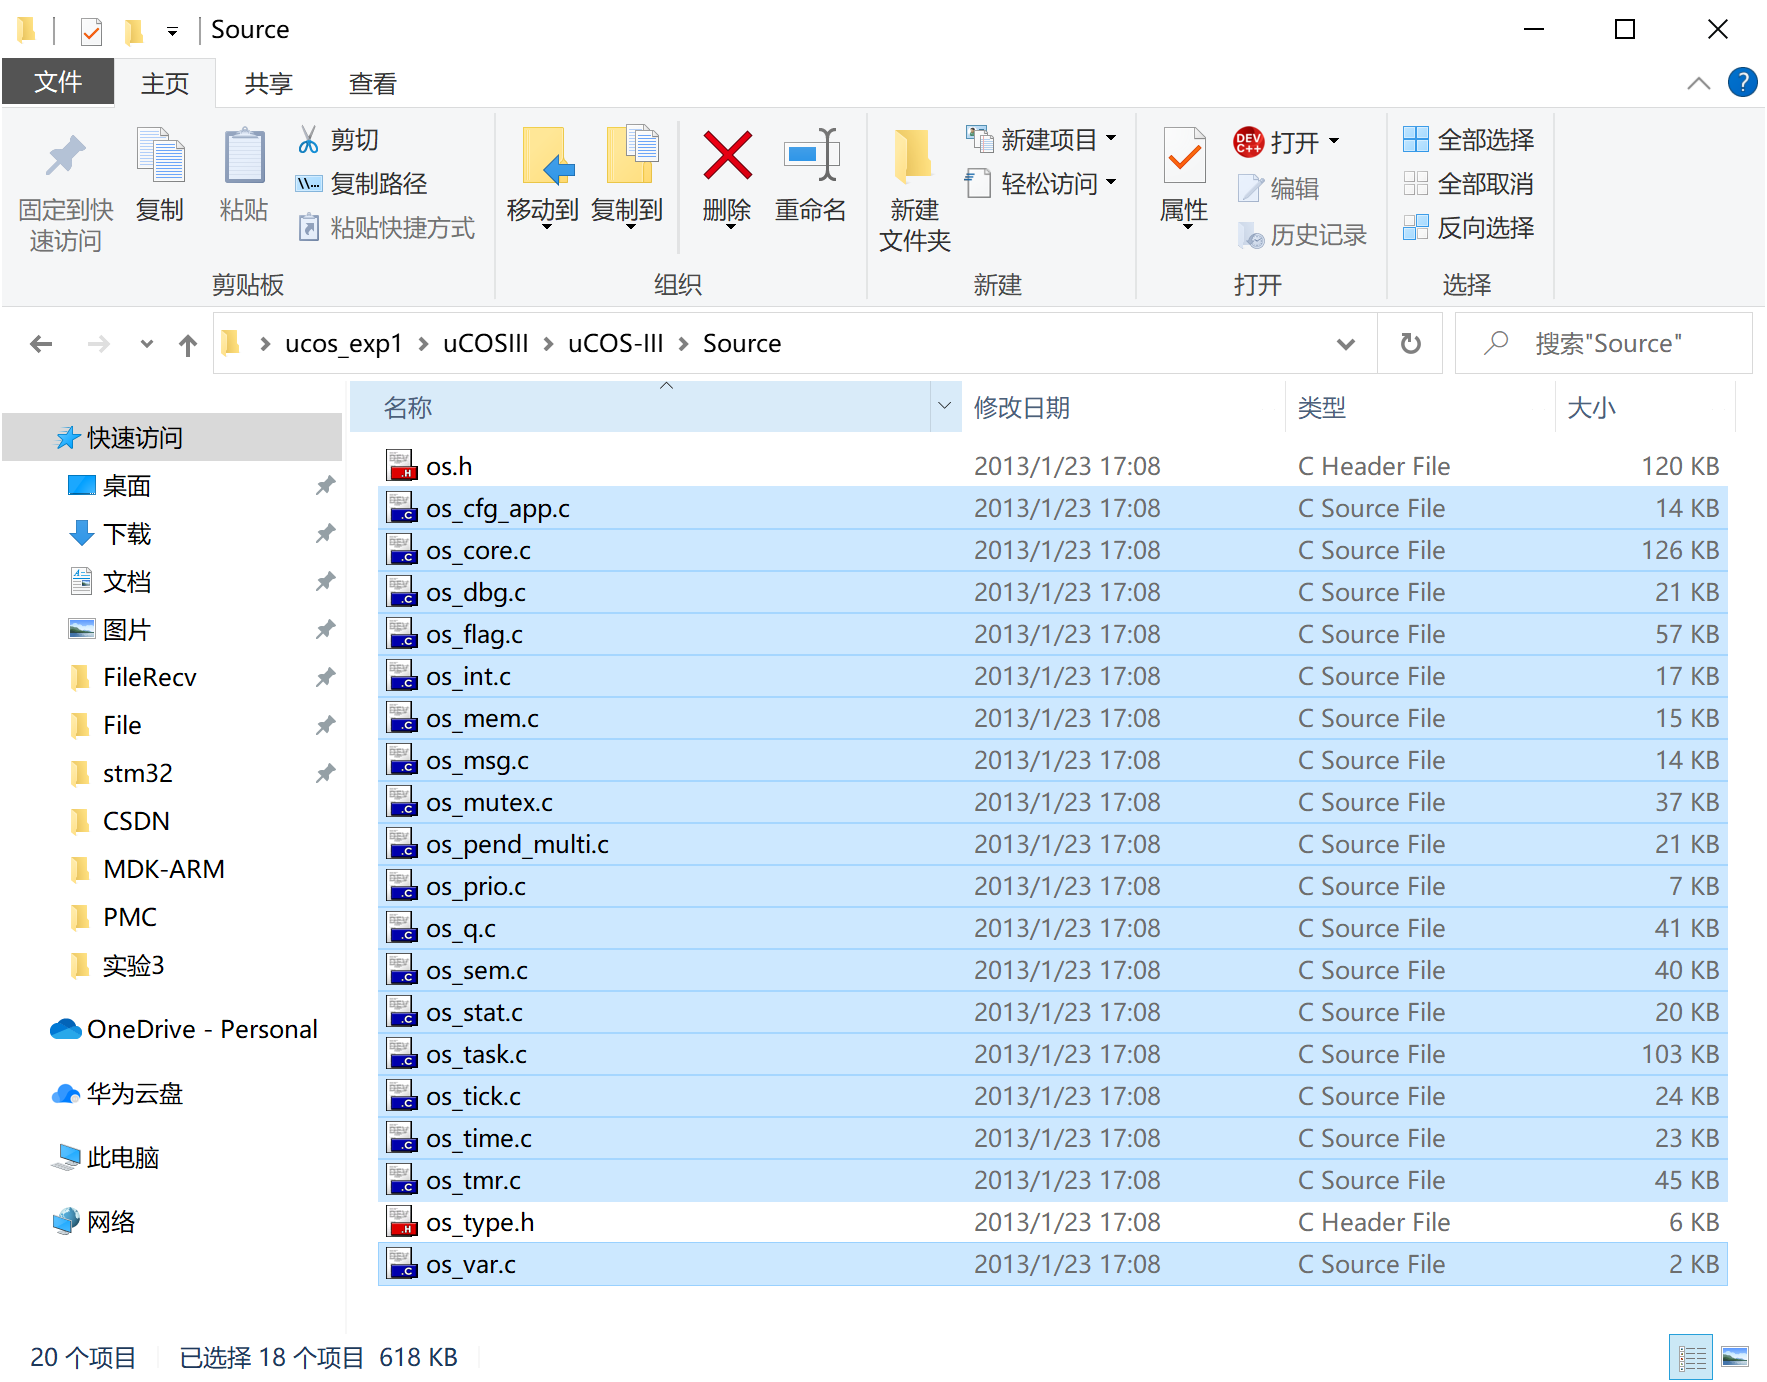
The file location is in the \ uCOSIII\uCOS-III\Source directory, with a total of 18 files
Finally, on OS_ Add OS to CFG group_ app_ Hooks. C file, located in \ Core\Src\OS

Next, add the header file, as shown in the following figure
3. Modify code
3.1 startup documents
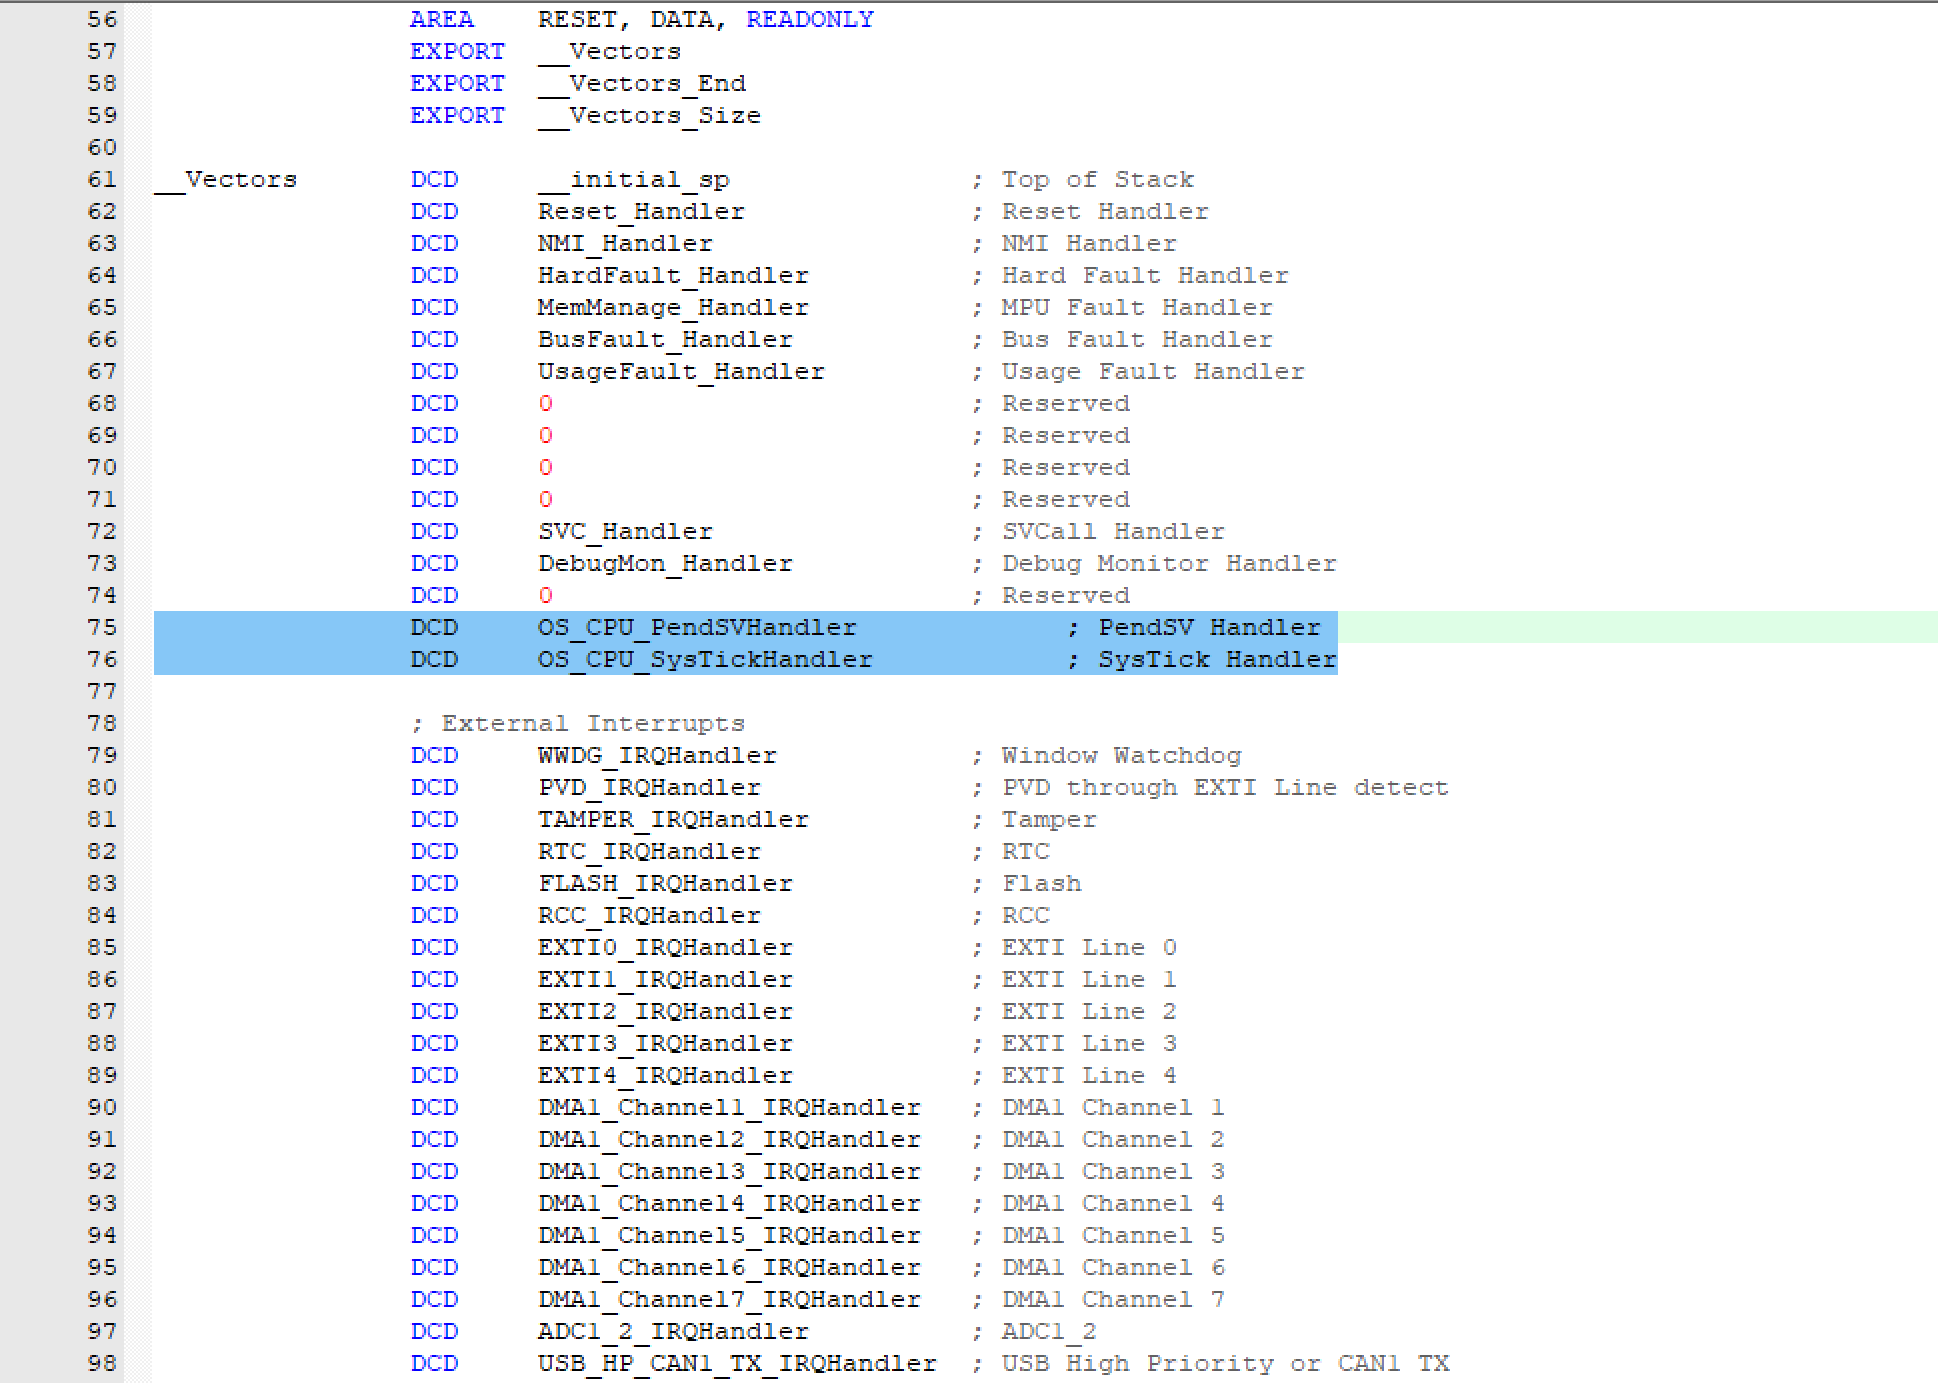
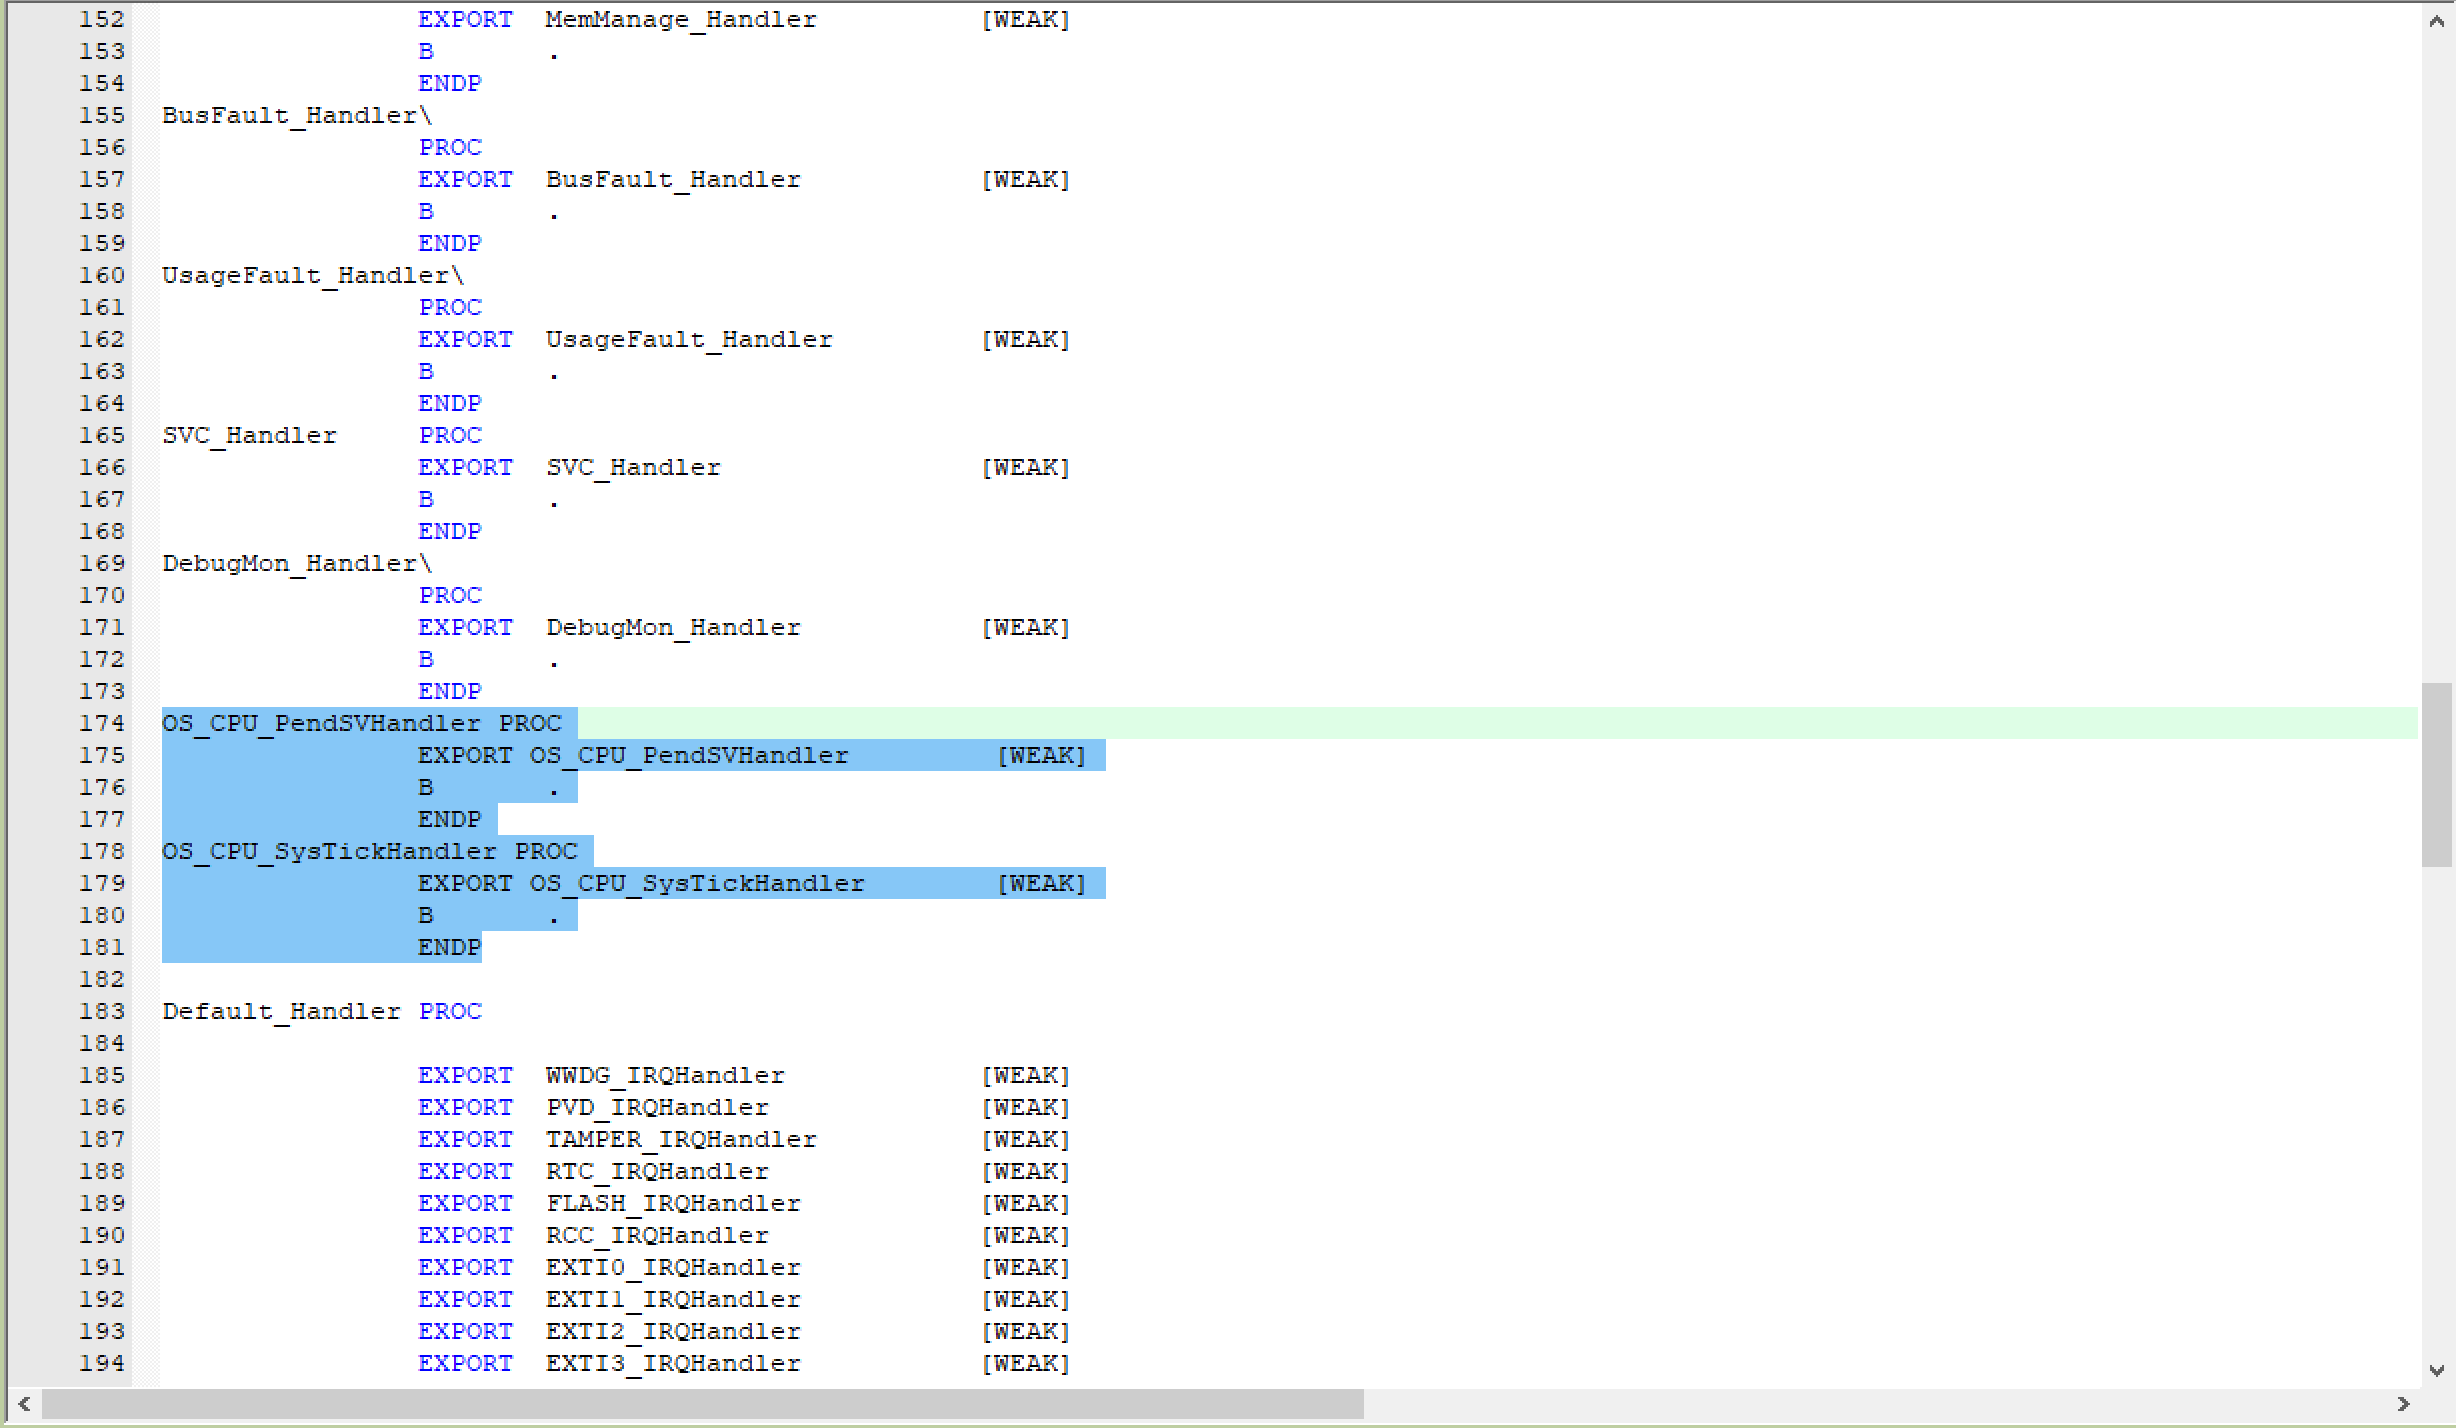
Group Application/MDK-ARM into startup file startup_ Pendsv in stm32f103xb. S_ Handler and systick_ Modify handler to OS_CPU_PendSVHandler and OS_CPU_SysTickHandler
DCD     OS_CPU_PendSVHandler             ; PendSV Handler
DCD     OS_CPU_SysTickHandler            ; SysTick Handler
Similarly, change the following function declaration to
OS_CPU_PendSVHandler PROC
				EXPORT OS_CPU_PendSVHandler			[WEAK]
				B		.
				ENDP
OS_CPU_SysTickHandler PROC
				EXPORT OS_CPU_SysTickHandler		[WEAK]
				B		.
				ENDP
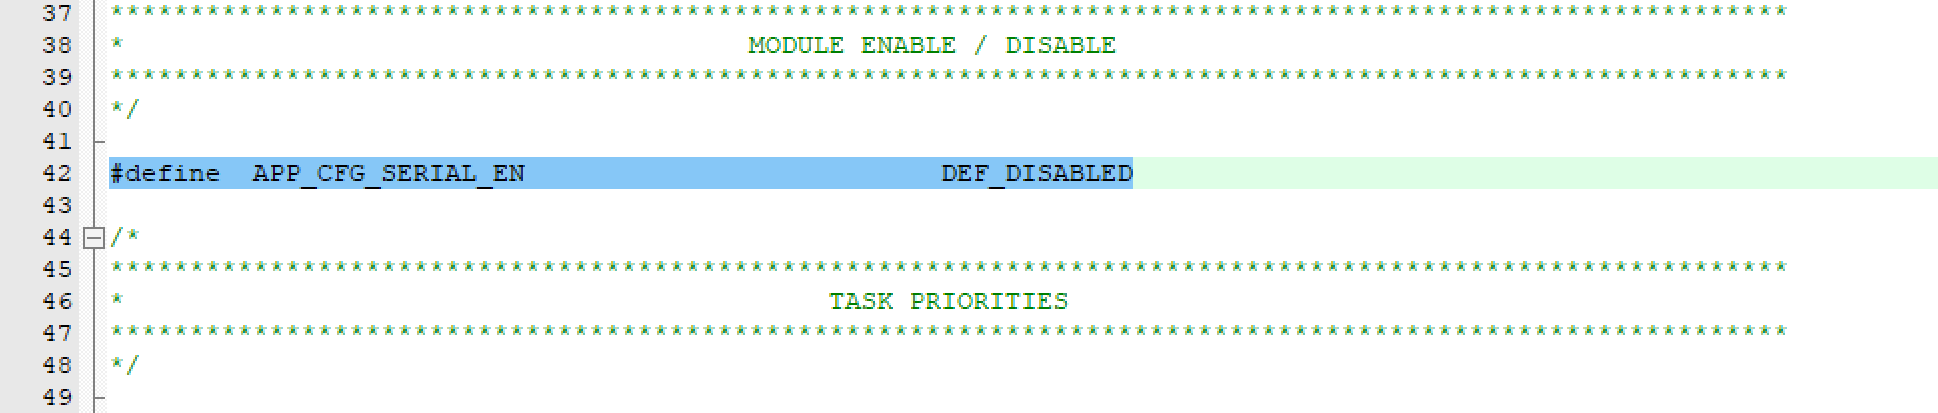
3.2 app_cfg.h
Note: since the header file is not added into the group, there are two ways to open the header file: first, compile the C file, then click the + sign and pull down to find the header file. Such as app_cfg.h can be found in app.c; 2, Find the header file in the project directory and drag it to keil to open editing
Set def in line 42_ Enabled is changed to DEF_DISABLED
#define APP_CFG_SERIAL_EN DEF_DISABLED
Add the #define app in line 85_ TRACE BSP_ Ser_ Change printf to #define APP_TRACE(void)
#define APP_TRACE(void)

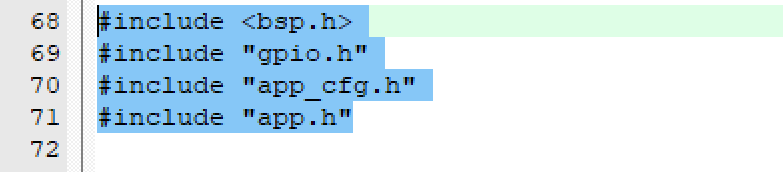
3.3 includes.h
The header file can be found in the app.c compiled drop-down file
Add the include library file on line 68
#include <bsp.h>
#include "gpio.h"
#include "app_cfg.h"
#include "app.h"
Set line 89 to #include < stm32f10x_ Modify lib. H > to #include "stm32f1xx_hal.h"
#include "stm32f1xx_hal.h"
3.4 lib_cfg.h
The header file can be found in the app.c compiled drop-down file
In line 120, modify the size of heap space and adjust it accordingly according to different chips. STM32F103C8T6 chip is used in this experiment. The chip RAM size is very small, so this parameter is modified to 5u*1024u
#define LIB_MEM_CFG_HEAP_SIZE 5u * 1024u /* Configure heap memory size [see Note #2a]. */
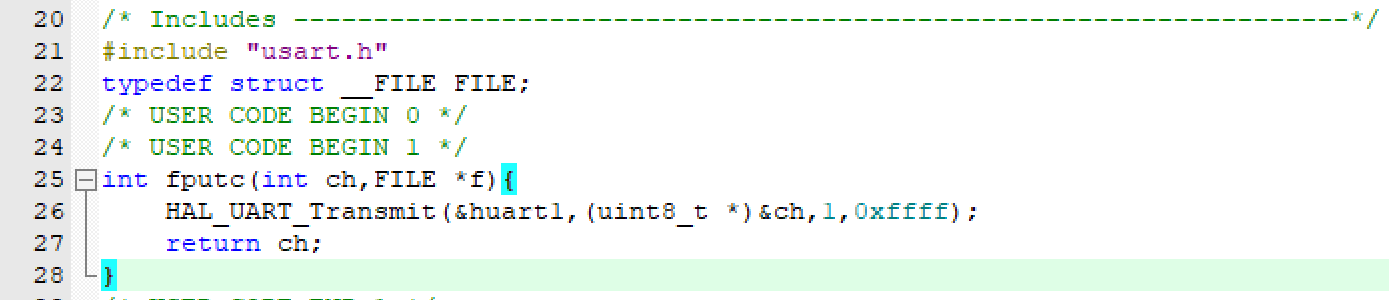
Because the redirected printf function is used, you need to check Use MicroLIB in the setting and add the redirection function, such as adding the following statement in the usart.c file
typedef struct __FILE FILE;
/* USER CODE BEGIN 0 */
/* USER CODE BEGIN 1 */
int fputc(int ch,FILE *f){
	HAL_UART_Transmit(&huart1,(uint8_t *)&ch,1,0xffff);
	return ch;
}
3.5 detailed code
bsp.h
// bsp.h
#ifndef  __BSP_H__
#define  __BSP_H__

#include "stm32f1xx_hal.h"

void BSP_Init(void);

#endif
bsp.c
// bsp.c
#include "includes.h"

#define  DWT_CR      *(CPU_REG32 *)0xE0001000
#define  DWT_CYCCNT  *(CPU_REG32 *)0xE0001004
#define  DEM_CR      *(CPU_REG32 *)0xE000EDFC
#define  DBGMCU_CR   *(CPU_REG32 *)0xE0042004

#define  DEM_CR_TRCENA                   (1 << 24)
#define  DWT_CR_CYCCNTENA                (1 <<  0)

CPU_INT32U  BSP_CPU_ClkFreq (void)
{
    return HAL_RCC_GetHCLKFreq();
}

void BSP_Tick_Init(void)
{
	CPU_INT32U cpu_clk_freq;
	CPU_INT32U cnts;
	cpu_clk_freq = BSP_CPU_ClkFreq();

	#if(OS_VERSION>=3000u)
		cnts = cpu_clk_freq/(CPU_INT32U)OSCfg_TickRate_Hz;
	#else
		cnts = cpu_clk_freq/(CPU_INT32U)OS_TICKS_PER_SEC;
	#endif
	OS_CPU_SysTickInit(cnts);
}


void BSP_Init(void)
{
	BSP_Tick_Init();
	MX_GPIO_Init();
}


#if (CPU_CFG_TS_TMR_EN == DEF_ENABLED)
void  CPU_TS_TmrInit (void)
{
    CPU_INT32U  cpu_clk_freq_hz;


    DEM_CR         |= (CPU_INT32U)DEM_CR_TRCENA;                /* Enable Cortex-M3's DWT CYCCNT reg.                   */
    DWT_CYCCNT      = (CPU_INT32U)0u;
    DWT_CR         |= (CPU_INT32U)DWT_CR_CYCCNTENA;

    cpu_clk_freq_hz = BSP_CPU_ClkFreq();
    CPU_TS_TmrFreqSet(cpu_clk_freq_hz);
}
#endif


#if (CPU_CFG_TS_TMR_EN == DEF_ENABLED)
CPU_TS_TMR  CPU_TS_TmrRd (void)
{
    return ((CPU_TS_TMR)DWT_CYCCNT);
}
#endif


#if (CPU_CFG_TS_32_EN == DEF_ENABLED)
CPU_INT64U  CPU_TS32_to_uSec (CPU_TS32  ts_cnts)
{
	CPU_INT64U  ts_us;
  CPU_INT64U  fclk_freq;


  fclk_freq = BSP_CPU_ClkFreq();
  ts_us     = ts_cnts / (fclk_freq / DEF_TIME_NBR_uS_PER_SEC);

  return (ts_us);
}
#endif


#if (CPU_CFG_TS_64_EN == DEF_ENABLED)
CPU_INT64U  CPU_TS64_to_uSec (CPU_TS64  ts_cnts)
{
	CPU_INT64U  ts_us;
	CPU_INT64U  fclk_freq;


  fclk_freq = BSP_CPU_ClkFreq();
  ts_us     = ts_cnts / (fclk_freq / DEF_TIME_NBR_uS_PER_SEC);

  return (ts_us);
}
#endif
main.c
/* USER CODE END Header */
/* Includes ------------------------------------------------------------------*/
#include "main.h"
#include "gpio.h"
#include "usart.h"
/* Private includes ----------------------------------------------------------*/
/* USER CODE BEGIN Includes */
#include <includes.h>
#include "stm32f1xx_hal.h"
/* USER CODE END Includes */

/* Private define ------------------------------------------------------------*/
/* USER CODE BEGIN PD */
/* Task priority */
#define START_TASK_PRIO		3
#define LED1_TASK_PRIO		4
#define MSG_TASK_PRIO		5
#define LED2_TASK_PRIO		6

/* Task stack size	*/
#define START_STK_SIZE 		96
#define LED1_STK_SIZE 		64
#define MSG_STK_SIZE 		64
#define LED2_STK_SIZE 		64

/* Task stack */
CPU_STK START_TASK_STK[START_STK_SIZE];
CPU_STK LED1_TASK_STK[LED1_STK_SIZE];
CPU_STK MSG_TASK_STK[MSG_STK_SIZE];
CPU_STK LED2_TASK_STK[LED2_STK_SIZE];

/* Task control block */
OS_TCB StartTaskTCB;
OS_TCB Led1TaskTCB;
OS_TCB MsgTaskTCB;
OS_TCB Led2TaskTCB;

/* USER CODE END PD */

/* Private macro -------------------------------------------------------------*/
/* USER CODE BEGIN PM */

/* USER CODE END PM */

/* Private variables ---------------------------------------------------------*/

/* USER CODE BEGIN PV */

/* Task function definition */
void start_task(void *p_arg);
static  void  AppTaskCreate(void);
static  void  AppObjCreate(void);
static  void  led_pa1(void *p_arg);
static  void  send_msg(void *p_arg);
static  void  led_pa2(void *p_arg);
/* USER CODE END PV */

/* Private function prototypes -----------------------------------------------*/
void SystemClock_Config(void);
/* USER CODE BEGIN PFP */

/* USER CODE END PFP */

/* Private user code ---------------------------------------------------------*/
/* USER CODE BEGIN 0 */
/**
  * @brief System Clock Configuration
  * @retval None
  */
void SystemClock_Config(void)
{
  RCC_OscInitTypeDef RCC_OscInitStruct = {0};
  RCC_ClkInitTypeDef RCC_ClkInitStruct = {0};

  /**Initializes the CPU, AHB and APB busses clocks
  */
  RCC_OscInitStruct.OscillatorType = RCC_OSCILLATORTYPE_HSE;
  RCC_OscInitStruct.HSEState = RCC_HSE_ON;
  RCC_OscInitStruct.HSEPredivValue = RCC_HSE_PREDIV_DIV1;
  RCC_OscInitStruct.HSIState = RCC_HSI_ON;
  RCC_OscInitStruct.PLL.PLLState = RCC_PLL_ON;
  RCC_OscInitStruct.PLL.PLLSource = RCC_PLLSOURCE_HSE;
  RCC_OscInitStruct.PLL.PLLMUL = RCC_PLL_MUL9;
  if (HAL_RCC_OscConfig(&RCC_OscInitStruct) != HAL_OK)
  {
    Error_Handler();
  }
  /**Initializes the CPU, AHB and APB busses clocks
  */
  RCC_ClkInitStruct.ClockType = RCC_CLOCKTYPE_HCLK|RCC_CLOCKTYPE_SYSCLK
                              |RCC_CLOCKTYPE_PCLK1|RCC_CLOCKTYPE_PCLK2;
  RCC_ClkInitStruct.SYSCLKSource = RCC_SYSCLKSOURCE_PLLCLK;
  RCC_ClkInitStruct.AHBCLKDivider = RCC_SYSCLK_DIV1;
  RCC_ClkInitStruct.APB1CLKDivider = RCC_HCLK_DIV2;
  RCC_ClkInitStruct.APB2CLKDivider = RCC_HCLK_DIV1;

  if (HAL_RCC_ClockConfig(&RCC_ClkInitStruct, FLASH_LATENCY_2) != HAL_OK)
  {
    Error_Handler();
  }
}

/* USER CODE END 0 */

/**
  * @brief  The application entry point.
  * @retval int
  */
int main(void)
{
	OS_ERR  err;
	OSInit(&err);
	HAL_Init();
	SystemClock_Config();
	//MX_GPIO_Init();  This will also be initialized in BSP initialization
	MX_USART1_UART_Init();
	/* Create task */
	OSTaskCreate((OS_TCB     *)&StartTaskTCB,                /* Create the start task                                */
				 (CPU_CHAR   *)"start task",
				 (OS_TASK_PTR ) start_task,
				 (void       *) 0,
				 (OS_PRIO     ) START_TASK_PRIO,
				 (CPU_STK    *)&START_TASK_STK[0],
				 (CPU_STK_SIZE) START_STK_SIZE/10,
				 (CPU_STK_SIZE) START_STK_SIZE,
				 (OS_MSG_QTY  ) 0,
				 (OS_TICK     ) 0,
				 (void       *) 0,
				 (OS_OPT      )(OS_OPT_TASK_STK_CHK | OS_OPT_TASK_STK_CLR),
				 (OS_ERR     *)&err);
	/* Start the multitasking system and give control to uC/OS-III */
	OSStart(&err);            /* Start multitasking (i.e. give control to uC/OS-III). */

}


void start_task(void *p_arg)
{
	OS_ERR err;
	CPU_SR_ALLOC();
	p_arg = p_arg;

	/* YangJie add 2021.05.20*/
	BSP_Init();                                                   /* Initialize BSP functions */
	//CPU_Init();
	//Mem_Init();                                                 /* Initialize Memory Management Module */

#if OS_CFG_STAT_TASK_EN > 0u
   OSStatTaskCPUUsageInit(&err);  		//Statistical tasks
#endif

#ifdef CPU_CFG_INT_DIS_MEAS_EN 			// If enabled, measure the interrupt off time
    CPU_IntDisMeasMaxCurReset();
#endif

#if 	 OS_CFG_SCHED_ROUND_ROBIN_EN   		// When using time slice rotation
	 //Enable the time slice rotation scheduling function. The time slice length is 1 system clock beat, i.e. 1*5=5ms
	OSSchedRoundRobinCfg(DEF_ENABLED,1,&err);
#endif

	OS_CRITICAL_ENTER();	//Enter critical zone
	/* Create LED1 task */
	OSTaskCreate((OS_TCB 	* )&Led1TaskTCB,
				 (CPU_CHAR	* )"led_pa1",
                 (OS_TASK_PTR )led_pa1,
                 (void		* )0,
                 (OS_PRIO	  )LED1_TASK_PRIO,
                 (CPU_STK   * )&LED1_TASK_STK[0],
                 (CPU_STK_SIZE)LED1_STK_SIZE/10,
                 (CPU_STK_SIZE)LED1_STK_SIZE,
                 (OS_MSG_QTY  )0,
                 (OS_TICK	  )0,
                 (void   	* )0,
                 (OS_OPT      )OS_OPT_TASK_STK_CHK|OS_OPT_TASK_STK_CLR,
                 (OS_ERR 	* )&err);

/* Create LED2 task */
	OSTaskCreate((OS_TCB 	* )&Led2TaskTCB,
				 (CPU_CHAR	* )"led_pa2",
                 (OS_TASK_PTR )led_pa2,
                 (void		* )0,
                 (OS_PRIO	  )LED2_TASK_PRIO,
                 (CPU_STK   * )&LED2_TASK_STK[0],
                 (CPU_STK_SIZE)LED2_STK_SIZE/10,
                 (CPU_STK_SIZE)LED2_STK_SIZE,
                 (OS_MSG_QTY  )0,
                 (OS_TICK	  )0,
                 (void   	* )0,
                 (OS_OPT      )OS_OPT_TASK_STK_CHK|OS_OPT_TASK_STK_CLR,
                 (OS_ERR 	* )&err);

	/* Create MSG task */
	OSTaskCreate((OS_TCB 	* )&MsgTaskTCB,
				 (CPU_CHAR	* )"send_msg",
                 (OS_TASK_PTR )send_msg,
                 (void		* )0,
                 (OS_PRIO	  )MSG_TASK_PRIO,
                 (CPU_STK   * )&MSG_TASK_STK[0],
                 (CPU_STK_SIZE)MSG_STK_SIZE/10,
                 (CPU_STK_SIZE)MSG_STK_SIZE,
                 (OS_MSG_QTY  )0,
                 (OS_TICK	  )0,
                 (void   	* )0,
                 (OS_OPT      )OS_OPT_TASK_STK_CHK|OS_OPT_TASK_STK_CLR,
                 (OS_ERR 	* )&err);

	OS_TaskSuspend((OS_TCB*)&StartTaskTCB,&err);		//Suspend start task
	OS_CRITICAL_EXIT();	//Enter critical zone
}
/**
  * Function function: start the task function body.
  * Input parameter: p_arg is the formal parameter passed when the task was created
  * Return value: None
  * Description: None
  */
static  void  led_pa1 (void *p_arg)
{
  OS_ERR err;

  (void)p_arg;

  BSP_Init();                                                 /* Initialize BSP functions                             */
  CPU_Init();

  Mem_Init();                                                 /* Initialize Memory Management Module                  */

#if OS_CFG_STAT_TASK_EN > 0u
  OSStatTaskCPUUsageInit(&err);                               /* Compute CPU capacity with no task running            */
#endif

  CPU_IntDisMeasMaxCurReset();

  AppTaskCreate();                                            /* Create Application Tasks                             */

  AppObjCreate();                                             /* Create Application Objects                           */

  while (DEF_TRUE)
  {
		HAL_GPIO_WritePin(LED1_GPIO_Port,LED1_Pin,GPIO_PIN_RESET);
		OSTimeDlyHMSM(0, 0, 1, 0,OS_OPT_TIME_HMSM_STRICT,&err);
		HAL_GPIO_WritePin(LED1_GPIO_Port,LED1_Pin,GPIO_PIN_SET);
		OSTimeDlyHMSM(0, 0, 1, 0,OS_OPT_TIME_HMSM_STRICT,&err);
    /* USER CODE END WHILE */

    /* USER CODE BEGIN 3 */
  }
  /* USER CODE END 3 */
}

static  void  led_pa2 (void *p_arg)
{
  OS_ERR      err;

  (void)p_arg;

  BSP_Init();                                                 /* Initialize BSP functions                             */
  CPU_Init();

  Mem_Init();                                                 /* Initialize Memory Management Module                  */

#if OS_CFG_STAT_TASK_EN > 0u
  OSStatTaskCPUUsageInit(&err);                               /* Compute CPU capacity with no task running            */
#endif

  CPU_IntDisMeasMaxCurReset();

  AppTaskCreate();                                            /* Create Application Tasks                             */

  AppObjCreate();                                             /* Create Application Objects                           */

  while (DEF_TRUE)
  {
		HAL_GPIO_WritePin(LED2_GPIO_Port,LED2_Pin,GPIO_PIN_RESET);
		OSTimeDlyHMSM(0, 0, 3, 0,OS_OPT_TIME_HMSM_STRICT,&err);
		HAL_GPIO_WritePin(LED2_GPIO_Port,LED2_Pin,GPIO_PIN_SET);
		OSTimeDlyHMSM(0, 0, 3, 0,OS_OPT_TIME_HMSM_STRICT,&err);
    /* USER CODE END WHILE */

    /* USER CODE BEGIN 3 */
  }
  /* USER CODE END 3 */
}

static  void  send_msg (void *p_arg)
{
  OS_ERR      err;

  (void)p_arg;

  BSP_Init();                                                 /* Initialize BSP functions                             */
  CPU_Init();

  Mem_Init();                                                 /* Initialize Memory Management Module                  */

#if OS_CFG_STAT_TASK_EN > 0u
  OSStatTaskCPUUsageInit(&err);                               /* Compute CPU capacity with no task running            */
#endif

  CPU_IntDisMeasMaxCurReset();

  AppTaskCreate();                                            /* Create Application Tasks                             */

  AppObjCreate();                                             /* Create Application Objects                           */

  while (DEF_TRUE)
  {
		printf("hello uc/OS! Welcome to RTOS Multitasking environment! \r\n");
		OSTimeDlyHMSM(0, 0, 2, 0,OS_OPT_TIME_HMSM_STRICT,&err);
    /* USER CODE END WHILE */

    /* USER CODE BEGIN 3 */
  }
  /* USER CODE END 3 */
}


/* USER CODE BEGIN 4 */
/**
  * Function function: create application task
  * Input parameter: p_arg is the formal parameter passed when the task was created
  * Return value: None
  * Description: None
  */
static  void  AppTaskCreate (void)
{

}


/**
  * Function function: uCOSIII kernel object creation
  * Input parameters: None
  * Return value: None
  * Description: None
  */
static  void  AppObjCreate (void)
{

}

/* USER CODE END 4 */

/**
  * @brief  This function is executed in case of error occurrence.
  * @retval None
  */
void Error_Handler(void)
{
  /* USER CODE BEGIN Error_Handler_Debug */
  /* User can add his own implementation to report the HAL error return state */

  /* USER CODE END Error_Handler_Debug */
}

#ifdef  USE_FULL_ASSERT
/**
  * @brief  Reports the name of the source file and the source line number
  *         where the assert_param error has occurred.
  * @param  file: pointer to the source file name
  * @param  line: assert_param error line source number
  * @retval None
  */
void assert_failed(uint8_t *file, uint32_t line)
{
  /* USER CODE BEGIN 6 */
  /* User can add his own implementation to report the file name and line number,
     tex: printf("Wrong parameters value: file %s on line %d\r\n", file, line) */
  /* USER CODE END 6 */
}
#endif /* USE_FULL_ASSERT */

/************************ (C) COPYRIGHT STMicroelectronics *****END OF FILE****/
4, Experimental results
1. Software simulation
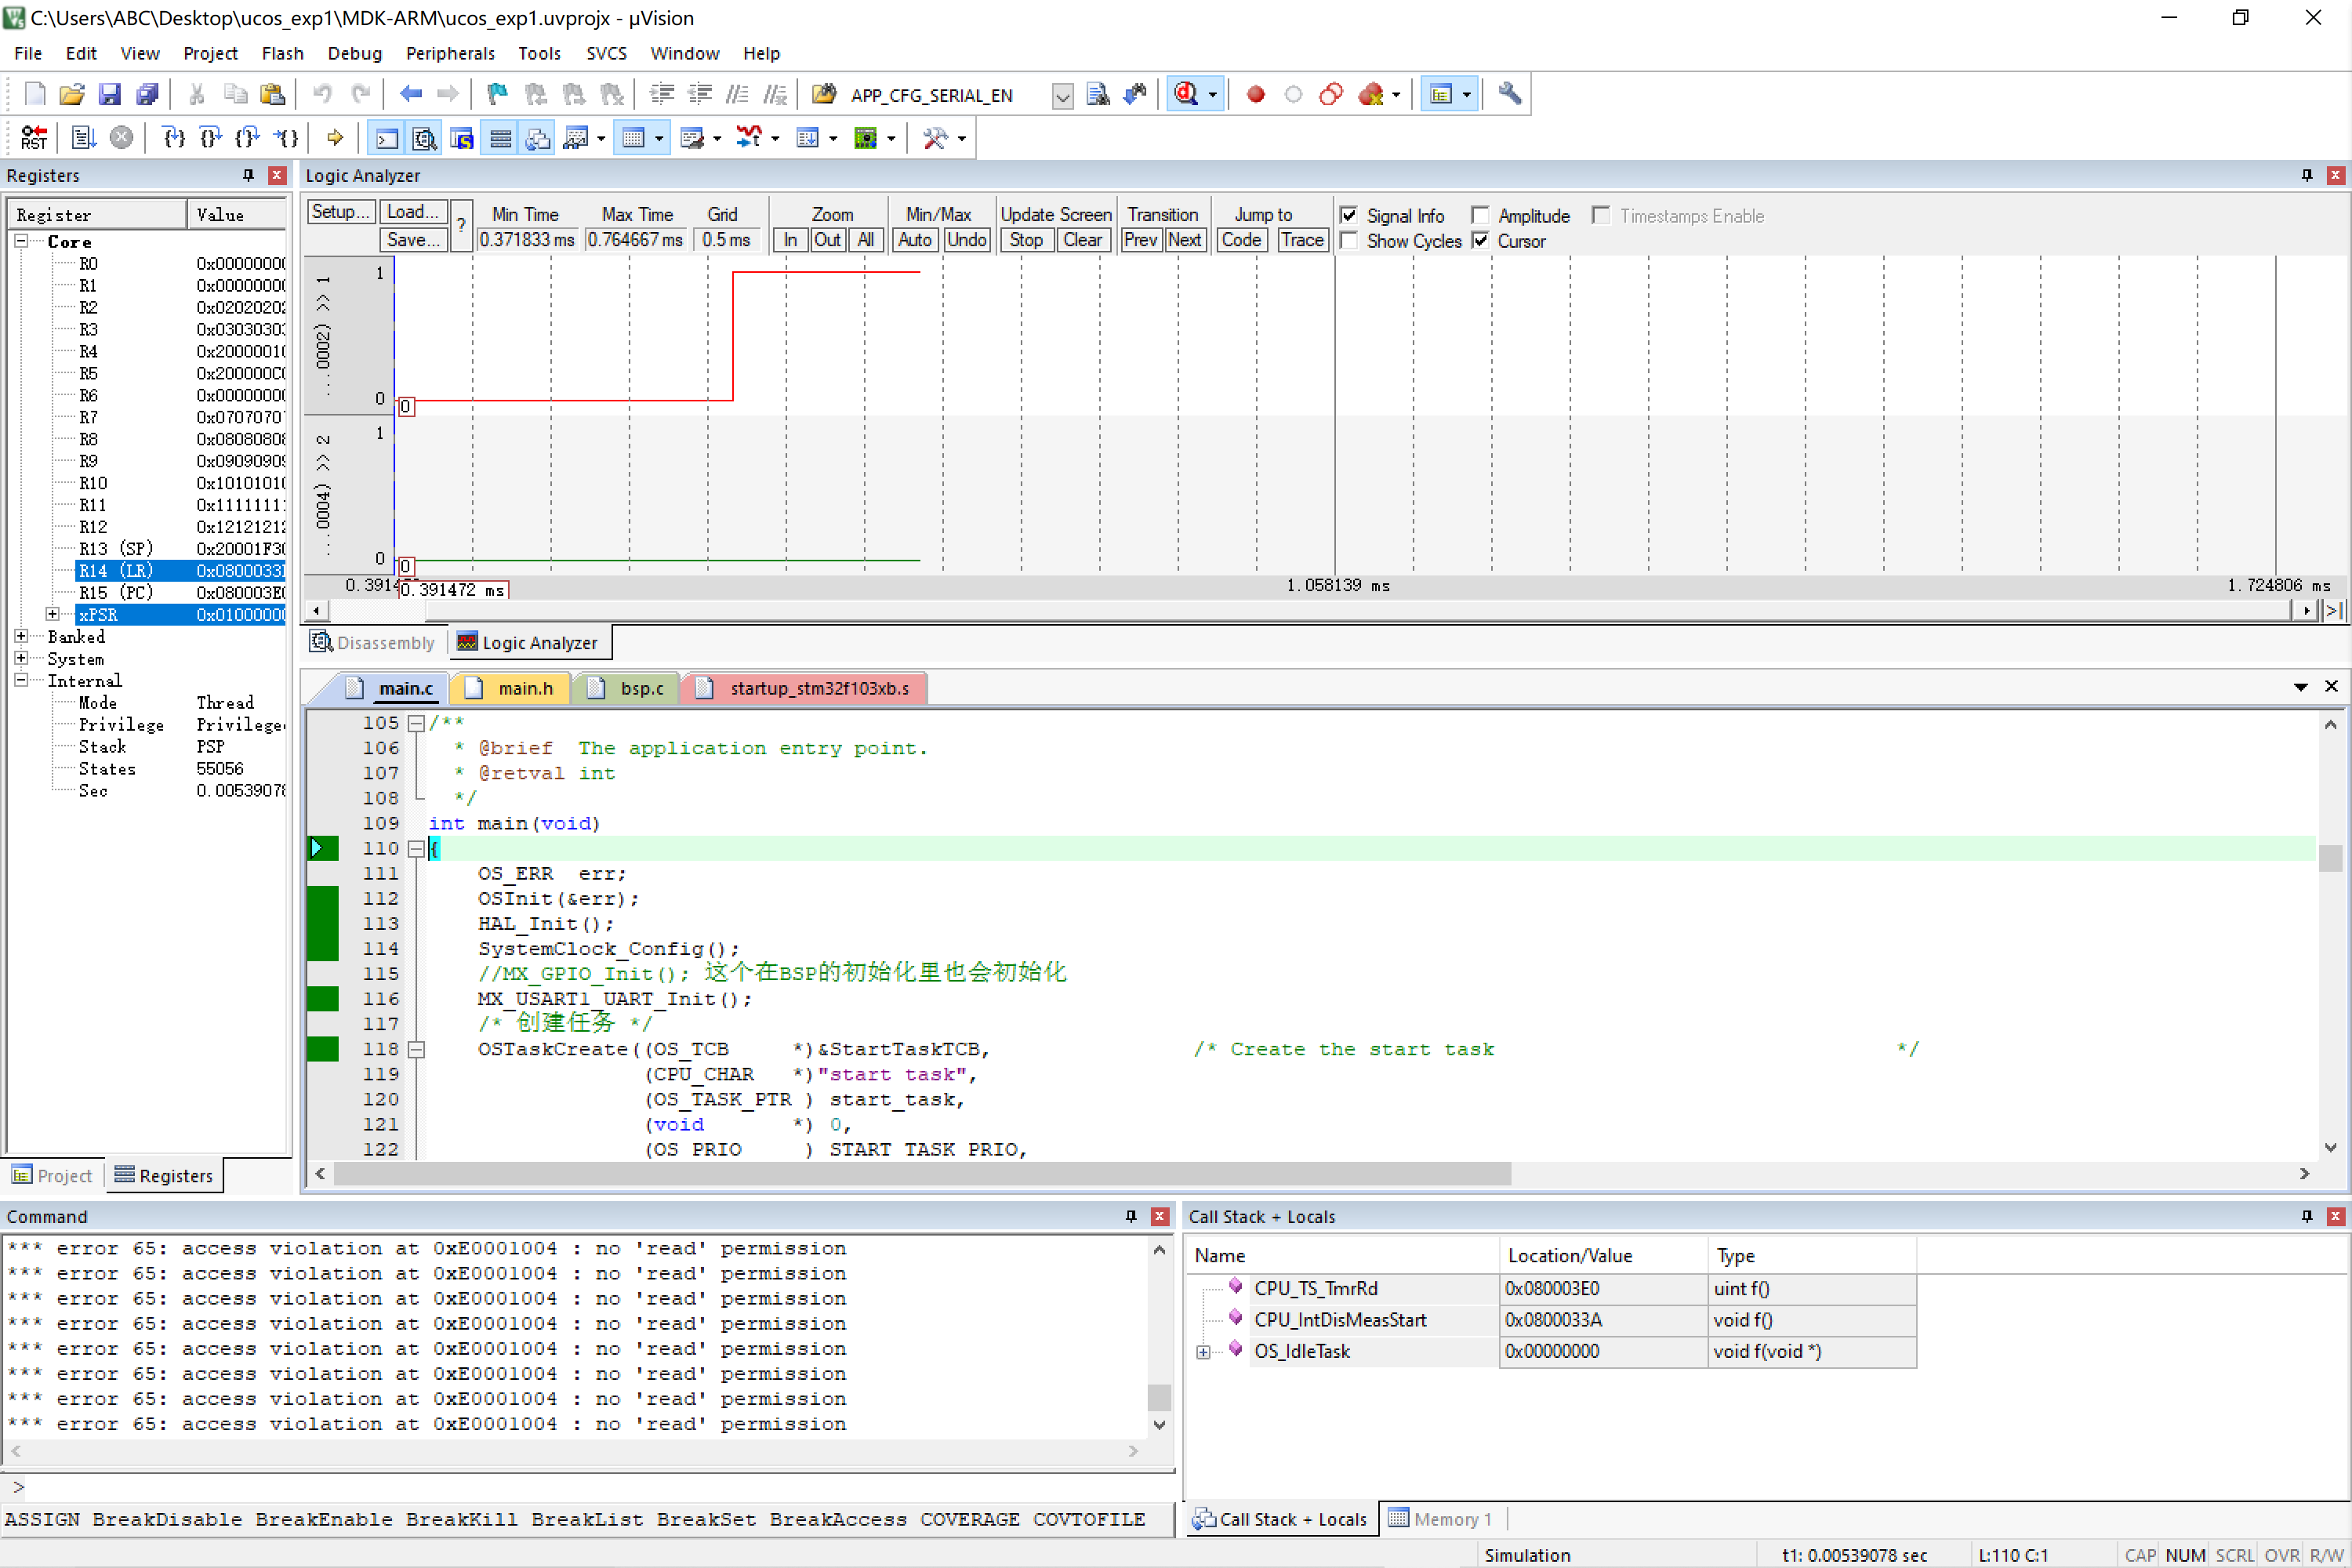
Firstly, we can use keil to simulate and check whether the LED and serial port can normally achieve the experimental effect. However, for some reasons, we need to click the run button many times to get a small section of waveform, so it is difficult to achieve the expected effect of the experiment. Software simulation can refer to Keil environment configuration and simulation debugging of stm32 program_ Jiangnan smoke and rain blog - CSDN blog and
Installation and simple application of STM32CubeMX_ Jiangnan smoke and rain blog - CSDN blog
2. Hardware effect
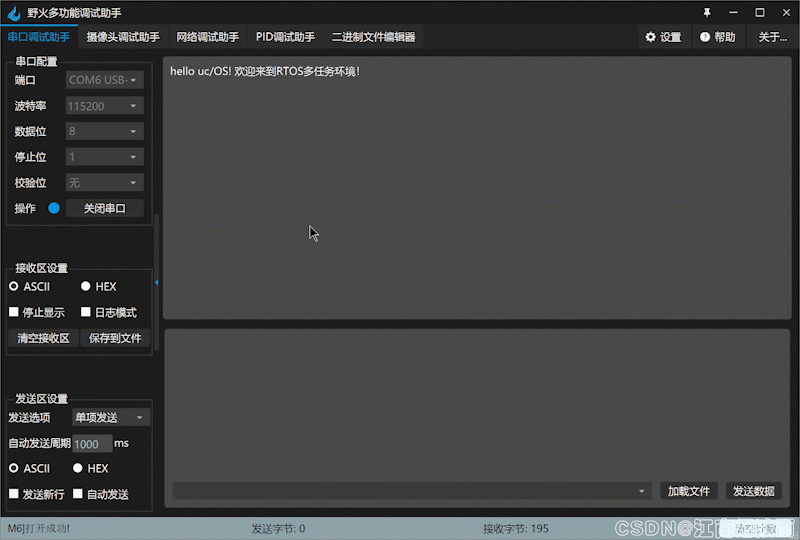
First, open the serial port, and the chip will send text to the computer in a 3s cycle.
After connecting the circuit (PA1 and PA2 connect two LED lights)

3. Logical analysis
Connect the logic analyzer LED1, LED2 and RX and TX of the serial port
Note: the logic analyzer is connected to the computer through USB interface, so it is connected to the same power supply as STM32 chip, that is, the same computer is connected at the same time
The following waveforms can be obtained by setting the sampling rate and sampling time
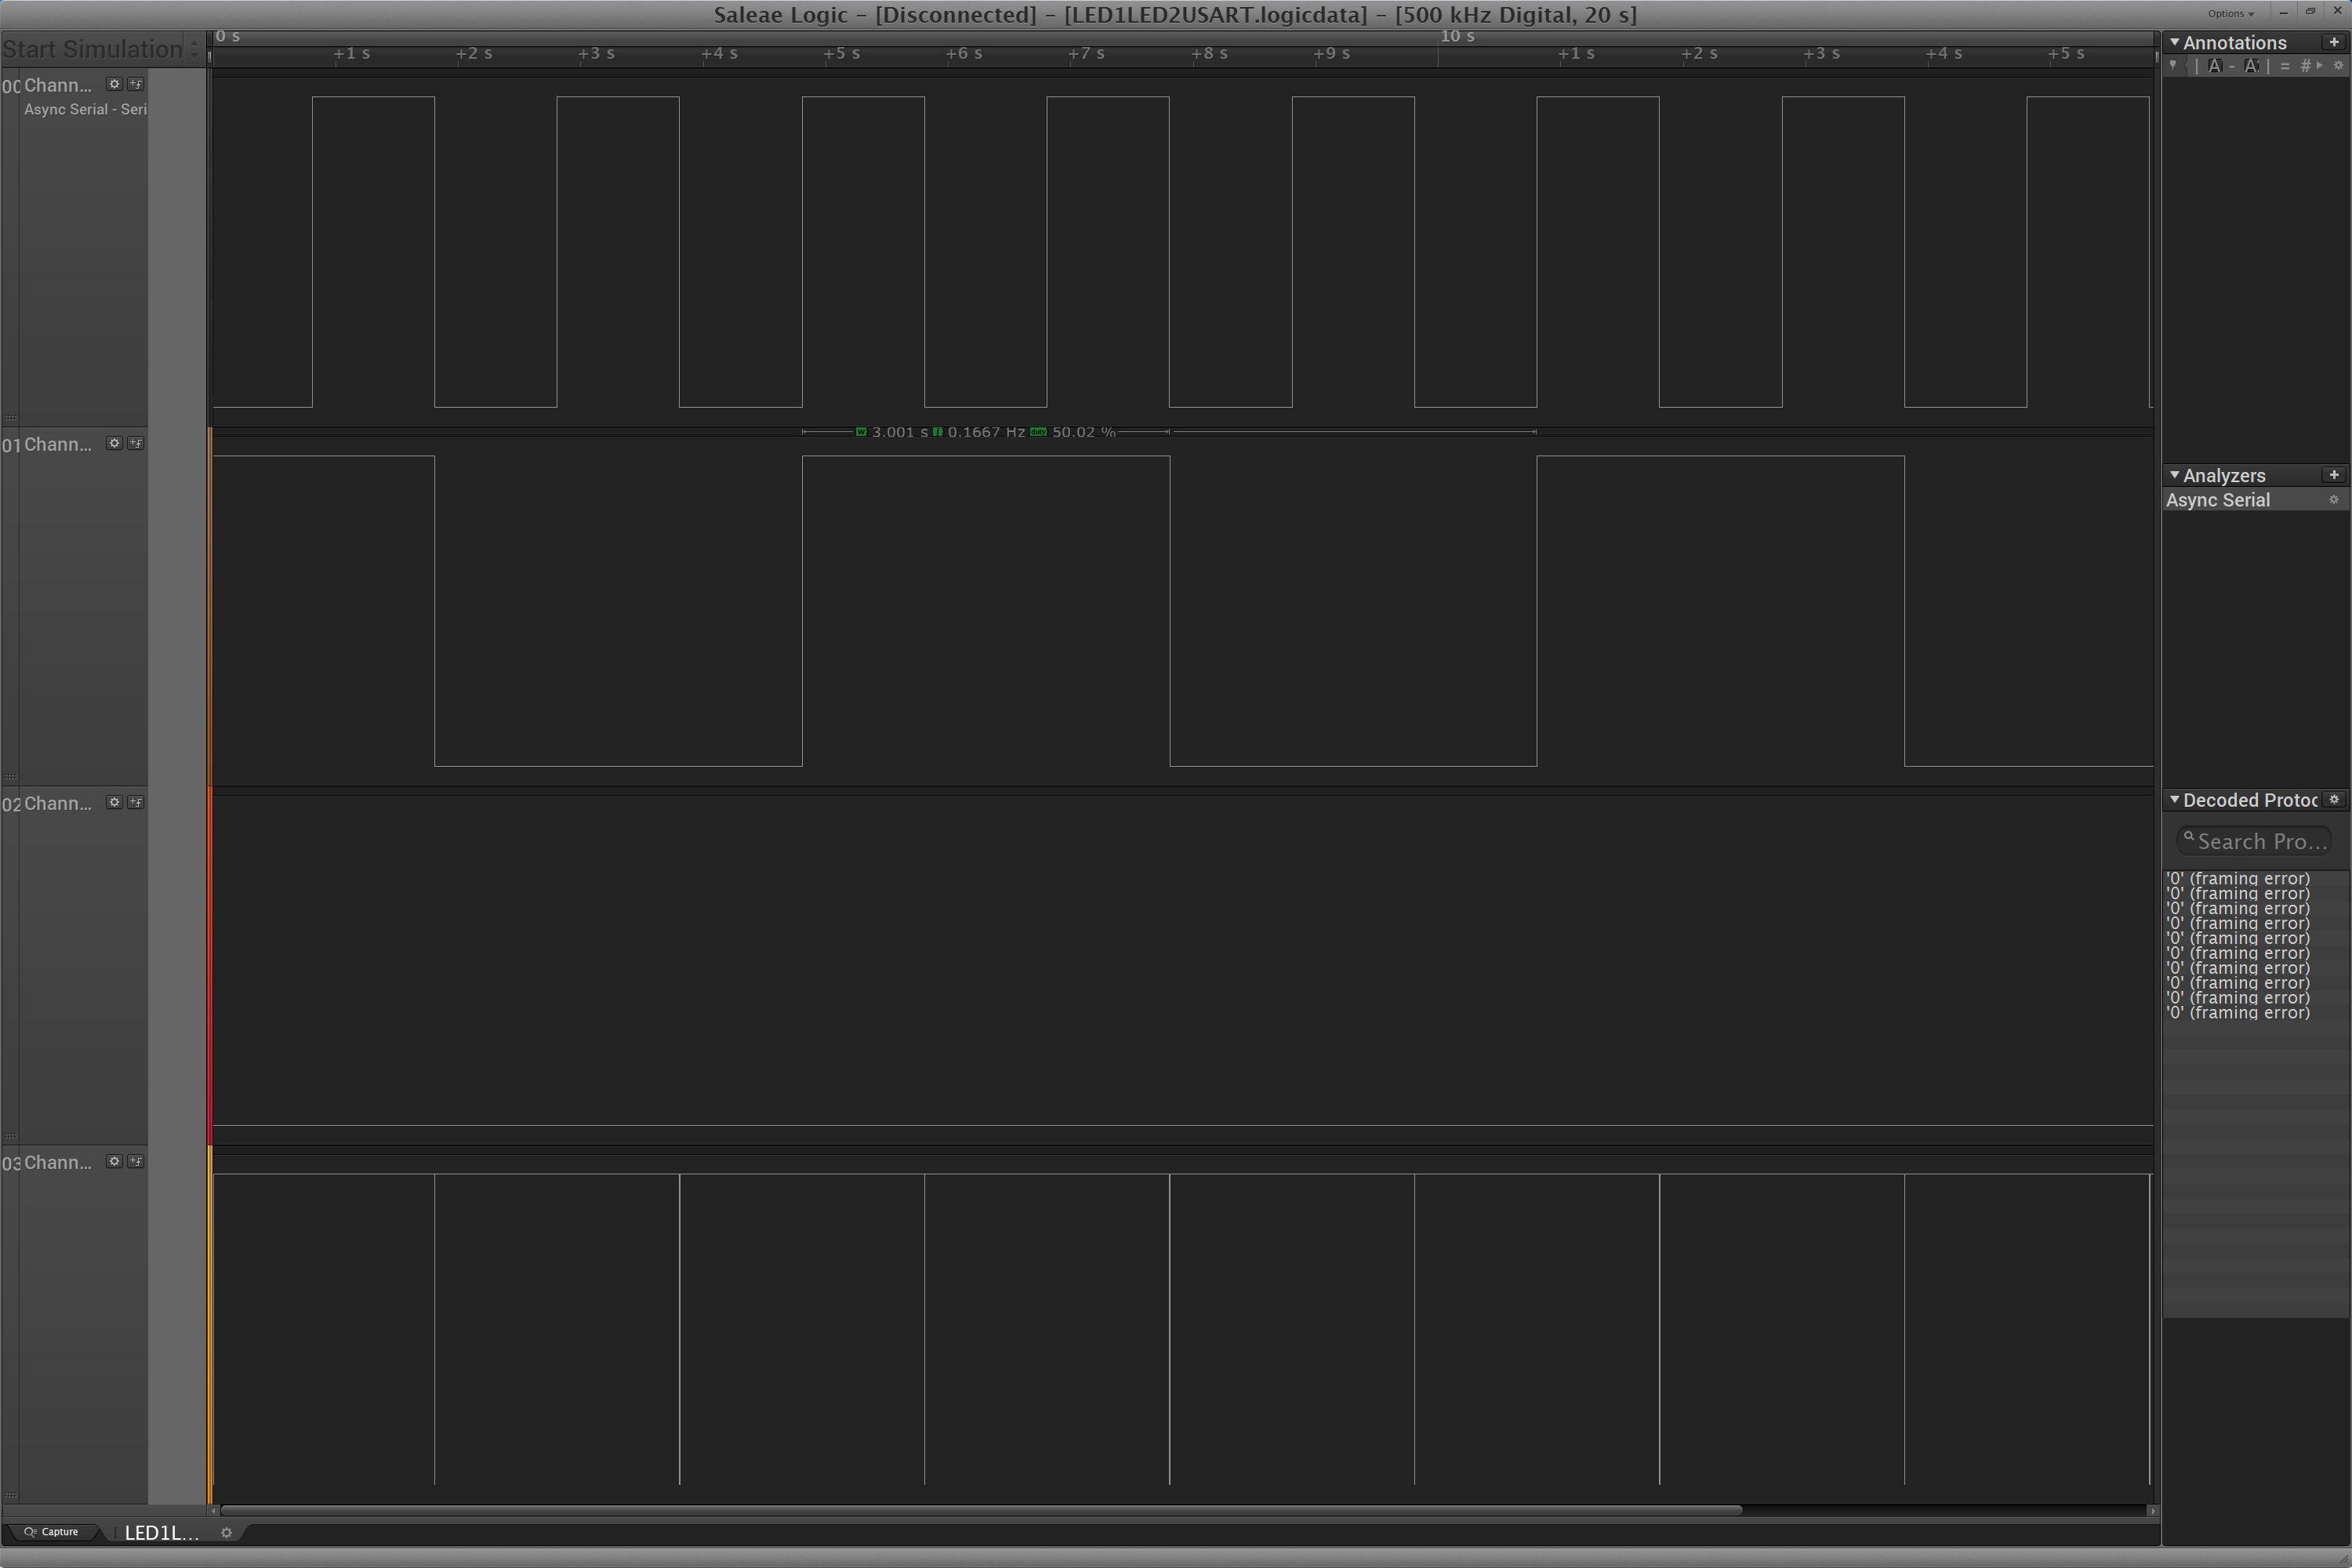
Check CH0 and CH1, i.e. LED1 and LED2, which meet the expected effect of the experiment.
Because the baud rate set by the serial port is 115200, it is necessary to enlarge and observe the received data
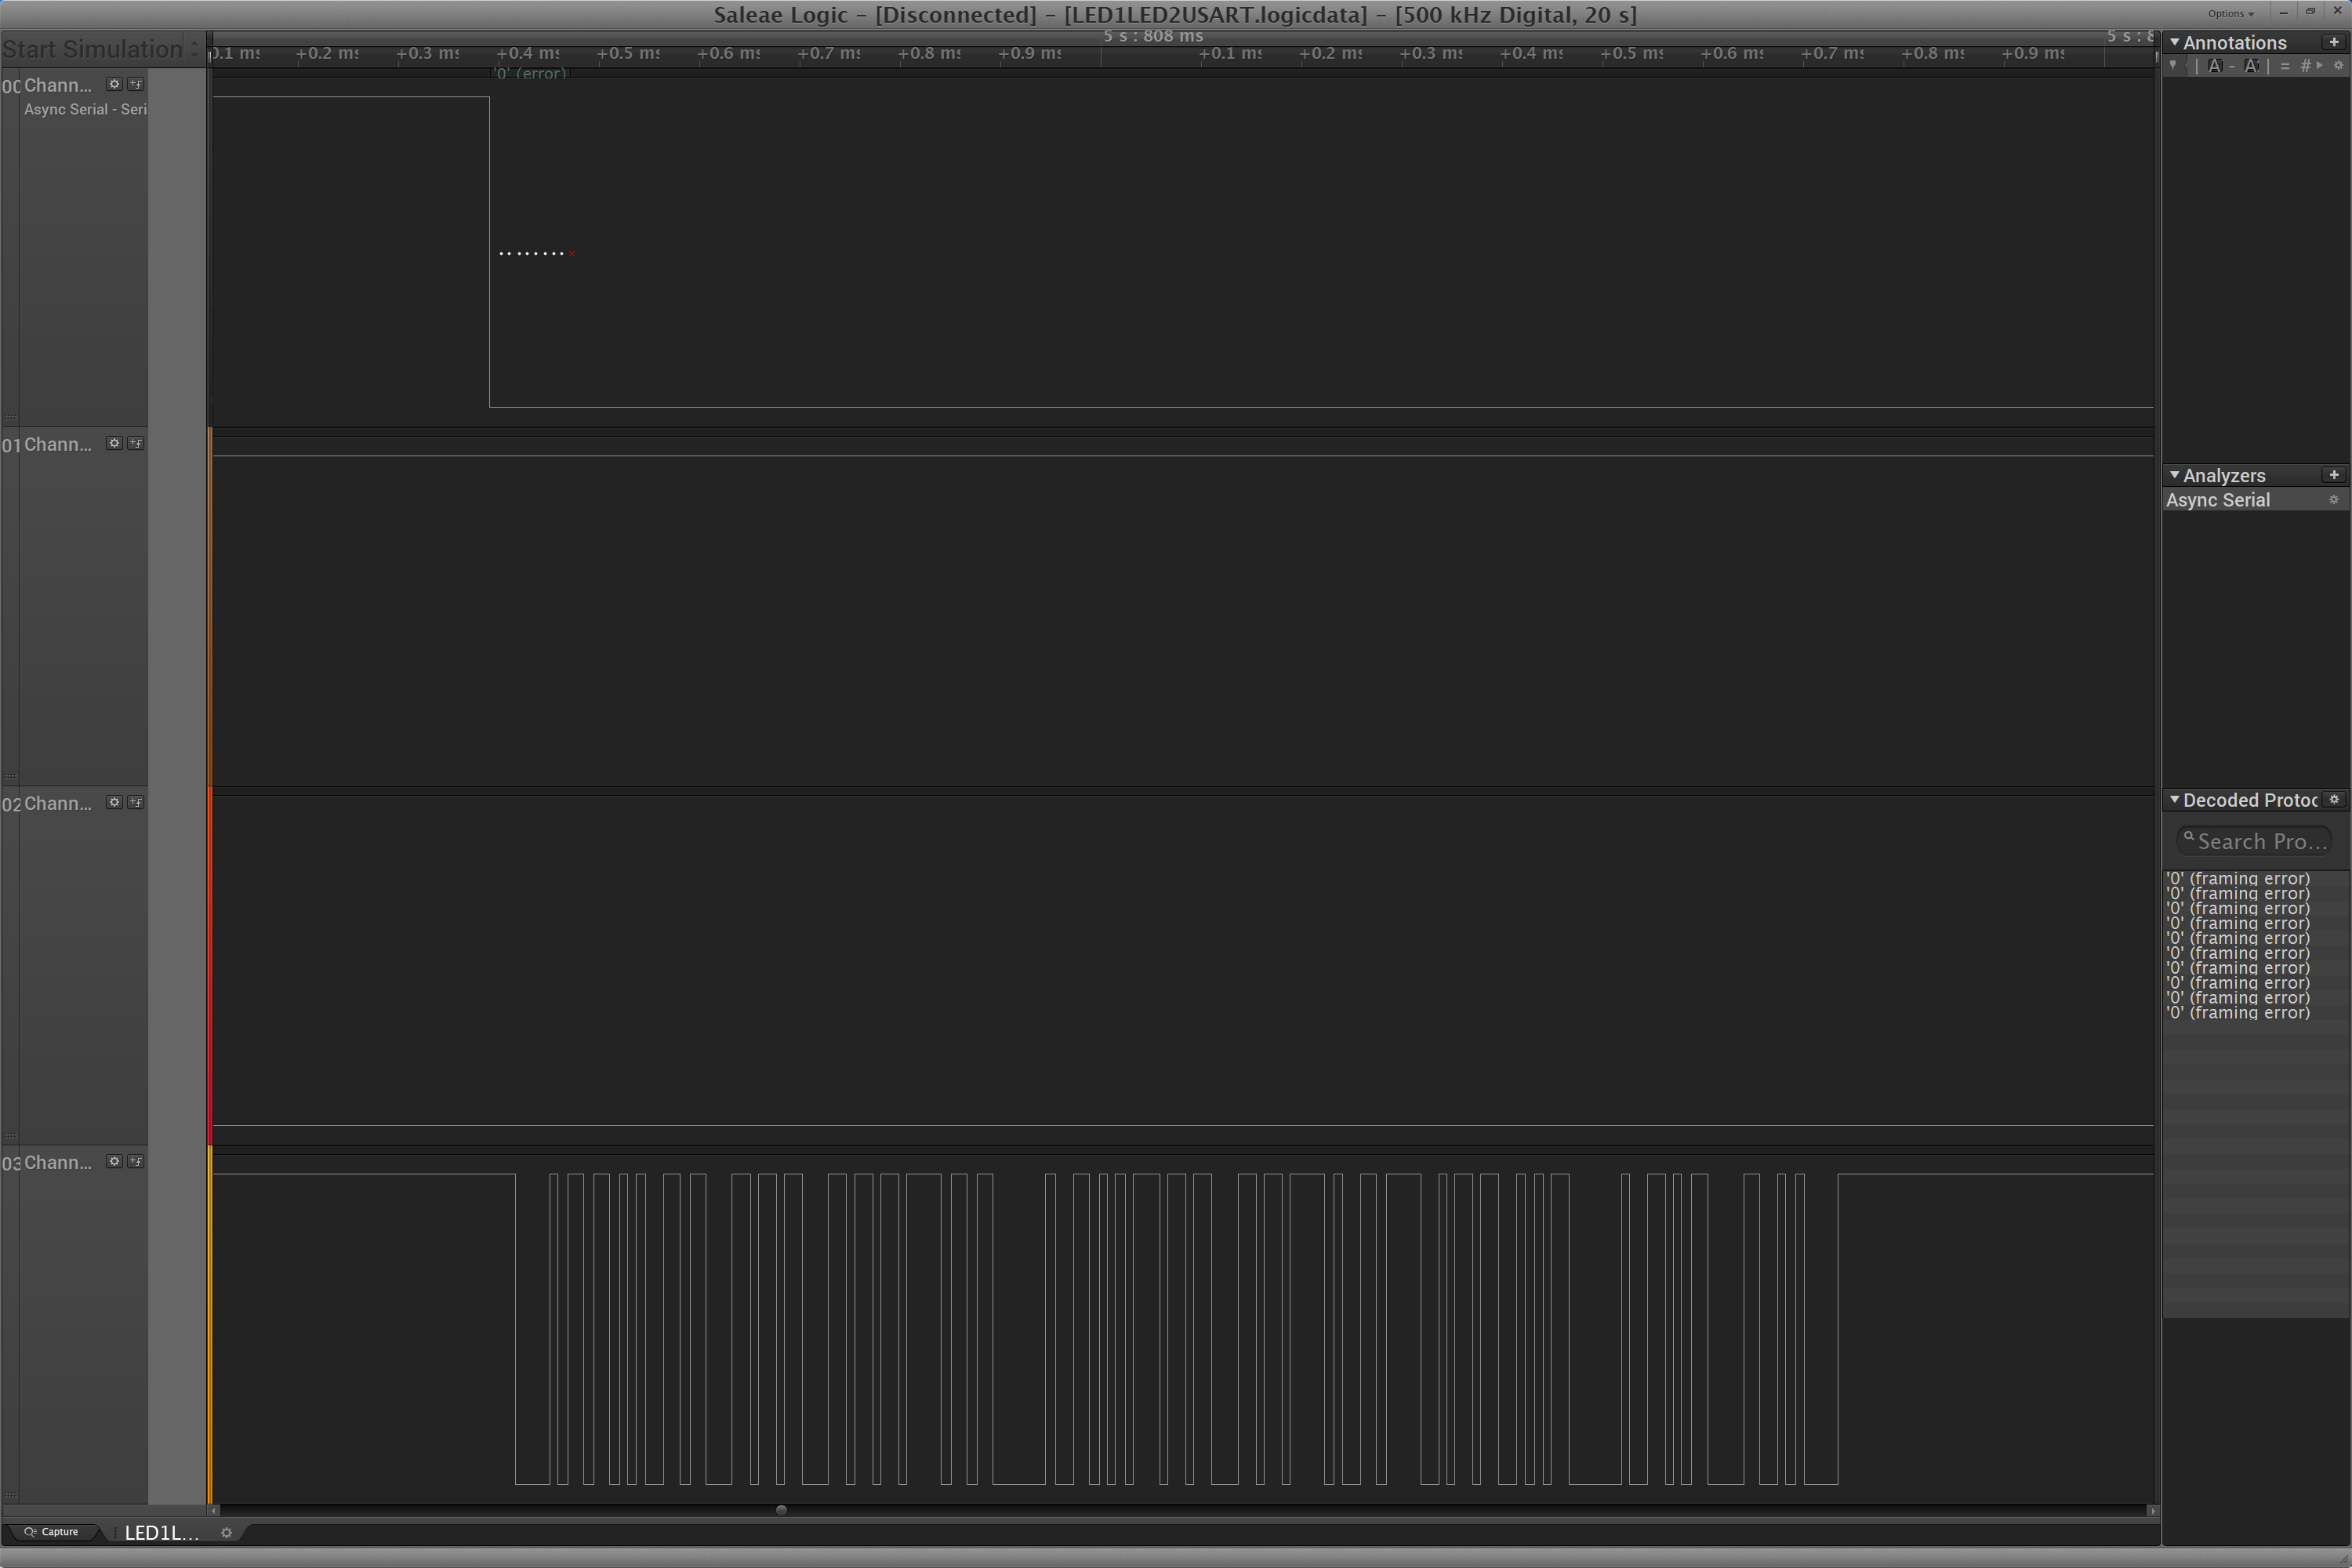
The start bit can be observed by observing the waveform. Set the sampling rate to 5k/s and the baud rate to 115200, so the data length of one bit is 1/115200s. However, due to the limitation of the sampling rate, the occurrence period will be 10 μ S waveform. Interested readers can analyze the waveform according to the above data and the results according to Nyquist sampling law. (if you have any questions, please leave a message in the comment area for correction, or discuss them in a private letter)
5, Experimental summary
Through this experiment, the transplantation of uCOSIII operating system is completed. Of course, many aspects of uCOSIII still need to be learned slowly. Many bugs and problems were encountered during the experiment. Thank you for the information provided on the network. Finally, the experimental source code is attached
Link: https://pan.baidu.com/s/1CY_iYus_ao-krWzm6rYQlw
Extraction code: 1234
6, References
STM32F103 interrupt serial communication USART_ Jiangnan smoke and rain blog - CSDN blog
STM32F103 turns on the LED water lamp_ Jiangnan smoke and rain blog - CSDN blog
Installation and simple application of STM32CubeMX_ Jiangnan smoke and rain blog - CSDN blog
STM32F103C8T6 porting uCOS based on HAL Library_ Witty orange blog - CSDN blog