ssm integration framework is to integrate mybatis, spring and spring MVC to obtain a complete and portable project framework, which can be developed according to this framework in future projects.
Before consolidation, create a database smbms, and then add the user table.
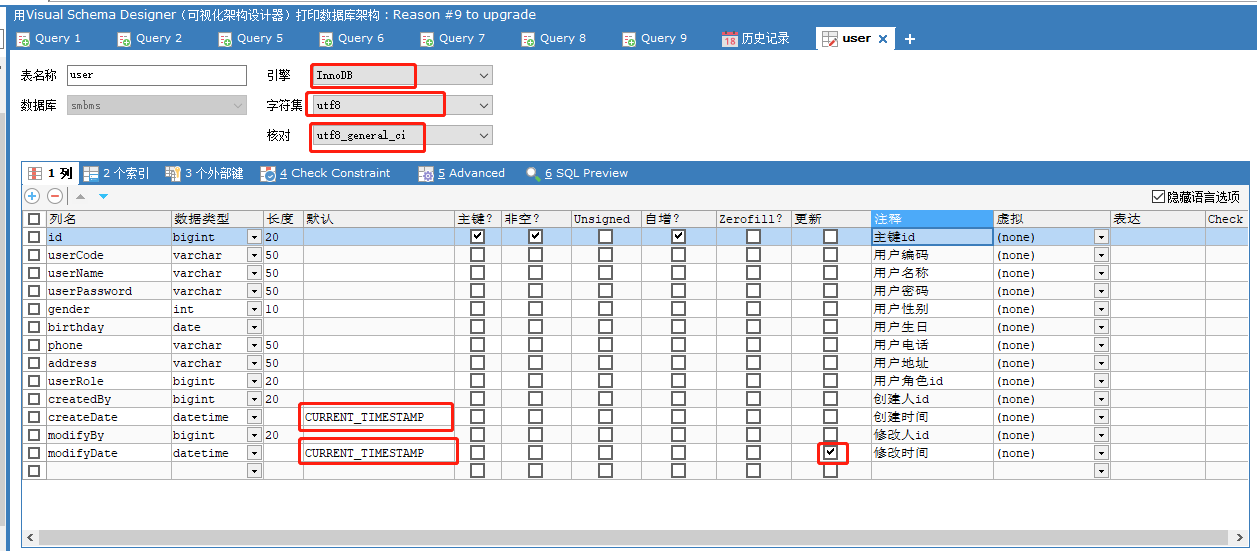
ssm integration steps:
1. First create a maven project with a blank template, and then import the corresponding jar packages. The main jar packages are
mysql driver, c3p0 connection pool, mybatis, spring MVC, spring mybatis, spring JDBC, aop, lombok
<?xml version="1.0" encoding="UTF-8"?>
<project xmlns="http://maven.apache.org/POM/4.0.0"
         xmlns:xsi="http://www.w3.org/2001/XMLSchema-instance"
         xsi:schemaLocation="http://maven.apache.org/POM/4.0.0 http://maven.apache.org/xsd/maven-4.0.0.xsd">
    <modelVersion>4.0.0</modelVersion>

    <groupId>org.example</groupId>
    <artifactId>ssmDemo</artifactId>
    <version>1.0-SNAPSHOT</version>

    <dependencies>
        <!--junit test-->
        <dependency>
            <groupId>junit</groupId>
            <artifactId>junit</artifactId>
            <version>4.12</version>
        </dependency>
        <!--servlet rely on-->
        <dependency>
            <groupId>javax.servlet</groupId>
            <artifactId>servlet-api</artifactId>
            <version>2.5</version>
        </dependency>
        <!--jsp-->
        <dependency>
            <groupId>javax.servlet.jsp</groupId>
            <artifactId>javax.servlet.jsp-api</artifactId>
            <version>2.3.3</version>
        </dependency>
        <!--standard Tag library dependency-->
        <dependency>
            <groupId>taglibs</groupId>
            <artifactId>standard</artifactId>
            <version>1.1.2</version>
        </dependency>
        <!--jstl Expression dependency-->
        <dependency>
            <groupId>javax.servlet.jsp.jstl</groupId>
            <artifactId>jstl-api</artifactId>
            <version>1.2</version>
        </dependency>
        <!--mysql Database driven-->
        <dependency>
            <groupId>mysql</groupId>
            <artifactId>mysql-connector-java</artifactId>
            <version> 5.1.47</version>
        </dependency>
        <!-- Database connection pool c3p0 -->
        <dependency>
            <groupId>com.mchange</groupId>
            <artifactId>c3p0</artifactId>
            <version>0.9.5.5</version>
        </dependency>
        <!-- https://mvnrepository.com/artifact/com.mchange/mchange-commons-java -->
        <dependency>
            <groupId>com.mchange</groupId>
            <artifactId>mchange-commons-java</artifactId>
            <version>0.2.19</version>
        </dependency>
        <!--mybatis-->
        <dependency>
            <groupId>org.mybatis</groupId>
            <artifactId>mybatis</artifactId>
            <version>3.5.2</version>
        </dependency>
        <!--springMVC-->
        <dependency>
            <groupId>org.springframework</groupId>
            <artifactId>spring-webmvc</artifactId>
            <version>5.3.9</version>
        </dependency>
        <!--mybatis-spring integration-->
        <dependency>
            <groupId>org.mybatis</groupId>
            <artifactId>mybatis-spring</artifactId>
            <version>2.0.6</version>
        </dependency>
        <!--spring-jdbc:use spring To connect to the operation database-->
        <dependency>
            <groupId>org.springframework</groupId>
            <artifactId>spring-jdbc</artifactId>
            <version>5.3.9</version>
        </dependency>
        <!--aop-->
        <dependency>
            <groupId>org.aspectj</groupId>
            <artifactId>aspectjweaver</artifactId>
            <version>1.8.13</version>
        </dependency>
        <!--lombok Set annotation for entity class-->
        <dependency>
            <groupId>io.github.qsy7.java.dependencies</groupId>
            <artifactId>lombok</artifactId>
            <version>0.1.0</version>
        </dependency>


    </dependencies>

    <!--maven Filter resource files-->
    <build>
        <resources>
            <resource>
                <directory>src/main/resources</directory>
                <includes>
                    <include>**/*.properties</include>
                    <include>**/*.xml</include>
                </includes>
                <filtering>true</filtering><!--Meaning of turning on filtering-->
            </resource>
            <resource>
                <directory>src/main/java</directory>
                <includes>
                    <include>**/*.properties</include>
                    <include>**/*.xml</include>
                </includes>
                <filtering>true</filtering><!--Meaning of turning on filtering-->
            </resource>
        </resources>
    </build>
</project>
Note: the maven resource filter file needs to be configured. If this file is not configured, the configuration file in the java directory cannot be recognized.
2. Integrate mybatis
Before integration, create the package in the java directory, create pojo, mapper (DAO), services, controller, filter and utils, add the User class in pojo, add the UserMapper interface and UserMapper XML file under the mapper package, and create the mybatis core configuration file mybatis-config.xml and database resource configuration file database.properties.xml in the resources directory
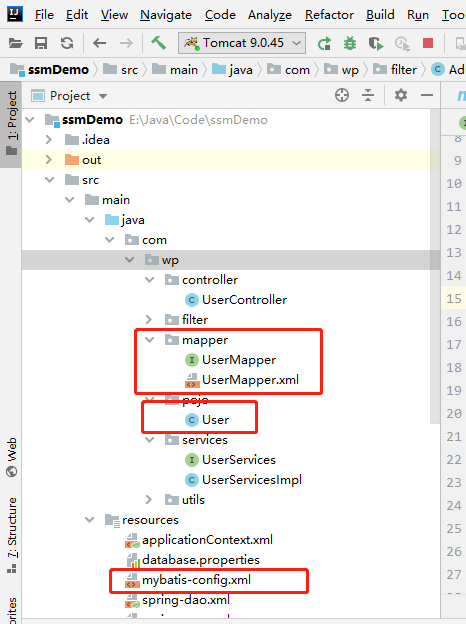
pojo.User entity class
package com.wp.pojo;

import lombok.AllArgsConstructor;
import lombok.Data;
import lombok.NoArgsConstructor;
import org.apache.ibatis.type.Alias;
import org.springframework.stereotype.Component;

import java.util.Date;

/**
 * @author wp
 * @PackageName:com.jskj.pojo
 * @ClassName:User
 * @Description:
 * @date:2021/9/16 16:38
 */
@Data /*Instead of the original get, set and tostring*/
@AllArgsConstructor /*All parameter constructors*/
@NoArgsConstructor  /*Nonparametric structure*/
@Component /*Inject User into spring*/
public class User {
    private int id;//id
    private String userCode;//User code
    private String userName;//User name
    private String userPassword;//User password
    private Integer gender;//Gender
    private Date birthday;//date of birth
    private String phone;//Telephone
    private String address;//User address
    private Integer userRole;//User role
    private Integer createBy;//creator
    private Date createDate;//Creation date
    private Integer modifyBy;//Modified by
    private Date modifyDate;//Modification time
}
Interface of mapper.UserMapper
package com.wp.mapper;
import com.wp.pojo.User;
import org.apache.ibatis.annotations.Param;
import java.util.List;

public interface UserMapper {
    public User getUser(int id);
    public List<User> getAllUser();
    public int inserUser(User user);
    public int deleteUser(int id);
    public int updateUser(User user);
}
Note: if the interface has multiple value type parameters, @ param('value name used in xml file, i.e. #{} value name ') must be added before the parameter type
mapper.UserMapper.xml configuration file
<?xml version="1.0" encoding="UTF8"?>
<!--Note: the original encoding="UTF-8",The following is a comment in Chinese. An error will be reported when the project is running. You need to'UTF-8'Change to'UTF8'-->
<!DOCTYPE mapper
        PUBLIC "-//mybatis.org//DTD Config 3.0//EN"
        "http://mybatis.org/dtd/mybatis-3-mapper.dtd">
<mapper namespace="com.wp.mapper.UserMapper">
   <select id="getUser" parameterType="int" resultType="com.wp.pojo.User">
       select * from user where id=#{id}
   </select>
    <select id="getAllUser" resultType="com.wp.pojo.User">
        select * from user
    </select>
    <insert id="inserUser" parameterType="com.wp.pojo.User">
        insert into user(userCode,userName,userPassword,gender,birthday,phone,address,userRole,createBy,modifyBy) values (#{userCode},#{userName},#{userPassword},#{gender},#{birthday},#{phone},#{address},#{userRole},#{createBy},#{modifyBy})
    </insert>
    <delete id="deleteUser" parameterType="int">
        delete from user where id=#{id}
    </delete>
    <update id="updateUser" parameterType="com.wp.pojo.User">
        update user set userName#{userName},userPassword#{userPassword},phone=#{phone} where id=#{id}
    </update>

</mapper>
The database resource configuration file database.properties under resources
jdbc.driver=com.mysql.jdbc.Driver
# If you are using mysql8.0, you need to add a time zone configuration to the url
jdbc.url=jdbc:mysql://localhost:3306/smbms?useUnicode=true&characterEncoding=utf8&useSSL=false
jdbc.name=root
jdbc.password=Mysql@3306
Mybatis core configuration file mybatis-config.xml under resources
<?xml version="1.0" encoding="UTF8"?>
<!--Note: the original encoding="UTF-8",The following is a comment in Chinese. An error will be reported when the project is running. You need to'UTF-8'Change to'UTF8'-->
<!DOCTYPE configuration
PUBLIC "-//mybatis.org//DTD Config 3.0//EN"
"http://mybatis.org/dtd/mybatis-3-config.dtd">
<configuration>
<!--Alias settings-->
<typeAliases>
<!--Allow you to set your own alias under this package-->
<package name="com.wp.pojo"/>
<!--<!–Direct alias settings–>
<typeAlias type="com.wp.pojo.User" alias="User"></typeAlias>-->
</typeAliases>
<!--register mapper,Note: in spring All are registered in Mapper.xml File, there is no need to register here-->
<!--<mappers>
<mapper class="com.wp.mapper.UserMapper"></mapper>
</mappers>-->
</configuration>
Note: mybatis-config.xml is actually unnecessary. It can be configured in spring later. For example, Mapper.xml can be registered in spring later. In order to make the integration idea clearer, we add it first, and we can consider deleting it in subsequent projects.
3. Integrate spring
Before integrating spring, first add the interface and implementation class under the services package, UserServices interface and UserServicesImpl implementation class, and then add the spring core configuration file applicationContext.xml under the resources resource directory. In order to make the integration process clearer, spring-dao.xml and spring-services.xml are added.
services.UserServices interface
package com.wp.services;

import com.wp.pojo.User;

import java.util.List;

public interface UserServices {
    public User getUser(int id);
    public List<User> getAllUser();
    public int inserUser(User user);
    public int deleteUser(int id);
    public int updateUser(User user);
}
services.UserServices implementation class
package com.wp.services;

import com.wp.mapper.UserMapper;
import com.wp.pojo.User;
import org.junit.Test;

import java.util.List;

/**
 * @author wp
 * @PackageName:com.wp.services
 * @ClassName:UserServicesImpl
 * @Description:
 * @date:2021/10/21 16:21
 */
public class UserServicesImpl implements UserServices {
    private UserMapper userMapper;
    /*setUserMapper Method and the userServicesImpl injected in the spring file can be deleted,
    Use @ services on the class and @ autoWire on the UserMapper attribute of the reference class*/
    public void setUserMapper(UserMapper userMapper) {
        this.userMapper = userMapper;
    }

    public User getUser(int id) {
        return userMapper.getUser(id);
    }

    public List<User> getAllUser() {
        return userMapper.getAllUser();
    }

    public int inserUser(User user) {
        return userMapper.inserUser(user);
    }

    public int deleteUser(int id) {
        return userMapper.deleteUser(id);
    }

    public int updateUser(User user) {
        return userMapper.updateUser(user);
    }

}
Spring configuration file spring-dao.xml for Dao layer
<?xml version="1.0" encoding="UTF8"?>
<beans xmlns="http://www.springframework.org/schema/beans"
       xmlns:xsi="http://www.w3.org/2001/XMLSchema-instance"
       xmlns:context="http://www.springframework.org/schema/context"

       xsi:schemaLocation="http://www.springframework.org/schema/beans
       http://www.springframework.org/schema/beans/spring-beans.xsd
       http://www.springframework.org/schema/context
       http://www.springframework.org/schema/context/spring-context.xsd

       ">
    <!--Specify the package to be scanned, indicating that the annotations under the package will take effect-->
    <context:component-scan base-package="com.wp.pojo"></context:component-scan>
    <context:component-scan base-package="com.wp.mapper"></context:component-scan>

    <!--Import database configuration file database.properties-->
    <context:property-placeholder location="classpath:database.properties"></context:property-placeholder>
    <!--Configure data sources datasource-->
    <bean id="dataSource" class="com.mchange.v2.c3p0.ComboPooledDataSource">
        <property name="driverClass" value="${jdbc.driver}"></property>
        <property name="jdbcUrl" value="${jdbc.url}"></property>
        <property name="user" value="${jdbc.name}"></property>
        <property name="password" value="${jdbc.password}"></property>
        <!--to configure C3p0 Private properties of-->
        <property name="maxPoolSize" value="30" />    <!--Maximum connections 30-->
        <property name="initialPoolSize" value="10"/> <!--Number of initialized connections 10-->
        <property name="minPoolSize" value="10" />    <!--Minimum number of connections 10-->
        <property name="autoCommitOnClose" value="false" />    <!--Not automatically after closing the connection commit-->
        <property name="acquireRetryAttempts" value="2"/> <!--Number of connection retries after database connection failure-->
        <property name="acquireRetryDelay" value="1000" />    <!--The interval between two connections, in milliseconds, is 1000 by default-->
        <property name="checkoutTimeout" value="10000" />  <!--Get connection timeout-->

    </bean>
    <!--to configure sqlSessionFactory-->
    <bean id="sqlSessionFactory" class="org.mybatis.spring.SqlSessionFactoryBean">
        <!--injection dataSource-->
        <property name="dataSource" ref="dataSource"></property>
        <!--binding mybatis configuration file,mybatis-config.xml The configuration file can be completely omitted and can be configured here mybatis Everything, but keep it and brush it mybatis Sense of existence-->
        <property name="configLocation" value="classpath:mybatis-config.xml"></property>
        <!--register mapper Mapping file,use*.xml You can match all the mapping files, so you don't have to mybatis-config.xml Register in mapper Yes-->
        <property name="mapperLocations" value="classpath*:com/wp/mapper/*.xml"></property>
    </bean>

    <!--to configure dao Automatically scan the package, and dynamically realize the automatic injection of the interface under the package spring In container-->
    <bean class="org.mybatis.spring.mapper.MapperScannerConfigurer">
        <!--take sqlSessionFactory Inject into sqlSessionFactoryBeanName in-->
        <property name="sqlSessionFactoryBeanName" value="sqlSessionFactory"></property>
        <!--scanning mapper package-->
        <property name="basePackage" value="com.wp.mapper"></property>
    </bean>


</beans>
Note: 1. Bind the mybatis configuration file. All contents of mybatis can be configured under the parent tag of this tag, so the core configuration file of mybatis can be deleted, but the retention organization will be clearer
2. Register the mapper mapping file. With this configuration, the mapper that should have been registered in the mybatis core configuration file can be omitted.
3. Automatically scan the package and dynamically inject the interface under the package into the spring container
In the past, if the services layer wanted to call the interface method of the mapper package, it needed to add an implementation class mapperinpl of the mapper interface under the mapper package. In the implementation class mapperinpl, it needed the parameter of sqlSession to obtain the mapper interface, so as to call the method of the mapper interface. In the past, there were two ways to obtain sqlSession: one is to inject SqlSessionTemplate class into spring and assemble sqlSessionFactory to implement it; the other is to inherit SqlSessionDaoSupport class and obtain sqlSession through getSqlSession(). The mapperImpl class is manually injected into the spring, and finally the interface method of the mapper package can be invoked in service.
Now with this automatic scanning package, the mapper interface implementation class and the implementation class of injecting mapper into spring are omitted.
Spring configuration file spring-service.xml of services layer
<?xml version="1.0" encoding="UTF8"?>
<beans xmlns="http://www.springframework.org/schema/beans"
       xmlns:xsi="http://www.w3.org/2001/XMLSchema-instance"
       xmlns:context="http://www.springframework.org/schema/context"
       xmlns:tx="http://www.springframework.org/schema/tx"
       xmlns:aop="http://www.springframework.org/schema/aop"
       xsi:schemaLocation="http://www.springframework.org/schema/beans
       http://www.springframework.org/schema/beans/spring-beans.xsd
       http://www.springframework.org/schema/context
       http://www.springframework.org/schema/context/spring-context.xsd
       http://www.springframework.org/schema/tx
       http://www.springframework.org/schema/tx/spring-tx.xsd
       http://www.springframework.org/schema/aop
       http://www.springframework.org/schema/aop/spring-aop.xsd
       ">
    <!--scanning services Package under,services As long as there are comments under the package, you can scan it spring in-->
    <context:component-scan base-package="com.wp.services"></context:component-scan>
    <!--take services Entity class injection under spring The same effect can be achieved through configuration or annotation@services Acting on entity classes,@autoWire Acts on the reference parameters of the entity class-->
    <bean id="userServicesImpl" class="com.wp.services.UserServicesImpl">
        <property name="userMapper" ref="userMapper"></property>
    </bean>


    <!--Declarative transaction-->
    <bean id="transactionManager" class="org.springframework.jdbc.datasource.DataSourceTransactionManager">
        <!--injection dataSource-->
        <property name="dataSource" ref="dataSource"></property>
    </bean>
    <!--aop Weaving transaction-->
    <!--Configure transaction notifications-->
    <tx:advice id="txAdvice" transaction-manager="transactionManager">
        <tx:attributes>
            <!--Configure transactions for methods-->
            <tx:method name="add"/>
            <tx:method name="delete"/>
            <tx:method name="update"/>
            <tx:method name="query"/>
            <!--Configure transactions for all methods-->
            <!--Configure the propagation characteristics of transactions, REQUIRED: The current transaction is supported. If there is no current transaction, a transaction will be created-->
            <tx:method name="*" propagation="REQUIRED"/>
        </tx:attributes>
    </tx:advice>
    <!--Configure transaction entry-->
    <aop:config>
        <!--The entry point is in the package com.wp.mapper Cut into the methods of all classes under-->
        <aop:pointcut id="txPointCut" expression="execution(* com.wp.services.*.*(..))"/>
        <!--Transactions are formally entered at the entry point-->
        <aop:advisor advice-ref="txAdvice" pointcut-ref="txPointCut"></aop:advisor>
    </aop:config>

</beans>
Note: the spring configuration file of services is mainly used to inject the implementation class of the services layer and assemble the mapper interface of the implementation class of the services layer. It can also be used to configure declarative transactions.
1. The use of aop weaving in transactions solves the problem of reducing code coupling. With this aop weaving in transaction configuration, you can not modify the code of the services implementation class, but also realize the transactional processing of the services layer business logic. In the past, in order to realize the transactional processing of a business, the business code must be modified. With this configuration, there is no need to modify the code at all. It is very practical and convenient.
3. Integrate spring MVC
Integrating spring MVC is mainly to call the web resources of the control layer. Firstly, the project imports the support of the web framework, as shown in the following steps; Then configure web.xml, add the spring configuration file spring-mvc.xml of the controller layer, add the controller class, and test a method to obtain users.
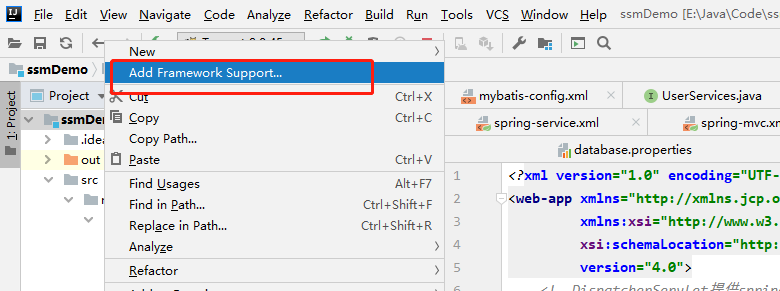
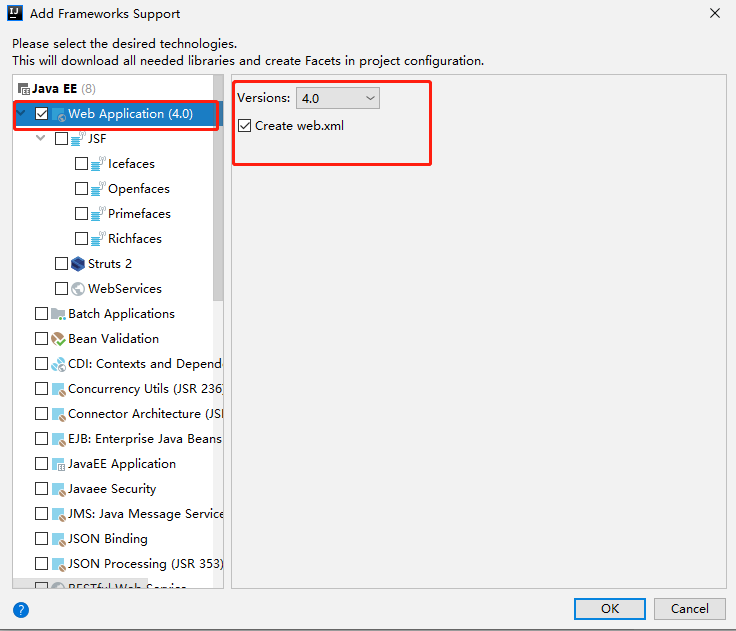
Configure web.xml
<?xml version="1.0" encoding="UTF-8"?>
<web-app xmlns="http://xmlns.jcp.org/xml/ns/javaee"
         xmlns:xsi="http://www.w3.org/2001/XMLSchema-instance"
         xsi:schemaLocation="http://xmlns.jcp.org/xml/ns/javaee http://xmlns.jcp.org/xml/ns/javaee/web-app_4_0.xsd"
         version="4.0">
    <!--DispatcherServlet provide springMVC Centralized access point, which can be connected with springIOC Seamless butt joint to obtain spring All the benefits of-->
    <servlet>
        <servlet-name>springMvc</servlet-name>
        <servlet-class>org.springframework.web.servlet.DispatcherServlet</servlet-class>
        <!--binding spring configuration file-->
        <init-param>
            <param-name>contextConfigLocation</param-name>
            <param-value>classpath:applicationContext.xml</param-value>
        </init-param>
        <!--Startup level: follow tomcat One piece start-->
        <load-on-startup>1</load-on-startup>
    </servlet>
    <!--
    "/":Match all requests, excluding pages
    "/*":Match all requests, including pages
    -->
    <servlet-mapping>
        <servlet-name>springMvc</servlet-name>
        <url-pattern>/</url-pattern>
    </servlet-mapping>

    <!--Filter garbled code-->
    <filter>
        <filter-name>characterEncoding</filter-name>
        <filter-class>org.springframework.web.filter.CharacterEncodingFilter</filter-class>
        <!--Set encoding-->
        <init-param>
            <param-name>encoding</param-name>
            <param-value>utf-8</param-value>
        </init-param>
    </filter>
    <filter-mapping>
        <filter-name>characterEncoding</filter-name>
        <url-pattern>/*</url-pattern>
    </filter-mapping>

    <!--session obsolete,Time unit: minutes-->
    <session-config>
        <session-timeout>1</session-timeout>
    </session-config>
    <!--validate logon-->
    <filter>
        <filter-name>adminFilter</filter-name>
        <filter-class>com.wp.filter.AdminFilter</filter-class>
    </filter>
    <filter-mapping>
        <filter-name>adminFilter</filter-name>
        <url-pattern>/jsp/*</url-pattern>
    </filter-mapping>


</web-app>
Note: when binding the spring configuration file, applicationContext.xml must import the spring-dao.xml, spring-service.xml and spring-mvc.xml files, otherwise an error will be reported when the project runs, and the bean cannot be found. The previously bound spring-mvc.xml will cause the project to run without finding the relevant bean.
contextConfigLocation
classpath:applicationContext.xml
spring-mvc.xml configuration file for controller layer
<?xml version="1.0" encoding="UTF8"?>
<beans xmlns="http://www.springframework.org/schema/beans"
       xmlns:xsi="http://www.w3.org/2001/XMLSchema-instance"
       xmlns:context="http://www.springframework.org/schema/context"
       xmlns:mvc="http://www.springframework.org/schema/mvc"
       xsi:schemaLocation="http://www.springframework.org/schema/beans
       http://www.springframework.org/schema/beans/spring-beans.xsd
       http://www.springframework.org/schema/context
       http://www.springframework.org/schema/context/spring-context.xsd
       http://www.springframework.org/schema/mvc
       http://www.springframework.org/schema/mvc/spring-mvc.xsd

       ">
    <!--Specify the package to be scanned, indicating that the annotations under the package will take effect-->
    <context:component-scan base-package="com.wp.controller"></context:component-scan>
    <!--Filter out static resource files so that they are not parsed by the view parser, otherwise there will be problems in parsing such static resource files, such as: css/js/mp3/mp4-->
    <mvc:default-servlet-handler></mvc:default-servlet-handler>
    <!--
    support mvc Annotation driven:
    stay spring In general use@RequestMapping Annotation to complete the mapping relationship, in order to make@RequestMapping Effective, must
    Register with context DefaultAnnotationHandlerMapping and AnnotationMethodHandlerAdapter,use mvc:annotation-driven,
    Instead of registering the above two instance processor mappers and processor adapters,
    -->
    <mvc:annotation-driven></mvc:annotation-driven>

    <!--Add view parser-->
    <bean class="org.springframework.web.servlet.view.InternalResourceViewResolver" id="InternalResourceViewResolver">
        <property name="prefix" value="/WEB-INF/jsp/"></property>
        <property name="suffix" value=".jsp"></property>
    </bean>

</beans>
Note: 1. The prefix and suffix of the view parser change with the actual situation of the project.
2. The 'UTF-8' of the header files of all the above configuration files shall be changed to 'UTF8', and the horizontal bar in the middle shall be removed, otherwise there will be problems in the operation of the project
3. In the project release structure of Artifacts of Project structure, add the lib directory under the WEB-INF directory, and copy the package file under Libraries to the lib directory. Otherwise, the project runs in tomcat and cannot find package resources.
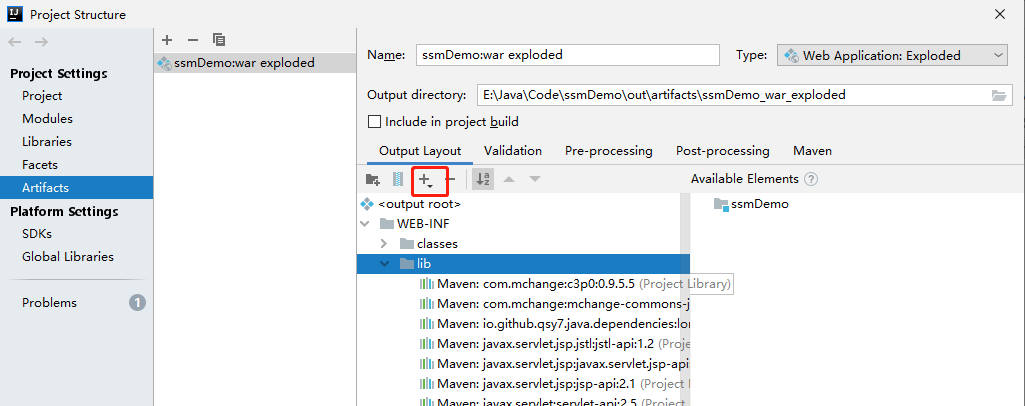

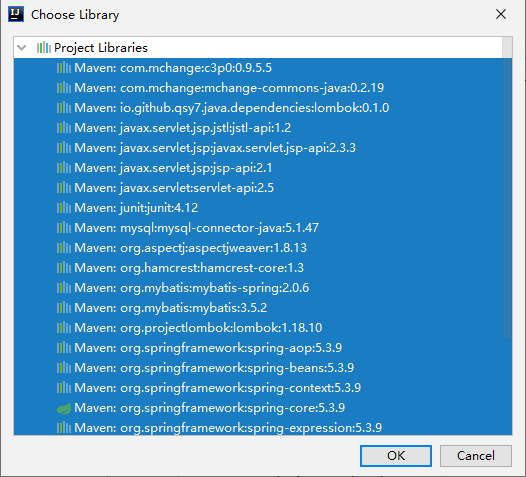
After the framework integration is completed, you need to test the project to verify whether the framework is successful
Verify whether the framework is successful
1. Add UserController entity class under controller package
package com.wp.controller;

import com.wp.pojo.User;
import com.wp.services.UserServices;
import com.wp.utils.Constant;
import org.springframework.beans.factory.annotation.Autowired;
import org.springframework.beans.factory.annotation.Qualifier;
import org.springframework.stereotype.Controller;
import org.springframework.ui.Model;
import org.springframework.web.bind.annotation.RequestMapping;
import org.springframework.web.bind.annotation.RequestParam;

import javax.servlet.http.HttpSession;

/**
 * @author wp
 * @PackageName:com.wp.controller
 * @ClassName:UserController
 * @Description:
 * @date:2021/10/21 17:04
 */
@Controller //Injecting entity classes into spring
@RequestMapping("/user")
public class UserController {
    @Autowired/*Annotation realizes automatic assembly and automatically assigns values to userServices*/
    //@Qualifier("userServicesImpl") / * if there are many implementation classes, specify a specific implementation class, or a single implementation class may not be specified*/
    private UserServices userServices;
    @RequestMapping("/login.do")
    public String login(@RequestParam("userName") String name, @RequestParam("userPassword") String password, Model model, HttpSession session){
        User user= userServices.getUser(1);
        model.addAttribute("user",user);
        //Add user to the session, which can be used in the login authentication filter later
        session.setAttribute(Constant.USER_SESSION,user);

        return "hello";
    }
}

Note: 1.model It is used to return a value to the front page through model.addAttribute To achieve
2.Return value string,Is the front-end page name, which will be spliced with the prefix and suffix in the view parser to form a front-end page under a complete path
2. Add JSP file and hello.jsp file under the WEB-INF path
<%--
  Created by IntelliJ IDEA.
  User: Administrator
  Date: 2021/10/21
  Time: 17:29
  To change this template use File | Settings | File Templates.
--%>
<%@ page contentType="text/html;charset=UTF-8" language="java" %>
<html>
<head>
    <title>Title</title>
</head>
<body>
ssm After the combined frame is completed, you can apply the fixed frame
${user}
</body>
</html>
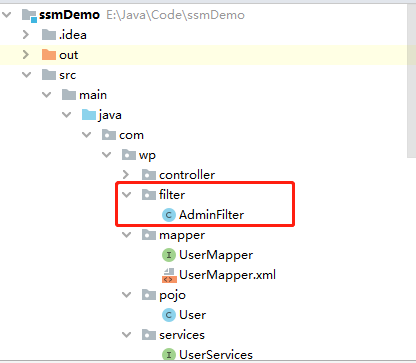
3. In order to make other requests accessible only after successful login, you need to use the filter, add the filter package, and add the AdminFilter entity class under the package,
AdminFilter inherits the Filter under servlet package
AdminFilter entity class
package com.wp.filter;

import com.wp.pojo.User;
import com.wp.utils.Constant;

import javax.servlet.*;
import javax.servlet.http.HttpServletRequest;
import javax.servlet.http.HttpServletResponse;
import java.io.IOException;

/**
 * @author wp
 * @PackageName:com.wp.filter
 * @ClassName:AdminFilter
 * @Description:
 * @date:2021/10/20 21:36
 */
public class AdminFilter implements Filter {
    public void init(FilterConfig filterConfig) throws ServletException {

    }

    public void doFilter(ServletRequest servletRequest, ServletResponse servletResponse, FilterChain filterChain) throws IOException, ServletException {
        HttpServletRequest httpServletRequest=(HttpServletRequest)servletRequest;
        HttpServletResponse httpServletResponse=(HttpServletResponse) servletResponse;
        User user=(User) httpServletRequest.getSession().getAttribute(Constant.USER_SESSION);
        if(user!=null){
            filterChain.doFilter(servletRequest,servletResponse);
        }
        else {
            httpServletResponse.sendRedirect("/smbms/login.jsp");
        }
    }

    public void destroy() {

    }
}
Register AdminFilter in web.xml
<!--validate logon-->
    <filter>
        <filter-name>adminFilter</filter-name>
        <filter-class>com.wp.filter.AdminFilter</filter-class>
    </filter>
    <filter-mapping>
        <filter-name>adminFilter</filter-name>
        <url-pattern>/jsp/*</url-pattern>
    </filter-mapping>
Note: the login interface must be excluded from the filter request range here, otherwise the filter method will enter the dead cycle and the project will not run
At this point, the construction and verification of the whole ssm framework have been completed. This blog was originally planned to take one hour, but it took three hours. It is also to make the project faster in the future, and spend more time understanding and solving the problems encountered.