1. Spring MVC Workflow Diagram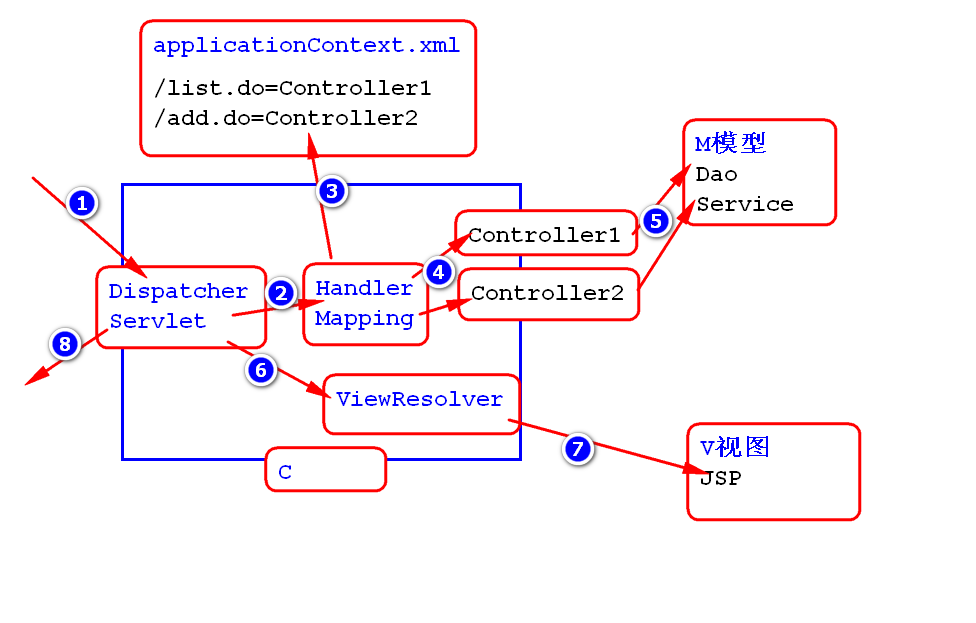
Configuration of Despatcher Servlet
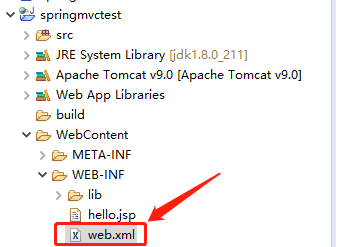
- Configuration path: WebContent/WEB-INF/web.xml
- Configuration:
<?xml version="1.0" encoding="UTF-8"?>
<web-app xmlns:xsi="http://www.w3.org/2001/XMLSchema-instance" xmlns="http://xmlns.jcp.org/xml/ns/javaee" xsi:schemaLocation="http://xmlns.jcp.org/xml/ns/javaee http://xmlns.jcp.org/xml/ns/javaee/web-app_4_0.xsd" id="WebApp_ID" version="4.0">
  <display-name>springmvctest</display-name>

  <servlet>
  	<!-- Value and servlet-mapping in servlet-name The values are consistent. -->
  	<servlet-name>mvctest</servlet-name>
  	<!-- Corresponding jar Packet path, fixed value -->
  	<servlet-class>org.springframework.web.servlet.DispatcherServlet</servlet-class>
  	<init-param>
  		<!-- Fixed configuration -->
  		<param-name>contextConfigLocation</param-name>
  		<!-- applicationContext.xml File path, classpath Express src Route -->
  		<param-value>classpath:applicationContext.xml</param-value>
  	</init-param>
  	<!-- Represent this servlet Load priority, the smaller the number, the higher the priority;
  	//In addition, the servlet loads at project startup, and if it does not, it executes at actual trigger time. -->
  	<load-on-startup>1</load-on-startup>
  </servlet>
  <servlet-mapping>
  	<!-- Value and servlet in servlet-name The values are consistent. -->
  	<servlet-name>mvctest</servlet-name>
  	<!-- Request type.doIt's the one that ends. servlet -->
  	<url-pattern>*.do</url-pattern>
  </servlet-mapping>

  <welcome-file-list>
    <welcome-file>index.html</welcome-file>
    <welcome-file>index.htm</welcome-file>
    <welcome-file>index.jsp</welcome-file>
    <welcome-file>default.html</welcome-file>
    <welcome-file>default.htm</welcome-file>
    <welcome-file>default.jsp</welcome-file>
  </welcome-file-list>
</web-app>
3. Sample jsp file: hello.jsp
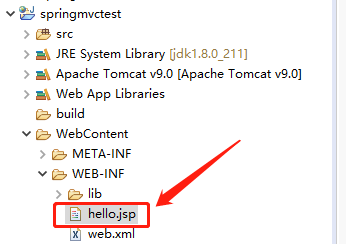
- New hello.jsp, path: WebContent/WEB-INF/hello.jsp
- hello.jsp
<%@ page language="java" contentType="text/html; charset=UTF-8"
    pageEncoding="UTF-8"%>
<!DOCTYPE html>
<html>
<head>
<meta charset="UTF-8">
<title>Insert title here</title>
</head>
<body>
	<h2>spring mvc Introduction examples</h2>
	<h3>${msg }</h3>
</body>
</html>
4. Writing Controller classes
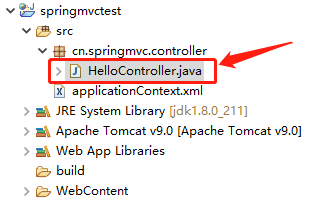
- New HelloController class, directory: cn/spring mvc/controller/HelloController.java
- The Controller class must inherit the Controller class
package cn.springmvc.controller;

import javax.servlet.http.HttpServletRequest;
import javax.servlet.http.HttpServletResponse;

import org.springframework.web.servlet.ModelAndView;
import org.springframework.web.servlet.mvc.Controller;
/**
 * controller Controller must be inherited
 * @author ZJ
 *
 */
public class HelloController implements Controller{

	@Override
	public ModelAndView handleRequest(HttpServletRequest request, HttpServletResponse respone) throws Exception {
//		ModelAndView mav = new ModelAndView();
//		mav.setViewName("hello"); set the view name and pass the return value of the class to the view named hello when it is called
		ModelAndView mav = new ModelAndView("hello");//The effect is the same when the above two steps are combined.
		mav.getModel().put("msg", "Pass a value to the page");
		return mav;
	}

}
5. Configure Handler Mapping in applicationContext.xml
<!-- To configure HandlerMapping,classThe path is jar Packet paths, and paths are not newline-->
<bean id="handlerMapping"
	class="org.springframework.web.servlet.handler.SimpleUrlHandlerMapping">
	<!-- name="mappings"Fixed value, immutable -->
	<property name="mappings">
		<props>
			<!-- key: request localhost:8080/springmvctest/hello.doMedium hello.do value: Controller Of id value -->
			<prop key="hello.do">helloController</prop>
		</props>
	</property>
</bean>
Configuring Controller in applicationContext.xml
<!-- To configure Controller -->
<bean id="helloController" class="cn.springmvc.controller.HelloController"></bean>
7. Configure ViewResolver in applicationContext.xml
<! -- Configure ViewResolver, the class path is the jar package path, and the path cannot be newline - >.
<bean id="viewResolver" class="org.springframework.web.servlet.view.InternalResourceViewResolver">
	<! - The first half of the view position - >
	<property name="prefix" value="/WEB-INF/"/>
	<! - View format - >
	<property name="suffix" value=".jsp"/>
</bean>
So far, we have been able to display hello pages through Spring MVC, and the effect is shown in the figure.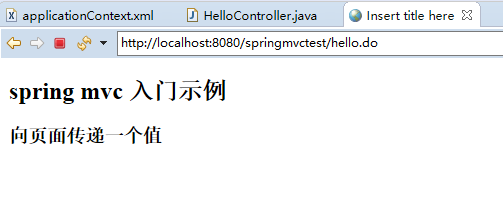
Here's how to use annotation configuration to achieve the above functions
New web project, introducing jar package, adding configuration file applicationContext.xml
Configuration of Dispatch Servlet
<?xml version="1.0" encoding="UTF-8"?>
<web-app xmlns:xsi="http://www.w3.org/2001/XMLSchema-instance" xmlns="http://xmlns.jcp.org/xml/ns/javaee" xsi:schemaLocation="http://xmlns.jcp.org/xml/ns/javaee http://xmlns.jcp.org/xml/ns/javaee/web-app_4_0.xsd" id="WebApp_ID" version="4.0">
  <display-name>springmvctest01</display-name>

  <servlet>
  	<servlet-name>springmvc</servlet-name>
  	<servlet-class>org.springframework.web.servlet.DispatcherServlet</servlet-class>
  	<init-param>
  		<param-name>contextConfigLocation</param-name>
  		<param-value>classpath:applicationContext.xml</param-value>
  	</init-param>
  	<load-on-startup>1</load-on-startup>
  </servlet>
  <servlet-mapping>
  	<servlet-name>springmvc</servlet-name>
  	<url-pattern>*.do</url-pattern>
  </servlet-mapping>

  <welcome-file-list>
    <welcome-file>index.html</welcome-file>
    <welcome-file>index.htm</welcome-file>
    <welcome-file>index.jsp</welcome-file>
    <welcome-file>default.html</welcome-file>
    <welcome-file>default.htm</welcome-file>
    <welcome-file>default.jsp</welcome-file>
  </welcome-file-list>
</web-app>
Configuring HandleMapping in applicationContext.xml
<!-- To configure HandleMapping -->
<mvc:annotation-driven/>
Configuring Controller in applicationContext.xml
<!-- To configure Controller -->
<context:component-scan base-package="cn.springmvc.controller"/>
4. Configure ViewResolver in applicationContext.xml
<!-- To configure ViewResolver -->
<bean id="viewResolver" class="org.springframework.web.servlet.view.InternalResourceViewResolver">
	<property name="prefix" value="/WEB-INF/"></property>
	<property name="suffix" value=".jsp"></property>
</bean>
5. Create hello.jsp
<%@ page language="java" contentType="text/html; charset=UTF-8"
    pageEncoding="UTF-8"%>
<!DOCTYPE html>
<html>
<head>
<meta charset="UTF-8">
<title>Insert title here</title>
</head>
<body>
	Spring MVC Annotated Edition
	${msg }
</body>
</html>
6. Creating Controller Classes
package cn.springmvc.controller;

import org.springframework.stereotype.Controller;
import org.springframework.web.bind.annotation.RequestMapping;
import org.springframework.web.servlet.ModelAndView;

@Controller
public class HelloController {

	@RequestMapping("/hello.do")
	public ModelAndView execute() {
		ModelAndView mav = new ModelAndView("hello");
		mav.getModel().put("msg", "Pass a value to the page");
		return mav;
	}
}
So far, hello pages are displayed through Spring MVC annotations, and the effect is shown in the figure.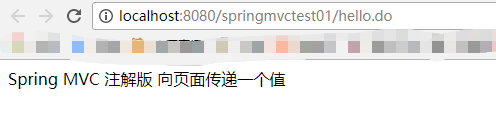
Here's how Controller receives request parameters
Create login.jsp with request parameters of username, password
<%@ page language="java" contentType="text/html; charset=UTF-8" pageEncoding="UTF-8"%> <!DOCTYPE html> <html> <head> </head> <body> <h2>User login</h2> <form action="checkLogin.do" method="post"> //User name:<input type="text" name="username"><br/> //dense Code:<input type="text" name="password"><br/> <input type="submit" value="Land"> </form> </body> </html>
Create ok.jsp
<%@ page language="java" contentType="text/html; charset=UTF-8"
    pageEncoding="UTF-8"%>
<!DOCTYPE html>
<html>
<head>
<meta charset="UTF-8">
<title>Insert title here</title>
</head>
<body>
	<h2>Successful landing</h2>
</body>
</html>
I. Through HttpServletRequest
Create LoginController.java
package cn.springmvc.controller;

import javax.servlet.http.HttpServletRequest;

import org.springframework.stereotype.Controller;
import org.springframework.web.bind.annotation.RequestMapping;

@Controller
public class LoginController {

	@RequestMapping("/checkLogin.do")
	//Receiving request parameters through HttpServletRequest
	public String checkLogin(HttpServletRequest request) {
		if("root".equals(request.getParameter("username"))
				&& "1234".equals(request.getParameter("password"))) {
			return "ok";
		}
		return "login";

	}
}
II. Using Business Method Parameters
The method parameter name is consistent with the request parameter key
Make use of @RequestParam("key")
package cn.springmvc.controller;

import javax.servlet.http.HttpServletRequest;

import org.springframework.stereotype.Controller;
import org.springframework.web.bind.annotation.RequestMapping;
import org.springframework.web.bind.annotation.RequestParam;

@Controller
public class LoginController {

	//With business method parameters, the method parameter name must be consistent with the key of the request parameter.
	//In case of inconsistency, you can use @RequestParam("key")
	@RequestMapping("/checkLogin1.do")
	public String checkLogin1(@RequestParam("username")String name, String password) {
		if("root".equals(name) && "1234".equals(password)) {
			return "ok";
		}
		return "login";
	}


}
3. Using Entity Object as Method Parameter
Create entity object User
package cn.springmvc.entity;

public class User {
	//Attributes must be consistent with request parameters
	private String username;
	private String password;
	public String getUsername() {
		return username;
	}
	public void setUsername(String username) {
		this.username = username;
	}
	public String getPassword() {
		return password;
	}
	public void setPassword(String password) {
		this.password = password;
	}

}
Create LoginController.java
package cn.springmvc.controller;

import javax.servlet.http.HttpServletRequest;

import org.springframework.stereotype.Controller;
import org.springframework.web.bind.annotation.RequestMapping;
import org.springframework.web.bind.annotation.RequestParam;

import cn.springmvc.entity.User;

@Controller
public class LoginController {
	//Using Entity Object as Method Parameter
	@RequestMapping("/checkLogin2.do")
	public String checkLogin(User user) {
		if("root".equals(user.getUsername()) && "1234".equals(user.getPassword())) {
			return "ok";
		}
		return "login";
	}

}
Suggestions for use:
A small number of parameters are used two.
A large number of parameters are used three.
If client form data is not format checked, non-string type parameters are recommended.
Here's how Controller passes values to the response JSP
ok.jsp
<%@ page language="java" contentType="text/html; charset=UTF-8"
    pageEncoding="UTF-8"%>
<!DOCTYPE html>
<html>
<head>
<meta charset="UTF-8">
<title>Insert title here</title>
</head>
<body>
controller towards jsp The passed value: ${msg }
	<h2>Successful landing</h2>
</body>
</html>
I. Utilizing HttpServletRequest
package cn.springmvc.controller;

import javax.servlet.http.HttpServletRequest;

import org.springframework.stereotype.Controller;
import org.springframework.web.bind.annotation.RequestMapping;
import org.springframework.web.bind.annotation.RequestParam;

import cn.springmvc.entity.User;

@Controller
public class LoginController {

	@RequestMapping("/checkLogin.do")
	//Receiving request parameters through HttpServletRequest
	public String checkLogin(HttpServletRequest request) {
		if("root".equals(request.getParameter("username"))
				&& "1234".equals(request.getParameter("password"))) {
			//Passing values to pages using HttpServletRequest
			request.setAttribute("msg", request.getParameter("username"));
			return "ok";

		}
		return "login";

	}

}
2. Using ModelAndView as the Return Value
package cn.springmvc.controller;

import javax.servlet.http.HttpServletRequest;

import org.springframework.stereotype.Controller;
import org.springframework.web.bind.annotation.RequestMapping;
import org.springframework.web.bind.annotation.RequestParam;
import org.springframework.web.servlet.ModelAndView;

import cn.springmvc.entity.User;

@Controller
public class LoginController {

	//Use ModelAndView as the return value to pass the value to the page
	@RequestMapping("/checkLogin3.do")
	public ModelAndView checkLogin(String username, String password) {
		ModelAndView mav = new ModelAndView();
		if("root".equals(username) && "1234".equals(password)) {
			mav.setViewName("ok");
			mav.getModel().put("msg", username);
		}else {
			mav.setViewName("login");
		}
		return mav;
	}

}
3. Using ModelMap Method Parameters
package cn.springmvc.controller;

import javax.servlet.http.HttpServletRequest;

import org.springframework.stereotype.Controller;
import org.springframework.web.bind.annotation.RequestMapping;
import org.springframework.web.bind.annotation.RequestParam;
import org.springframework.web.servlet.ModelAndView;
import org.springframework.ui.ModelMap;

import cn.springmvc.entity.User;

@Controller
public class LoginController {

	//Pass parameters to pages using ModelMap method parameters
	@RequestMapping("/checkLogin4.do")
	public String checkLogin4(String username, String password, ModelMap model) {
		if("root".equals(username) && "1234".equals(password)) {
			model.put("msg", username);
			return "ok";
		}
		return "login";
	}

}
4. Use session to save data
package cn.springmvc.controller;

import javax.servlet.http.HttpServletRequest;
import javax.servlet.http.HttpSession;

import org.springframework.stereotype.Controller;
import org.springframework.ui.ModelMap;
import org.springframework.web.bind.annotation.RequestMapping;
import org.springframework.web.bind.annotation.RequestParam;
import org.springframework.web.servlet.ModelAndView;

import cn.springmvc.entity.User;

@Controller
public class LoginController {

	//Use session to save data and pass parameters to pages
	@RequestMapping("/checkLogin4.do")
	public String checkLogin4(String username, String password, HttpSession session) {
		if("root".equals(username) && "1234".equals(password)) {
			session.setAttribute("msg", username);
			return "ok";
		}
		return "login";
	}

}
Exercise: List presentation
Create: ListController.java
package cn.springmvc.controller;

import java.util.ArrayList;
import java.util.List;

import org.springframework.stereotype.Controller;
import org.springframework.web.bind.annotation.RequestMapping;
import org.springframework.web.servlet.ModelAndView;

import cn.springmvc.entity.User;

@Controller
public class ListController {

	@RequestMapping("/list.do")
	public ModelAndView listShow() {
		List<User> list = new ArrayList<User>();
		for(int i=0;i<10;i++) {
			User user = new User();
			user.setUsername("root"+i);
			user.setPassword("0000"+i);
			list.add(user);
		}
		ModelAndView mav = new ModelAndView("list");
		mav.getModel().put("list", list);
		return mav;
	}
}
Create list.jsp,
Note: Use <%@ taglib uri=“ http://java.sun.com/jsp/jstl/core ” The prefix = "c"%> tag requires the introduction of jstl.jar, standard.jar under WEB-INF/lib
<%@ page language="java" contentType="text/html; charset=UTF-8" pageEncoding="UTF-8"%>
<%@ taglib uri="http://java.sun.com/jsp/jstl/core" prefix="c" %>
<!DOCTYPE html>
<html>
<head>
<meta charset="UTF-8">
<title>Insert title here</title>
</head>
<body>
	<h2>Membership list</h2>
	<table>
		<tr>
			<td>Full name</td>
			<td>Password</td>
		</tr>
		<c:forEach items="${list }" var="user">
			<tr>
				<td>${user.username }</td>
				<td>${user.password }</td>
			</tr>

		</c:forEach>

	</table>
</body>
</html>
Show the results: