1, SSH service
1.1 SSH Foundation
1.1.1 what is an SSH server?
- SSH (Secure Shell) is a secure channel protocol, which is mainly used to realize the functions of remote login and remote replication of character interface;
- SSH protocol encrypts the data transmission between the communication parties, including the user password entered when the user logs in;
- SSH is a security protocol based on application layer and transport layer. Compress the data to speed up the transmission speed.
1.1.2 advantages of SSH
- Data transmission is encrypted to prevent information leakage
- Data transmission is compressed, which can improve the transmission speed
1.1.3 common ssh protocols
Client: Linux Client: ssh, scp, sftp, slogin, Windows client: xshell,MobaXterm,putty, securecrt, sshsecureshellclient
OpenSSH is an open source software project to implement SSH protocol, which is applicable to various UNIX and Linux operating systems.
The Centos 7 system has installed the openssh related software package by default, and adds the sshd service as self startup.
Execute the "systemctl start sshd" command to start the sshd service
By default, the sshd service uses port 22 of TCP, and the security protocol version sshv2. In addition to 2, there is 1 (there is a vulnerability)
The default configuration file for the sshd service is / etc/ssh/sshd_config
ssh_config and sshd_config is the configuration file of ssh server. The difference between the two is that the former is the configuration file for the client and the latter is the configuration file for the server.
Service Name: sshd
 Server main program:/usr/sbin/sshd
Server configuration file:/etc/ssh/sshd_config
Client profile:/etc/ssh/ssh_configan>
1.2 SSH principle
1.2.1 public key transmission principle
-
Client initiated link request
-
The server returns its own public key and a session ID (in this step, the client gets the server's public key)
-
Client generated key pair
-
The client calculates a value Res with its own public key XOR session ID, and encrypts it with the public key of the server
-
The client sends the encrypted value to the server, and the server decrypts it with the private key to obtain Res
-
The server uses the decrypted value Res XOR session ID to calculate the client's public key (in this step, the server obtains the client's public key)
-
Finally: each party holds three secret keys, namely its own pair of public and private keys, and the other party's public key. All subsequent communications are secure
Will be encrypted
1.2.2 ssh encrypted communication principle
(1) Symmetric encryption
1. Concept
Using the encryption method of single key cryptosystem, the same key can be used for information encryption and decryption at the same time. This encryption method is called symmetric encryption. Because of its fast speed, symmetric encryption is usually used when the message sender needs to encrypt a large amount of data
2. Common algorithms
Common algorithms in symmetric encryption algorithms include DES, 3DES, TDEA, Blowfish, RC2, RC4, RC5, IDEA, SKIPJACK, etc.
3. Characteristics
1. The encryption party and the decryption party use the same key;
2. The speed of encryption and decryption is relatively fast, which is suitable for the use of long data;
3. The process of key transmission is not secure and easy to crack, and the key management is also troublesome;
4. Advantages and disadvantages
The advantages of symmetric encryption algorithm are open algorithm, small amount of calculation, fast encryption speed and high encryption efficiency.
The disadvantage of symmetric encryption algorithm is that before data transmission, the sender and receiver must agree on the secret key, and then both sides can save the secret key. Secondly, if one party's secret key is leaked, the encrypted information is not safe. In addition, every time a pair of users use a symmetric encryption algorithm, they need to use a unique secret key that others do not know, which will make the number of keys owned by the receiving and sending sides huge, and key management becomes a burden on both sides
(2) Asymmetric encryption
1. Concept
Asymmetric encryption algorithm requires two keys: public key (public key for short) and private key (private key for short). The public key and the private key are a pair. If the data is encrypted with the public key, only the corresponding private key can be decrypted. Because encryption and decryption use two different keys, this algorithm is called asymmetric encryption algorithm.
2. Common algorithms
RSA (RSA algorithm): the most widely used algorithm at present
DSA (Digital Signature Algorithm): Digital Signature Algorithm, which is different from RSA
It can only be used for digital signature, not data encryption and decryption. Its security is equivalent to RSA, but its performance is faster than RSA
ECC (Elliptic curve cryptography)
ECDSA: Elliptic Curve Digital Signature Algorithm, which is ECC and DSA
Compared with RSA algorithm, ECC can use smaller secret keys, higher efficiency and provide higher security
3. Principle
Firstly, SSH generates a key pair (public key and private key) at the client through the encryption algorithm. The public key is sent to the server and the private key is retained. If you want to connect to the ssh server with the public key, the client SSH software will send a request to the ssh server for security verification with the online user key. After the ssh server receives the request, it will first under the home directory of the user connected to the ssh server
5. Advantages and disadvantages
Compared with symmetric encryption technology, asymmetric encryption technology has better security, but its performance is slower.
In this experiment, we use the asymmetric encryption algorithm ECDSA for encryption. In order to facilitate the root user, it can also be configured for other ordinary users
1.2.2 login
#Login method 1:
ssh [Remote host user name]@[Remote server hostname or IP address] -p port

When in Linux Connect another computer remotely on the host Linux Host, such as the currently logged in user is
root It is also used when connecting to another host root When users log in, they can use it directly ssh
IP,The port can be used by default. If the port is not the default, it needs to be used-p Specify the port.

example:
[root@ky15 ~]#ssh root@192.168.91.101
#By default, 22 port root (the user who logs in to the other party) and IP address are used. When logging in for the first time, you will be asked and asked to enter a password
The authenticity of host '192.168.59.117(192.168.59.107)' can't be established.
ECDSA key fingerprint is SHA256:o72+YjT+8laQRofsv2dFlcx099aeoI92rloek3ZVrUY.
ECDSA key fingerprint is MD5:a7:9c:69:35:16:17:21:cb:0e:4f:0d:42:44:16:3a:f7.
Are you sure you want to continue connecting (yes/no)?
root@192.168.59.101's password:
Last login: Tue Sep 28 22:23:52 2021
[root@ky15-1 ~]#

#Login method 2
ssh -l [Remote host user name] [Remote server hostname or IP address] -p port
-l : -l Option to specify the login name.
-p: -p Option to specify the login port (required when the server port is not the default)-p Specify port for login)

example:
[root@ky15 ~]#ssh -l root 192.168.59.117
root@192.168.91.101's password:
Last login: Tue Sep 28 22:25:40 2021 from 192.168.59.102
1.2.3 server configuration
1. The sshd service supports login authentication
- Password verification:
Verify with the login name and password of the local system user in the server. This method is the easiest to use, but from the perspective of the client, the connected server may be counterfeited. From the perspective of the server, the defense ability is relatively weak when encountering a password brute force attack. - Key pair validation:
Matching key information is required to pass the verification. Usually, a pair of key files (public key and private key) are created in the client, and then the public key file is placed in the specified location in the server. During remote login, the system will use public key and private key for encryption / decryption Association verification, which enhances the security of remote management.- The public key and private key are generated in pairs. The two keys are different from each other and can be encrypted and decrypted;
- It is impossible to deduce another key from one password;
- The public key is made public, and the private key is known only to the holder of the private key.
2. Common configuration items based on key
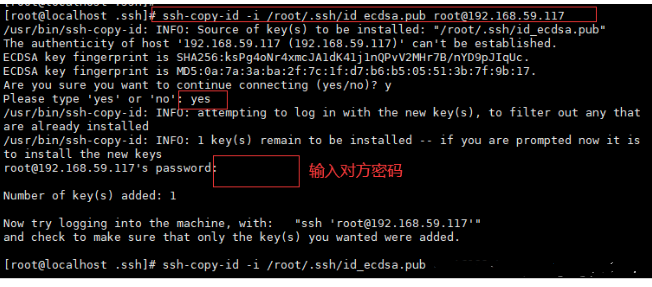
#Generate key file
[root@localhost ~]# ssh-keygen -t ecdsa
(If password free login is set, reset it, do not set the password, and press enter all the way)
#Import the public key file into the attention path of the opposite user
[root@localhost .ssh]# ssh-copy-id -i /root/.ssh/id_ecdsa.pub root@192.168.59.117

#Login client
1. Generate key file
[root@localhost ~]# ssh-keygen -t ecdsa
Generating public/private ecdsa key pair.
Enter file in which to save the key (/root/.ssh/id_ecdsa):
Created directory '/root/.ssh'.
Enter passphrase (empty for no passphrase):
Enter same passphrase again:
Your identification has been saved in /root/.ssh/id_ecdsa.
Your public key has been saved in /root/.ssh/id_ecdsa.pub.
The key fingerprint is:
SHA256:gzl0K6d+RkHeNUiGjS3uvvi3GwLxaf3DXDmgVlUmIIQ root@localhost.localdomain
The key's randomart image is:
+---[ECDSA 256]---+
|         O=...o.o|
|        E.+.o. o |
|      o+.o .o.   |
|     . *++.o . . |
|      *.S.+   +  |
|       Boo + . . |
|      .o. . =    |
|     . .+... .   |
|      o+oooo     |
+----[SHA256]-----+
[root@localhost ~]# ^C
[root@localhost ~]#
Generate file
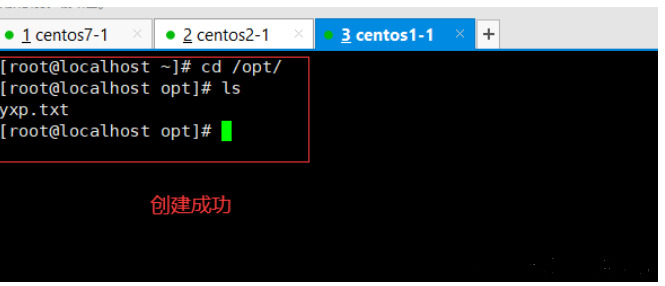
[root@localhost ~]# cd /root/.ssh/
[root@localhost .ssh]# ls
id_ecdsa  id_ecdsa.pub
[root@localhost .ssh]#
2. Import the public key file into the attention path of the opposite user
3. Log in to the client

1.3 lightweight automatic operation and maintenance tool pssh
-
Several automated operation and maintenance tools pssh are provided in the EPEL source: tools written in python that can execute commands on multiple servers, file replication, and ssh based
Multiple parallel tools for and scp, projects: http://code.google.com/p/parallel-ssh/
-
pdsh: Parallel remote shell program is a multi-threaded remote shell client that can execute commands on multiple remote hosts in parallel.
Several different remote shell services can be used, including rsh, Kerberos IV and ssh. Project: https://p
dsh.googlecode.com/ -
mussh: Multihost SSH wrapper is a shell script that allows commands to be executed over ssh on multiple hosts
Order. SSH agent and RSA/DSA key can be used to reduce password input. Items: http://www.sourceforge.net/pr
ojects/mussh
The pssh command options are as follows:
-H: Host string, content format "[user@]host[:port]"

-h file: Host list file, content format "[user@]host[:port]"

-A: Manual password entry mode

-i: Internal processing information output of each server

-l: Login user name -p: Number of concurrent threads [optional]

-o: Output file directory [optional]

-e: Error output file [optional]

-t: TIMEOUT Timeout setting, 0 unlimited [optional]

-O: SSH Options for

-P: Print out server return information

-v: Detailed mode

--version: View version
pssh configuration steps
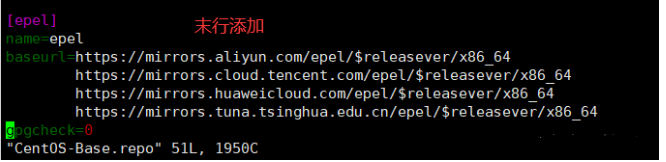
#You need to configure the power on source for installation
[root@localhost ~]## cd /etc/yum.repos.d
[root@localhost ~]## vim CentOS-Base.repo
#Add last line
[epel]
name=epel
baseurl=https://mirrors.aliyun.com/epel/$releasever/x86_64
https://mirrors.cloud.tencent.com/epel/$releasever/x86_64
https://mirrors.huaweicloud.com/epel/$releasever/x86_64
https://mirrors.tuna.tsinghua.edu.cn/epel/$releasever/x86_64
gpgcheck=0
#Clear cache
[root@localhost yum.repos.d]# yum clean all
#Install pssh
[root@localhost yum.repos.d]# yum install pssh -y
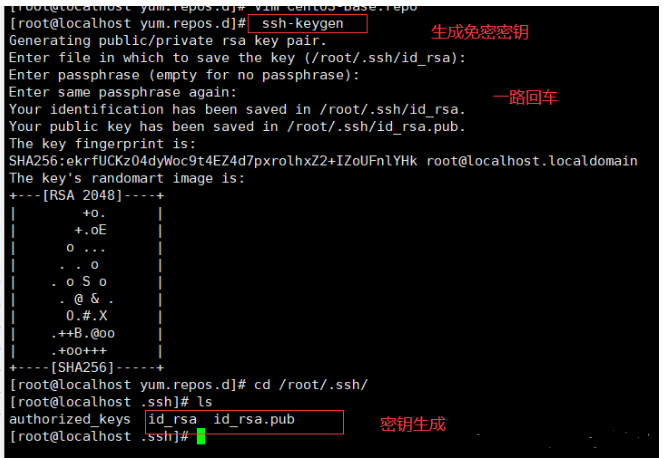
#Generate the key and press enter all the way
[root@localhost yum.repos.d]# ssh-keygen
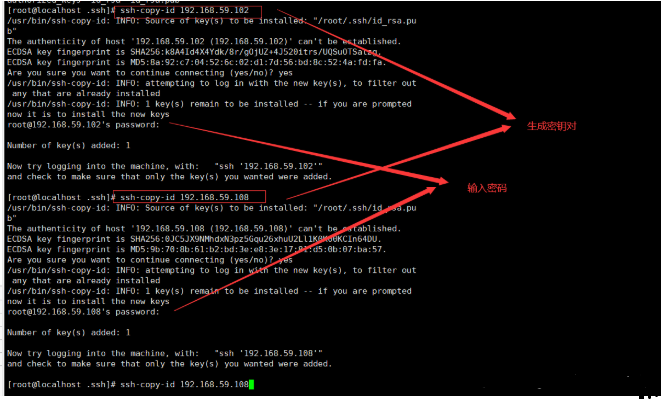
#Upload secret key pair
[root@localhost .ssh]# ssh-copy-id 192.168.59.102
[root@localhost .ssh]# ssh-copy-id 192.168.59.108
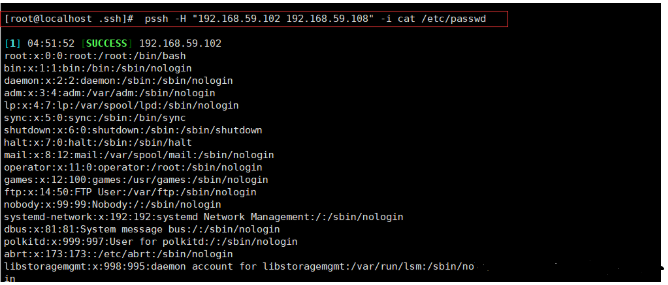
#Manage and view a file of multiple clients at the same time
[root@localhost .ssh]# pssh -H "192.168.59.102 192.168.59.108" -i cat /etc/passwd