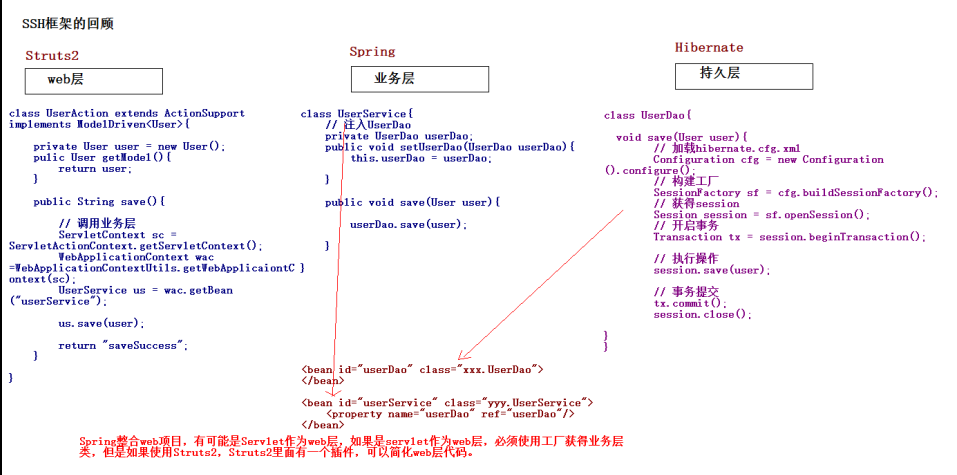
SSH Integration (Struts 2 + Spring + Hibernate)
SSH integration, Struts 2 as the web layer, Spring as the business layer, Hibernate as the persistence layer, the situation is roughly illustrated as follows:
1. Import the Jar package
The first step in integration is to create a web project and import the jar packages required by each of the three frameworks.
-
Struts2:
The basic package of Struts 2:
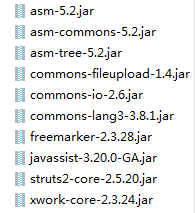
There are also special packages in Struts 2 that need to be noted:
// This package must be introduced when developing Struts 2 with annotations
 struts2-convention-plugin-2.3.24.jar --- annotation development kit for Struts2.

Struts 2-json-plugin-2.3.24.jar ---- Struts 2 integrated AJAX development kit.

// Introducing this package makes it easy to reference Service layer classes in the web tier
 Struts 2-spring-plugin-2.3.24.jar -- Struts 2's integrated Spring plug-in development kit.
-
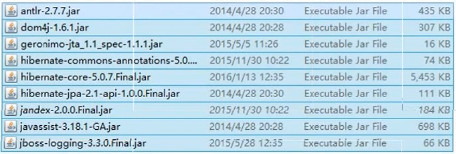
Hibernate:
Hibernate's basic package:
Mysql driver package:
Log Pack:
Using C3P0 Connection pool also requires Introduce C3P0 jar:
PS: Be careful: Struts 2 and Hibernate both Introduce a same jar package (javassist package). Delete one
-
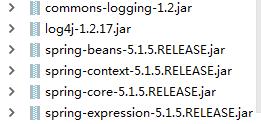
Spring:
IOC development:
AOP development: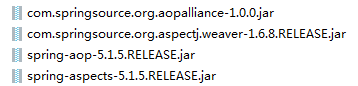
JDBC template development:
Transaction management:
Integrating web project development:
Integrated Unit Test Development:
Integrating hibernate development:
2. Introducing configuration files
- Struts2 configuration file
web.xml: Configure Struts2 Core Filter
<!--Struts2 Core filter-->
<filter>
    <filter-name>struts2</filter-name>
    <filter-class>org.apache.struts2.dispatcher.filter.StrutsPrepareAndExecuteFilter</filter-class>
</filter>

<filter-mapping>
    <filter-name>struts2</filter-name>
    <url-pattern>/*</url-pattern>
</filter-mapping>
struts.xml: Constants for configuring struts 2
<?xml version="1.0" encoding="UTF-8"?>

<!DOCTYPE struts PUBLIC
        "-//Apache Software Foundation//DTD Struts Configuration 2.5//EN"
        "http://struts.apache.org/dtds/struts-2.5.dtd">

<struts>
    <!--To configure struts2 Constant-->
    <constant name="struts.action.extension" value="action"/>
</struts>
-
Hibernate configuration file
hibernate.cfg.xml: Configure database connection and CP30 connection pool
<?xml version="1.0" encoding="UTF-8"?> <!DOCTYPE hibernate-configuration PUBLIC "-//Hibernate/Hibernate Configuration DTD 3.0//EN" "http://www.hibernate.org/dtd/hibernate-configuration-3.0.dtd"> <hibernate-configuration> <session-factory> <!-- Basic parameters for connecting database --> <property name="hibernate.connection.driver_class">com.mysql.cj.jdbc.Driver</property> <property name="hibernate.connection.url">jdbc:mysql://localhost:3306/an?characterEncoding=UTF-8&serverTimezone=UTC&useSSL=false</property> <!-- To configure Hibernate Dialect --> <property name="hibernate.dialect">org.hibernate.dialect.MySQLDialect</property> <property name="hibernate.connection.username">root</property> <property name="hibernate.connection.password">root</property> <!-- Optional configuration================ --> <!-- Printing SQL --> <property name="hibernate.show_sql">true</property> <!-- Format SQL --> <property name="hibernate.format_sql">true</property> <!-- Automatically create tables --> <property name="hibernate.hbm2ddl.auto">update</property> <!-- To configure C3P0 Connection pool --> <property name="connection.provider_class">org.hibernate.c3p0.internal.C3P0ConnectionProvider</property> <!--Minimum number of database connections available in connection pool --> <property name="c3p0.min_size">5</property> <!--Maximum number of database connections in connection pool --> <property name="c3p0.max_size">20</property> <!--Setting the expiration time of database connection,In seconds, If a database connection in the connection pool is idle longer than timeout time,It will be cleared from the connection pool --> <property name="c3p0.timeout">120</property> <!--Check free connections in all connection pools every 3000 seconds in seconds--> <property name="c3p0.idle_test_period">3000</property> <!-- Introducing mapping --> <mapping resource="ssh/domain/Customer.hbm.xml"/> </session-factory> </hibernate-configuration>
Mapping file:
- Spring configuration file
web.xml: Configure Spring's core listener, create a Spring factory at initialization, and store it in the ServletContext object
<! - Spring's core listener
<listener>
    <! -- When initialized, a Spring factory will be created and placed in the ServletContext object - >.
    <listener-class>org.springframework.web.context.ContextLoaderListener</listener-class>
</listener>

<! - Load Spring's configuration file path, defau lt load is / WEB-INF / applicationContext. XML - >.
<! - The contextConfigLocation property stores the loading path of the configuration file - > the
<context-param>
    <param-name>contextConfigLocation</param-name>
    <param-value>classpath:applicationContext.xml</param-value>
</context-param>
applicationContext.xml: Introducing a well-constrained configuration file
<?xml version="1.0" encoding="UTF-8"?>
<beans xmlns="http://www.springframework.org/schema/beans"
	xmlns:xsi="http://www.w3.org/2001/XMLSchema-instance"
	xmlns:context="http://www.springframework.org/schema/context"
	xmlns:aop="http://www.springframework.org/schema/aop"
	xmlns:tx="http://www.springframework.org/schema/tx"
	xsi:schemaLocation="http://www.springframework.org/schema/beans
	http://www.springframework.org/schema/beans/spring-beans.xsd
	http://www.springframework.org/schema/context
	http://www.springframework.org/schema/context/spring-context.xsd
	http://www.springframework.org/schema/aop
	http://www.springframework.org/schema/aop/spring-aop.xsd
	http://www.springframework.org/schema/tx
	http://www.springframework.org/schema/tx/spring-tx.xsd">

</beans>
Logging: log4j.properties
### direct log messages to stdout ###
log4j.appender.stdout=org.apache.log4j.ConsoleAppender
log4j.appender.stdout.Target=System.err
log4j.appender.stdout.layout=org.apache.log4j.PatternLayout
log4j.appender.stdout.layout.ConversionPattern=%d{ABSOLUTE} %5p %c{1}:%L - %m%n

### direct messages to file mylog.log ###
log4j.appender.logfile=org.apache.log4j.FileAppender
log4j.appender.logfile.File=target/spring.log
log4j.appender.logfile.layout=org.apache.log4j.PatternLayout
log4j.appender.logfile.layout.ConversionPattern=%d %p [%c] - %m%n

### set log levels - for more verbose logging change 'info' to 'debug' ###
# error warn info debug trace
log4j.rootLogger= info, stdout
3. Create package structure
According to the three-tier structure of MVC, the package structure is established:
dao: persistence layer; domain: model layer
service: business layer; web.action: web layer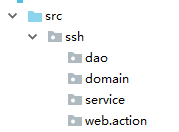
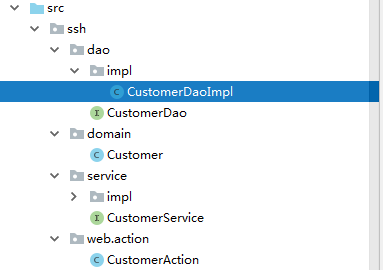
4. Create related classes
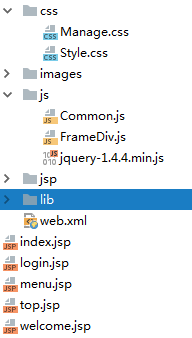
5. Introduce relevant pages
6.Spring integrates Strusts2 in one way: Action is created by Struts2 framework
Introducing plug-in packages: struts-spring-plugin.jar
Write the CustomerAction class and add a save d customer saving method:
public class CustomerAction extends ActionSupport implements ModelDriven<Customer> {
    //Model-driven objects
    private Customer customer = new Customer () ;
    @Override
    public Customer getModel() {
        return customer;
    }

    /*
    * How to save customers: save
    * */

    public String save(){
        System.out.println("Action Medium save Method executed....");
        return null;
    }
}
Configure Action in Struts.xml:
In order to increase security after version 2.3 of struts, access to methods has been added to action. If you want to use wildcard * to call methods, you need to add additional code, otherwise you will report inaccessible errors.
There are several solutions
- 1. Add < allowed-methods > label to action label
< allowed-methods>save< /allowed-methods>
< allowed-methods>Method 1, Method 2,...< /allowed-methods>
< allowed-methods >regex:*< /allowed-methods>
- 2. Add global-allowed-methods label to package label
< global-allowed-methods>regex:.*< /global-allowed-methods>
- 3. Add strict-method-invocation attribute to the package tag
strict-method-invocation="false"
<!--To configure action-->
<!--The first way is in package Add on strict-method-invocation="false"-->
<package name="SSH1" extends="struts-default" namespace="/"  strict-method-invocation="false">
    <!--The second way is in package Add in global-allowed-methods-->
    <!--<global-allowed-methods>regex:.*</global-allowed-methods>-->
    <action name="customer_*" class="ssh.web.action.CustomerAction" method="{1}">
        <!--The third way is in action Add in allowed-methods-->
        <!--<allowed-methods >regex:*</allowed-methods>-->
        <allowed-methods>save</allowed-methods>

    </action>

</package>
Introduce Service in Action:
- Traditional ways:
//If struts2 is not used in the web tier, the following way must be used to obtain the classes of the business tier
WebApplicationContext applicationContext = WebApplicationContextUtils.getWebApplicationContext(ServletActionContext.getServletContext());
CustomerService customerService = (CustomerService) applicationContext.getBean("customerService");
-
Integration of Spring and Struts2:
Introduce struts-spring-plugin.jar
There are the following sections in the plug-in package configuration file

This configuration opens a constant: simply opening this constant in Struts2 will cause the following constants to take effect: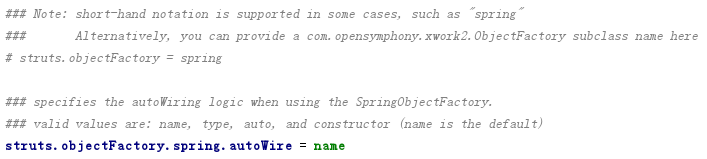
That is to start Spring's factory so that Action can automatically inject Service by name
So Service is handed over to spring to manage and configured in applicationContext.xml:
<!--To configure service-->
<bean id="customerService" class="ssh.service.impl.CustomerServiceImpl">

</bean>
Action injects Service, so write in Customer Action:
//    Injection service attribute
private CustomerService customerService;

public void setCustomerService(CustomerService customerService) {
    this.customerService = customerService;
}
And call the service method in the save method of CustomerAction:
public String save(){
    System.out.println("Action Medium save Method executed....");
    //Method of calling service
    customerService.save();
    return NONE;
	}
The results are as follows: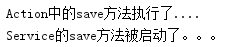
7.Spring Integration Struts 2 Mode 2: Action to Spring Management (Recommendation)
If the action is handed over to spring management, it will be convenient to use AOP to enhance the action in the future, because AOP can only enhance the bean s handed over to spring management.
First and foremost, plug-in packages need to be introduced.
-
Introducing plug-in packages: struts-spring-plugin.jar
-
Then give the action class to Spring management
In the configuration file applicationContext.xml
<!--take action Hand spring Administration-->
<bean id="customerAction" class="ssh.web.action.CustomerAction" scope="prototype">
	<property name="customerService" ref="customerService"/>
</bean>
Because action is handed over to spring management, we need to manually inject service.
PS: HIA should note that in spring, the bean s created are singleton by default, and our action requires multiple patterns, so we need to add scope= "prototype" attribute configuration.
-
Then configure struts.xml to point the class value in action to the id of the bean created in spring
Plug-in packages need to be introduced before they can be used in this way
<action name="customer_*" class="customerAction" method="{1}"></action>
8.Service calls Dao
- Deliver Dao to Spring Management
<!--To configure dao-->
<bean id="customerDao" class="ssh.dao.impl.CustomerDaoImpl">

</bean>
- At the same time, define a dao in Service and inject dao
ServiceImpl:
    private CustomerDao customerDao;

    public void setCustomerDao(CustomerDao customerDao) {
        this.customerDao = customerDao;
    }
applicationContext.xml:
<!--To configure service-->
<bean id="customerService" class="ssh.service.impl.CustomerServiceImpl">
	<property name="customerDao" ref="customerDao"/>
</bean>
9.Spring Integrates Hibernate Framework
- Create a table:customer
CREATE TABLE `customer` (
  `cust_id` bigint(32) NOT NULL AUTO_INCREMENT COMMENT 'Customer number(Primary key)',
  `cust_name` varchar(32) NOT NULL COMMENT 'Customer name(Corporate name)',
  `cust_source` varchar(32) DEFAULT NULL COMMENT 'Customer Information Sources',
  `cust_industry` varchar(32) DEFAULT NULL COMMENT 'Customer information',
  `cust_level` varchar(32) DEFAULT NULL COMMENT 'Customer level',
  `cust_phone` varchar(64) DEFAULT NULL COMMENT 'Fixed telephone',
  `cust_mobile` varchar(16) DEFAULT NULL COMMENT 'Mobile phone',
  PRIMARY KEY (`cust_id`)
) ENGINE=InnoDB AUTO_INCREMENT=1 DEFAULT CHARSET=utf8;
- Writing entities and mappings
Before compiling the mapping file, we need to configure the DataSource, that is, to establish the connection between the project and the database. The steps of establishing the connection refer to the original text in the link below and establish a hibernate project:
https://blog.csdn.net/sinat_18538231/article/details/77986020
When the connection between the project and the data is established.
Create a new mapping file of Customer.hbm.xml under the domian package, and establish the connection between tables and entity classes:
Customer.hbm.xml:
<?xml version="1.0" encoding="utf-8" ?>
<!DOCTYPE hibernate-mapping PUBLIC
        "-//Hibernate/Hibernate Mapping DTD 3.0//EN"
        "http://www.hibernate.org/dtd/hibernate-mapping-3.0.dtd">
<hibernate-mapping>
    <!-- Establishing Mapping Between Classes and Tables -->
    <class name="ssh.domain.Customer" table="customer">
        <!-- Establishing the correspondence between attributes in classes and primary keys in tables -->
        <id name="cust_id" column="cust_id" >
            <!-- Primary key generation strategy -->
            <generator class="native"/>
        </id>

        <!-- Establish the correspondence between common attributes and fields of tables in a class -->
        <property name="cust_name" column="cust_name"  />
        <property name="cust_source" column="cust_source" />
        <property name="cust_industry" column="cust_industry"/>
        <property name="cust_level" column="cust_level"/>
        <property name="cust_phone" column="cust_phone"/>
        <property name="cust_mobile" column="cust_mobile"/>
    </class>
</hibernate-mapping>
At the same time, add mapping in Hibernate configuration file, hibernate.cfg.xml:
<!-- Introducing mapping -->
<mapping resource="ssh/domain/Customer.hbm.xml"/>
- Integration of Spring and Hibernate
In Spring's configuration file, introduce Hibernate's configuration information
<!--spring integration hibernate-->
<!--Introduce hibernate Configuration information-->
<bean id="sessionFactory" class="org.springframework.orm.hibernate5.LocalSessionFactoryBean">
	<!--Introduce hibernate Configuration file-->
	<property name="configLocation" value="classpath:hibernate.cfg.xml"></property>
</bean>
After integrating Spring with Hibernate, Spring provides a Hibernate template class to simplify Hibernate development.
Rewrite DAO to inherit Hibernate DaoSupport:
public class CustomerDaoImpl extends HibernateDaoSupport implements CustomerDao {
    @Override
    public void save() {
        System.out.println("dao Medium save Method is called...");
    }
}
Since Dao inherits Hibernate DaoSupport, the SessionFactory attribute is injected directly into Dao when configuring.
Injecting session Factory automatically creates a Hibernate template, written in the setsession Factory method in the Hibernate DaoSupport source code.
<!--To configure dao-->
<bean id="customerDao" class="ssh.dao.impl.CustomerDaoImpl">
	<property name="sessionFactory" ref="sessionFactory"/>
</bean>
Finally, we use hibernate template to complete the saving operation in dao
10. Configure spring's transaction management
Configure the transaction manager in the spring configuration file:
- Configuring Transaction Manager
<! - Configure the transaction manager - >
<bean id="transactionManager" class="org.springframework.orm.hibernate5.HibernateTransactionManager">
	<! - To open a transaction, you need to get a connection, similar to DataSource's connection pool, sessionFactory - >.
	<property name="sessionFactory" ref="sessionFactory"/>
</bean>
- Open annotated transactions
<! - Open annotated business - > Open annotated business
<tx:annotation-driven transaction-manager="transactionManager"/>
- Use annotated transactions in business-level services
@Transactional
public class CustomerServiceImpl implements CustomerService {
}
summary
SSH Framework Integration Mode 1: Summary of steps with hibernate configuration file
-
Create projects and introduce jar packages for the three main frameworks of SSH
-
Introduce three framework configuration files (application Context. xml, struts.xml, hibernate.cfg.xml)
-
Create package structure
-
Create related classes
-
Import page
-
Write Action, configure Action
-
Write Service and submit it to Sprign Management
-
Integration of Spring and Struts 2: Action is created by Struts 2
- Introduce a plug-in package: struts2-spring-plugin-2.3.24.jar
- set Method for Providing Service in Action
-
Integration of Spring and Strust 2: Action is handed over to Spring to create
-
Introduce a plug-in package: struts2-spring-plugin-2.3.24.jar
-
Configure Action into Spring
-
When configuring the class of Action in struts 2, the class is written with the id of Spring Action's class.
-
Be careful:
- Action s are multiple examples. To set up in the bean tag, scope= "prototype"
- Manual injection of Srevice
-
-
Service calls Dao
-
Spring integrates hibernate
- Write Dao to inherit Hibernate DaoSupport
- Writing hibernate template
-
Spring's transaction management configuration
Delay Loading Solution: Turn Session on and off at the web layer.