preface
The image with low resolution caused by enlargement and reduction is converted into an image with high resolution. More attention is paid to filling new pixels in the process of reconstructing the picture. SRCNN is also the ancestor of applying deep learning to image reconstruction. The network structure is very simple, so I decided to reproduce it.
Code link: https://github.com/jiantenggei/SRCNN-Keras (including all resources)
1, SRCNN
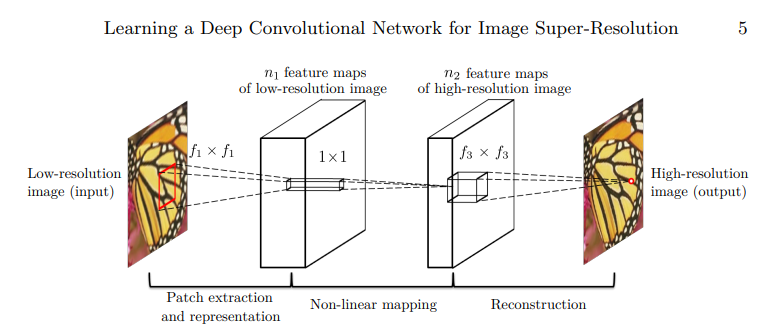
The network structure of SRCNN is particularly simple. First, a low-resolution image is used as the input, and after two convolutions, it is restored to a high-quality image. In the network convolution operation, the size of the characteristic image is consistent with that of the reconstructed image. And there is no linear connection in the network. There are only three layers of convolution ~.
2, SRCNN implementation
Firstly, the training and testing process of SRCNN network is briefly described here:
1. First reduce the picture, then enlarge it, and make an unclear picture as training data
2. Use the untreated original picture as the label during training.
3. Put pictures and labels into the network for training.
4. When testing the model, input an unclear picture into the trained network, and calculate the peak signal-to-noise ratio between the generated picture and the unclear picture.
1. Model construction
The code is as follows:
from keras.models import Sequential, model_from_json
from keras.layers.convolutional import Conv2D
from keras.layers.core import Activation


def built_model(input_shape=(33, 33, 1)):
    model = Sequential()
    model.add(Conv2D(filters=64, kernel_size=9,
                    padding='same', input_shape=input_shape))
    model.add(Activation('relu'))
    model.add(Conv2D(32, 1, padding='same'))
    model.add(Activation('relu'))
    model.add(Conv2D(input_shape[2], 5, padding='same'))
    return model

if __name__ == '__main__':
    model = built_model()
    model.summary()
The last layer restores the image from the multi-channel feature map to be consistent with the input channel.
2. Generate training data
1. First reduce the picture, then enlarge it, and make an unclear picture as training data
2. Use the untreated original picture as the label during training.
The code is as follows:
def load_train(image_size=33, stride=33, scale=3,dirname=r'dataset\train'):
    dir_list = os.listdir(dirname)
    images = [cv2.cvtColor(cv2.imread(os.path.join(dirname,img)),cv2.COLOR_BGR2GRAY) for img in dir_list]
    #==========================
    #Here, it is determined whether the sampling step can be divided
    #=========================
    images = [img[0:img.shape[0]-np.remainder(img.shape[0],scale),0:img.shape[1]-np.remainder(img.shape[1],scale)] for img in images]

    trains = images.copy()
    labels = images.copy()
    #========================================
    #Reduce and enlarge the train image to produce an unclear image
    #========================================
    trains = [cv2.resize(img, None, fx=1/scale, fy=1/scale, interpolation=cv2.INTER_CUBIC) for img in trains]
    trains = [cv2.resize(img, None, fx=scale/1, fy=scale/1, interpolation=cv2.INTER_CUBIC) for img in trains]

    sub_trains = []
    sub_labels = []

    #========================================
    # Label and training data are formed by sampling,
    # Through sampling, a picture can be divided into many image blocks as training data to enrich the samples
    #========================================
    for train, label in zip(trains, labels):
        v, h = train.shape
        print(train.shape)
        for x in range(0,v-image_size+1,stride):
            for y in range(0,h-image_size+1,stride):
                sub_train = train[x:x+image_size,y:y+image_size]
                sub_label = label[x:x+image_size,y:y+image_size]
                sub_train = sub_train.reshape(image_size,image_size,1)
                sub_label = sub_label.reshape(image_size,image_size,1)
                sub_trains.append(sub_train)
                sub_labels.append(sub_label)
    #========================================
    #Encoded as numpy array
    #========================================
    sub_trains = np.array(sub_trains)
    sub_labels = np.array(sub_labels)
    return sub_trains, sub_labels

def load_test(scale=3,dirname=r'dataset\test'):
    #========================================
    # Test data is generated in the same way as training data
    # pre_tests is used to save the reduced image
    #========================================
    dir_list = os.listdir(dirname)
    images = [cv2.cvtColor(cv2.imread(os.path.join(dirname,img)),cv2.COLOR_BGR2GRAY) for img in dir_list]
    images = [img[0:img.shape[0]-np.remainder(img.shape[0],scale),0:img.shape[1]-np.remainder(img.shape[1],scale)] for img in images]

    tests = images.copy()
    labels = images.copy()

    pre_tests = [cv2.resize(img, None, fx=1/scale, fy=1/scale, interpolation=cv2.INTER_CUBIC) for img in tests]
    tests = [cv2.resize(img, None, fx=scale/1, fy=scale/1, interpolation=cv2.INTER_CUBIC) for img in pre_tests]

    pre_tests = [img.reshape(img.shape[0],img.shape[1],1) for img in pre_tests]
    tests = [img.reshape(img.shape[0],img.shape[1],1) for img in tests]
    labels = [img.reshape(img.shape[0],img.shape[1],1) for img in labels]

    return pre_tests, tests, labels
Note: the sampling process (three for training places) in the code is to intercept a picture and small areas, so that one picture can generate multiple data to make up for the shortage of training samples.
3. Training process:
The code is as follows:
from tensorflow.python.keras.saving.model_config import model_from_config
from model import built_model
from utils import load_train
from keras.optimizers import Adam

def train():
    # ==========================
    # input_shape input picture size
    # Stripe original picture sampling interval
    # batch_size epochs learning_rate
    #============================
    input_shape = (33, 33, 1)
    stride = 14
    batch_size = 64
    epochs=100
    learning_rate=0.001

    # Define model
    srcnn_model = built_model(input_shape=input_shape)
    srcnn_model.load_weights(r'model\srcnn_weight.hdf5')
    srcnn_model.summary()

    # Load data
    X_train, Y_train = load_train(image_size=input_shape[0], stride=stride)
    print(X_train.shape, Y_train.shape)
    optimizer = Adam(lr=learning_rate)
    srcnn_model.compile(optimizer=optimizer, loss='mean_squared_error', metrics=['accuracy'])
    srcnn_model.fit(X_train,Y_train,epochs=epochs,batch_size=batch_size)
    srcnn_model.save(r'model/srcnn.h5')

if __name__ == '__main__':
    train()
The mean square deviation is used to calculate the loss here, because the input and output are pictures of the same size ~ but with different resolutions.
4. Test process
The code is as follows:
from model import built_model
import os
from utils import load_test,psnr
import cv2
def test():
    input_shape = (None, None, 1)
    scale = 3
    srcnn_model = built_model(input_shape=input_shape)
    srcnn_model.load_weights(r'model\srcnn_weight.hdf5')

    X_pre_test, X_test, Y_test = load_test(scale=scale)

    predicted_list = []

    for img in X_test:
        img = img.reshape(1,img.shape[0],img.shape[1],1)
        predicted=srcnn_model.predict(img)
        predicted_list.append(predicted.reshape(predicted.shape[1],predicted.shape[2],1))
    n_img = len(predicted_list)
    dirname = './result'
    for i in range(n_img):
        imgname = 'image{:02}'.format(i)
        cv2.imwrite(os.path.join(dirname,imgname+'_original.bmp'), X_pre_test[i])
        cv2.imwrite(os.path.join(dirname,imgname+'_input.bmp'), X_test[i])
        cv2.imwrite(os.path.join(dirname,imgname+'_answer.bmp'), Y_test[i])
        cv2.imwrite(os.path.join(dirname,imgname+'_predicted.bmp'), predicted_list[i])
          # Calculate peak signal-to-noise ratio
        answer = psnr(X_test[i],predicted_list[i])
        print(imgname+"_psnr:",answer)

if __name__ == '__main__':
    test()
X_test stores unclear pictures, which are used to calculate the peak signal-to-noise ratio with the prediction results.
summary
Various networks have different functions, different ways of feeding data and different ways of calculating losses~