In the actual development, it is often unavoidable to operate the database on the interface. For example, to develop a shopping cart, we need to display the goods in the shopping cart in the form of a list, and we also need to add, delete and check the goods in the shopping cart. To achieve these functions, you need to use ListView and SQLLite databases. Next, we use a case of "commodity display" to realize the operation of database on the interface.
listview and adapterde Usage Reference Address: http://www.cnblogs.com/zhengbeibei/archive/2013/05/14/3078805.html
Use reference address of SQLite database: http://blog.csdn.net/xushuaic/article/details/8170614
1. Create programs
First, create an application called "Merchandise Show". Add three TextView s to display the id, name and amount of a data in the database. Three ImageView s are used to increase the amount, reduce the amount and delete the data. Designing user interface as follows: 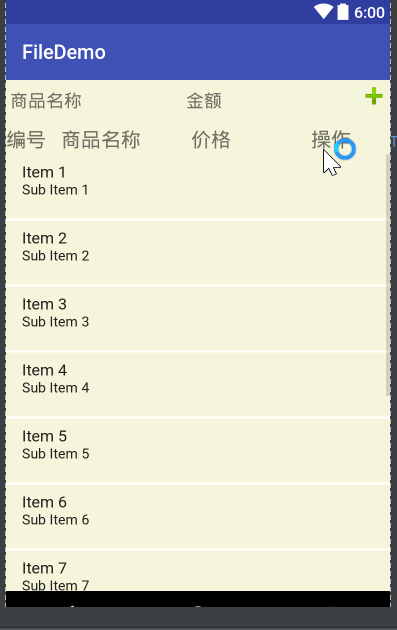
The layout file (activity_main.xml) corresponding to the graph is as follows:
<?xml version="1.0" encoding="utf-8"?>
<RelativeLayout xmlns:android="http://schemas.android.com/apk/res/android"
    android:layout_width="match_parent"
    android:layout_height="match_parent"
    android:background="#f5f5dc">
    <LinearLayout
        android:id="@+id/LL"
        android:layout_width="match_parent"
        android:layout_height="wrap_content"
        android:orientation="horizontal">

        <EditText
            android:layout_width="0dp"
            android:layout_height="wrap_content"
            android:layout_weight="1"
            android:hint="Name of commodity"
            android:id="@+id/name"/>
        <EditText
            android:layout_width="0dp"
            android:layout_height="wrap_content"
            android:layout_weight="1"
            android:hint="Amount of money"
            android:id="@+id/price"/>
        <ImageView
            android:id="@+id/addAccount"
            android:layout_width="wrap_content"
            android:layout_height="wrap_content"
            android:src="@android:drawable/ic_input_add"/>
    </LinearLayout>
    <LinearLayout
        android:id="@+id/LL2"
        android:layout_below="@id/LL"
        android:layout_width="match_parent"
        android:layout_height="wrap_content"
        android:layout_marginTop="5dp"
        android:layout_marginBottom="3dp">
    <TextView
        android:layout_width="wrap_content"
        android:layout_height="wrap_content"
        android:text="number"
        android:textSize="20dp" />
    <TextView
        android:layout_width="wrap_content"
        android:layout_height="wrap_content"
        android:text="Name of commodity"
        android:textSize="20dp"
        android:layout_marginLeft="15dp"/>
    <TextView
        android:layout_width="wrap_content"
        android:layout_height="wrap_content"
        android:text="Price"
        android:textSize="20dp"
        android:layout_marginLeft="50dp"/>
    <TextView
        android:layout_width="wrap_content"
        android:layout_height="wrap_content"
        android:text="operation"
        android:textSize="20dp"
        android:layout_marginLeft="80dp"/>
    </LinearLayout>

    <ListView
        android:id="@+id/display"
        android:layout_width="wrap_content"
        android:layout_height="wrap_content"
        android:fadeScrollbars="false"
        android:divider="#FFFFFF"
        android:dividerHeight="2dp"
        android:layout_below="@+id/LL2" />

</RelativeLayout>
2. Create the ListView Item layout
Create an item.xml file in the res/layout directory and write it as an interface as shown in the figure: 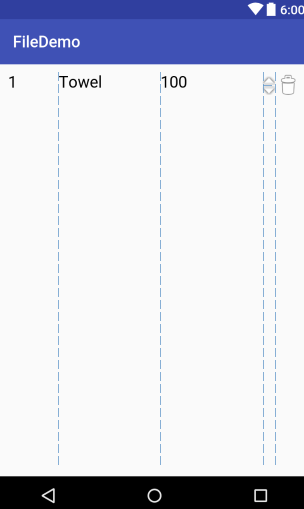
The code is as follows:
 <?xml version="1.0" encoding="utf-8"?>
<LinearLayout xmlns:android="http://schemas.android.com/apk/res/android"
    android:layout_width="match_parent"
    android:layout_height="match_parent"
    android:orientation="horizontal"
    android:layout_margin="10dp">
    <TextView
        android:id="@+id/idTV"
        android:layout_width="0dp"
        android:layout_height="wrap_content"
        android:layout_weight="1"
        android:text="1"
        android:textColor="#000000"
        android:textSize="20sp"
        />
    <TextView
        android:id="@+id/nameTV"
        android:layout_width="0dp"
        android:layout_height="wrap_content"
        android:layout_weight="2"
        android:text="Towel"
        android:textColor="#000000"
        android:textSize="20sp"
        />
    <TextView
        android:id="@+id/priceTV"
        android:layout_width="0dp"
        android:layout_height="wrap_content"
        android:layout_weight="2"
        android:text="100"
        android:textColor="#000000"
        android:textSize="20sp"
        />
    <LinearLayout
        android:layout_width="wrap_content"
        android:layout_height="wrap_content"
        android:orientation="vertical"
        android:layout_marginTop="5dp">
        <ImageView
            android:id="@+id/up"
            android:layout_width="wrap_content"
            android:layout_height="wrap_content"
            android:src="@android:drawable/arrow_up_float"/>
        <ImageView
            android:id="@+id/down"
            android:layout_width="wrap_content"
            android:layout_height="wrap_content"
            android:src="@android:drawable/arrow_down_float"/>

    </LinearLayout>
    <ImageView
        android:id="@+id/delete"
        android:layout_width="wrap_content"
        android:layout_height="wrap_content"
        android:src="@android:drawable/ic_menu_delete"/>
</LinearLayout>
3. Create a database
Creating a database is a data operation, so create a package called model.
In this package, we define a class that inherits from SQLiteOpenHelper. The code is as follows:
package bzu.edu.cn.filedemo.model;

import android.content.Context;
import android.database.sqlite.SQLiteDatabase;
import android.database.sqlite.SQLiteOpenHelper;
import android.util.Log;

/**
 * Created by yn on 2017/4/17.
 */

public class AccountDB extends SQLiteOpenHelper{
    public  Context context;
    public static final String DB_NAME="Account.db";
    public static final String ACCOUNT="create table account(id integer primary key autoincrement,name text,balance integer)";
    public AccountDB(Context context) {
        super(context, DB_NAME, null, 1);
        this.context=context;
    }

    @Override
    public void onCreate(SQLiteDatabase db) {
            Log.d("AccountDB","Successful database creation");
            db.execSQL(ACCOUNT);
    }

    @Override
    public void onUpgrade(SQLiteDatabase db, int oldVersion, int newVersion) {

    }
}
4. Create Account class
It is more convenient to store data in a JavaBean object when operating a database.
So define a class Account under the model package, code as follows:
package bzu.edu.cn.filedemo.model;

/**
 * Created by yn on 2017/4/17.
 */

public class Account {
    private long id;
    private String name;
    private Integer balance;

    public Account() {}

    public Account(String name, Integer balance) {
        this.name = name;
        this.balance = balance;
    }

    public Account(long id, String name, Integer balance) {
        this.id = id;
        this.name = name;
        this.balance = balance;
    }

    public long getId() {
        return id;
    }

    public void setId(long id) {
        this.id = id;
    }

    public String getName() {
        return name;
    }

    public void setName(String name) {
        this.name = name;
    }

    public Integer getBalance() {
        return balance;
    }

    public void setBalance(Integer balance) {
        this.balance = balance;
    }

    @Override
    public String toString() {
        return
                "[number:" + id +
                ", Name of commodity:" + name +
                ", Price:" + balance +
                "]";
    }
}
5. Create logical classes for data manipulation
Create an AccountDao class under the model package to manipulate data to add, delete, modify and check the database. The code is as follows:
package bzu.edu.cn.filedemo.model;

import android.content.ContentValues;
import android.content.Context;
import android.database.Cursor;
import android.database.sqlite.SQLiteDatabase;

import java.util.ArrayList;
import java.util.List;

/**
 * Created by yn on 2017/4/17.
 */

public class AccountDao {
    private AccountDB accountDB;

    public AccountDao(Context context){
        accountDB=new AccountDB(context);
    }
   //insert data
    public void insert(Account account){
        //Getting database objects
        SQLiteDatabase sqLiteDatabase=accountDB.getWritableDatabase();
        ContentValues values=new ContentValues();   //Map for loading data to be inserted
        values.put("name",account.getName());
        values.put("balance",account.getBalance());
        long id=sqLiteDatabase.insert("account",null,values);
        account.setId(id);
    }
    //Query all data
    public List<Account> querryAll(){
        SQLiteDatabase sqLiteDatabase=accountDB.getReadableDatabase();
        Cursor cursor=sqLiteDatabase.query("account",null,null,null,null,null,null);
        List<Account> list=new ArrayList<Account>();
        if(cursor.moveToFirst()) {
                do{
                    long id=cursor.getLong(cursor.getColumnIndex("id"));
                    String name=cursor.getString(1);
                    int balance=cursor.getInt(2);
                    list.add(new Account(id,name,balance));
                }while(cursor.moveToNext());
        }
        return list;
    }

    //Modify data
    public int update(Account account){
        SQLiteDatabase sqLiteDatabase=accountDB.getWritableDatabase();
        ContentValues values=new ContentValues();
        values.put("name",account.getName());
        values.put("balance",account.getBalance());
        int count=sqLiteDatabase.update("account",values,"id=?",new String[]{account.getId()+""});
        return count;
    }
    //Delete data according to id
    public int delete(long id){
        SQLiteDatabase sqLiteDatabase=accountDB.getWritableDatabase();
        int count=sqLiteDatabase.delete("account","id=?",new String[]{id+""});
        return count;
    }
}
6. Write MainActivity
To display the data in the database in the form of ListView on the interface, it is necessary to adapt the data of ListView.
If the LIstView is not adapted to data, then you cannot see the ListView created by the layout file on the interface.
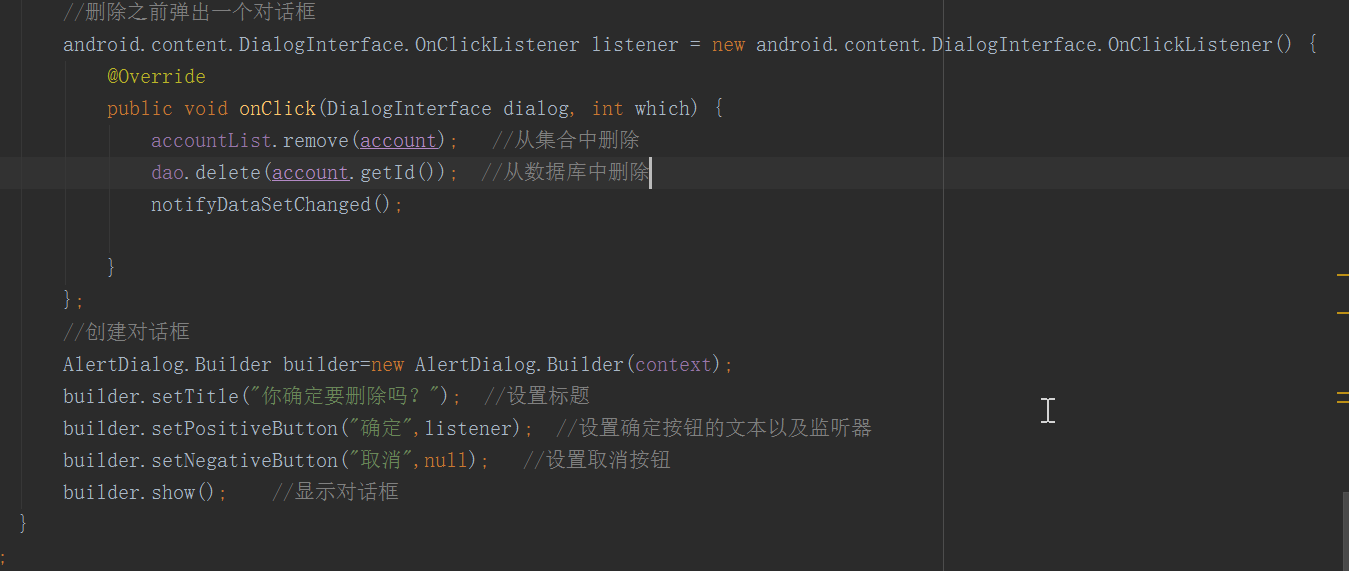
A dialog box is used in the program. When clicking on the delete icon, a dialog box pops up. Click events are also set for each line in ListView.
The specific code is as follows:
package bzu.edu.cn.filedemo;

import android.app.AlertDialog;
import android.content.Context;
import android.content.DialogInterface;
import android.support.annotation.NonNull;
import android.support.v7.app.AppCompatActivity;
import android.os.Bundle;
import android.view.LayoutInflater;
import android.view.View;
import android.view.ViewGroup;
import android.widget.AdapterView;
import android.widget.ArrayAdapter;
import android.widget.ImageView;
import android.widget.ListView;
import android.widget.TextView;
import android.widget.Toast;

import java.util.ArrayList;
import java.util.List;

import bzu.edu.cn.filedemo.model.Account;

import bzu.edu.cn.filedemo.model.AccountDao;

public class Main4Activity extends AppCompatActivity {
    private TextView name, account;
    private ImageView iv;
    private ListView lv;
    AccountArray accountArray;
    private List<Account> accountList;
    //private AccountDB accountDB;
    private AccountDao dao;

    @Override
    protected void onCreate(Bundle savedInstanceState) {
        super.onCreate(savedInstanceState);
        setContentView(R.layout.activity_main4);

        //Find the controls we need
        name = (TextView) findViewById(R.id.name);
        account = (TextView) findViewById(R.id.price);
        iv = (ImageView) findViewById(R.id.addAccount);
        lv = (ListView) findViewById(R.id.display);

        //Add listen events, listen for item click events
        lv.setOnItemClickListener(new AdapterView.OnItemClickListener() {
            @Override
            public void onItemClick(AdapterView<?> parent, View view, int position, long id) {
                //Get the data on the click position
                Account account=(Account)parent.getItemAtPosition(position);
                Toast.makeText(Main4Activity.this,account.toString(),Toast.LENGTH_LONG).show();
            }
        });
        //Instantiate AccountDao
        dao = new AccountDao(this);
        //Invoke method to query all data
        selectAccount();
        //Click events for ImageView
        iv.setOnClickListener(new View.OnClickListener() {
            @Override
            public void onClick(View v) {
                addAccount();
                selectAccount();
            }
        });
    }

    //Add a data
    private void addAccount() {
        String name1 = name.getText().toString();
        String price = account.getText().toString();
        accountList = new ArrayList<>();
        //Check whether the name and price of the commodity are empty
        if(name1.equals("")&&price.equals("")){
            Toast.makeText(this,"Please enter the name and price of the product.",Toast.LENGTH_LONG).show();
        }
        else {
            //If balance is not an empty string, type conversion is performed
            Account a = new Account(name1, price.equals("") ? 0 : Integer.parseInt(price));
            dao.insert(a);     //insert database
            accountList.add(a);    //Insert Sets
        }
        name.setText("");
        account.setText("");
    }

    //Query the data and display it on ListView
    private void selectAccount() {
        accountList = dao.querryAll();   //Query out all data from the database
        //Add an adapter to ListView
        accountArray = new AccountArray(Main4Activity.this, R.layout.shop_item, accountList);
        lv.setAdapter(accountArray);
    }

    //Customize an adapter
    public class AccountArray extends ArrayAdapter<Account> {
        //private TextView id,name,price;
        private int resourseId;
        private Context context;
       // private AccountDao dao;
        //List<Account> list;

        public AccountArray(Context context, int resource, List<Account> list) {
            super(context, resource, list);
            resourseId=resource;
            //this.list=list;
            this.context=context;
        }
        @NonNull
        @Override
        public View getView(int position, View convertView, ViewGroup parent) {
            //Obtain the Account object from the current location
            final Account account=getItem(position);
            View view;
            ViewHolder viewHolder;
            //ListView optimization
            if(convertView==null){
                view= LayoutInflater.from(getContext()).inflate(resourseId,parent,false);
                viewHolder=new ViewHolder();
                viewHolder.id=(TextView)view.findViewById(R.id.idTV);
                viewHolder.name=(TextView)view.findViewById(R.id.nameTV);
                viewHolder.price=(TextView)view.findViewById(R.id.priceTV);
                view.setTag(viewHolder);    //Store viewHolder in view
            }else{
                view=convertView;
                viewHolder=(ViewHolder)view.getTag();   //Retrieve viewHolder
            }
            viewHolder.id.setText(account.getId()+"");
            viewHolder.name.setText(account.getName());
            viewHolder.price.setText(account.getBalance()+"");
             //Get control
            ImageView up=(ImageView)view.findViewById(R.id.up);
            ImageView down=(ImageView)view.findViewById(R.id.down);
            ImageView delete=(ImageView)view.findViewById(R.id.delete);
            //Click events on the up arrow
            up.setOnClickListener(new View.OnClickListener() {
                @Override
                public void onClick(View v) {
                    account.setBalance(account.getBalance() + 1);   //Modified values
                    dao.update(account);     //Update database
                    notifyDataSetChanged();    //Refresh interface
                }
            });

            //Down arrow click event
            down.setOnClickListener(new View.OnClickListener() {
                @Override
                public void onClick(View v) {
                    account.setBalance(account.getBalance()-1);
                    dao.update(account);
                    notifyDataSetChanged();
                }
            });

            //Deleted click events
            delete.setOnClickListener(new View.OnClickListener() {
                @Override
                public void onClick(View v) {
                    //A dialog box pops up before deleting
                    android.content.DialogInterface.OnClickListener listener = new android.content.DialogInterface.OnClickListener() {
                        @Override
                        public void onClick(DialogInterface dialog, int which) {
                            accountList.remove(account);
                            dao.delete(account.getId());
                            notifyDataSetChanged();

                        }
                    };
                    //create a dialog box
                    AlertDialog.Builder builder=new AlertDialog.Builder(context);
                    builder.setTitle("Are you sure you want to delete it?");  //Setting titles
                    builder.setPositiveButton("Determine",listener);  //Setting the text of the confirmation button and the listener
                    builder.setNegativeButton("cancel",null);   //Setting Cancel Button
                    builder.show();    //display a dialog box
                }
            });
            return view;
        }
        class ViewHolder{
            TextView id;
            TextView name;
            TextView price;

        }
    }
}
The above code implements the interface management database, (1) The ListView is adapted using the Array Adapter adapter:
Steps:
Customize a class to inherit ArrayAdapter;
Define a construction method for this class.
Rewrite the getView() method in ArrayAdapter;
Call the getItem() method to get each line in the entry
(2) Optimize ListView:
Reuse ConvertView
Reuse ViewHolder
Detailed reference address: http://www.tuicool.com/articles/uyiAZzA
http://blog.csdn.net/dfqin/article/details/7458853
The code is as follows: 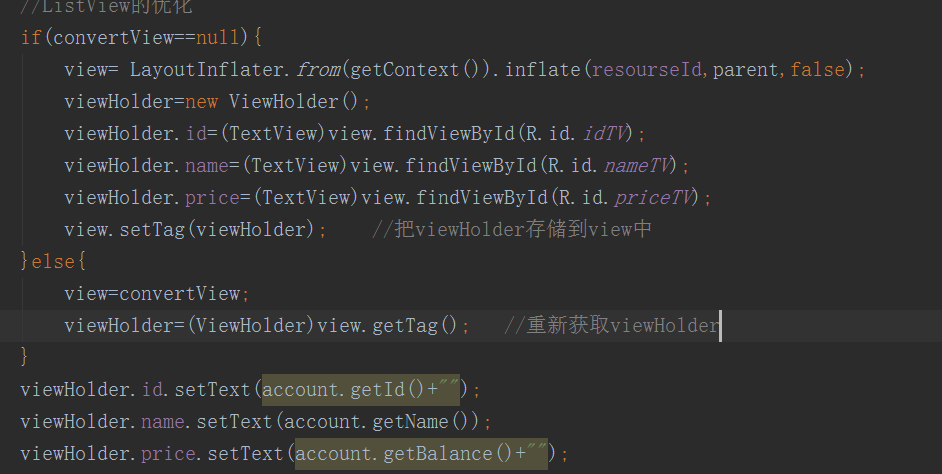
(3) Set up a listening event for ListView and click on each row to get the data for that row
(4) The dialog box Alert Dialog is used in the program. The creation code of the dialog box is as follows:
7. Results of Program Running
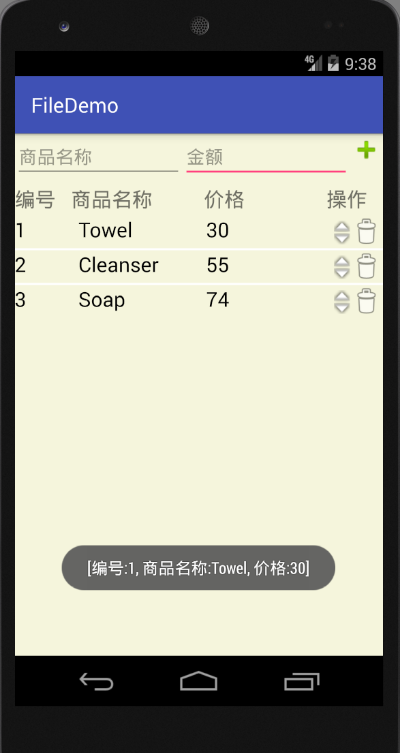
1. The results of the first run of the program are as follows: 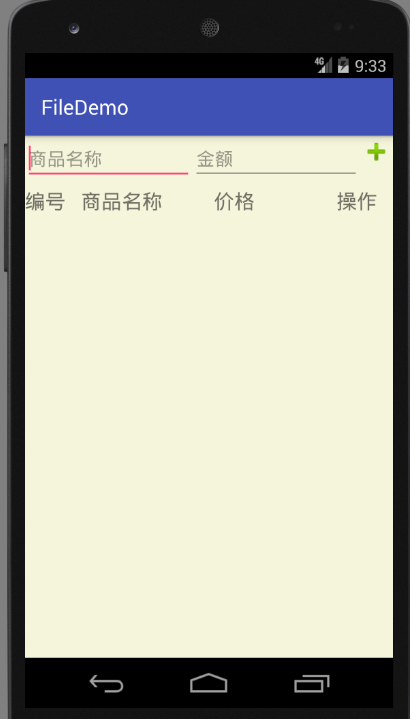
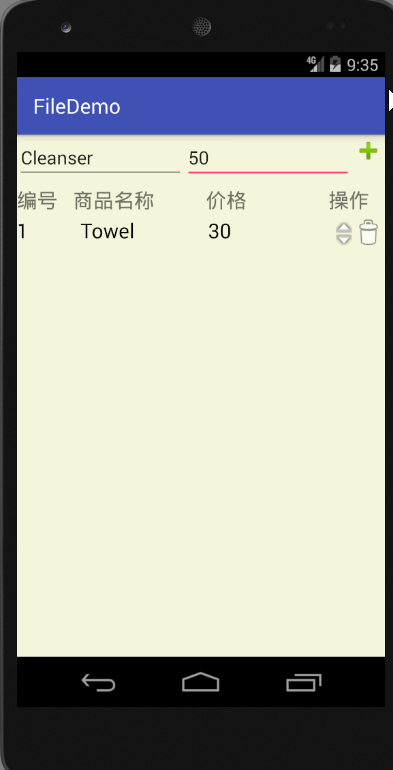
2. Adding goods
Increase or decrease the amount of goods 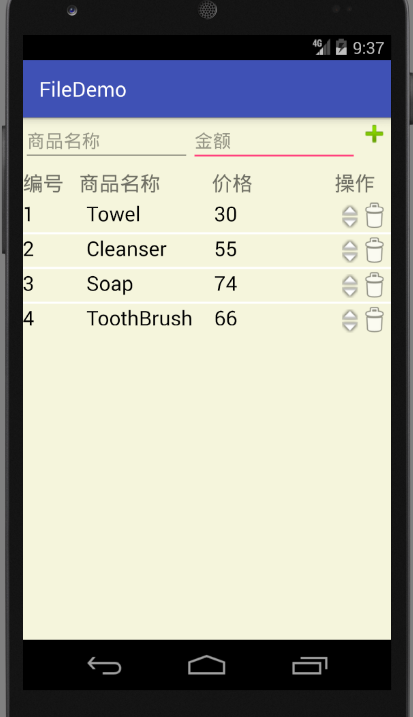
Delete goods 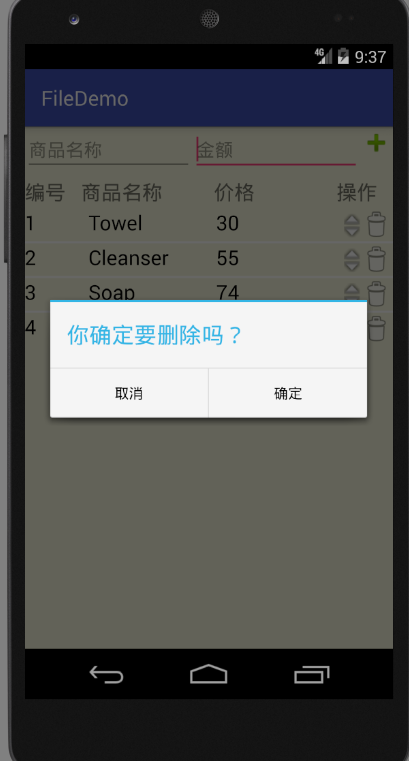
When clicking on each line