1. Introduction to JDBC
JDBC (Java Data Base Connectivity, Java Database Connectivity) states that JDBC is a set of API specifications for Java access to databases; Spring Boot supports the mainstream ORM frameworks: MyBatis, Hibernate, and Spring JDBC. Several ORMs have their own advantages in different scenarios and have corresponding Sta within the Spring Boot system.Rter package for easy integration
- The steps to use JDBC directly in Java are complex and require seven steps:
try {
    // 1. Load database driver
    Class.forName(driver);
    // 2. Get a database connection
    conn = DriverManager.getConnection(url, username, password);
    // 3. Get the database operation object
    stmt = conn.createStatement();
    // 4. SQL statements defining operations
    String sql = "select * from user where id = 6";
    // 5. Perform database operations
    rs = stmt.executeQuery(sql);
    // 6. Get and manipulate result sets
    while (rs.next()) {
    // Parse Result Set
    }
} catch (Exception e) {
    // log information
} finally {
    // 7. Close Resources
}
From the example above, you can see that it is more complex to operate a database directly using JDBC, so many well-known ORM frameworks have been developed on the basis of JDBC in the later stage, among which Hibernate, MyBatis and Spring JDBC are the most popular ones. Here we will focus on the use of Spring JDBC in Spring Boot.
2. Example single data source operation
Integrating JDBC with Spring Boot is simple, requires dependencies to be introduced and basic configurations to be made, and creates tables to be used as project demonstrations before developing a project.Design a User user table with fields such as id, name, password, age, etc. The corresponding SQL script is as follows:
DROP TABLE IF EXISTS `users`;
CREATE TABLE `users` (
  `id` bigint(20) NOT NULL AUTO_INCREMENT COMMENT 'Primary key id',
  `name` varchar(32) DEFAULT NULL COMMENT 'User name',
  `password` varchar(32) DEFAULT NULL COMMENT 'Password',
  `age`  int DEFAULT NULL,
  PRIMARY KEY (`id`)
) ENGINE=InnoDB AUTO_INCREMENT=1 DEFAULT CHARSET=utf8;
- Add Configuration
- Add dependent packages:
<dependency>
    <groupId>org.springframework.boot</groupId>
    <artifactId>spring-boot-starter-jdbc</artifactId>
</dependency>
<dependency>
    <groupId>mysql</groupId>
    <artifactId>mysql-connector-java</artifactId>
</dependency>
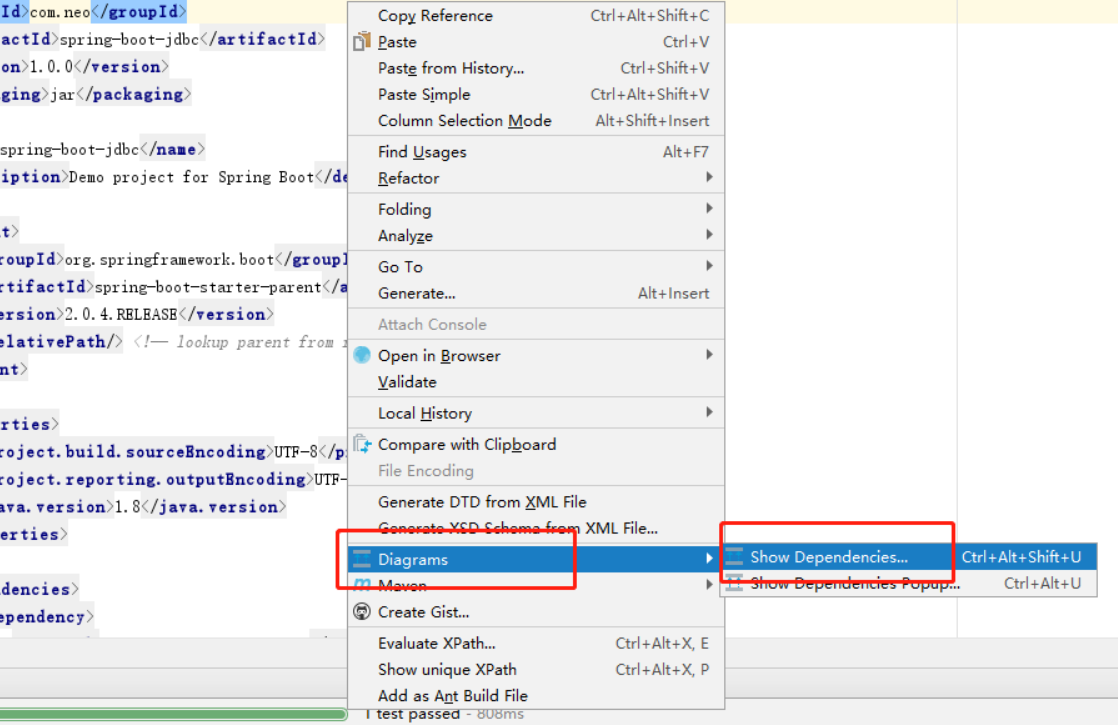
- MySQL is used as the database in the demonstration project, so the MySQL driver package and spring-boot-starter-jdbc need to be introduced in the project.Open the pom.xml file and press the shortcut: Ctrl + Alt + SHIFT + U, or right-click and select the Diagrams | Show Dependencies option to view the project dependency class diagram.
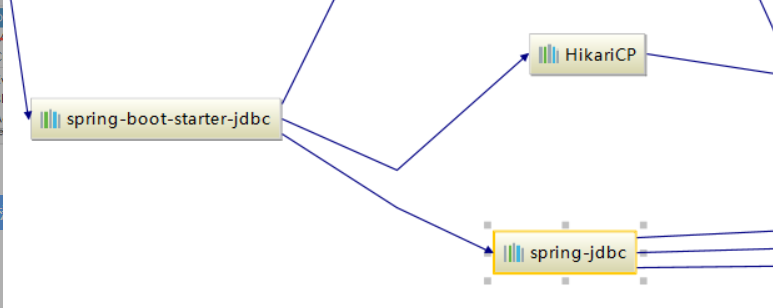
- After popping up the Class Diagram dialog box, scroll the mouse to zoom in and see that spring-boot-starter-jdbc is directly dependent on HikariCP and spring-jdbc.
-
HikariCP is the default database connection pool used by Spring Boot 2.0 and is also the fastest database connection pool in legend.
-
spring-jdbc is a Spring package for encapsulating JDBC operations.
-
Configuration of data sources
spring.datasource.url=jdbc:mysql://localhost:3306/test?serverTimezone=UTC&useUnicode=true&characterEncoding=utf-8&useSSL=true
spring.datasource.username=root
spring.datasource.password=root
spring.datasource.driver-class-name=com.mysql.cj.jdbc.Driver
It is worth noting that in Spring Boot 2.1.0, com.mysql.jdbc.Driver has expired and com.mysql.cj.jdbc.Driver is recommended.
- Entity Class
- Create an entity class for the table:
public class User  {
    private Long id;
    private String name;
    private String password;
    private int age;

    public User(String name, String password, int age) {
        this.name = name;
        this.password = password;
        this.age = age;
    }
    // Omit getter setter
}
- Encapsulate Repository
- Create UserRepository to define our common add-delete check interfaces;
public interface UserRepository  {
    int save(User user);
    int update(User user);
    int delete(long id);
    List<User> findALL();
    User findById(long id);
}
- Create UserRepositoryImpl class to implement UserRepository class interface; use on class @Repository Annotations are used to annotate data access components and inject JdbcTemplate into the class, which is a tool class provided by the Spring operation JDBC.
@Repository
public class UserRepositoryImpl implements UserRepository {
    @Autowired
    private JdbcTemplate jdbcTemplate;
}
- Next encapsulate methods to save/update user information/delete user information/user id query/get user list
@Override
public int save(User user) {
    return jdbcTemplate.update("INSERT INTO users(name, password, age) values(?, ?, ?)",
          user.getName(), user.getPassword(), user.getAge());
}

@Override
public int update(User user) {
    return jdbcTemplate.update("UPDATE users SET name = ? , password = ? , age = ? WHERE id=?",
           user.getName(), user.getPassword(), user.getAge(), user.getId());
}

@Override
public int delete(long id) {
    return jdbcTemplate.update("DELETE FROM users where id = ? ",id);
}

@Override
public User findById(long id) {
    return jdbcTemplate.queryForObject("SELECT * FROM users WHERE id=?", new Object[] { id }, new BeanPropertyRowMapper<User>(User.class));
}

@Override
public List<User> findALL() {
    return jdbcTemplate.query("SELECT * FROM users", new UserRowMapper());
    // return jdbcTemplate.query("SELECT * FROM users", new BeanPropertyRowMapper(User.class));
}
The returned data is encapsulated in a new BeanPropertyRowMapper <User> (User.class), which automatically maps a row of data to an instance of a specified class, instantiates the class first, and then maps to attributes by name matching.
findALL() uses a new way to encapsulate the return of a result set, creating an internal class UserRowMapper. UserRowMapper inherits RowMapper, which encapsulates each row of data into user-defined classes, implements that the RowMapper interface overrides the mapRow method, and encapsulates the return processing of data in the mapRow method.From the code above, you can see that the UserRowMapper loop traverses the result set returned by the query, assigning values according to attributes while traversing.This allows the return data to be automatically parsed by simply passing in a new UserRowMapper() when the query is used.
class UserRowMapper implements RowMapper<User> {
    @Override
    public User mapRow(ResultSet rs, int rowNum) throws SQLException {
        User user = new User();
        user.setId(rs.getLong("id"));
        user.setName(rs.getString("name"));
        user.setPassword(rs.getString("password"));
        user.setAge(rs.getInt("age"));
    }
}
- test
- Next, we test the encapsulated UserRepository to see if each method in the UserRepository is correct.Create the UserRepositoryTests class and inject the userRepository into the class.
@RunWith(SpringRunner.class)
@SpringBootTest
public class UserRepositoryTests {
    @Autowired
    private UserRepository userRepository;
}

//Testing insert data directly calls the save method corresponding to userRepository
@Test
public void testSave() {
    User user =new User("neo","123456",30);
    userRepository.save(user);
}

//Test the other methods separately as above...
3. Use of Multiple Data Sources
It is common to use multiple data sources in a project, and the use of multiple data sources in Spring Boot requires self-encapsulation.We build on the example project above.
- configuration file
- Two data sources have been added, one is the test1 library and the other is the test2 library.
spring.datasource.primary.jdbc-url=jdbc:mysql://localhost:3306/test1?serverTimezone=UTC&useUnicode=true&characterEncoding=utf-8&useSSL=true
spring.datasource.primary.username=root
spring.datasource.primary.password=root
spring.datasource.primary.driver-class-name=com.mysql.cj.jdbc.Driver

spring.datasource.secondary.jdbc-url=jdbc:mysql://localhost:3306/test2?serverTimezone=UTC&useUnicode=true&characterEncoding=utf-8&useSSL=true
spring.datasource.secondary.username=root
spring.datasource.secondary.password=root
spring.datasource.secondary.driver-class-name=com.mysql.cj.jdbc.Driver
- Initialize JDBC
- Read the information in the configuration file and initialize the JDBC when the project starts.
@Configuration
public class DataSourceConfig {
    @Primary
    @Bean(name = "primaryDataSource")
    @Qualifier("primaryDataSource")
    @ConfigurationProperties(prefix="spring.datasource.primary")
    public DataSource primaryDataSource() {
            return DataSourceBuilder.create().build();
    }

    @Bean(name = "secondaryDataSource")
    @Qualifier("secondaryDataSource")
    @ConfigurationProperties(prefix="spring.datasource.secondary")
    public DataSource secondaryDataSource() {
        return DataSourceBuilder.create().build();
    }

    @Bean(name="primaryJdbcTemplate")
    public JdbcTemplate primaryJdbcTemplate (
        @Qualifier("primaryDataSource")  DataSource dataSource ) {
        return new JdbcTemplate(dataSource);
    }

    @Bean(name="secondaryJdbcTemplate")
    public JdbcTemplate  secondaryJdbcTemplate(
            @Qualifier("secondaryDataSource") DataSource dataSource) {
        return new JdbcTemplate(dataSource);
    }
}
This code means that at startup, different data sources are loaded according to a specific prefix, and different JDBC s are created based on the built data sources.
- UserRepository Modification
- We modified all the methods in UserRepository by adding a parameter JdbcTemplate. If JdbcTemplate is transferred in the method, the passed JdbcTemplate will be used to operate inside the method. If the passed JdbcTemplate is empty, the default JdbcTemplate connection operation will be used.
@Repository
public class UserRepositoryImpl implements UserRepository {
    @Autowired
    private JdbcTemplate primaryJdbcTemplate;

    @Override
    public int save(User user,JdbcTemplate jdbcTemplate) {
        if(jdbcTemplate == null){
            jdbcTemplate= primaryJdbcTemplate;
        }
        return jdbcTemplate.update("INSERT INTO users(name, password, age) values(?, ?, ?)",
              user.getName(), user.getPassword(), user.getAge());
    }

  //Other methods are omitted, details can be viewed source code
}
- Multiple Data Source Testing
- The test class is injected with JdbcTemplate from two different data sources and UserRepository.Test inserting two data using different JdbcTemplate to see if both databases were saved successfully.Before testing, create the test1 and test2 databases and user tables in both databases.
@RunWith(SpringRunner.class)
@SpringBootTest
public class UserRepositoryTests {
    @Autowired
    private UserRepository userRepository;
    @Autowired
    private JdbcTemplate primaryJdbcTemplate;
    @Autowired
    private JdbcTemplate secondaryJdbcTemplate;

    @Test
    public void testSave() {
        User user =new User("smile","123456",30);
        userRepository.save(user,primaryJdbcTemplate);
        userRepository.save(user,secondaryJdbcTemplate);
    }
}
After successful execution of testSave(), when you log in to the test1 and test 2 databases to view the user table, there is a user information with the name smile that multiple data sources have successfully inserted data, and the tests for other methods are generally the same.This way, in a project, when we want to use which data source to operate the database, we just need to pass in the corresponding JdbcTemplate instance of the data source.
4. Summary
Through this lesson, you learned that using native JDBC to operate databases is cumbersome and requires developers to encapsulate database connections themselves and manually close the corresponding resources after execution is complete. This is not conducive to uniform specifications, but also prone to problems.Later Spring introduced Spring JDBC for the use of JDBC, on which Spring Boot was further encapsulated. JDBC now operates on databases very easily in the Spring Boot project.