I. Introduction
One advantage of SpringBoot is Starter, because SpringBoot has many out-of-the-box Starter dependencies that make our development easy, and we don't need to focus too much on the configuration of the framework.
In daily development, we will also customize some Starters, especially now the micro service framework, where a single project is divided into several individual projects that reference some of the company's components. At this time, we define Starters so that these individual projects can be built up quickly. We just need to focus on business development.
Before that, we'll take a closer look at how SpringBoot works.Then you'll customize the starter.
2. Startup principle
To understand how it works, we can follow the code step by step in Debug mode, starting with the entry method:
public static ConfigurableApplicationContext run(Class<?>[] primarySources,
      String[] args) {
   return new SpringApplication(primarySources).run(args);
}
Here you create a SpringApplication object and call the run method
2.1 Create a SpringApplication object
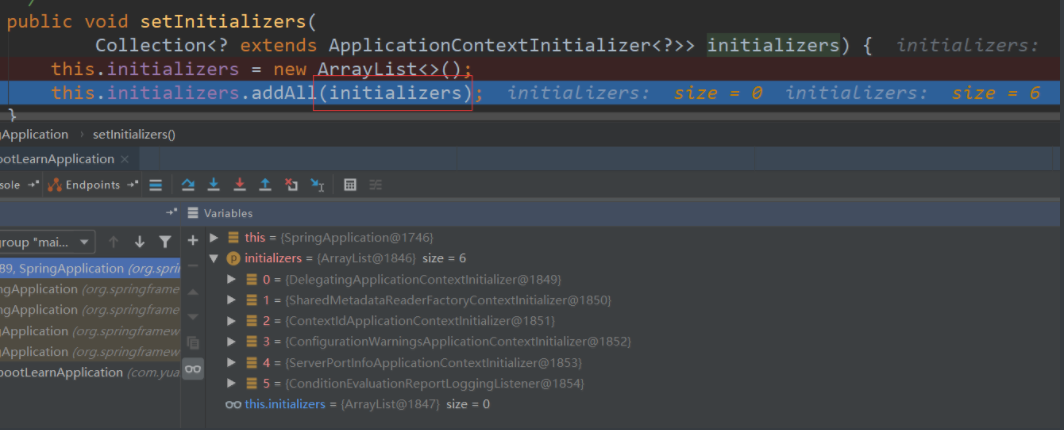
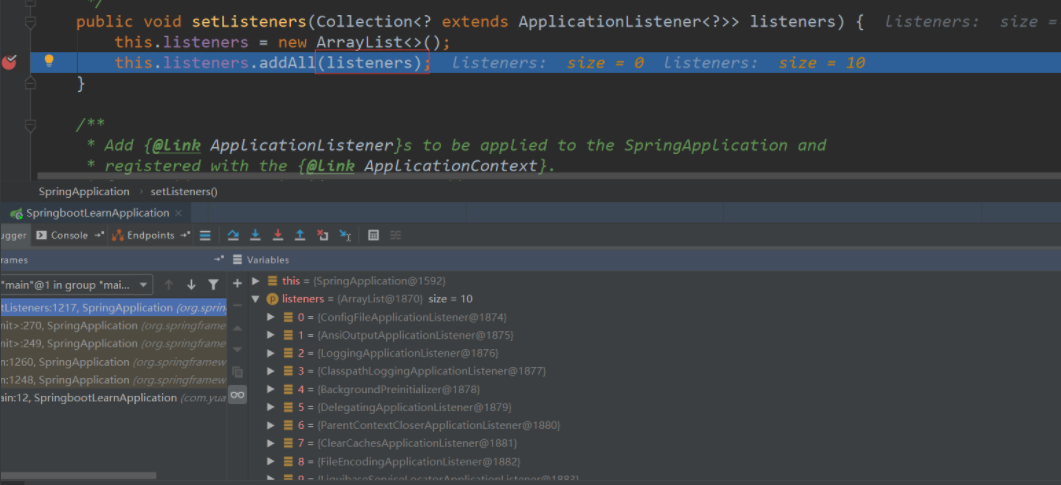
public SpringApplication(ResourceLoader resourceLoader, Class<?>... primarySources) {
    this.resourceLoader = resourceLoader;
    Assert.notNull(primarySources, "PrimarySources must not be null");
    //Save the main configuration class
    this.primarySources = new LinkedHashSet<>(Arrays.asList(primarySources));
    //Determine web Application Type
    this.webApplicationType = WebApplicationType.deduceFromClasspath();
    //Find it under the class path META-INF/spring.factories All configured ApplicationContextInitializer;And save it
    setInitializers((Collection) getSpringFactoriesInstances(
          ApplicationContextInitializer.class));
    //Find it under the class path ETA-INF/spring.factories All configured ApplicationListener
    setListeners((Collection) getSpringFactoriesInstances(ApplicationListener.class));
    //Found in multiple configuration classes main Main Configuration Class for Methods
    this.mainApplicationClass = deduceMainApplicationClass();
}
As you can see from this method, this
Step 1: Save the main configuration class.
Step 2: Determine the type of web application.
Step 3: the setInitializers method, which takes the parameter we see as getSpringFactoriesInstances(ApplicationContextInitializer.class), and we'll look further at getSpringFactoriesInstances
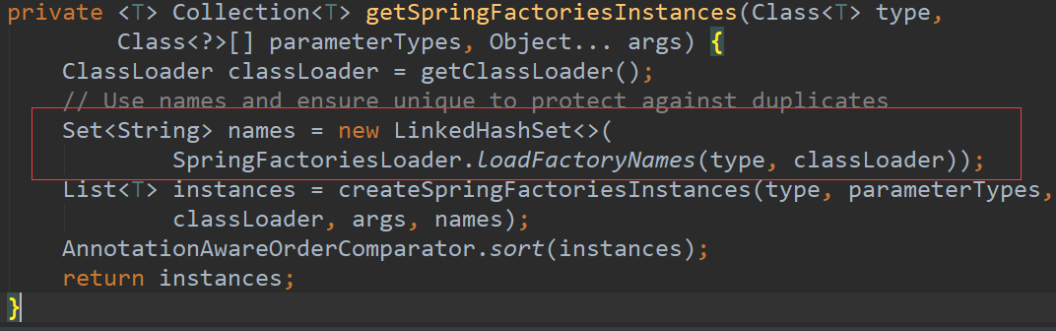
Enter this method again:

This is where we find all the ApplicationContextInitializer s for the META-INF/spring.factories configuration from the class path, then save them, release the breakpoints, and we can see what we got at this time
Step 4: Find all the ApplicationListener s for the ETA-INF/spring.factories configuration from the class path and work similarly to enter the breakpoint
Step 5: Find the main configuration class with the main method from multiple configuration classes.After this execution, SpringApplication is created
2.2 run method
Paste out the code first
public ConfigurableApplicationContext run(String... args) {
   StopWatch stopWatch = new StopWatch();
   stopWatch.start();
   ConfigurableApplicationContext context = null;
   Collection<SpringBootExceptionReporter> exceptionReporters = new ArrayList<>();
   configureHeadlessProperty();
   //From Class Path META-INF/spring.factories Obtain SpringApplicationRunListeners
   SpringApplicationRunListeners listeners = getRunListeners(args);
   //Callback all acquisitions SpringApplicationRunListener.starting()Method
   listeners.starting();
   try {
      //Encapsulate command line parameters
      ApplicationArguments applicationArguments = new DefaultApplicationArguments(
            args);
       //Prepare the environment
      ConfigurableEnvironment environment = prepareEnvironment(listeners,
            applicationArguments);//Callback when environment creation is complete SpringApplicationRunListener.environmentPrepared();Indicates that the environment is ready
      configureIgnoreBeanInfo(environment);
      //Print Banner chart
      Banner printedBanner = printBanner(environment);
      //Establish ApplicationContext,Decide to create web Of ioc Or normal ioc
      context = createApplicationContext();
       //Exception Analysis Report
      exceptionReporters = getSpringFactoriesInstances(
            SpringBootExceptionReporter.class,
            new Class[] { ConfigurableApplicationContext.class }, context);
      //Prepare the context for environment Save to ioc in
      //applyInitializers(): All saved before callback ApplicationContextInitializer Of initialize Method
      //listeners.contextPrepared(context)
      //prepareContext Callback all SpringApplicationRunListener Of contextLoaded()
      prepareContext(context, environment, listeners, applicationArguments,
            printedBanner);
       //Refresh Container,ioc Container initialization (if yes) web The application will also create embedded Tomcat)
       //Where to scan, create, load all components,(Configuration class, component, auto-configuration)
      refreshContext(context);
      afterRefresh(context, applicationArguments);
      stopWatch.stop();
      if (this.logStartupInfo) {
         new StartupInfoLogger(this.mainApplicationClass)
               .logStarted(getApplicationLog(), stopWatch);
      }
      //Be-all SpringApplicationRunListener Callback started Method
      listeners.started(context);
      //from ioc Get all in container ApplicationRunner and CommandLineRunner Callback,
      //ApplicationRunner Callback first, CommandLineRunner Callback
      callRunners(context, applicationArguments);
   }
   catch (Throwable ex) {
      handleRunFailure(context, ex, exceptionReporters, listeners);
      throw new IllegalStateException(ex);
   }

   try {
       //Be-all SpringApplicationRunListener Callback running Method
      listeners.running(context);
   }
   catch (Throwable ex) {
      handleRunFailure(context, ex, exceptionReporters, null);
      throw new IllegalStateException(ex);
   }
   //Whole SpringBoot Return to startup after application startup completes ioc container
   return context;
}
The preceding code does not need to be analyzed, it is mainly about preparing objects, so let's start with SpringApplicationRunListeners listeners = getRunListeners(args).
The first step is to get the SpringApplicationRunListeners from META-INF/spring.factories under the class path.
This method is similar to the two Get Configuration methods analyzed earlier.
Step 2: Callback all get SpringApplicationRunListener.start() methods.
Step 3: Encapsulate command line parameters.
Step 4: Prepare the environment and call the prepareEnvironment method.
Step 5: Print the Banner diagram (the identification diagram at startup).
Step 6: Create an ApplicationContext and decide whether to create an IOC for the web or a normal ioc.
Step 7: Report of anomaly analysis.
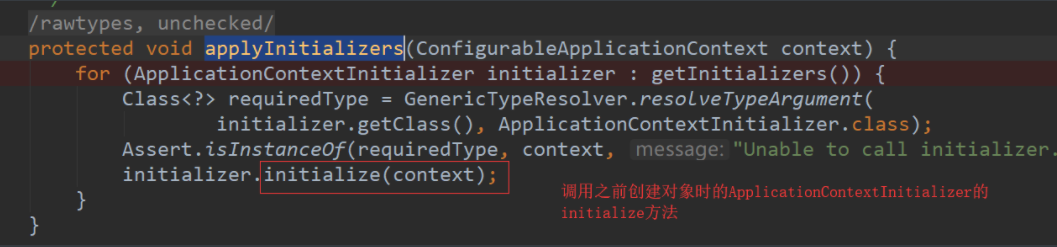
Step 8: Prepare the context and save the environment in ioc. This method needs to be carefully analyzed before we enter this method
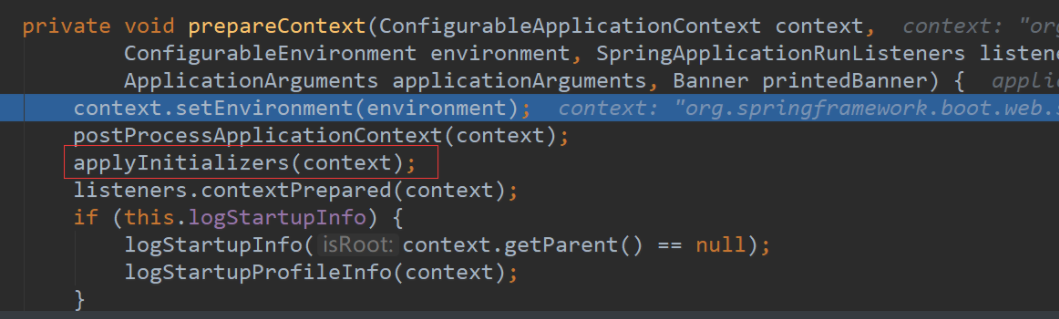
Here is an applyInitializers method, which is the initialize method for all ApplicationContextInitializer s saved before the callback
There is also a listeners.contextPrepared(context), which calls back contextPrepared() for all SpringApplicationRunListener s.
The final listeners.contextLoaded(context) is the contextLoaded () that calls back all SpringApplicationRunListener s after the prepareContext runs.
Step 9: Refresh the container, initialize the ioc container (and create an embedded Tomcat if it's a web application), which is where you scan, create, and load all components (configuration classes, components, automatic configuration).
Step 10: All SpringApplicationRunListener callbacks the started method.
Step 11: Retrieve all the ApplicationRunners and CommandLineRunners from the ioc container for callback, ApplicationRunner callback first, CommandLineRunner callback again.
Step 12: All SpringApplicationRunListener callback running methods.
Step 13: Return to the started ioc container after the entire SpringBoot application has started.
This is the whole process of run, and you need to look at the source code yourself for a more detailed understanding.
3. Custom starter
To customize starter, there are two things we need to do: determine dependencies and write automatic configurations.The main thing we need to do is write automatic configuration. We have written some automatic configuration before, mainly to annotate the use of configuration. The main annotations are:
-
@Configuration: Specifies that this class is a configuration class
-
@ConditionalOnXXX: Automatically configure classes to take effect if specified conditions are met
-
@AutoConfigureAfter: Specifies the order in which classes are automatically configured
-
@Bean: Add components to the container
-
@ConfigurationPropertie: Bind related configurations with related xxProperties classes
-
@EnableConfiguration Properties: Make xxProperties valid for inclusion in containers
After writing the auto-configuration classes according to these annotations, we also need to load the auto-configuration classes by configuring them in META-INF/spring.factories when they need to be started. The general principle of the starter is the same, but there is a certain pattern in the actual design of the starter, that is, the starter module is an empty JAR file, providing only auxiliary dependenciesRationally, the auto-configuration module should be redesigned and then referenced by the launcher.This is how Springboot was designed:
There is also a naming rule:
Official Namespace
- Prefix:'spring-boot-starter-'
- Mode: spring-boot-starter-module name
- Examples: spring-boot-starter-web, spring-boot-starter-actuator, spring-boot-starter-jdbc
Custom Namespace
- Suffix: "-spring-boot-starter"
- mode: module-spring-boot-starter
- Example: mybatis-spring-boot-starter
3.1 Create a custom starter
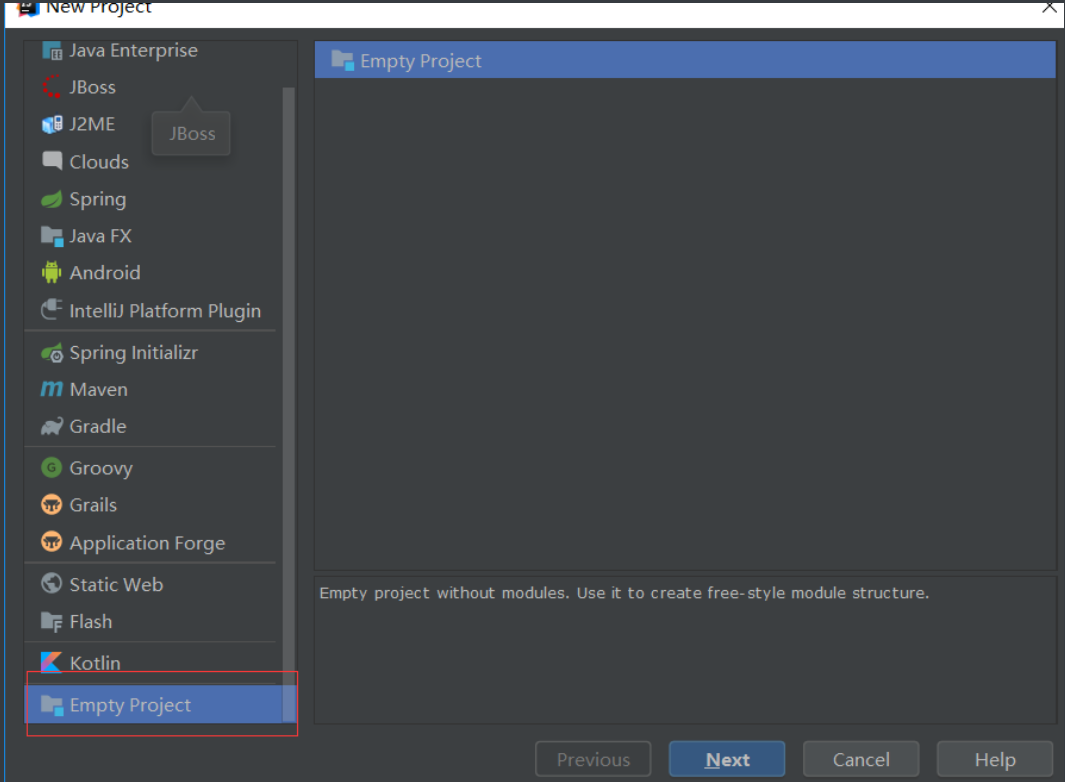
Step 1: Because we need to create two modules, create a new, empty project and then create two modules as modules.
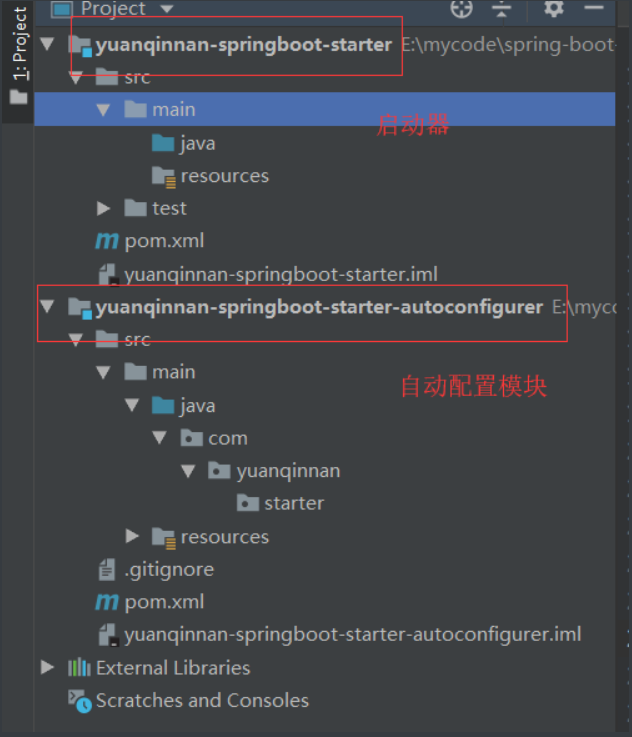
Step 2: Create two more modules, a starter and an automatic configuration module

The specific creation process will not be redundant, that is, the simplest project, remove unwanted files, create the completion structure as follows:
Step 3: Let's first import the auto-configuration module into starter so that the startup module depends on the auto-configuration module
Start module POM file add dependency
<dependencies>
    <!--Introducing an automatic configuration module-->
    <dependency>
        <groupId>com.yuanqinnan-starter</groupId>
        <artifactId>yuanqinnan-springboot-starter-autoconfigurer</artifactId>
        <version>0.0.1-SNAPSHOT</version>
    </dependency>
</dependencies>
Full POM file for automatic configuration module:
<?xml version="1.0" encoding="UTF-8"?>
<project xmlns="http://maven.apache.org/POM/4.0.0" xmlns:xsi="http://www.w3.org/2001/XMLSchema-instance"
         xsi:schemaLocation="http://maven.apache.org/POM/4.0.0 http://maven.apache.org/xsd/maven-4.0.0.xsd">
    <modelVersion>4.0.0</modelVersion>
    <parent>
        <groupId>org.springframework.boot</groupId>
        <artifactId>spring-boot-starter-parent</artifactId>
        <version>2.1.4.RELEASE</version>
        <relativePath/> <!-- lookup parent from repository -->
    </parent>
    <groupId>com.yuanqinnan-starter</groupId>
    <artifactId>yuanqinnan-springboot-starter-autoconfigurer</artifactId>
    <version>0.0.1-SNAPSHOT</version>
    <packaging>jar</packaging>
    <properties>
        <java.version>1.8</java.version>
    </properties>

    <dependencies>
        <!--Introduce spring-boot-starter;All starter Basic configuration-->
        <dependency>
            <groupId>org.springframework.boot</groupId>
            <artifactId>spring-boot-starter</artifactId>
        </dependency>
    </dependencies>
</project>
So far, the two projects have basically been created, and now we have a simple configuration.
Step 5: Auto-configure code for auto-configure classes
Write a configuration class to configure:
@ConfigurationProperties(prefix = "yuanqinnan.hello")
public class HelloProperties {
    //prefix
    private String prefix;
    //Suffix
    private String suffix;

    public String getPrefix() {
        return prefix;
    }

    public void setPrefix(String prefix) {
        this.prefix = prefix;
    }

    public String getSuffix() {
        return suffix;
    }

    public void setSuffix(String suffix) {
        this.suffix = suffix;
    }
}
Write another service
public class HelloService {

    HelloProperties helloProperties;

    public HelloProperties getHelloProperties() {
        return helloProperties;
    }

    public void setHelloProperties(HelloProperties helloProperties) {
        this.helloProperties = helloProperties;
    }

    public String sayHello(String name) {
        return helloProperties.getPrefix() + "-" + name + helloProperties.getSuffix();
    }
}
Then inject this service into the component:
@Configuration
@ConditionalOnWebApplication //web Application takes effect
@EnableConfigurationProperties(HelloProperties.class)
public class HelloServiceAutoConfiguration {

    @Autowired
    HelloProperties helloProperties;
    @Bean
    public HelloService helloService(){
        HelloService service = new HelloService();
        service.setHelloProperties(helloProperties);
        return service;
    }
}
This is the last step in our automatic configuration and writing, since SpringBoot read automatic configuration is in the META-INF spring.factories file, so we will also write our automatic configuration class to it
org.springframework.boot.autoconfigure.EnableAutoConfiguration=\
  com.yuanqinnan.starter.HelloServiceAutoConfiguration
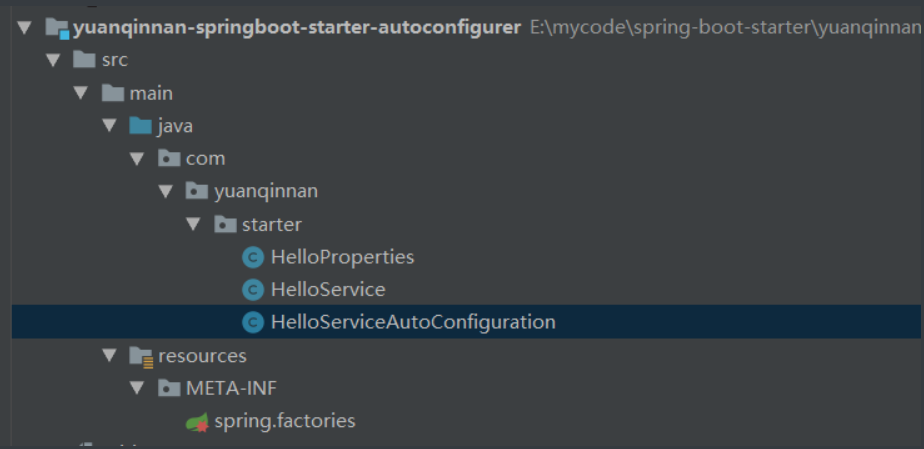
The final structure is as follows:
At this point, the code and the writing are complete, at which point we will load it into the repository for other projects to reference
3.2 Use custom starter
Create a web project and then introduce dependencies into the project
<!--Introducing Customization starter-->
<dependency>
  <groupId>com.yuanqinnan.starter</groupId>
  <artifactId>yuanqinnan-springboot-starter</artifactId>
  <version>1.0-SNAPSHOT</version>
</dependency>
Add a configuration to the application.properties configuration:
yuanqinnan.hello.prefix=Good morning
yuanqinnan.hello.suffix=good night
Join the test:
@Autowired HelloService helloService; @Test public void contextLoads() { System.out.println(helloService.sayHello("world")); }
This completes both custom Starter and reference customization, summarizes the core knowledge of Springboot, and then integrates some advanced scenarios of Springboot, such as caching, messaging, retrieval, distribution, and so on.