Interested friends can go to understand the first five articles, your praise is my greatest support, thank you!
(1) SpringBoot take off - HelloWorld
(2) The way to take off of SpringBoot: an analysis of the entry principle
(3) SpringBoot take off road - YAML configuration summary (must know before getting started)
(4) Spring boot take off - static resource processing
(5) SpringBoot take off road - tymeleaf template engine
(6) SpringBoot take off - integrate jdbctemplate Druid mybatis
explain:
-
The purpose of this article is integration, that is, a concrete practical experience. It's not involved in the principle, and I haven't studied it in depth, so I won't make a fool of myself
-
The source code of the spring boot take-off series of articles has been uploaded to github synchronously. If you need a little partner, go down at will
- https://github.com/ideal-20/Springboot-Study-Code
-
If you don't have the ability to learn, you will learn something. You have the right to read it as a tool. Don't be angry if you don't like it~
(1) Get to know Spring Security
(1) Introduction
Although permissions and security issues are not necessary to affect the operation of programs and projects, they are important considerations in development. For example, some resources we do not want to be accessed or some of our methods want to meet the specified identity to be accessible. We can use AOP Or filters to achieve the requirements. But in fact, if the code involves more logic, the code is extremely cumbersome and redundant. There are many development frameworks, such as Spring Security and Shiro, which have provided us with this function. We just need to know how to configure and use it correctly
(2) Basic introduction
Take a look at the introduction of the official website
Spring Security is a powerful and highly customizable authentication and access-control framework. It is the de-facto standard for securing Spring-based applications.
Spring Security is a powerful and highly customizable authentication and access control framework. It is the actual standard for protecting spring based applications.
Spring Security is a framework that focuses on providing both authentication and authorization to Java applications. Like all Spring projects, the real power of Spring Security is found in how easily it can be extended to meet custom requirements
Spring Security is a framework that focuses on providing authentication and authorization for Java applications. Like all spring projects, the real strength of Spring Security is that it can be easily extended to meet customization requirements
In short, Spring Security is a powerful and perfect framework for controlling access rights
The security of Web application includes two parts: Authentication and Authorization, which are also the core functions provided by Spring Security
User authentication: user authentication refers to whether the user's identity is legal or not. Generally, our user authentication is to judge the legitimacy of the user's identity by verifying the user name and password. After confirming that the identity is legal, the user can access the system
User authorization: if different users need different levels of permissions, it involves user authorization. User authorization is to control the resources that users can access and the operations they can perform, and to divide different permissions according to different user roles
(2) Static page import And environment construction
(1) About static pages
A: Page introduction
The page is temporarily made by myself. If you need it, you can go to GitHub: ideal-20 to download the source code. Briefly explain this page
If it's too much trouble to make a static page, you can simply create some simple pages and write a few titles to show which page is currently
The pages I use in my code are beautified with the open source front-end component framework, and then it is convenient to explain some functions. The page template mainly cooperates with Thymeleaf
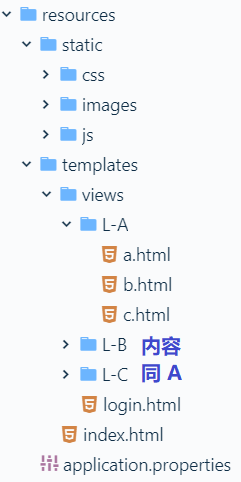
1. Directory structure
├── index.html                        // home page
├── images                            // Homepage picture, only beautiful, no practical effect
├── css                               // Online project files can be accessed normally after being placed on the server
├── js                                // Project screenshot
├── views                             // Total sub page folder, key page for permission verification
│   ├── login.html					  // Self made login page (used to replace Spring Security default)
│   ├── L-A							  // L-A sub page folder, including a b c three sub pages
│   │   ├── a.html
│   │   ├── b.html
│   │   ├── c.html
|	├── L-B							  // L-B sub page folder, including a b c three sub pages
│   │   ├── a.html
│   │   ├── b.html
│   │   ├── c.html
|	├── L-C							  // L-C sub page folder, including a b c three sub pages
│   │   ├── a.html
│   │   ├── b.html
│   │   ├── c.html
B: Import to project
It's mainly to replace the basic links and the introduced ones with the tag format of Thymeleaf. The syntax here is not very much. Even if you are not familiar with Thymeleaf, it's easy to understand. Of course, if you still feel a bit laborious, you can simply make html, make do with it, or go to my previous article, which contains about Thymeleaf Introduction
css, image and js are put under Resources - > static, views and index.html Put it under Resources - > Templates
(2) Environment construction
A: Introduce dependency
It's better to import this part. When initializing a project, check auto generate. You only need to rely on normal import
- Introducing Spring Security module
<dependency>
    <groupId>org.springframework.boot</groupId>
    <artifactId>spring-boot-starter-security</artifactId>
</dependency>
The key dependency is mainly the above initiator, but there are some regular or supplementary ones, such as web, thymeleaf, devtools
Tymeleaf-extras-Spring Security5, which will be mentioned later, is used to integrate Spring Security with tymeleaf
<dependency>
    <groupId>org.thymeleaf.extras</groupId>
    <artifactId>thymeleaf-extras-springsecurity5</artifactId>
    <version>3.0.4.RELEASE</version>
</dependency>

<dependency>
    <groupId>org.springframework.boot</groupId>
    <artifactId>spring-boot-starter-security</artifactId>
</dependency>
<dependency>
    <groupId>org.springframework.boot</groupId>
    <artifactId>spring-boot-starter-thymeleaf</artifactId>
</dependency>
<dependency>
    <groupId>org.springframework.boot</groupId>
    <artifactId>spring-boot-starter-web</artifactId>
</dependency>

<dependency>
    <groupId>org.springframework.boot</groupId>
    <artifactId>spring-boot-devtools</artifactId>
    <scope>runtime</scope>
    <optional>true</optional>
</dependency>
B: Page Jump Controller
Because we use the template, the jump of the page needs to be handed to the Controller. It's very simple. First, it's the homepage. Of course, it doesn't matter about the page. I just jump to my blog, and then there's a jump of the login page
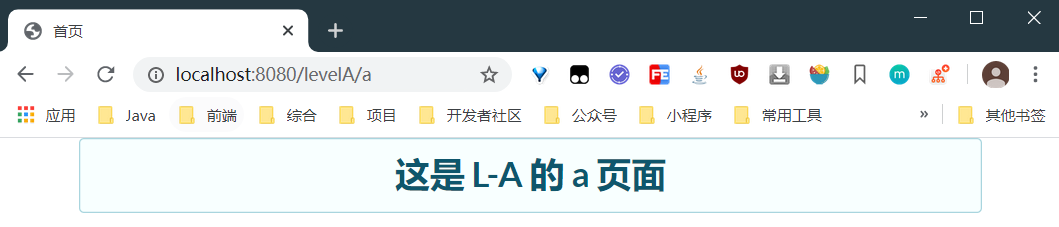
There is a small Tip to mention. Because there are three pages a.html, b.html and c.html under the L-A, L-B and L-C folders, you can use @ PathVariable to write a more general jump method
@Controller
public class PageController {

    @RequestMapping({"/", "index"})
    public String index() {
        return "index";
    }

    @RequestMapping("/about")
    public String toAboutPage() {
        return "redirect:http://www.ideal-20.cn";
    }

    @RequestMapping("/toLoginPage")
    public String toLoginPage() {
        return "views/login";
    }

    @RequestMapping("/levelA/{name}")
    public String toLevelAPage(@PathVariable("name") String name) {
        return "views/L-A/" + name;
    }

    @RequestMapping("/levelB/{name}")
    public String toLevelBPage(@PathVariable("name") String name) {
        return "views/L-B/" + name;
    }

    @RequestMapping("/levelC/{name}")
    public String toLevelCPage(@PathVariable("name") String name) {
        return "views/L-C/" + name;
    }
}
C: Final effect of environment construction
- For the convenience of mapping, I narrowed the page a little
- The top right corner of the home page should be the link for login. Here is because I am running the code that has been written. Without the login page, such as L-A-a and other modules, it will not be displayed, so I log in as a defined administrator
- How to make it automatically switch to display login or post login information will be explained later
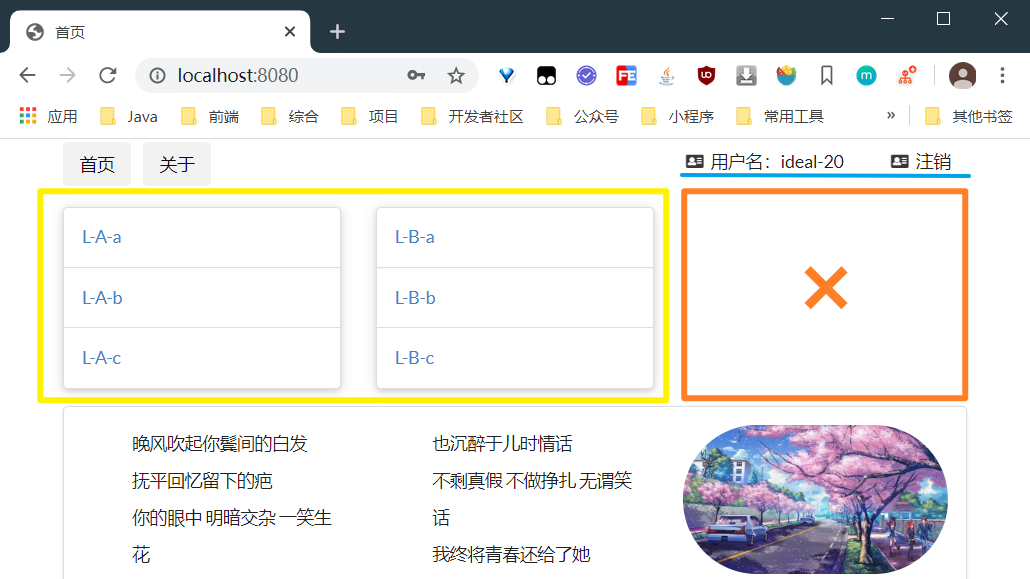
1. Home page
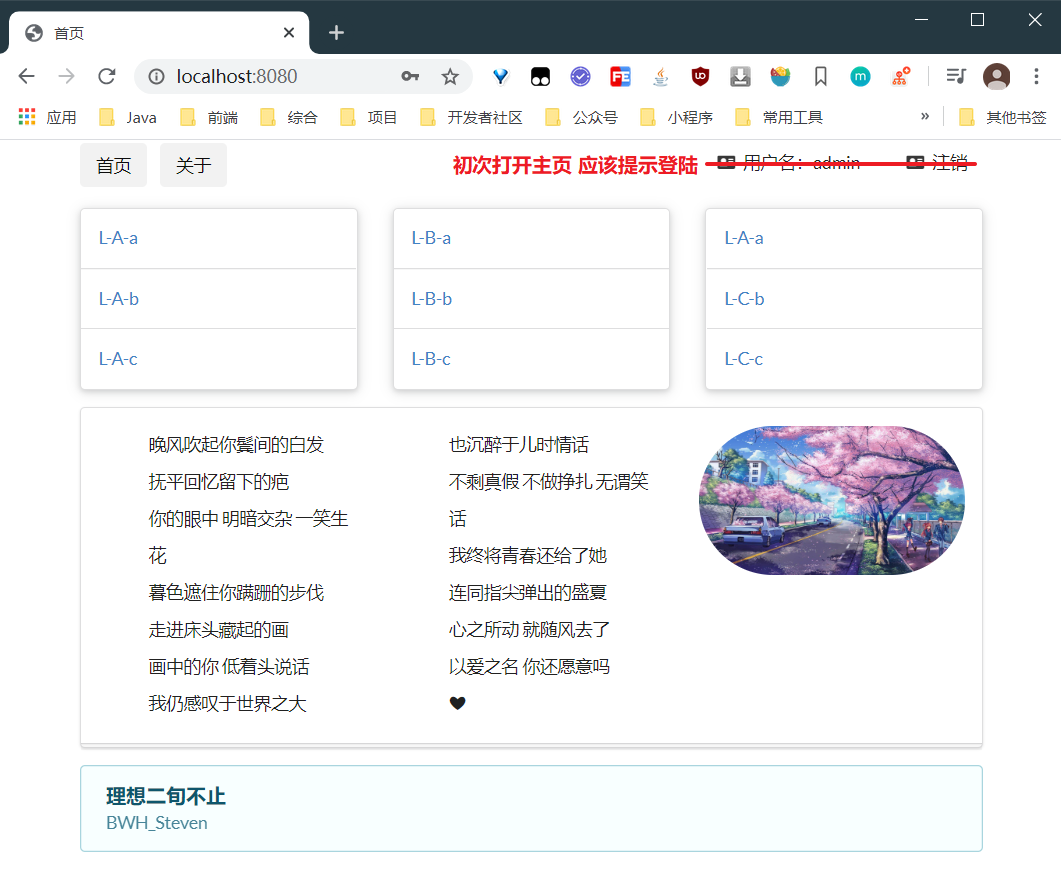
2. Subpage
Under L-A, L-B and L-C, a.html, b.html and c.html are the same, but the text changes a little
3. Landing page

(three) integrate Spring Security (in memory)
In order to simplify and understand this part, instead of starting from the scene with data (because less code is involved, more explanation will be given), some identities will be directly written to memory for easy understanding, and then the writing method containing database will be given in the next title (less explanation will be given, and the emphasis will only be on the former one Differences)
(1) Configure authorization content
A: Source code understanding user authorization mode
You can go to the official website to have a look. The official website provides us with some samples, including a small sample about configuration class, which is the following one. We use this example to analyze
https://docs.spring.io/spring-security/site/docs/5.3.2.RELEASE/reference/html5/#jc-custom-dsls
@EnableWebSecurity
public class Config extends WebSecurityConfigurerAdapter {
    @Override
    protected void configure(HttpSecurity http) throws Exception {
        http
            .apply(customDsl())
                .flag(true)
                .and()
            ...;
    }
}
1. Create config - > securityconfig configuration class
- Create a configuration class that inherits the WebSecurityConfigurerAdapter as in the official website
- Add @ EnableWebSecurity annotation on the class, which means WebSecurity mode is enabled
- Override the configure(HttpSecurity http) method
@EnableWebSecurity
public class SecurityConfig extends WebSecurityConfigurerAdapter {
	@Override
    protected void configure(HttpSecurity http) throws Exception {
        super.configure(http);
    }
}
Since it's rewriting, we can go in and take a look at the source code annotation of the configure(HttpSecurity http) method in the parent class. It has a lot of useful information
I picked out two short paragraphs. The first paragraph means that we want to use HttpSecurity. We need to rewrite it, not call it through super. Otherwise, there will be coverage problems. The second paragraph gives a default configuration method
* Override this method to configure the {@link HttpSecurity}. Typically subclasses
* should not invoke this method by calling super as it may override their

* configuration. The default configuration is:
* http.authorizeRequests().anyRequest().authenticated().and().formLogin().and().httpBasic();
2. Analysis according to the notes of source code
First of all, we can see that it supports a chain call
@Override
protected void configure(HttpSecurity http) throws Exception {
    http.authorizeRequests()
            .anyRequest().authenticated()
            .and().formLogin()
            .and().httpBasic();
}
-
It's also easy to understand the literal meaning. authorizeRequests is about request authorization, so it needs to be called in order to deal with the problem of request authorization (allowing the specified identity user to access resources with different permissions)
-
Second, anyRequest().authenticated(), which means that all HTTP requests need to be authenticated
-
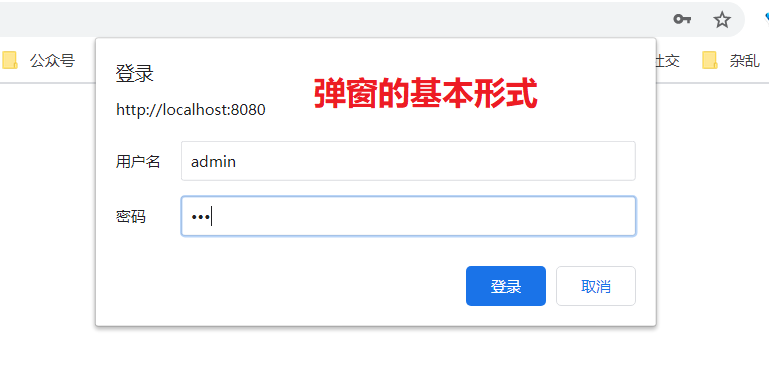
Next, I connected some new content through and(), such as the way to choose form login or HTTP basic (the process of authentication here is to let you enter the user name and password, check your identity, two ways of form or that kind of pop-up window)
Basic authentication is a relatively simple HTTP authentication method. The client transmits the user name and password to the server through plaintext (Base64 encoding format) for authentication, which usually needs to cooperate with HTTPS to ensure the security of information transmission
Let me show you:
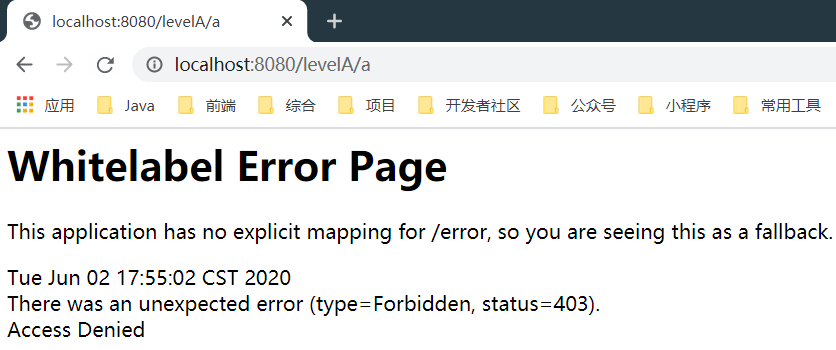
- If you do not specify an authentication method. and().formLogin() or. and().httpBasic() to access any page, you will be prompted with 403 Forbidden error
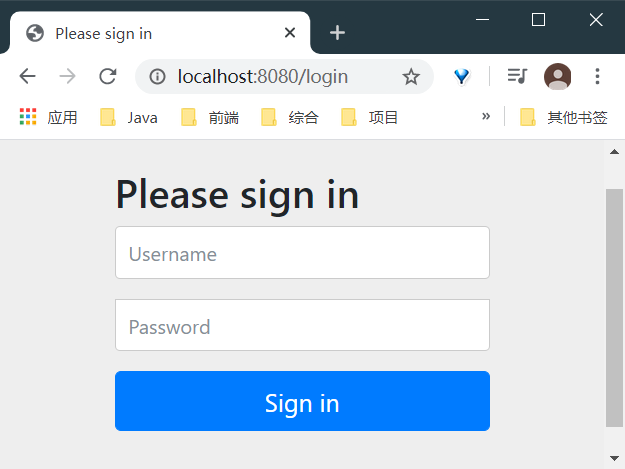
- Specify. and().formLogin() authentication, and a form page will pop up (self provided, not related to the one you created)
- Specify. and().httpBasic(); authentication, and a window will pop up for HTTPBasic authentication
B: Custom user authorization
1. First look at the source code Notes
By default, it is set that all HTTP requests need to be authenticated, so we will also be blocked when we visit the home page, etc., but in reality, some pages can be accessed by anyone, such as the home page, or the customized landing page, etc., at this time, we need to define some user authorization rules by ourselves
Next to the formLogin() annotation of WebSecurityConfigurerAdapter, you can see another interesting content
Note: quote stands for quotation mark
* 		http
* 			.authorizeRequests(authorizeRequests ->
* 				authorizeRequests
* 					.antMatchers("/**").hasRole("USER")
* 			)
This is the custom configuration we want to find. We use an ant matchers to match, and we use a hasRole to define its legal identity. That is to say, only users who meet this identity can access the path resources specified above
The ant prefix in front of Matchers means that they can use ant style path expressions (for example, you can understand them)
| wildcard | explain |
|---|---|
| ? | Match any single character |
| * | Match 0 or any number of characters |
| ** | Match 0 or more directories |
Add: if you want to use regular expression, you can use this method. regexMatchers()
Of course, there are many cases where you want anyone to have access to a certain path, such as the home page. The permitAll() method can achieve this effect. Here are some common methods to add
-
permitAll(): allow any access
-
Deny all(): deny all access
-
anonymous(): allow anonymous user access
-
authenticated(): allows authenticated users to access
-
hasRole(String): allows access if the user has a given role (user group)/
-
hasAnyRole(String… ): allows access if the user has one of the given roles (user groups)
-
rememberMe(): if the user is authenticated by the remember me function, access is allowed
-
fullyAuthenticated(): if the user is fully authenticated (not through the remember me function), access is allowed
-
hasAuthority(String): allow access if the user has the given permission
-
hasAnyAuthority(String… ): allow access if the user has one of the given permissions
-
hasIpAddress(String): allows access if the request comes from a given ip address
-
not(): negate other access results
Description: hasAnyAuthority("ROLE_ The difference between ADMIN) and hasRole("ADMIN") is that the latter will automatically use it and will automatically use "ROLE" prefix
2. Let's customize user authorization
@Override
protected void configure(HttpSecurity http) throws Exception {
	http.authorizeRequests()
        	.antMatchers("/").permitAll()
        	.antMatchers("/levelA/**").hasRole("vip1")
        	.antMatchers("/levelB/**").hasRole("vip2")
        	.antMatchers("/levelC/**").hasRole("vip3")
        	.and().formLogin();
}
The above code means that any file (a/b/c.html here) under the three paths of / levelA/ /levelB/ /levelC / needs to be authenticated. The identity corresponds to vip1, vip2 and vip3 respectively. Other pages can be accessed at will
Obviously, although the content of authorization is specified, that is, which users have permissions and which resources can be accessed, we have not configured the user's information (legal or illegal), so naturally, the previous login page will report errors directly. Let's analyze how to authenticate
(2) Configure authentication content
A: Source code understanding user authentication mode
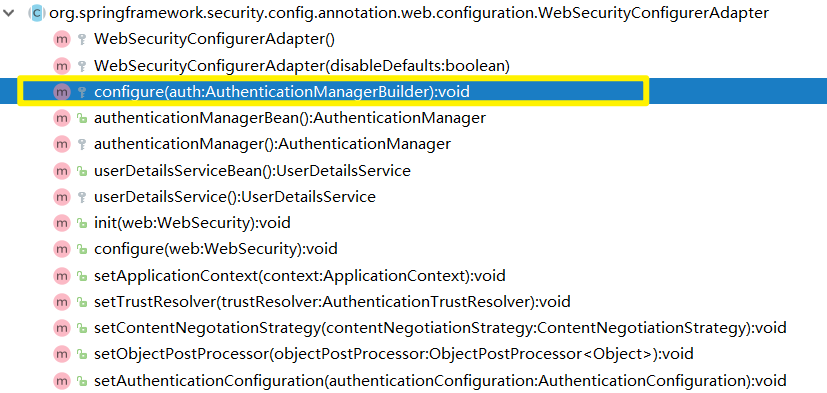
In the authorization part just now, we have rewritten the configure(HttpSecurity http) method. Let's continue to see whether the rewriting method can help us verify our identity and conduct user authentication. Let's first look at the method configure(AuthenticationManagerBuilder auth)
First, I'll take a look at the comments of the source code (the format of this part has been slightly modified for easy viewing):
This is an example given by another office. Actually, this is what we want. You can see from the comments. It is used to enable user name based authentication in memory
* protected void configure(AuthenticationManagerBuilder auth) {
*  auth
*  // enable in memory based authentication with a user named
*  // "user" and "admin"
*  		.inMemoryAuthentication()
*   		.withUser("user")
*    			.password("password")
*    			.roles("USER").and()
*        	.withUser("admin")
*    			.password("password")
*    			.roles("USER", "ADMIN");
* }
Follow the cat and draw the tiger. We'll do the same first
B: Custom user authentication
The code is as follows:
//Define authentication rules
@Override
protected void configure(AuthenticationManagerBuilder auth) throws Exception {
    auth.inMemoryAuthentication().passwordEncoder(new BCryptPasswordEncoder())
            .withUser("admin")
        		.password(new BCryptPasswordEncoder().encode("666"))
        		.roles("vip1", "vip2", "vip3")
            .and()
            .withUser("ideal-20")
        		.password(new BCryptPasswordEncoder().encode("666"))
        		.roles("vip1", "vip2")
            .and()
            .withUser("jack")
        		.password(new BCryptPasswordEncoder().encode("666"))
        		.roles("vip1");
}
We just follow the example. However, we add the problem of coding, which requires coding, otherwise it will report an error. The official recommendation is bcrypt encryption, which we use here. Of course, we can use the common MD5 and so on. We can write a tool class by ourselves
Here, test it. In fact, you can have access to different path resources according to different identities. The main functions have been implemented. Here are some more friendly functions, such as the display of login / logout button, remembering password, etc
(3) Cancellation issues
1. Unregister configuration
Of course, because there are many configurations in the front, you can connect through. and(), such as. and().xxx, or write a separate one as shown below http.xxx
@Override
protected void configure(HttpSecurity http) throws Exception {
   ......
    // Unregister configuration
	http.logout().logoutSuccessUrl("/")
}
In the above short sentence code, logout() indicates that the logout configuration is enabled, logoutsuccessusurl ("/"), which indicates the page returned after the logout is successful. We have to make it return to the home page after the logout
In the foreground page, I have given the code of the logout button. Of course, this is not fixed. Different ui frameworks and different template engines are different, but the path is / logout
<a class="item" th:href="@{/logout}">
  <i class="address card icon"></i> cancellation
</a>
(4) Display components according to identity permission
A: Display of login and logout
There is also such a problem. In the upper right corner, when you are not logged in, you should display the login button. After you log in, you should display the user information and log out. This part is mainly about the problems on the page side
The display condition is actually very simple, that is, to judge whether it is authenticated or not, take some values when it is authenticated, and display the login when it is not authenticated
1. At this point, we need to introduce a Thymeleaf with a dependency of Spring Security (of course, if it is another technology, it will be different)
The address is as follows:
https://mvnrepository.com/artifact/org.thymeleaf.extras/thymeleaf-extras-springsecurity5
<dependency>
    <groupId>org.thymeleaf.extras</groupId>
    <artifactId>thymeleaf-extras-springsecurity5</artifactId>
    <version>3.0.4.RELEASE</version>
</dependency>
2. Import namespace
The purpose of introducing this file is to give a prompt when writing permission judgment and other related content on the page
<html lang="en" xmlns:th="http://www.thymeleaf.org"
      xmlns:sec="http://www.thymeleaf.org/extras/spring-security">
3. Modify navigation bar logic
<!--Log in and log out-->
<div class="right menu">

  <!--If not logged in-->
  <div sec:authorize="!isAuthenticated()">
    <a class="item" th:href="@{/toLoginPage}">
      <i class="address card icon"></i> Sign in
    </a>
  </div>

  <!--If logged in-->
  <div sec:authorize="isAuthenticated()">
    <a class="item">
      <i class="address card icon"></i>
      user name:<span sec:authentication="principal.username"></span>
      <!--Role:<span sec:authentication="principal.authorities"></span>-->
    </a>
  </div>

  <div sec:authorize="isAuthenticated()">
    <a class="item" th:href="@{/logout}">
      <i class="address card icon"></i> cancellation
    </a>
  </div>
</div>
B: Display of component panel
The above code solves the problem of navigation bar, but for example, in our homepage, are some sections different for different users
As shown in the above example, users without login cannot access any file under / levelA /, / levelB /, / levelC /. Only the login user can access one or all of the files according to the permission size
The three panels of our home page are used to display these three links. For those who do not have enough identity, it is unnecessary to display this panel. Of course, you can choose to display it, but what do you want to do according to the identity display panel?
The key is to add such a permission code to the div. without the specified identity, the panel will not display sec:authorize="hasRole('vip1')"
<div class="column" sec:authorize="hasRole('vip1')">
  <div class="ui raised segments">
    <div class="ui segment">
      <a th:href="@{/levelA/a}">L-A-a</a>
    </div>
    <div class="ui segment">
      <a th:href="@{/levelA/b}">L-A-b</a>
    </div>
    <div class="ui segment">
      <a th:href="@{/levelA/c}">L-A-c</a>
    </div>
  </div>
</div>
<div class="column" sec:authorize="hasRole('vip2')">
  <div class="ui raised segments">
    <div class="ui segment">
      <a th:href="@{/levelB/a}">L-B-a</a>
    </div>
    <div class="ui segment">
      <a th:href="@{/levelB/b}">L-B-b</a>
    </div>
    <div class="ui segment">
      <a th:href="@{/levelB/c}">L-B-c</a>
    </div>
  </div>
</div>
<div class="column" sec:authorize="hasRole('vip3')">
  <div class="ui raised segments">
    <div class="ui segment">
      <a th:href="@{/levelC/a}">L-A-a</a>
    </div>
    <div class="ui segment">
      <a th:href="@{/levelC/b}">L-C-b</a>
    </div>
    <div class="ui segment">
      <a th:href="@{/levelC/c}">L-C-c</a>
    </div>
  </div>
</div>
Here's a demonstration:
(5) Remember users
If you restart your browser, you need to log in again. For some users, they think it's troublesome, so many websites provide the option of remembering users when logging in
1. A simple configuration can achieve the goal. In this case, the default landing page will have a radio box to remember the user
@Override
protected void configure(HttpSecurity http) throws Exception {
	......
	//Remember users
    http.rememberMe();
}
2. But what if the landing page is customized? In fact, you only need to change it to the following configuration,
//Custom remember my parameters!
http.rememberMe().rememberMeParameter("remember");
The above remember corresponds to the name attribute value in input
<input type="checkbox" name="remember"/>
<label>Remember the password</label>
3. What does it do?
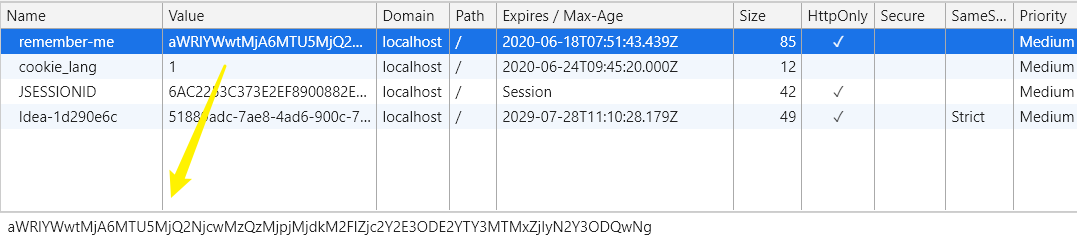
You can open the console of the page to have a look. In fact, after configuration, the user selects to remember the password, it will automatically help us add a cookie called remember me. The expiration time is 14 days. When you log off, the cookie will be deleted
(6) Custom landing page
1. Configuration
The landing page that comes with it is really ugly, and the one with lower version is even more ugly. If you want to use your own customized landing page, you can add the following configuration
@Override
protected void configure(HttpSecurity http) throws Exception {
	......
	// Login form submission request
    http.formLogin()
	.usernameParameter("username")
	.passwordParameter("password")
	.loginPage("/toLoginPage")
	.loginProcessingUrl("/login")
}
- . loginPage("/toLoginPage") means that when you access some pages that require user authority authentication, you will initiate this request to your login page
- . loginprocessing URL ("/ login") is a path in the form to submit the request
- The other two are about the acquisition of user name and password, whose value is consistent with the name attribute value of user name and password in the page
2. Page Jump
We mentioned this before. Let's review it
@RequestMapping("/toLoginPage")
public String toLoginPage() {
    return "views/login";
}
3. Customize the form submission action settings of the login page
<form id="login" class="ui fluid form segment" th:action="@{/login}" method="post">
	......
</form>
(7) Close csrf
@Override
protected void configure(HttpSecurity http) throws Exception {
	......
	//Turn off the csrf function: Cross Site Request Forgery. By default, logout requests can only be submitted by post
	http.csrf().disable();
}
(4) Integrating Spring Security (JDBC)
Because the configuration of users in the memory is relatively simple, so some details are also mentioned. Based on the above foundation, let's see how to use JDBC to realize the above functions. Of course, this part can only be used as supplement, but not so. The following integration of MyBatis is commonly used ()
(1) Create tables and data
Three fields are created here: user name, password, and role. When inserting data, md5 encryption is used for password (a tool class is written by myself)
It's more reasonable here. I define permissions as ordinary users, ordinary administrators and super administrators (I can design them myself)
-- ----------------------------
-- Table structure for user
-- ----------------------------
DROP TABLE IF EXISTS `user`;
CREATE TABLE `user`  (
  `uid` int(11) NOT NULL AUTO_INCREMENT,
  `username` varchar(255) DEFAULT NULL COMMENT 'user name',
  `password` varchar(255) DEFAULT NULL COMMENT 'password',
  `roles` varchar(255) DEFAULT NULL COMMENT 'role',
  PRIMARY KEY (`uid`)
)

-- ----------------------------
-- Records of user
-- ----------------------------
INSERT INTO `user` VALUES (1, 'superadmin', 'FAE0B27C451C728867A567E8C1BB4E53', 'ROLE_SUPER_ADMIN');
INSERT INTO `user` VALUES (2, 'admin', 'FAE0B27C451C728867A567E8C1BB4E53', 'ROLE_ADMIN');
INSERT INTO `user` VALUES (3, 'ideal-20', 'FAE0B27C451C728867A567E8C1BB4E53', 'ROLE_USER');
(2) Create entity
I used lombok, but the same is true when I write the get set construction method
@Data
@AllArgsConstructor
@NoArgsConstructor
public class User {
    private Integer uid;
    private String username;
    private String password;
    private String roles;
}
(3) Configure authorization content
There's no difference in this part
@Override
protected void configure(HttpSecurity http) throws Exception {
    http.authorizeRequests()
            .antMatchers("/").permitAll()
            .antMatchers("/levelA/**").hasAnyRole("USER","ADMIN","SUPER_ADMIN")
            .antMatchers("/levelB/**").hasAnyRole("ADMIN","SUPER_ADMIN")
            .antMatchers("/levelC/**").hasRole("SUPER_ADMIN")
            .and().formLogin()

            // Login form submission request
            .and().formLogin()
            .usernameParameter("username")
            .passwordParameter("password")
            .loginPage("/toLoginPage")
            .loginProcessingUrl("/login")
            //cancellation
            .and().logout().logoutSuccessUrl("/")
            //Remember me
            .and().rememberMe().rememberMeParameter("remember")
            //close csrf function:Cross-site request forgery ,By default, only through post Method submission logout request
            .and().csrf().disable();
}
(4) Configure authentication content
A: Configuration database
spring:
  datasource:
    username: root
    password: root99
    url: jdbc:mysql://localhost:3306/springboot_security_test?serverTimezone=Asia/Shanghai&useUnicode=true&characterEncoding=utf-8
    driver-class-name: com.mysql.cj.jdbc.Driver

server:
  port: 8082
B: Specific configuration
Here are a few things to note:
-
Query statements are all queried by username
-
The parameters in the usersByUsernameQuery() method must have a true query result, so I wrote a true in the query statement directly
-
The MD5 tool class is the part that I sorted out and added salt in a previous project. I have commented it out because it is easier for me to test
-
DataSource dataSource to be injected in front (select sql's)
//Define authentication rules
@Override
protected void configure(AuthenticationManagerBuilder auth) throws Exception {

auth.jdbcAuthentication()
            .dataSource(dataSource)
            .usersByUsernameQuery("select username,password,true from user where username = ?")
            .authoritiesByUsernameQuery("select username,roles from user where username = ?")
            .passwordEncoder(new PasswordEncoder() {
                @Override
                public String encode(CharSequence rawPassword) {
                    return MD5Util.MD5EncodeUtf8((String) rawPassword);
                }

                @Override
                public boolean matches(CharSequence rawPassword, String encodedPassword) {
                    return encodedPassword.equals(MD5Util.MD5EncodeUtf8((String) rawPassword));
                }
            });
}
C: MD5 tool class
package cn.ideal.utils;

import java.security.MessageDigest;

/**
 * @ClassName: MD5Util
 * @Description: MD5 Encryption tool class
 * @Author: BWH_Steven
 * @Date: 2020/4/27 16:46
 * @Version: 1.0
 */
public class MD5Util {

    private static String byteArrayToHexString(byte b[]) {
        StringBuffer resultSb = new StringBuffer();
        for (int i = 0; i < b.length; i++)
            resultSb.append(byteToHexString(b[i]));

        return resultSb.toString();
    }

    private static String byteToHexString(byte b) {
        int n = b;
        if (n < 0)
            n += 256;
        int d1 = n / 16;
        int d2 = n % 16;
        return hexDigits[d1] + hexDigits[d2];
    }

    /**
     * Return to uppercase MD5
     *
     * @param origin
     * @param charsetname
     * @return
     */
    private static String MD5Encode(String origin, String charsetname) {
        String resultString = null;
        try {
            resultString = new String(origin);
            MessageDigest md = MessageDigest.getInstance("MD5");
            if (charsetname == null || "".equals(charsetname))
                resultString = byteArrayToHexString(md.digest(resultString.getBytes()));
            else
                resultString = byteArrayToHexString(md.digest(resultString.getBytes(charsetname)));
        } catch (Exception exception) {
        }
        return resultString.toUpperCase();
    }

    public static String MD5EncodeUtf8(String origin) {
//        origin = origin + PropertiesUtil.getProperty("password.salt", "");
        return MD5Encode(origin, "utf-8");
    }

    private static final String hexDigits[] = {"0", "1", "2", "3", "4", "5",
            "6", "7", "8", "9", "a", "b", "c", "d", "e", "f"};
}
D: Modify page
At this point, the integration of JDBC is successful. As for the front page, we only need to modify it according to our own design permission. The other places are the same as the way in the front memory
<div class="ui stackable three column grid">
  <div class="column" sec:authorize="hasAnyRole('USER','ADMIN','SUPER_ADMIN')">
    <div class="ui raised segments">
      <div class="ui segment">
        <a th:href="@{/levelA/a}">L-A-a</a>
      </div>
      <div class="ui segment">
        <a th:href="@{/levelA/b}">L-A-b</a>
      </div>
      <div class="ui segment">
        <a th:href="@{/levelA/c}">L-A-c</a>
      </div>
    </div>
  </div>
  <div class="column" sec:authorize="hasAnyRole('ADMIN','SUPER_ADMIN')">
    <div class="ui raised segments">
      <div class="ui segment">
        <a th:href="@{/levelB/a}">L-B-a</a>
      </div>
      <div class="ui segment">
        <a th:href="@{/levelB/b}">L-B-b</a>
      </div>
      <div class="ui segment">
        <a th:href="@{/levelB/c}">L-B-c</a>
      </div>
    </div>
  </div>
  <div class="column" sec:authorize="hasRole('SUPER_ADMIN')">
    <div class="ui raised segments">
      <div class="ui segment">
        <a th:href="@{/levelC/a}">L-C-a</a>
      </div>
      <div class="ui segment">
        <a th:href="@{/levelC/b}">L-C-b</a>
      </div>
      <div class="ui segment">
        <a th:href="@{/levelC/c}">L-C-c</a>
      </div>
    </div>
  </div>
  <!-- <div class="column"></div> -->
</div>
(5) Integrating Spring Security (MyBatis)
Because this part of the content is more commonly used, so I try to improve it as much as possible
(1) Add dependency
For example, lombok and Commons lang3 are not necessary. They can be replaced by some native methods. I will mention them when I write there
<dependency>
    <groupId>org.thymeleaf.extras</groupId>
    <artifactId>thymeleaf-extras-springsecurity5</artifactId>
    <version>3.0.4.RELEASE</version>
</dependency>

<dependency>
    <groupId>org.springframework.boot</groupId>
    <artifactId>spring-boot-starter-thymeleaf</artifactId>
</dependency>

<dependency>
    <groupId>org.apache.commons</groupId>
    <artifactId>commons-lang3</artifactId>
</dependency>

<dependency>
    <groupId>org.projectlombok</groupId>
    <artifactId>lombok</artifactId>
    <optional>true</optional>
</dependency>

<dependency>
    <groupId>mysql</groupId>
    <artifactId>mysql-connector-java</artifactId>
</dependency>

<dependency>
    <groupId>org.springframework.boot</groupId>
    <artifactId>spring-boot-starter-security</artifactId>
</dependency>
<dependency>
    <groupId>org.springframework.boot</groupId>
    <artifactId>spring-boot-starter-web</artifactId>
</dependency>
<dependency>
    <groupId>org.mybatis.spring.boot</groupId>
    <artifactId>mybatis-spring-boot-starter</artifactId>
    <version>2.1.2</version>
</dependency>

<dependency>
    <groupId>org.springframework.boot</groupId>
    <artifactId>spring-boot-devtools</artifactId>
    <scope>runtime</scope>
    <optional>true</optional>
</dependency>
(2) Create table
Same table as JDBC part
Three fields, user name, password, and role. When inserting data, md5 encryption is used for password (a tool class is written by myself)
It's more reasonable here. I define permissions as ordinary users, ordinary administrators and super administrators (I can design them myself)
-- ----------------------------
-- Table structure for user
-- ----------------------------
DROP TABLE IF EXISTS `user`;
CREATE TABLE `user`  (
  `uid` int(11) NOT NULL AUTO_INCREMENT,
  `username` varchar(255) DEFAULT NULL COMMENT 'user name',
  `password` varchar(255) DEFAULT NULL COMMENT 'password',
  `roles` varchar(255) DEFAULT NULL COMMENT 'role',
  PRIMARY KEY (`uid`)
)

-- ----------------------------
-- Records of user
-- ----------------------------
INSERT INTO `user` VALUES (1, 'superadmin', 'FAE0B27C451C728867A567E8C1BB4E53', 'ROLE_SUPER_ADMIN');
INSERT INTO `user` VALUES (2, 'admin', 'FAE0B27C451C728867A567E8C1BB4E53', 'ROLE_ADMIN');
INSERT INTO `user` VALUES (3, 'ideal-20', 'FAE0B27C451C728867A567E8C1BB4E53', 'ROLE_USER');
(3) Integrating MyBatis
Before you configure Spring Security, you'd better integrate MyBatis, so that you can only consider Spring Security
Note: I've simplified this part as much as possible. For example, the default connection pool is used. If this part still feels a bit problematic, please refer to my previous articles on integrating MyBatis
A: Configuration database
spring:
  datasource:
    username: root
    password: root99
    url: jdbc:mysql://localhost:3306/springboot_security_test?serverTimezone=Asia/Shanghai&useUnicode=true&characterEncoding=utf-8
    driver-class-name: com.mysql.cj.jdbc.Driver

mybatis:
  mapper-locations: classpath:mapper/*Mapper.xml
  type-aliases-package: cn.ideal.pojo

server:
  port: 8081
B: Configure Mapper and XML
UserMapper
@Mapper
public interface UserMapper {
    User queryUserByUserName(String username);
}
mapper/UserMapper.xml
<?xml version="1.0" encoding="utf-8" ?>
<!DOCTYPE mapper PUBLIC "-//mybatis.org//DTD Mapper 3.0//EN" "http://mybatis.org/dtd/mybatis-3-mapper.dtd" >
<mapper namespace="cn.ideal.mapper.UserMapper">
    <select id="queryUserByUserName" parameterType="String" resultType="cn.ideal.pojo.User">
         select * from user where username = #{username}
    </select>
</mapper>
There will be no demonstration test here. There is no problem
(4) Configure authorization content
There's nothing to say about this part. It's the same as the previous one. It's explained in detail when configuring users in memory
@Override
protected void configure(HttpSecurity http) throws Exception {
    http.authorizeRequests()
            .antMatchers("/").permitAll()
            .antMatchers("/levelA/**").hasAnyRole("USER","ADMIN","SUPER_ADMIN")
            .antMatchers("/levelB/**").hasAnyRole("ADMIN","SUPER_ADMIN")
            .antMatchers("/levelC/**").hasRole("SUPER_ADMIN")
            .and().formLogin()

            // Login form submission request
            .and().formLogin()
            .usernameParameter("username")
            .passwordParameter("password")
            .loginPage("/toLoginPage")
            .loginProcessingUrl("/login")
            //cancellation
            .and().logout().logoutSuccessUrl("/")
            //Remember me
            .and().rememberMe().rememberMeParameter("remember")
            //close csrf function:Cross-site request forgery ,By default, only through post Method submission logout request
            .and().csrf().disable();
}
(5) Configure authentication content
A: Create UserService
Create a class to implement UserDetailsService, which is mainly for the loadUserByname method. In this class, we can inject mapper and so on to check the User. If we can't find it, we will stay on this page. If we find it, we will make some logic (such as empty judgment, etc.), and then we will encapsulate the User information to Spring Security's own In the User class, Spring Security compares the foreground data with it and makes operations, such as authentication success or error
be careful:
- StringUtils yes commons.lang3 Next, you need to use the guided package. We use a void judgment function. If you don't want to use it, you need to use the original one. This is not the point
- Pay attention to the distinction between your own User and Spring Security User
@Service
public class UserService<T extends User> implements UserDetailsService{

    @Autowired
    private UserMapper userMapper;

    @Override
    public UserDetails loadUserByUsername(String username) throws UsernameNotFoundException {
        User user = userMapper.queryUserByUserName(username);
        if (username == null){
            throw  new UsernameNotFoundException("user name does not exist");
        }

        List<SimpleGrantedAuthority> authorityList = new ArrayList<>();
        String role = user.getRoles();
        if (StringUtils.isNotBlank(role)){
            authorityList.add(new SimpleGrantedAuthority(role.trim()));
        }
        return new org.springframework.security.core.userdetails
            .User(user.getUsername(),user.getPassword(),authorityList);
    }
}
B: Modify configuration class
We are also familiar here. We can call userDetailsService when we call. We also need to specify encoding related content to instantiate PasswordEncoder. We need to rewrite encode and matches
//Define authentication rules
@Override
protected void configure(AuthenticationManagerBuilder auth) throws Exception {
    auth.userDetailsService(userService).passwordEncoder(new PasswordEncoder() {
        @Override
        public String encode(CharSequence rawPassword) {
            return MD5Util.MD5EncodeUtf8((String) rawPassword);
        }

        @Override
        public boolean matches(CharSequence rawPassword, String encodedPassword) {
            return encodedPassword.equals(MD5Util.MD5EncodeUtf8((String) rawPassword));
        }
    });
}
C: MD5 tool class supplement
In fact, it has been given above, but I'm afraid it's inconvenient for you to post here
The MD5 tool class is the part that I sorted out and added salt in a previous project. I have commented it out, because it can be simpler when I test
package cn.ideal.utils;

import java.security.MessageDigest;

/**
 * @ClassName: MD5Util
 * @Description: MD5 Encryption tool class
 * @Author: BWH_Steven
 * @Date: 2020/4/27 16:46
 * @Version: 1.0
 */
public class MD5Util {

    private static String byteArrayToHexString(byte b[]) {
        StringBuffer resultSb = new StringBuffer();
        for (int i = 0; i < b.length; i++)
            resultSb.append(byteToHexString(b[i]));

        return resultSb.toString();
    }

    private static String byteToHexString(byte b) {
        int n = b;
        if (n < 0)
            n += 256;
        int d1 = n / 16;
        int d2 = n % 16;
        return hexDigits[d1] + hexDigits[d2];
    }

    /**
     * Return to uppercase MD5
     *
     * @param origin
     * @param charsetname
     * @return
     */
    private static String MD5Encode(String origin, String charsetname) {
        String resultString = null;
        try {
            resultString = new String(origin);
            MessageDigest md = MessageDigest.getInstance("MD5");
            if (charsetname == null || "".equals(charsetname))
                resultString = byteArrayToHexString(md.digest(resultString.getBytes()));
            else
                resultString = byteArrayToHexString(md.digest(resultString.getBytes(charsetname)));
        } catch (Exception exception) {
        }
        return resultString.toUpperCase();
    }

    public static String MD5EncodeUtf8(String origin) {
//        origin = origin + PropertiesUtil.getProperty("password.salt", "");
        return MD5Encode(origin, "utf-8");
    }

    private static final String hexDigits[] = {"0", "1", "2", "3", "4", "5",
            "6", "7", "8", "9", "a", "b", "c", "d", "e", "f"};
}
(6) End
If there are any deficiencies in the article, welcome to leave a message and exchange, thank you for your support!
If you can help, then pay attention to me! If you love the way WeChat reads, you can pay attention to my official account.
We don't know each other here, but we are working hard for our dreams Mei
An official account of the article that persists in pushing original development technology: ideal two days