springboot notes
Reference from http://c.biancheng.net/spring_boot/
Parent project dependency management
<!--SpringBoot Parent project dependency management,spring-boot-starter-parent Is all Spring Boot The parent dependency of the project, which is called Spring Boot The version arbitration center can uniformly manage some common dependencies in the project.-->
    <parent>
        <groupId>org.springframework.boot</groupId>
        <artifactId>spring-boot-starter-parent</artifactId>
        <version>2.4.5</version>
        <relativePath/>
    </parent>
Perform the following in this project mvn Command viewer dependency tree.
mvn dependency:tree
YAML
YAML syntax: https://www.runoob.com/w3cnote/yaml-intro.html
Spring Boot configuration binding
Encapsulate the configuration specified in the configuration file into a JavaBean (entity class)
SpringBoot provides the following two ways to configure bindings:
- Use @ ConfigurationProperties annotation: you can bind the configuration data in the global configuration file to JavaBean s
- Use @ Value annotation: when only one configuration in the configuration file needs to be read, it can be obtained through @ Value annotation
For example:
@ConfigurationProperties
Marked on the class name of JavaBean; Support for loose binding (loose syntax)
//Bind all attributes in the class to the configuration file; prefix = ": which of the following attributes in the configuration file is mapped one by one
@ConfigurationProperties(prefix = "person")
@Component//Annotation to add components to the container
public class Person {...}
@Controller
public class HelloController {
    @Autowired//Automatic assembly, displaying the attribute values in the configuration file in the browser
    private Person person;
    @ResponseBody
    @RequestMapping("/hello")
    public Person hello(){
        return person;}
}
@Value:
Annotation on JavaBean properties. Loose binding is not supported
@Component
public class Person {
    @Value("${person.lastName}")
    private String lastName;
    ...
- @ConfigurationProperties: supports encapsulation of all types of data, such as Map, List, Set, and object;
- @Value: only encapsulation of basic data types is supported, such as string, Boolean, integer, etc.
@PropertySource
Configurations unrelated to Spring Boot (such as custom configurations) are usually extracted and written in a separate configuration file, and the @ PropertySource annotation is used on the corresponding JavaBean to point to the configuration file
@PropertySource(value = "classpath:person.properties")//Point to the configuration file, person.properties
@Component
@ConfigurationProperties(prefix = "person")
public class Person {...
Spring Boot import spring configuration
By default, Spring Boot does not contain any spring configuration files. Spring Boot provides two ways to import spring configuration:
- Load the Spring configuration file using the @ ImportResource annotation
- Loading Spring configuration using full annotation
@ImportResource
One or more Spring configuration files can be imported using the @ ImportResource annotation on the main startup class
@ImportResource(locations = {"classpath:/beans.xml"})//Load beans.xml into the project
@SpringBootApplication
public class HelloworldApplication {
<!--beans.xml-->
<?xml version="1.0" encoding="UTF-8"?>
<beans xmlns="http://www.springframework.org/schema/beans"   ......>
  <bean id="persionService" class="net.biancheng.www.service.impl.PersonServiceImpl">  	 </bean> //Register personService in IOC
</beans>
@Configuration and @ Bean
@Configuration: annotation defines the configuration class, replaces the Spring configuration file, and loads the Spring configuration by annotation.
@Bean: the configuration class can contain one or more @ bean annotated methods, which will be annotated by AnnotationConfigApplicationContext
Or AnnotationConfigWebApplicationContext class scan to build the bean definition.
(equivalent to the label in the Spring configuration file), the return value of the method will be added to the ioc in the form of a component, and the id of the component is the method name.
/**
* @Configuration Annotation is used to define a configuration class, which is equivalent to the Spring configuration file. The configuration class contains one or more @ Bean annotated methods, which are equivalent to the components defined by the < Bean > tag in the Spring configuration file.
*/
@Configuration
public class Config {
    /**
     * Equivalent to < bean id = "personservice" class = "personserviceimpl" > < / bean >
     * The return value of this method is added to the container as a component, and the method name is the component id (equivalent to the attribute id of the < bean > tag)
     */
    @Bean
    public PersonService personService() {
        System.out.println("Added a component to the container:peronService");
        return new PersonServiceImpl();}
}
Spring Boot Profile (multi environment configuration)
A project usually has multiple environments. The Profile supports the use of different configurations in different environments. You can quickly switch environments by activating and specifying parameters.
#The configurations of different environments are distinguished by the naming form of file name. The file naming format is:
#{profile} is generally the name or abbreviation of each environment, such as dev, test, prod, and so on
application-{profile}.properties/yml
- application.properties: main configuration file
- application-dev.properties: development environment configuration file
- application-test.properties: test environment configuration file
- application.prod-properties: production environment configuration file
#properties file
#In the application.properties file, specify the default server port number and activate the profile of the production environment through the following configuration.
server.port=8080
#Activate the specified profile
spring.profiles.active=prod
#Application.yml file
#Default configuration
server:
  port: 8080
#Switch configuration
spring:
  profiles:
    active: dev #Activate development environment configuration
Application.yml file: in YAML configuration file, you can use "-" to divide the configuration file into multiple document blocks. You can make different configurations for different environments in different document blocks, and switch the configuration in the first document block.
#Default configuration
server:
  port: 8080
#Switch configuration
spring:
  profiles:
    active: test
---
#development environment
server:
  port: 8081
spring:
  config:
    activate:
      on-profile: dev
---
#testing environment
server:
  port: 8082
spring:
  config:
    activate:
      on-profile: test
Spring Boot default configuration file
Multiple application.properties or adaptation.yml can exist in the Spring Boot project.
When Spring boot starts, it will scan the application.properties or. yml files in the following five locations and take them as the default configuration file of Spring boot. (Note: File: refers to the root directory of the current project; classpath: refers to the class path of the current project, that is, the resources directory.)
- file:./config/
- file:./config/*/
- file:./
- classpath:/config/
- classpath:/
The configuration files in all the above locations will be loaded, and their priority will be reduced in turn. The smaller the serial number, the higher the priority. Secondly, the priority of application.properties in the same location is higher than that of application.yml.
Spring Boot external configuration file
The command line can specify the path of the external configuration file through the following 2 parameters:
- spring.config.location: specify the path of the external configuration file. Specifying the configuration file with this parameter will invalidate the default configuration file of the project, and Spring Boot will only load the specified external configuration file.
- Spring.config.additional-location: unlike spring.config.location, spring.config.additional-location does not invalidate the default configuration file of the project. The external configuration file added with this command line parameter will take effect together with the default configuration file of the project to form a complementary configuration, and its priority is the highest, higher than that of all default configuration files .
java -jar {JAR} --spring.config.additional-location={Full path of external configuration file}
Brief automatic configuration principle of Spring Boot
The automatic configuration of Spring Boot is based on the Spring Factories mechanism.
Spring Boot will automatically scan META-INF/spring.factories files under all Jar package Classpaths, read the contents and instantiate them. This mechanism is also the basis of Spring Boot Starter
The spring core package defines the springfactoryesloader class. This class will scan the META-INF/spring.factories file under the class path of all Jar packages and obtain the configuration of the specified interface
Two external methods are defined in the SpringFactoriesLoader class:
| Return value | method | describe |
|---|---|---|
| List | loadFactories(Class factoryType, @Nullable ClassLoader classLoader) | Static method; get the instance of its implementation class according to the interface; this method returns the list of implementation class objects. |
| List | loadFactoryNames(Class<?> factoryType, @Nullable ClassLoader classLoader) | Public static method; get the name of its implementation class according to interface l; this method returns a list of class names of implementation classes |
loadFactories() method: get the implementation class object of the specified interface.
loadFactoryNames() method: get the collection of its implementation class names according to the interface.
loadSpringFactories() method: read the configuration contents of META-INF/spring.factories file under the class path of all Jar packages in the project and return it in the form of Map collection.
Spring Boot automatic configuration is also implemented based on the Spring Factories mechanism. The content of Spring Boot automatic configuration is set in META-INF/spring.factories under the spring-boot-autoconfigure-xxx.jar class path.
@SpringBootApplication
@SpringBootApplication is a composite meta annotation, which mainly contains two annotations: @ SpringBootConfiguration and @ EnableAutoConfiguration. The @ EnableAutoConfiguration annotation is the core of SpringBoot automatic configuration.
@The EnableAutoConfiguration annotation is used to enable the auto configuration function of Spring Boot. It uses the @ Import annotation provided by the Spring framework to Import auto configuration components into the container through the AutoConfigurationImportSelector class (selector).
Spring Boot unified logging framework
There are many log frameworks, which can be divided into two categories: log facade (log abstraction layer) and log implementation.
| Log classification | describe | give an example |
|---|---|---|
| Log facade (log abstraction layer) | It provides a set of standard and normative API framework for Java log access. Its main significance is to provide interfaces. | JCL(Jakarta Commons Logging),SLF4j(Simple Logging Facade for Java),jboss-logging |
| Log implementation | Implementation of log facade | Log4j,JUL(java.util.logging),Log4j2,Logback |
The log is composed of a log facade and a log implementation. Spring Boot uses the combination of SLF4J + Logback to build the log system
Use of SLF4J
When logging, you should not directly call the methods of the log implementation layer, but the methods of the log facade (log abstraction layer)
Logger logger = LoggerFactory.getLogger(HelloWorld.class);
//Call the info() method of slf4j instead of the logback method
logger.info("Hello World");
Log4j does not directly implement SLF4J. When an application uses the combination of SLF4J and log4j to record logs, it needs to introduce not only the Jar package of SLF4J and log4j, but also the Adaptation layer SLF4J-log4j12.jarss between them. It needs to implement SLF4J methods and call log4j methods to connect the preceding and the following.
Each log implementation framework has its own configuration file. When logging with slf4j, the configuration file should use its own configuration file of the logging implementation framework (such as logback, log4j, JUL, etc.).
Usually, a complete application depends on a variety of different frameworks, and they use different logging frameworks for logging, such as * * Spring Boot (slf4j+logback), Spring (commons logging), Hibernate (JBoss logging) * * and so on.
Unified logging framework
The unified logging framework requires the following three steps:
(use a replacement package to replace the original logging framework, for example, log4j-over-slf4j replaces Log4j (common logging API), jul-to-slf4j.jar replaces JUL (java.util.logging API))
- Exclude the original log framework in the application;
- Introducing a replacement package to replace the excluded log framework;
- Import SLF4J implementation.
Spring Boot starter, the core initiator of Spring Boot, introduces Spring Boot starter logging

The Maven dependency of Spring Boot starter logging not only introduces logback classic (including the implementation of the logging framework SLF4J), but also introduces log4j-to-slf4j (the replacement package of log4j) and jul-to-slf4j (the replacement package of JUL), that is, Spring Boot has completed two of the three steps of the unified logging framework for us.
When a third-party framework (such as Hibernate) that relies on other logging frameworks is introduced, it is only necessary to exclude the logging framework that this framework depends on, so as to realize the unification of logging framework.
<dependency>
    <groupId>org.apache.activemq</groupId>
    <artifactId>activemq-console</artifactId>
    <version>${activemq.version}</version>
    <exclusions>
        <exclusion>
            <groupId>commons-logging</groupId>
            <artifactId>commons-logging</artifactId>
        </exclusion>
    </exclusions>
</dependency>
log level
| Serial number | log level | explain |
|---|---|---|
| 1 | trace | Tracking, indicating the running track of the program. |
| 2 | debug | Debugging is generally regarded as the lowest level in practical applications, while trace is rarely used. |
| 3 | info | Output important information and use it more. |
| 4 | warn | Warning, use more. |
| 5 | error | Error message, used more. |
Log output format
| Serial number | Output format | explain |
|---|---|---|
| 1 | %d{yyyy-MM-dd HH:mm:ss, SSS} | Log production time, output to milliseconds |
| 2 | %-5level | Output log level, - 5 indicates left alignment and fixed output of 5 characters. If it is insufficient, fill 0 on the right |
| 3 | %logger or% c | The name of the logger |
| 4 | %thread or% t | Output current thread name |
| 5 | %p | Log output format |
| 6 | %message or% msg or% m | Log content, i.e. logger.info("message") |
| 7 | %n | Newline character |
| 8 | %class or% C | Output Java class name |
| 9 | %file or% F | Output file name |
| 10 | %L | Output error line number |
| 11 | %method or% M | Output method name |
| 12 | %l | The number of lines where the output statement is located, including class name, method name, file name and number of lines |
| 13 | hostName | Local machine name |
| 14 | hostAddress | Local ip address |
The default level of Spring Boot log is info, and the log output contains the following elements by default:
- Time date
- log level
- Process ID
- Separator: --
- Thread Name: enclosed in square brackets (console output may be truncated)
- Logger name
- Log content
Custom log configuration
In the configuration file application.porperties/yml of Spring Boot, you can modify some default log configurations, but only individual log configurations can be modified in this way. If you want to modify more configurations or use more advanced functions, you need to configure through the log implementation framework's own configuration file.
| Log frame | configuration file |
|---|---|
| Logback | logback-spring.xml,logback-spring.groovy,logback.xml,logback.groovy |
| Log4j2 | log4j2-spring.xml,log4j2.xml |
| JUL (Java Util Logging) | logging.properties |
The configuration files of the log framework are basically divided into two categories:
- Normal log configuration file, that is, the configuration file without spring ID, such as logback.xml;
- A log configuration file with a spring representation, such as logback-spring.xml.
After the normal log configuration file without spring ID is placed in the classpath of the project, the Spring Boot will be skipped and directly loaded by the log framework. Through these configuration files, we can achieve the purpose of customizing log configuration.
After the configuration files with spring ID are placed in the project classpath, they will not be loaded directly by the logging framework, but will be parsed by Spring Boot. In this way, you can use the advanced function Profile of Spring Boot to use different logging configurations in different environments.
Spring Boot Web rapid development
Spring Boot provides automatic configuration for Spring MVC, and adds the following features based on the default functions of Spring MVC:
- Content negotiatingviewresolver and BeanNameViewResolver (view resolver) are introduced
- Support for static resources including WebJars
- Automatically register Converter, GenericConverter and Formatter (Converter and Formatter)
- Support for HttpMessageConverters (message converters used to convert HTTP requests and responses in Spring MVC)
- Automatically register MessageCodesResolver (used to define error code generation rules)
- Support access to the static home page (index.html)
- Automatically use ConfigurableWebBindingInitializer
Spring Boot starter web introduces the core initiator Spring Boot starter for us by default. Therefore, when pom.xml in the Spring Boot project introduces the dependency of Spring Boot starter web, there is no need to introduce the dependency of Spring Boot starter core initiator
Spring Boot static resource mapping
Spring Boot provides us with three static resource mapping rules by default:
- WebJars mapping: it can provide resource files for Web projects in the form of jars.
- Default resource mapping
- Static home page (welcome page) mapping
WebJars mapping
The Spring Boot project is deployed in the form of Jar package, and there is no webapp directory. WebJars can make Web front-end resources (JS, CSS, etc.) into Jar packages one by one, and then deploy these Jar packages to Maven central warehouse for unified management. When Web front-end resources need to be introduced into the Spring Boot project, just visit the WebJars official website, find the pom dependency of the required resources, and import them into the project. All front-end resources introduced through WebJars are stored in the "/ META-INF/resources/webjars /" directory under the current project classpath.
The mapping path of WebJars is "/ WebJars /", that is, all requests to access "/ WebJars /" will go to * * classpath:/META-INF/resources/webjars / * * to find WebJars front-end resources.
<dependency>
    <groupId>org.webjars</groupId>
    <artifactId>jquery</artifactId>
    <version>3.6.0</version>
</dependency>
Default resource mapping
When accessing any resource in the project (i.e. "/ * *"), Spring Boot will find the resource file from the following path by default (the priority decreases in turn):
- classpath:/META-INF/resources/
- classpath:/resources/
- classpath:/static/
- classpath:/public/
Static home page (welcome page) mapping
All index.html in the static resource folder are called static home page or welcome page, and they will be mapped by / * * in other words, when we access "/" or "/ index. HTML", we will jump to the static home page (welcome page).
When accessing the static home page or welcome page, the search order also follows the default search order of static resources until index.html is found.
Spring Boot customizing Spring MVC
The automatic Configuration of Spring MVC by Spring Boot can meet most of our needs, but we can also customize the Spring MVC Configuration by customizing the Configuration class (the class marked @ Configuration) and implementing the WebMvcConfigurer interface, such as interceptor, formatter, view controller, etc.
WebMvcConfigurer is a Java 8-based interface that defines many Spring MVC related methods, most of which are of type default and empty implementations. Therefore, we only need to define a configuration class, implement the WebMvcConfigurer interface, and rewrite the corresponding methods to customize the configuration of Spring MVC.
In the Spring Boot project, we can customize Spring MVC in the following 2 forms:
- Extend Spring MVC
- Fully take over Spring MVC
Extend Spring MVC
//Implementing the WebMvcConfigurer interface can extend the functionality of spring MVC
@Configuration
public class MyMvcConfig implements WebMvcConfigurer {
    //Override the addViewControllers() method
    @Override
    public void addViewControllers(ViewControllerRegistry registry) {
        //When accessing "/" or "/ index.html", you will directly jump to the login page
        registry.addViewController("/").setViewName("login");
        registry.addViewController("/index.html").setViewName("login");
    }
}
/*Start Spring Boot and you will find“ http://localhost:8080/login ”,“ http://localhost:8080/ ”
"http://localhost:8080/index.html" 3 Both URL s can jump to the landing page login.html  */
Fully take over Spring MVC
Under special circumstances, you may need to abandon all Spring Boot's automatic configuration of Spring MVC and take over Spring MVC completely. At this time, we can customize a configuration class of WebMvcConfigurer type (implementing the WebMvcConfigurer interface) and mark the @ EnableWebMvc annotation on this class to fully take over Spring MVC. (Spring Boot's automatic configuration of Spring MVC will all fail)
//Implementing the WebMvcConfigurer interface can extend the functionality of spring MVC
@EnableWebMvc  // Take over spring MVC completely, and mark @ EnableWebMvc on the configuration class
@Configuration
public class MyMvcConfig implements WebMvcConfigurer {...}
Spring Boot integrates Thymeleaf
Thymeleaf is a template engine for rendering XML/XHTML/HTML5 content. Features: even if you don't start the Web application, you can open it directly in the browser and display the template page correctly.
Thymeleaf supports html prototype, and its file suffix is ". html", so it can be opened directly by the browser. At this time, the browser will ignore the undefined thymeleaf tag attribute and display the static page effect of thymeleaf template; When accessed through a Web application, thymeleaf will dynamically replace the static content to make the page display dynamically.
<!--Thymeleaf Through in html Tag, add additional attributes to achieve "template"+Display method of "data"-->
<!DOCTYPE html>
<html lang="en" xmlns:th="http://www.thymeleaf.org">
<head>
    <meta charset="UTF-8">
    <title>Title</title>
</head>
<body>
<!--th:text by Thymeleaf Property to display text in the-->
<h1 th:text="Welcome to Thymeleaf">Welcome to the static page HTML</h1>
</body>
</html>
Welcome to the static page HTML   //When opened directly using the browser
 Welcome to Thymeleaf	   //When accessed through a Web application
Thymeleaf template engine has the following features:
- Dynamic and static combination: Thymeleaf can not only open it directly with the browser to view the static effect of the page, but also access it through the Web application to view the dynamic page effect.
- Out of the box: Thymeleaf provides Spring standard dialect and an optional module perfectly integrated with Spring MVC, which can quickly realize form binding, Attribute Editor, internationalization and other functions.
- Multi dialect support: it provides two dialects of Thymeleaf standard and Spring standard, which can directly apply the template to realize JSTL and OGNL expressions; If necessary, developers can also extend and create custom dialects.
- Perfect integration with Spring Boot: Spring Boot provides the default configuration for Thymeleaf and also sets a view parser for Thymeleaf, so Thymeleaf can be perfectly integrated with Spring Boot.
Spring Boot integrates Thymeleaf template engine. The following steps are required:
- Introduction of Starter dependency: spring boot Starter thymeleaf
- Create a template file and put it in the specified directory
The default location of Thymeleaf template is in the resources/templates directory, and the default suffix is HTML, that is, Thymeleaf can render automatically as long as the HTML page is placed under "classpath:/templates /".
<!--establish hello.html Page and place it in the project classpath( resources)Lower templates In the directory-->
<!DOCTYPE html>
<!--Import thymeleaf Namespace for-->
<html lang="en" xmlns:th="http://www.thymeleaf.org">
<head>
    <meta charset="UTF-8">
    <title>Title</title>
</head>
<body>
<!--th:text by Thymeleaf Property to get the value of the specified property-->
<h1 th:text="'Welcome to'+${name}"></h1>
</body>
</html>
@Controller
public class HelloController {
    @RequestMapping("/hello")
    public String hello(Map<String, Object> map) {
        //Pass data to front page through map
        map.put("name", "koma_zhe page");
        return "hello";
    }
}
//Access with browser“ http://localhost:8080/hello , the welcome page appears
Spring Boot internationalization (i18n)
To implement internationalization in Spring projects, you usually need the following three steps:
- Write internationalization resource (configuration) file
- Managing internationalization resource files using ResourceBundleMessageSource
- Get international content on the page
Write internationalization resource (configuration) file
Create an international resource file under the classpath of Spring Boot. The file name format is: basic name_ Language code_ Country or region code.
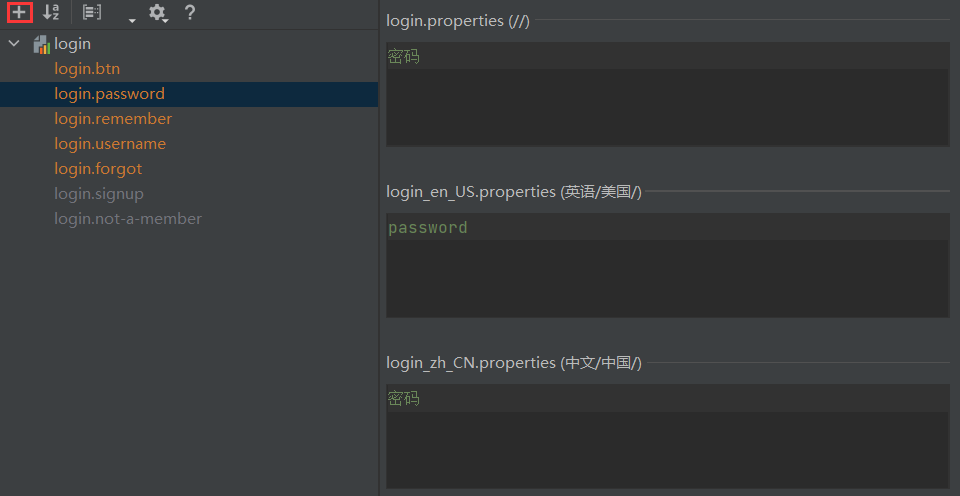
For example, create a directory of i18n under src/main/resources, and create the following three files in this directory according to the naming format of international resource files:
- login.properties: effective when there is no language setting
- login_en_US.properties: effective in English
- login_zh_CN.properties: effective when in Chinese

Open any internationalization resource file, switch to the Resource Bundle mode, and then click the "+" sign to create the required internationalization attributes.
Managing internationalization resource files using ResourceBundleMessageSource
Spring Boot has provided default auto configuration for ResourceBundleMessageSource. Spring Boot will get message.properties and message in the classpath by default_ 30. Properties as an internationalization resource file.
Spring Boot interceptor
In the Spring Boot project, using the interceptor function usually requires the following three steps:
- Define interceptors;
- Register interceptors;
- Specify the interception rule (if all static resources are intercepted, they will also be intercepted).
Define interceptor
You only need to create an interceptor class and implement the HandlerInterceptor interface. The following three methods are defined in the HandlerInterceptor interface
| return type | Method declaration | describe |
|---|---|---|
| boolean | preHandle(HttpServletRequest request, HttpServletResponse response, Object handler) | This method is executed before the controller processes the request method. Its return value indicates whether to interrupt the subsequent operation. Returning true indicates to continue the downward execution, and returning false indicates to interrupt the subsequent operation. |
| void | postHandle(HttpServletRequest request, HttpServletResponse response, Object handler, ModelAndView modelAndView) | This method is executed after the controller processes the request method call and before parsing the view. You can further modify the model and view in the request domain through this method. |
| void | afterCompletion(HttpServletRequest request, HttpServletResponse response, Object handler, Exception ex) | This method is executed after the rendering of the view. This method can be used to clean up resources and record log information. |
For example, create an interceptor class named LoginInterceptor to intercept login:
@Slf4j
public class LoginInterceptor implements HandlerInterceptor {
    /**
     * Before target method execution
     * @param request
     * @param response
     * @param handler
     * @return
     * @throws Exception
     */
    @Override
    public boolean preHandle(HttpServletRequest request, HttpServletResponse response, Object handler) throws Exception {
        Object loginUser = request.getSession().getAttribute("loginUser");
        if (loginUser == null) {
            //If you are not logged in, return to the login page
            request.setAttribute("msg", "You do not have permission to perform this operation, please log in first!");
            request.getRequestDispatcher("/index.html").forward(request, response);
            return false;
        } else {
            return true;//Release
        }
    }
    /**
     * After the target method is executed
     * @param request
     * @param response
     * @param handler
     * @param modelAndView
     * @throws Exception
     */
    @Override
    public void postHandle(HttpServletRequest request, HttpServletResponse response, Object handler, ModelAndView modelAndView) throws Exception {
        log.info("postHandle implement{}", modelAndView);
    }

    /**
     * After page rendering
     * @param request
     * @param response
     * @param handler
     * @param ex
     * @throws Exception
     */
    @Override
    public void afterCompletion(HttpServletRequest request, HttpServletResponse response, Object handler, Exception ex) throws Exception {
        log.info("afterCompletion Execution exception{}", ex);
    }
}
Register interceptor
Create a configuration class that implements the WebMvcConfigurer interface (using @Configuration annotated class), rewrite the addInterceptors() method, and call registry.addInterceptor() method to register the custom interceptor in the container.
In the configuration class MyMvcConfig, add the following method to register the Interceptor:
@Configuration
public class MyMvcConfig implements WebMvcConfigurer {
    ......
    @Override
    public void addInterceptors(InterceptorRegistry registry) {
        registry.addInterceptor(new LoginInterceptor());
    }
}
Specify interception rules
After registering the interceptor in the container using the registry.addInterceptor() method, we can continue to specify the interceptor's interception rules
@Slf4j
@Configuration
public class MyConfig implements WebMvcConfigurer {
    ......
    @Override
    public void addInterceptors(InterceptorRegistry registry) {
        log.info("Register interceptor");

        registry.addInterceptor(new LoginInterceptor())
            	.addPathPatterns("/**") //Intercept all requests, including static resource files
            	.excludePathPatterns("/", "/login", "/index.html", "/user/login", "/css/**", "/images/**", "/js/**", "/fonts/**"); //Release login page, login operation, static resources
    }
}
- addPathPatterns: this method specifies the interception path. For example, the interception path is "/ * *", which means to intercept all requests, including requests for static resources.
- excludePathPatterns: this method is used to exclude interception paths, that is, specify requests that do not need to be intercepted by the interceptor.
Spring Boot exception handling
Default exception handling mechanism
For the browser client, Spring Boot will respond to a "whitelabel" error view and present the error message in HTML format. For the machine client, Spring Boot will generate a JSON response to display the exception message.
Custom exception handling
We can customize the Spring Boot error page in the following three ways:
- Custom error.html
- Custom dynamic error page
- Custom static error page
Custom error.html: create error.html directly under the template engine folder (/ resources/templates), overwriting the default white error page of Spring Boot.
Custom dynamic error page: if the Sprng Boot project uses a template engine, when an exception occurs to the program, the default error view resolver of Spring Boot will parse the error view page in the error directory under the template engine folder (resources/templates /). You can also use 4xx.html and 5xx.html as file names for dynamic error pages (fuzzy matching)
Custom static error page: the Sprng Boot project does not use the template engine. When an exception occurs in the program, the default error view resolver of Spring Boot will parse the static error page in the error directory under the static resource folder.
Error page priority
The above methods can customize Spring Boot error pages, and their priority order is: Custom dynamic error page (exact matching) > Custom static error page (exact matching) > Custom dynamic error page (fuzzy matching) > Custom static error page (fuzzy matching) > Custom error.html.
Error data of custom Spring Boot
@The classes annotated by ControllerAdvice can be used to implement global exception handling, which is a function provided in Spring MVC and can be used directly in Spring Boot
//Custom exception
public class UserNotExistException extends RuntimeException {
    public UserNotExistException() {
        super("User does not exist!");
    }
}
@Controller
public class IndexController {
    ......
    @GetMapping(value = {"/testException"})
    public String testException(String user) {
        if ("user".equals(user)) {
            throw new UserNotExistException();//The UserNotExistException exception is triggered
        }
        //Jump to login.html
        return "login";
    }
}
//MyExceptionHandler exception handling class
@ControllerAdvice
public class MyExceptionHandler {
    @ExceptionHandler(UserNotExistException.class)
    public String handleException(Exception e, HttpServletRequest request) {
        Map<String, Object> map = new HashMap<>();
        //Pass in the error status code to the request object
        request.setAttribute("javax.servlet.error.status_code",500);
        //Customize the error data according to the currently processed exception
        map.put("code", "user.notexist");
        map.put("message", e.getMessage());
        //Pass the self-determined error data into the request field
        request.setAttribute("ext",map);
        return "forward:/error";
    }
}
Spring Boot registers Web native components (Servlet, Filter, Listener)
Spring Boot is deployed in Jar package by default, and there is no web.xml by default. Therefore, Servlet, Filter and Listener can no longer be used through web.xml configuration as before, but Spring Boot provides two ways to register these Web native components.
-
Register by component scan
-
Register with RegistrationBean
Register by component scan
Servlet 3.0 provides the following three annotations:
- @WebServlet: used to declare a Servlet;
- @WebFilter: used to declare a Filter;
- @WebListener: used to declare a Listener.
These native Web components can be registered in SpringBoot using the @ ServletComponentScan annotation (which can only be marked on the startup class or configuration class). The annotation can scan the component classes marked with @ WebServlet, @ WebFilter and @ WebListener annotations and register them in the container.
//Declare a Servlet using the @ WebServlet annotation
@WebServlet(name = "myServlet", urlPatterns = "/myServlet")
public class MyServlet extends HttpServlet {
    @Override
    protected void doGet(HttpServletRequest req, HttpServletResponse resp) throws 							 ServletException, IOException {
        doPost(req, resp);
    }
    @Override
    protected void doPost(HttpServletRequest req, HttpServletResponse resp) throws 							  ServletException, IOException {
        resp.setContentType("text/html;charset=UTF-8");
        PrintWriter writer = resp.getWriter();
        writer.write("Spring Boot Servlet");
        writer.close();
    }
}
//Declare a custom Filter using the @ WebFilter annotation
@WebFilter(urlPatterns = ("/myServlet"))
public class MyFiler implements Filter {
    @Override
    public void init(FilterConfig filterConfig) throws ServletException {
        System.out.println("MyFiler initialization");
    }
    @Override
    public void doFilter(ServletRequest request, ServletResponse response, FilterChain chain) throws IOException, ServletException {
        System.out.println("MyFiler doFilter");
        chain.doFilter(request, response);
    }
    @Override
    public void destroy() {
        System.out.println("MyFiler Destroy");
    }
}
//Declare a custom Listener using the @ WebListener annotation
@WebListener
public class MyListener implements ServletContextListener {
    @Override
    public void contextInitialized(ServletContextEvent sce) {
        System.out.println("MyListener Monitor ServletContext initialization");
    }
    @Override
    public void contextDestroyed(ServletContextEvent sce) {
        System.out.println("MyListener Monitor ServletContext Destroy");
    }
}
Register with RegistrationBean
You can also use RegistrationBean in the configuration class to register native Web components, but this method is more cumbersome than annotation. Native Web components registered in this way no longer need annotations such as @ WebServlet, @ WebListener, and @ WebListener.
RegistrationBean is an abstract class that is responsible for registering components in the Servlet container. Spring provides three implementation classes for registering Servlet, Filter and Listener respectively.
- ServletRegistrationBean: the registration class of the Servlet
- FilterRegistrationBean: the registration class of Filter
- ServletListenerRegistrationBean: registration class of Listener
Spring Boot JDBC accessing database
Whether it is SQL or NOSQL, Spring Boot adopts the method of integrating Spring Data for unified processing by default.
Import JDBC scenario launcher
Import JDBC scenario initiator: spring boot starter data JDBC. By default, the scenario initiator introduces a data source: HikariCP
Import database driver
Spring Boot does version arbitration for the database driver by default, so we can no longer declare the version when importing the database driver.
Configure data sources
Configure the data source in the configuration file (application.properties/yml)
#Data source connection information
spring:
  datasource:
    username: root
    password: 123456
    url: jdbc:mysql://localhost:3306/xxxx
    driver-class-name: com.mysql.cj.jdbc.Driver
Spring Boot provides a lightweight data access tool called JdbcTemplate, which encapsulates JDBC. Spring Boot provides default automatic configuration for JdbcTemplate. We can directly inject it into bean s using @ Autowired or constructor.
@SpringBootTest
class SpringBootJdbcApplicationTests {
    @Autowired
    DataSource dataSource;//Data source component
    @Autowired
    JdbcTemplate jdbcTemplate; //Components for accessing the database
    @Test
    void contextLoads() throws SQLException {
        //class com.zaxxer.hikari.HikariDataSource
 		sout("The default data source is:"+dataSource.getClass());
        sout("Database connection instance:" + dataSource.getConnection());
        //Access database
        Integer i = jdbcTemplate.queryForObject("SELECT count(*) from `user`", 														Integer.class);
        sout("user Total in table" + i + "Data.");
    }
}
Spring Boot data source auto configuration principle:
- When the user does not configure the data source, if the HikariDataSource class exists in the container, Spring Boot will automatically instantiate Hikari and use it as its data source.
- Spring Boot JDBC scene initiator (Spring Boot starter data JDBC) introduces HikariCP data source (including HikariDataSource class) by default through Spring Boot starter JDBC. Therefore, Spring Boot uses HikariCP as its data source by default.
Spring Boot integrates Druid data sources
Spring Boot 2.x uses HikariCP as the data source by default. As long as we import the JDBC scenario initiator of Spring Boot in the project, we can use HikariCP data source to obtain database connection, add, delete, modify and query the database.
Druid is a high-performance data source product that supports all JDBC compatible databases, including Oracle, MySQL, SQL Server and H2. It combines the advantages of data source products such as C3P0, DBCP and PROXOOL, and adds a powerful monitoring function. Through Druid's monitoring function, you can observe the operation of database connection pool and SQL in real time. Druid is not a technology provided internally by Spring Boot. It is a third-party technology. We can integrate it in the following two ways:
- Custom integration Druid
- Integrating Druid with starter
Introducing Druid dependency
<!--Import JDBC Scene launcher-->
<dependency>
    <groupId>org.springframework.boot</groupId>
    <artifactId>spring-boot-starter-data-jdbc</artifactId>
</dependency>
<!--Import database driver-->
<dependency>
    <groupId>mysql</groupId>
    <artifactId>mysql-connector-java</artifactId>
    <scope>runtime</scope>
</dependency>
<!--Integrate in a customized way druid data source-->
<!--Custom integration requires writing a configuration class related to it-->
<dependency>
    <groupId>com.alibaba</groupId>
    <artifactId>druid</artifactId>
    <version>1.2.6</version>
</dependency>
Spring Boot uses HikariCP as its default data source, but there is a very important condition

//Create a configuration class named MyDataSourceConfig and add the Druid data source object to the container
@Configuration
public class MyDataSourceConfig implements WebMvcConfigurer {
    /**
     * When a Druid data source is added to the container
     * Use @ ConfigurationProperties to compare the configuration starting with spring.datasource in the configuration file with the property in the data source 	    Sex binding
     * @return
     */
    @ConfigurationPropserties("spring.datasource")
    @Bean
    public DataSource dataSource() throws SQLException {
        DruidDataSource druidDataSource = new DruidDataSource();
        return druidDataSource;
    }
}
@SpringBootTest
class SpringBootAdminexApplicationTests {
    //Data source component
    @Autowired
    DataSource dataSource;
    //Components for accessing the database
    @Autowired
    JdbcTemplate jdbcTemplate;
    @Test
    void contextLoads() throws SQLException {
        //class com.alibaba.druid.pool.DruidDataSource
        sout("The default data source is:" + dataSource.getClass());
        sout("Database connection instance:" + dataSource.getConnection());
        //Access database
        Integer i = jdbcTemplate.queryForObject("SELECT count(*) from `user`", Integer.class);
        sout("user Total in table" + i + "Data.");
    }
Open Druid built-in monitoring page
Druid provides a Servlet named StatViewServlet, which can open Druid's built-in monitoring page function and display Druid's statistical information. Its main purposes are as follows:
- Provide html page for monitoring information display
- JSON API that provides monitoring information
Enable SQL monitoring, firewall and web JDBC Association monitoring
Integrating Druid with starter
In the Spring Boot project, Druid's database connection pooling and monitoring functions can be easily integrated.
Druid Spring Boot Starter has configured all modules in the Druid data source by default. We can also modify the configuration of each Druid module through the Spring Boot configuration file (application.properties/yml). Otherwise, the default configuration will be used.
Configure the following in the Spring Boot configuration file:
- JDBC common configuration
- Druid data source connection pool configuration
- Druid monitoring configuration
- Druid built-in Filter configuration
######### JDBC General configuration #######
spring:
  datasource:
    username: root
    password: root
    url: jdbc:mysql://127.0.0.1:3306/bianchengbang_jdbc
    driver-class-name: com.mysql.cj.jdbc.Driver

######### Druid Configuration of connection pool ######
spring:
  datasource:
    druid:
      initial-size: 5		#Initialize connection size
      min-idle: 5           #Minimum number of connection pools
      max-active: 20        #Maximum number of connection pools
      max-wait: 60000       #Maximum wait time to get a connection, in milliseconds
      #Configure how often to detect idle connections that need to be closed. The unit is milliseconds
      time-between-eviction-runs-millis: 60000
      #Configure the minimum lifetime of a connection in the pool, in milliseconds
      min-evictable-idle-time-millis: 300000
      validation-query: SELECT 1 FROM DUAL 	#Test connection
      test-while-idle: true    #It is detected when applying for connection. It is recommended to configure it to true, which will not affect performance and ensure security
      test-on-borrow: false    #The detection is performed when obtaining the connection. It is recommended to close it, which will affect the performance
      test-on-return: false    #Perform detection when returning the connection. It is recommended to close it, which will affect the performance
      #Whether to enable PSCache. PSCache greatly improves the performance of databases supporting cursors. It is recommended to enable it in oracle and close it in mysql
      pool-prepared-statements: false
      #It takes effect after poolPreparedStatements is enabled
      max-pool-prepared-statement-per-connection-size: 20
      #Configure extension plug-ins. Common plug-ins are = > stat: monitoring statistics wall: defending sql injection
      filters: stat,wall
      #Open the mergeSql function through the connectProperties property; Slow SQL record
      connection-properties: 'druid.stat.mergeSql=true;druid.stat.slowSqlMillis=5000'

######## Druid Monitoring configuration information  #############
spring:
  datasource:
    druid:
      # For StatViewServlet configuration, please refer to Druid Wiki configuration_ StatViewServlet configuration
      stat-view-servlet:
        #Whether to open the built-in monitoring page. The default value is false
        enabled: true
        #The mapping path of StatViewServlet, that is, the access address of the built-in monitoring page
        url-pattern: '/druid/*'
         #Enable reset button
        reset-enable: true
        #Login page username of the built-in monitoring page username
        login-username: admin
        #Login page password of built-in monitoring page
        login-password: admin
      #For the configuration of WebStatFilter, please refer to the Druid Wiki_ Configure WebStatFilter
      web-stat-filter:
      	#Whether to enable Web JDBC associated monitoring data in built-in monitoring
        enabled: true
        #Matching path
        url-pattern: '/*'
        #Exclude path
        exclusions: '*.js,*.gif,*.jpg,*.png,*.css,*.ico,/druid/*'
        #Monitor session
        session-stat-enable: true
      #For Spring monitoring configuration, please refer to Druid Github Wiki configuration_ Druid and Spring are associated with monitoring configuration
      #Spring monitors AOP pointcuts, such as x.y.z.abc. *, and configures multiple English comma separated pointcuts
      aop-patterns: net.biancheng.www.*
Custom integration or Druid Spring Boot Starter integration can achieve the purpose of integrating Druid data sources by Spring Boot. They all have their own advantages and disadvantages.
-
According to the official documents, customizing and integrating Druid data sources can more clearly understand the various functions and implementation methods of Druid, but the integration process is cumbersome.
-
Integrating Druid data sources through Druid Spring Boot Starter is more convenient and fast, greatly simplifying the integration process, but it is impossible to clearly understand the internal implementation methods and principles of Druid functions.
Spring Boot integrates MyBatis
starter: mybatis-spring-boot-starter
######## MyBatis to configure########
mybatis:
  #Specify the location of mapper.xml
  mapper-locations: classpath:mybatis/mapper/*.xml
  #The location of the scanned entity class. Indicate the package of the scanned entity class here. You can not write the full pathname of the entity class in mapper.xml
  type-aliases-package: com.xxx.bean
  configuration:
    #The hump naming method is enabled by default, and you can not set this attribute
    map-underscore-to-camel-case: true
Create Mapper interface
@Mapper
public interface UserMapper {
    //Query user data through user name and password
    User getByUserNameAndPassword(User user);
}
//When there are many Mapper interfaces, we can scan the Mapper interfaces under the specified package using the @ MapperScan annotation on the Spring Boot main startup class, instead of labeling @ Mapper annotation on each Mapper interface.
Create Mapper mapping file
<!--stay mybatis.mapper-locations Created in the specified location UserMapper.xml-->
<?xml version="1.0" encoding="UTF-8"?>
<!DOCTYPE mapper PUBLIC "-//mybatis.org//DTD Mapper 3.0//EN" "http://mybatis.org/dtd/mybatis-3-mapper.dtd">
<mapper namespace="xxxx Corresponding to above mapper Path of xxx.UserMapper">
    <resultMap id="BaseResultMap" type="User">
        <id column="id" jdbcType="INTEGER" property="id"/>
        <result column="user_id" jdbcType="VARCHAR" property="userId"/>
        <result column="user_name" jdbcType="VARCHAR" property="userName"/>
        <result column="password" jdbcType="VARCHAR" property="password"/>
        <result column="email" jdbcType="VARCHAR" property="email"/>
    </resultMap>
    <sql id="Base_Column_List">
        id, user_id, user_name, password, email
    </sql>
    <!--Query user information according to user name and password-->
    <!--application.yml Passed in type-aliases-package The name of the entity class is specified, so resultType-->
    <select id="getByUserNameAndPassword" resultType="User">
        select *
        from user
        where user_name = #{userName,jdbcType=VARCHAR}
          and password = #{password,jdbcType=VARCHAR}
    </select>
</mapper>
When developing with Mapper, you need to follow the following rules:
- The namespace in the mapper mapping file must be consistent with the fully qualified name of the corresponding mapper interface.
- The id of the statement in the mapper mapping file must be consistent with the method name of the method in the mapper interface
- The type specified by the parameterType of the statement in the mapper mapping file must be consistent with the parameter type of the method in the mapper interface.
- The type specified by the resultType of the statement in the mapper mapping file must be consistent with the return value type of the method in the mapper interface.
use:
public interface UserService {
    public User getByUserNameAndPassword(User user);
}
@Service("userService")
public class UserServiceImpl implements UserService {
    @Autowired
    UserMapper userMapper;
    @Override
    public User getByUserNameAndPassword(User user) {
        User loginUser = userMapper.getByUserNameAndPassword(user);
        return loginUser;
    }
}
Annotation method
MyBatis provides the following notes to replace the mapper mapping file and simplify the configuration for the most commonly used "add injury and change query" operation in the actual business:
- @Select
- @Insert
- @Update
- @Delete
@Mapper
public interface UserMapper {
    @Select("select * from user where user_name = #{userName,jdbcType=VARCHAR} and password = #{password,jdbcType=VARCHAR}")
    List<User> getByUserNameAndPassword(User user);

    @Delete("delete from user where id = #{id,jdbcType=INTEGER}")
    int deleteByPrimaryKey(Integer id);

    @Insert("insert into user ( user_id, user_name, password, email)" +
            "values ( #{userId,jdbcType=VARCHAR}, #{userName,jdbcType=VARCHAR}, #{password,jdbcType=VARCHAR}, #{email,jdbcType=VARCHAR})")
    int insert(User record);

    @Update(" update user" +
            "    set user_id = #{userId,jdbcType=VARCHAR},\n" +
            "      user_name = #{userName,jdbcType=VARCHAR},\n" +
            "      password = #{password,jdbcType=VARCHAR},\n" +
            "      email = #{email,jdbcType=VARCHAR}\n" +
            "    where id = #{id,jdbcType=INTEGER}")
    int updateByPrimaryKey(User record);
}
These two methods can be mixed, and different methods can be selected according to the complexity of SQL to improve development efficiency.
- If there is no complex connection query, annotation can be used to simplify the configuration;
- If sql is complex, XML (mapper mapping file) is better