In the actual production environment, in order to ensure the stability of the database, we usually configure the dual hot standby mechanism for the database. In this way, slave database can be switched to master database immediately after the master database crashes. Data can be synchronized from master database to slave database by master-slave replication, and code can be written in the business code to achieve read-write separation (allowing the master database to handle transactions). Increase the concurrent load capacity of the database by adding, changing and deleting operations while processing query operations from the database.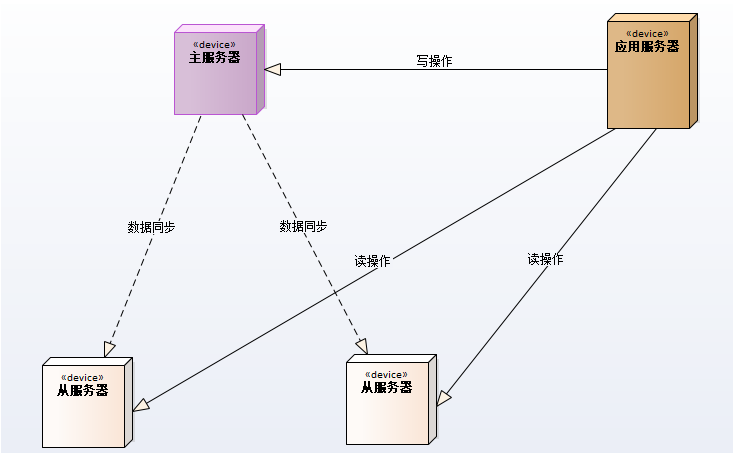
Next, we use the latest version of Mysql database (8.0.16) and SpringBook to implement this complete step (one master, one slave).
Install and configure mysql
Download the MySQL installation package from https://dev.mysql.com/downloads/mysql/page. I download MySQL 8.0.16 Linux-Generic here.
- Prepare two virtual machines to install MySQL and upload the downloaded file mysql-8.0.16-linux-glibc2.12-x86_64.tar.xz to the server/app/mysql
- 192.168.249.131 CENTOS7 Master
- 192.168.249.129 CENTOS7
- View the status of the firewall. Close the firewall first if you need to start it
service firewalld status  ## View firewall status
service firewalld stop   ## Close the firewall
Extract the xz file into a tar file using the following command
xz -d mysql-8.0.16-linux-glibc2.12-x86_64.tar.xzUnzip installation package
tar -xvf mysql-8.0.16-linux-gl-ibc2.12-x86_64.tarCreate a data folder under / app/mysql to store data
- Create mysql user groups and mysql users
groupadd mysql                                  ## Create user groups
useradd -g mysql -d /app/mysql mysql    ## Create mysql users under user groups and authorize related directories
groupdel mysql                                  ## Delete the user group name (if the relevant user group already exists)
userdel mysql                                   ## Delete users (if relevant users already exist)
-
Initialize installation of mysql database
./mysql-8.0.16-linux-glibc2.12-x86_64/bin/mysqld --user=mysql --basedir=/app/mysql --datadir=/app/mysql/data --initialize2019-07-01T02:05:52.681626Z 0 [Warning] [MY-011070] [Server] 'Disabling symbolic links using --skip-symbolic-links (or equivalent) is the default. Consider not using this option as it' is deprecated and will be removed in a future release. 2019-07-01T02:05:52.681694Z 0 [System] [MY-013169] [Server] /app/mysql/mysql-8.0.16-linux-glibc2.12-x86_64/bin/mysqld (mysqld 8.0.16) initializing of server in progress as process 1479 2019-07-01T02:05:52.681726Z 0 [ERROR] [MY-010338] [Server] Can't find error-message file '/app/mysql/share/errmsg.sys'. Check error-message file location and 'lc-messages-dir' configuration directive. 2019-07-01T02:05:55.713747Z 5 [Note] [MY-010454] [Server] A temporary password is generated for root@localhost: xa6(H>rK/r<E 2019-07-01T02:05:57.303240Z 0 [System] [MY-013170] [Server] /app/mysql/mysql-8.0.16-linux-glibc2.12-x86_64/bin/mysqld (mysqld 8.0.16) initializing of server has completed
Note that at this point mysql generates a default temporary password, which, as shown above, needs to be saved and then modified
Create mysql services and increase execution privileges
cp mysql-8.0.16-linux-glibc2.12-x86_64/support-files/mysql.server /etc/init.d/mysqld-
Modify mysql configuration file vi/etc/my.cnf to add the following configuration
[mysqld]
port=3306
basedir=/app/mysql/mysql-8.0.16-linux-glibc2.12-x86_64
datadir=/app/mysql/data
socket=/tmp/mysql.sock
symbolic-links=0

[mysqld_safe]
log-error=/app/mysql/data/log/error.log
pid-file=/app/mysql/data/mysql.pid
user=mysql
tmpdir=/tmp
character_set_server=utf8
default-storage-engine=INNODB
init_connect='SET NAMES utf8'

!includedir /etc/my.cnf.d
If there are errors related to log permissions, please first create the corresponding log files and authorize mysql users
chown -R mysql:mysql /app/mysql/data/log/error.log service mysql start
service mysqld startEstablishing mysql Client Soft Connection
ln -s /app/mysql/mysql-8.0.16-linux-glibc2.12-x86_64/bin/mysql /usr/local/bin/mysql- Log in mysql to change password
mysql -uroot -p Password       ## Sign in
ALTER USER 'root'@'localhost' IDENTIFIED WITH mysql_native_password BY '000000';
- Setting up remote login
use mysql;
update user set host='%' where user='root' limit 1;
flush privileges;
Configure mysql master-slave synchronization (binlog)
Replication principle
- Master records data changes to binary logs, which are files specified by the configuration file log-bin. These records are called binary log events.
- Slave reads binary log events in Master through I/O threads and writes them to its relay log
- Slave redo the events in the relay log, execute the event information in the relay log one by one locally, and store the data locally, so as to reflect the changes to its own data (data replay).
Replication requirements
- The master-slave server operating system version is the same as the number of digits.
- The versions of Master and Slave databases should be the same.
- Data in Master and Slave databases should be consistent.
- Master opens binary logs, and Master and Slave's server_id must be unique within the LAN
Configuration steps
Main database (192.168.249.131)
- Create synchronous users and authorize
CREATE USER 'slave'@'192.168.249.129' IDENTIFIED WITH 'mysql_native_password' BY '000000';
GRANT REPLICATION SLAVE, REPLICATION CLIENT ON *.* TO 'slave'@'192.168.249.129';
FLUSH PRIVILEGES;
Note that when creating users, you need to use mysql_native_password encryption plug-in. Otherwise, caching_sha2_password encryption mode will be used by default. So you need to use the identity of SSL to verify the synchronization. For convenience and simplicity, we directly use mysql_native_password mode.
Modify the configuration / etc/my.cnf, add the following configuration, start binlog, and restart mysql service
[mysqld] Open the binary logging function log-bin=mysql-bin Set up server_id, pay attention to the unique server-id=131 # (optional configuration) to synchronize the database name within the segment, and to synchronize multiple databases, add several replicate-db-db = the database name binlog-do-db=mydb# (optional configuration) to ignore the database log-ignore-db = MySQLView the status of the primary server
show master status
Note the parameters inside, especially the first two File s and Position s, which will be useful in configuring master-slave relationships in Slave.
From the database (192.168.249.129)
- Modify / etc/my.cnf, add the following configuration, and restart the service
[mysqld]
server-id=129
log-bin=mysql-bin
replicate-do-db=mydb
replicate-ignore-db=mysql
- Set master information in slave to specify synchronization location
stop slave;
change master to master_host='192.168.249.131',master_user='slave',master_password='000000',master_log_file='mysql-bin.000001',master_log_pos=155;
start slave;
Parameter Description:
Master_host='192.168.249.131'\ Master's IP address
master_user='slave'# User for synchronizing data (User authorized in Master)
master_password='000000'# Synchronized Data User's Password
Master_port = 3306 # Master database service port
Master logfile ='mysql-bin.000001'# specifies from which log file Slave starts reading replicated data (File field of the result of executing commands on Master)
Master logpos = 155 # # From which POSITION number to start reading (POSITION field of the result of command execution on Master)
Master Connection Retry = 30 # When a master-slave connection is re-established, if the connection fails to be established, how long does it take to retry? Set to 60 seconds by default, synchronization delay tuning parameters.
-
View slave server status
show slave status\G;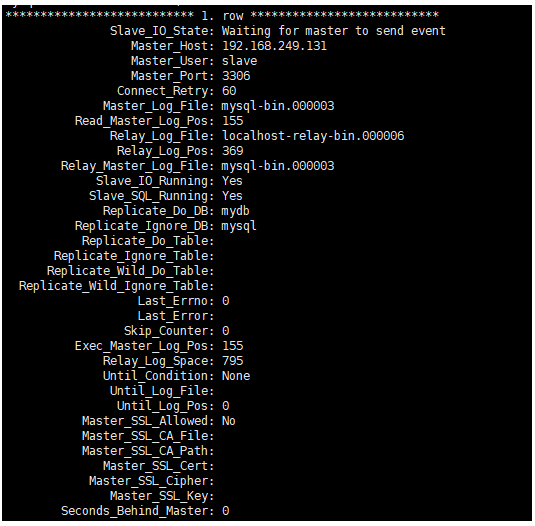
At this point, the master-slave configuration at the database level is completed.
Configuring Master-Slave Read-Write Separation in SpringBoot
In master-slave mode, follow the following rules:
The main database only performs INSERT,UPDATE,DELETE operations.
Only SELECT operations are performed from the database
We use the open source project [dynamic-data source-spring-boot-starter] (https://gitee.com/baomidou/dynamic-data source-spring-boot-starter/wikis/) as a tool kit for read-write separation.
Usage method
- Establish a simple data table user in mydb master database and automatically synchronize from the database after it is built
DROP TABLE IF EXISTS `user`;
CREATE TABLE `user` (
`id` int(11) NOT NULL AUTO_INCREMENT,
`account` varchar(255) COLLATE utf8mb4_unicode_ci DEFAULT NULL,
`name` varchar(255) COLLATE utf8mb4_unicode_ci DEFAULT NULL,
`position` varchar(255) COLLATE utf8mb4_unicode_ci DEFAULT NULL,
PRIMARY KEY (`id`)
) ENGINE=InnoDB AUTO_INCREMENT=5 DEFAULT CHARSET=utf8mb4 COLLATE=utf8mb4_unicode_ci;
- Introducing Relevant Dependencies
<dependencies>
       <dependency>
           <groupId>org.springframework.boot</groupId>
           <artifactId>spring-boot-starter</artifactId>
       </dependency>

       <dependency>
           <groupId>org.springframework.boot</groupId>
           <artifactId>spring-boot-starter-web</artifactId>
       </dependency>

       <dependency>
           <groupId>org.mybatis.spring.boot</groupId>
           <artifactId>mybatis-spring-boot-starter</artifactId>
           <version>2.0.1</version>
       </dependency>

       <dependency>
           <groupId>com.baomidou</groupId>
           <artifactId>dynamic-datasource-spring-boot-starter</artifactId>
           <version>2.5.5</version>
       </dependency>

       <dependency>
           <groupId>mysql</groupId>
           <artifactId>mysql-connector-java</artifactId>
           <version>8.0.15</version>
       </dependency>

       <dependency>
           <groupId>org.projectlombok</groupId>
           <artifactId>lombok</artifactId>
           <optional>true</optional>
       </dependency>

       <dependency>
           <groupId>org.springframework.boot</groupId>
           <artifactId>spring-boot-starter-test</artifactId>
           <scope>test</scope>
       </dependency>

</dependencies>- Configuring data sources
spring:
  datasource:
    dynamic:
      primary: master #Set the default data source or data source group. The default value is master.
      strict: false #Set strict mode, default false does not start. After startup, throw an exception for matching to the specified data source. If not startup, default data source will be used.
      datasource:
        master:
          type: com.zaxxer.hikari.HikariDataSource
          url: jdbc:mysql://192.168.249.131:3306/mydb?characterEncoding=utf8&zeroDateTimeBehavior=convertToNull&useSSL=false
          username: root
          password: '000000'
          driver-class-name: com.mysql.cj.jdbc.Driver
        slave_1:
          type: com.zaxxer.hikari.HikariDataSource
          url: jdbc:mysql://192.168.249.129:3306/mydb?characterEncoding=utf8&zeroDateTimeBehavior=convertToNull&useSSL=false
          username: root
          password: '000000'
driver-class-name: com.mysql.cj.jdbc.Driver- Add mybatis scan package to startup class entry
@SpringBootApplication@MapperScan("com.jianzh5.dynamic.mapper")
public class DynamicDatsourceBootstrap {
    public static void main(String[] args) {
        SpringApplication.run(DynamicDatsourceBootstrap.class, args);
    }
}- Establishing Entity Class User
@Data
public class User {
    private int id;
    private String account;
    private String name;
    private String position;
}- Create mapper interface file, add two new methods addUser(User user),getById(int id)
public interface UserDao {
    @Insert("INSERT INTO user(account, name, position) VALUES(#{account}, #{name}, #{position})")
    @Options(useGeneratedKeys = true,keyProperty = "id")
    int addUser(User user);

    @Select("SELECT * FROM user WHERE id = #{id}")
    User getById(int id);
}- Establishment of Service Layer Related Implementation
public interface UserService {
        int addUser(User user);
        User getById(int id);
}
@Service
public class UserServiceImpl implements UserService {
        @Resource
        private UserDao userDao;

        @Override
        public int addUser(User user) {
            return userDao.addUser(user);
        }
        @DS("slave")
        @Override
        public User getById(int id) {
            return userDao.getById(id);
        }
}
Because primary: master is configured in the data source, default operations are executed from the main database, and the annotation @DS is used to switch the data source. This annotation can also be used directly on the class file. Meanwhile, there are method annotations that take precedence over annotations on the class.
-
Write unit tests for testing
public class UserServiceTest extends DynamicDatsourceBootstrapTests {
    @Autowired
    private UserService userService;
    @Test
    public void testAddUser(){
        User user = new User();
        user.setName("Li Si");
        user.setAccount("sili");
        user.setPosition("JAVA Development Engineer");
        int i = userService.addUser(user);
        System.out.println(user);
    }
    @Test
    public void testGetById(){
        int id = 4;
        User user = userService.getById(id);
        Assert.assertEquals("sanzhang",user.getAccount());
    }
}
By observing the execution log, it is found that the read-write database will be switched according to the @DS annotation, so that the master-slave read-write separation of Springboot integrated database is completed.
Please pay attention to the personal public number: JAVA Daily Notice