@[toc]
brief introduction
Advantage
According to the swagger syntax, the back-end automatically generates beautiful interface documents.
Do interaction tests.
Inferiority
Intrusive, affecting program operation, especially when passing parameters.
Be careful
Swagger is divided into 1.2 version and 2.0 version, which are quite different. Swagger 1.2 is swagger UI; swagger 2.0 is springfox swagger. This article introduces a new version of spring fox swagger.
Release production, close swagger to prevent leakage of project interface documents, and***
Introduce swagger component
Add to pom.xml
<dependency>
    <groupId>io.springfox</groupId>
    <artifactId>springfox-swagger2</artifactId>
    <version>2.9.2</version>
</dependency>
<dependency>
    <groupId>io.springfox</groupId>
    <artifactId>springfox-swagger-ui</artifactId>
    <version>2.9.2</version>
</dependency>
Code actual combat
I see that many bloggers say that the configuration code of swagger should be in the same directory as the project startup file, which is as follows
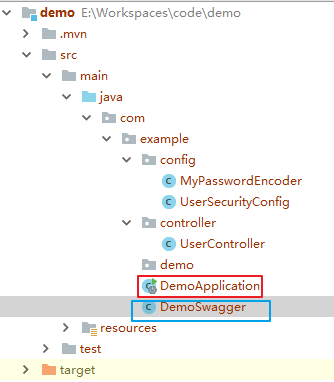
However, it is normal to move into the config directory after testing. It depends on personal habits.
DemoApplication.java
package com.example;

import org.springframework.context.annotation.Bean;
import org.springframework.context.annotation.Configuration;

import springfox.documentation.builders.ApiInfoBuilder;
import springfox.documentation.builders.PathSelectors;
import springfox.documentation.builders.RequestHandlerSelectors;
import springfox.documentation.service.ApiInfo;
import springfox.documentation.spi.DocumentationType;
import springfox.documentation.spring.web.plugins.Docket;
import springfox.documentation.swagger2.annotations.EnableSwagger2;

//Through the @ Configuration annotation, let Spring load the class Configuration.
//Then enable Swagger2 with the @ enableswager2 annotation.
@Configuration
@EnableSwagger2
public class DemoSwagger {
    @Bean
    public Docket api() {
        return new Docket(DocumentationType.SWAGGER_2)
                .apiInfo(apiInfo())
                .select()
                // Specify the package path to scan
             .apis(RequestHandlerSelectors.basePackage("com.example.controller"))
                .paths(PathSelectors.any())
                .build();
    }

    private ApiInfo apiInfo() {
        return new ApiInfoBuilder()
                .title("project api File")
                .description("swagger Access tutorial")
                .version("1.0")
                .build();
    }
}
Because spring security has been configured before, you can enter http://localhost:8080/swagger-ui.html After that, it will be blocked. After entering the previously configured user password, the effect is as follows:;
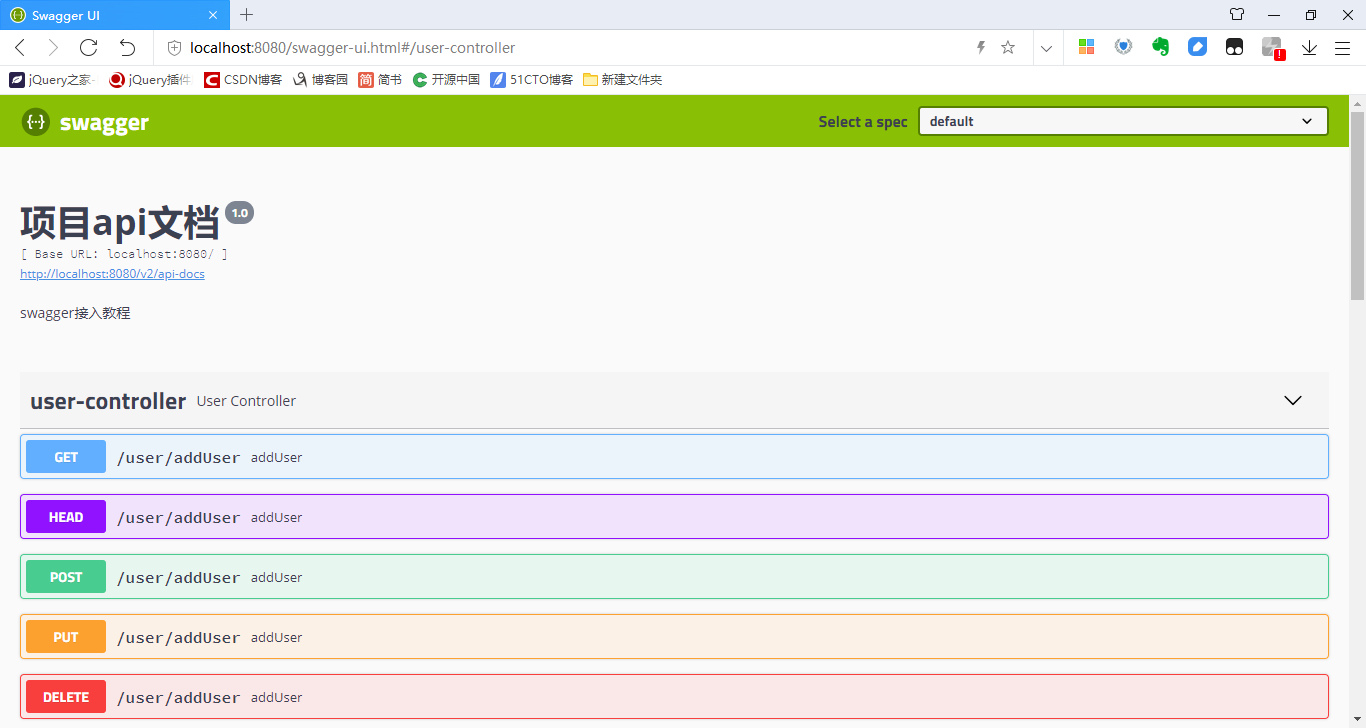
Because the user login and user permission have been tested before, there are some interface methods in the controller, but let it default. Obviously, the user experience is not good, so continue to add the comment of swagger in the previous user controller.
@Api: used on a class to illustrate its function.

@ApiOperation: describes the function of this method.
For more detailed notes, please refer to the official documents Common notes .
UserController.java
package com.example.controller;

import io.swagger.annotations.Api;
import io.swagger.annotations.ApiOperation;
import org.springframework.stereotype.Controller;
import org.springframework.web.bind.annotation.RequestMapping;
import org.springframework.web.bind.annotation.RequestMethod;
import org.springframework.web.bind.annotation.ResponseBody;

@Controller
@RequestMapping("user")
@Api(value = "User module description", description = "Provide user's addition, deletion, modification and query")
public class UserController {

    @RequestMapping(value = "/addUser", method = RequestMethod.GET)
    @ResponseBody
    @ApiOperation(value = "Add user", notes = "Put some information for testing and judgment")
    String addUser() {
        return "This is add user!!!";
    }

    @RequestMapping(value = "/deleteUser", method = RequestMethod.POST)
    @ResponseBody
    @ApiOperation(value = "delete user", notes = "Put some information for testing and judgment")
    String deleteUser() {
        return "This is to delete users!!!";
    }

    @RequestMapping("/updateUser")
    @ResponseBody
    @ApiOperation(value = "Modify user", notes = "Put some information for testing and judgment")
    String updateUser() {
        return "This is to modify users!!!";
    }

    @RequestMapping(value = "/findAllUsers", method = RequestMethod.PUT)
    @ResponseBody
    @ApiOperation(value = "Query users", notes = "Put some information for testing and judgment")
    String findAllUsers() {
        return "This is the query user!!!";
    }

}
The renderings are as follows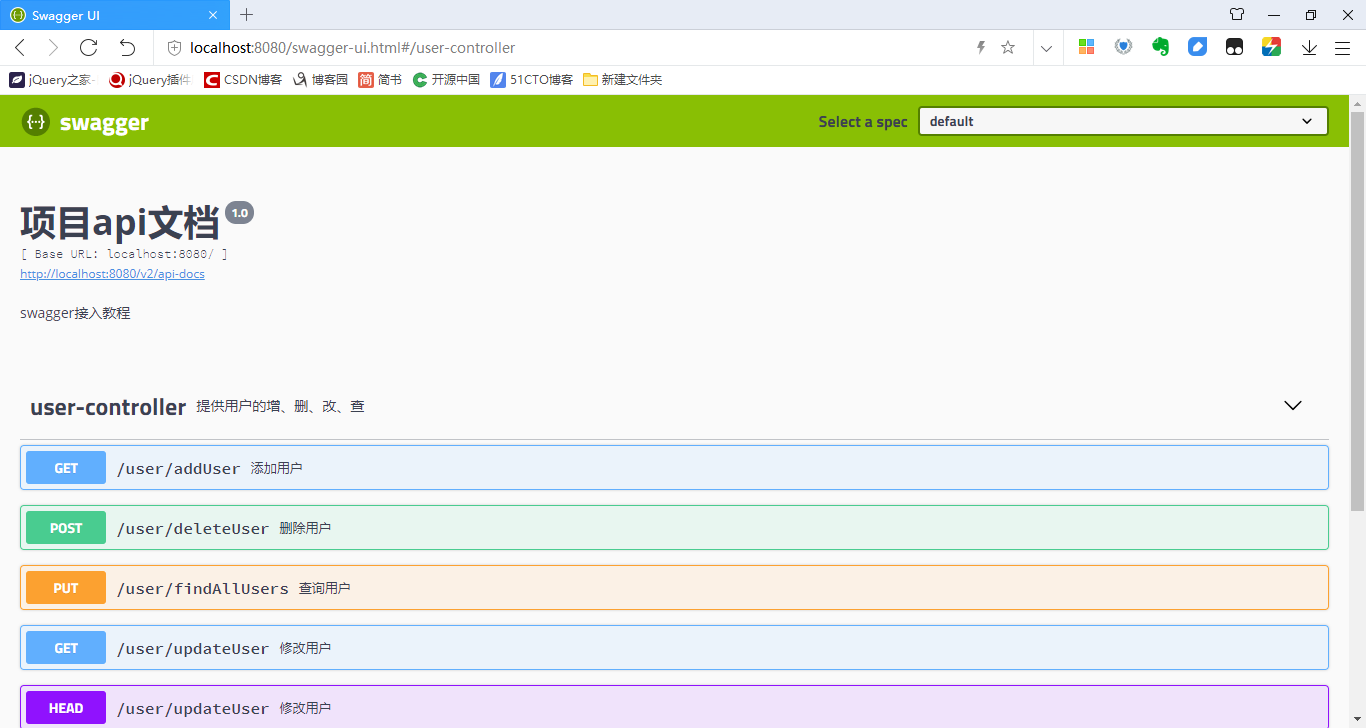
Open a specific item as follows
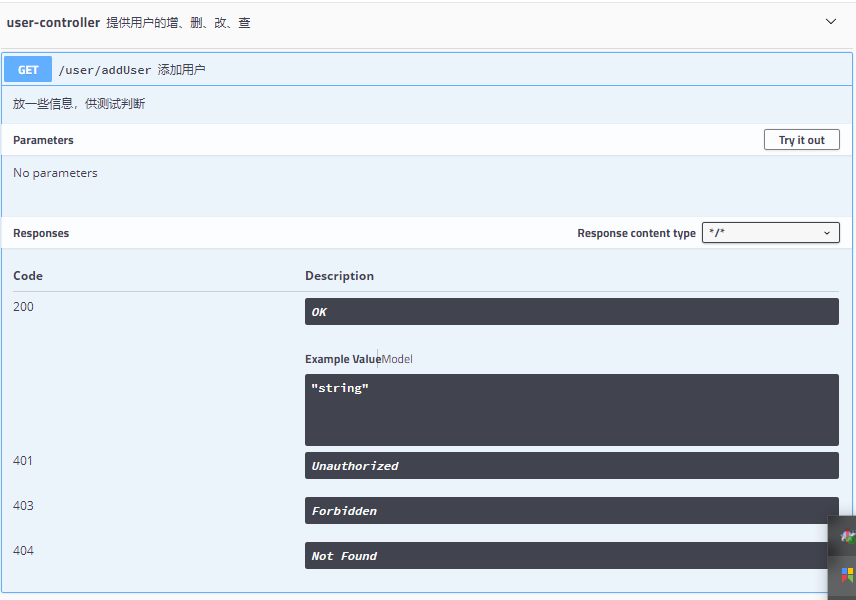
Obviously, with Chinese annotations, documents are more readable.
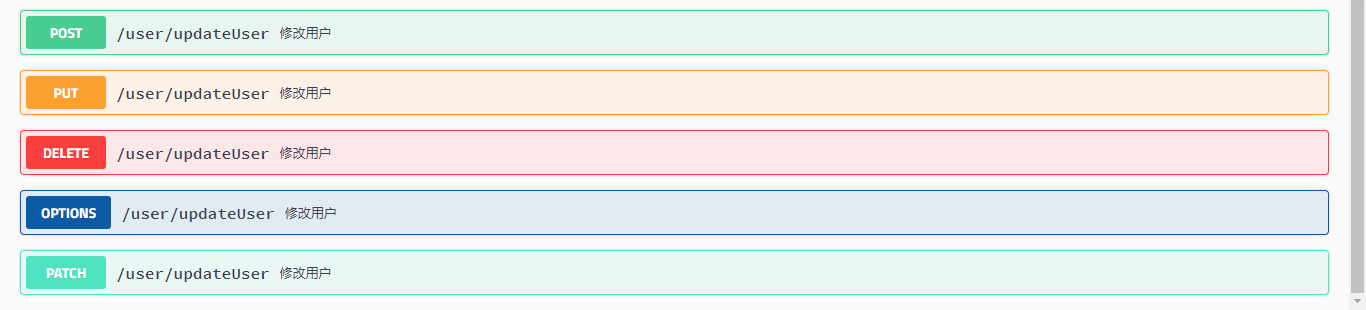
It should be noted that when I write @ RequestMapping annotation, I usually abbreviate it. For example, modify user method in demo. However, swagger is intrusive. If the RequestMethod type is not specified, a large number of items will be listed, such as GET, HEAD, POST, PUT, DELETE, OPTIONS, and PATCH. If other items are specified, they are one.