SpringBoot Basics
SpringBoot overview
SpringBoot: SpringBoot provides a way to quickly use Spring. Based on the idea that convention is better than configuration, developers do not have to switch between configuration and business logic, which greatly improves the development efficiency.
Spring disadvantages
-
Cumbersome configuration
Although spring's component code is lightweight, its configuration is heavyweight. At first, spring was configured with XML, and there were many XML configurations. Spring 2.5 introduces annotation based component scanning, which eliminates a large number of explicit XML configurations for the application's own components. Spring 3.0 introduces Java based configuration, which is a type safe reconfigurable configuration method that can replace XML.
All of these configurations represent development losses. Because there is a need to switch between thinking about Spring feature configuration and solving business problems, writing configuration takes up the time to write application logic. Like all frameworks, Spring is useful, but it requires a lot of return. -
Dependency cumbersome
Project dependency management is also a time-consuming and labor-consuming thing. When setting up the environment, it is necessary to analyze the coordinates of which libraries to import, as well as the coordinates of other libraries that depend on them. Once the wrong dependent version is selected, the resulting incompatibility will seriously hinder the development progress of the project.
SpringBoot features
-
Auto configuration
The automatic configuration of Spring Boot is a run-time (more accurately, application startup) process. Many factors are considered to determine which Spring configuration should be used and which should not be used. This process is done automatically by SpringBoot.
-
Dependency: dependency delivery
Start dependency is essentially a Maven Project Object Model (POM), which defines the transfer dependency on other libraries. These things together support a certain function.
In short, start dependency is to package the coordinates with certain functions and provide some default functions. -
Auxiliary function
It provides some common non functional features in large projects, such as embedded server, security, indicators, health detection, external configuration, etc.
Note: SpringBoot provides an embedded server, which defaults to Tomcat, so web applications do not need to be packaged as war packages, but as jar packages.
Spring boot is not an enhancement to spring, but provides a way to use spring quickly.
SpringBoot quick start
demand
Build the SpringBoot project, define the HelloController.hello() method, and return "Hello SpringBoot!".
Implementation steps
- Create Maven project
- Import SpringBoot dependency
- Define Controller
- Write boot class
- Start test
2,pom.xml
  <!--  SpringBoot Project needs inherited parent project-->
  <parent>
    <groupId>org.springframework.boot</groupId>
    <artifactId>spring-boot-starter-parent</artifactId>
    <version>2.5.0</version>
    <relativePath/> <!-- lookup parent from repository -->
  </parent>

  <dependencies>
    <!--    web Development start dependence-->
    <dependency>
      <groupId>org.springframework.boot</groupId>
      <artifactId>spring-boot-starter-web</artifactId>
    </dependency>

    <dependency>
      <groupId>org.springframework.boot</groupId>
      <artifactId>spring-boot-starter-test</artifactId>
      <scope>test</scope>
    </dependency>
  </dependencies>
3,HelloController.java
@RestController
public class HelloController {

  @RequestMapping("/hello")
  public String hello(){
    return "hello springboot";
  }

}
4. Boot class HelloApplication.java
/**
 * Boot class: the entry to the SpringBoot project
 */
@SpringBootApplication
public class HelloApplication {

  public static void main(String[] args) {
    SpringApplication.run(HelloApplication.class,args);
  }

}
summary
- SpringBoot uses jar packaging when creating projects.
- The boot class of SpringBoot is the project entry. You can start the project by running the main method.
- For projects built with SpringBoot and Spring, the business code is written in exactly the same way.
Spring boot project quick build
Select Spring Initializr
Directory structure in resources folder
-
Static: save all static resources: js/css/images, etc
-
It can be accessed directly through the browser address bar
-
Create index.html under this folder, and the page will be the default home page. That is, enter in the address field http://localhost:8080 You can directly access this page without other configurations.
-
If there are other static folders under this folder, you need to configure them in application.properties
-
spring.mvc.static-path-pattern=/static/** Otherwise, the static files under this file cannot be referenced or accessed
-
-
-
templates: save all template pages: (the default jar package of Springboot uses embedded Tomcat, and JSP pages are not supported by default); You can use the template engine
-
#Configure template engine
          spring.thymeleaf.prefix=classpath:/templates/
          spring.mvc.view.prefix=classpath:/templates/
          spring.mvc.view.suffix=.html(Note: fill in the suffix corresponding to your own page here. Mine is html Page)
-
-
application.properties
Analysis of SpringBoot start dependency principle
1) spring-boot-starter-parent
2)spring-boot-starter-web
Summary
- The version information of various technologies is defined in spring boot starter parent, and a set of optimal matching technology versions are combined.
- In various starter s, the coordinate set required to complete this function is defined, and most of the version information comes from the parent project.
- Our project inherits the parent. After introducing the starter, we can easily obtain the required jar package through dependency transfer, and there will be no version conflict and other problems.
SpringBoot configuration
Profile classification
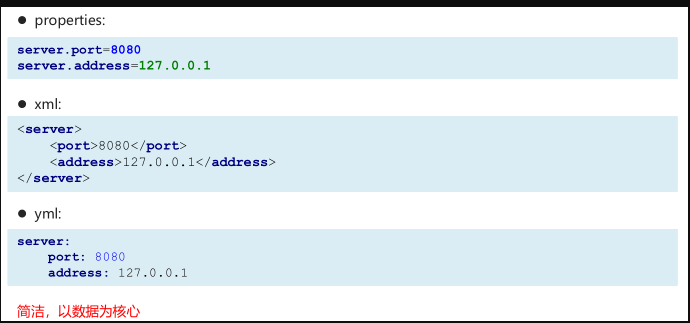
SpringBoot is convention based, so many configurations have default values. However, if you want to replace the default configuration with your own configuration, you can use application.properties or application.yml(application.yaml) for configuration.
-
properties
server.port=8080
-
yml:
server:
	port: 8080
	path: /index.html
-
SpringBoot provides two types of configuration files: properties and yml/yaml
-
Default profile name: application
-
Under the same level directory, the priority is: Properties > YML > yaml
YAML
yaml file takes data as the core, which is more concise than the traditional xml method. The extension of yaml file can use. yml or. yaml.

YAML basic syntax
- Case sensitive
- The data value must be preceded by a space as a separator
- Use indentation to represent hierarchical relationships
- The Tab key is not allowed to be used during indentation, and only spaces are allowed (the number of spaces corresponding to tabs in each system may be different, resulting in hierarchy confusion)
- The number of indented spaces is not important, as long as the elements of the same level are aligned to the left
- #Indicates a comment
YAML data format
-
Object (map): collection of key value pairs
person: name: zhangsan # Inline writing person: {name: zhangsan} -
Array:
address:
  - beijing
  - shanghai
# Inline writing
address: [beijing,shanghai]
-
Scalar: a single, non separable value
msg1: 'hello \n world'  # Single quotation marks ignore escape characters and output as is
msg2: "hello \n world"  # Double quotation marks identify escape characters and escape output
YAML parameter reference
name: lisi
person:
  name: ${name} #Reference the name value defined above
Random numbers can be used in the configuration file
${random.value}
${random.int}
${random.int(10)}
${random.value}
Summary
- Profile type
- properties: same as before
- yml/yaml: Note spaces
- yaml: concise, data centric
- Basic grammar
- Case sensitive
- The data value must be preceded by a space as a separator
- Use space indents to indicate hierarchical relationships, and the same indents to indicate the same level
- data format
- object
- Array: use "-" to represent each element of the array
- Pure quantity
- Parameter reference
- ${key}
- Basic grammar
Read configuration file contents
- @Value
- Environment
- @ConfigurationProperties
@Value mode
@Value("${name}") //Key value pair private string name@ Value("${person.name}") // Key value pair private string Name2@ Value("${address[0]}") // Array private string address1@ Value("${msg1}") // Single quote scalar private string MSG1@ Value("${msg2}") // Double quoted scalar private String msg2;
Environment mode
@Autowired private Environment env; System.out.println(env.getProperty("person.name")); System.out.println(env.getProperty("address[0]"));
@ConfigurationProperties
@Component@ConfigurationProperties(prefix = "person")public class Person { private String name; private int age; ...}
Note: @ Value get Value is compared with @ ConfigurationProperties get Value
| @ConfigurationProperties | @Value | |
|---|---|---|
| function | Properties in batch injection profile | Single designation |
| Loose grammar | support | I won't support it |
| SpEL | I won't support it | support |
| JSR303 data verification | support | I won't support it |
Add @ ConfigurationProperties and @ Validated annotations to support the verification function. For example, @ Email,@NotBlank
@PropertySource specifies the injection profile
@PropertySource is only valid for the properties file, not yml/yaml
@PropertySource(value = {"classpath:person.properties"})
SpringBoot recommends adding components to the container: full annotation
@Configurationpublic class MyAppConfig { //Add the return value of the method to the container. The default id of the component in the container is the method name @ bean public person() {return new person();}}
profile
When we develop Spring Boot applications, usually the same set of programs will be installed in different environments, such as development, testing, production, etc. The database address, server port and other configurations are different. If you have to modify the configuration file every time you package, it is very troublesome. The profile function is used for dynamic configuration switching.
- profile configuration mode
- Multi profile file mode
- yml multi document mode
- profile activation mode
- configuration file
- Virtual machine parameters
- Command line parameters
Multiple profiles file mode
application-devapplication-proapplication-test
Activate profiles in application.properties
spring.profiles.active=dev
yml multi document mode
---server: port: 8082spring: profiles: dev---server: port: 8082spring: profiles: dev
Virtual machine parameter activation
VM options:
-Dspring.profiles.active=dev
Command line parameter activation
Program arguments:
--spring.profiles.active=dev
profile summary
- profile is used to configure the dynamic switching function in different environments.
- profile configuration mode
- Multiple profile file mode: multiple profiles are provided, each representing an environment.
- Application dev.properties/yml development environment
- application-test.properties/yml test environment
- application-pro.properties/yml production environment
- yml multi document mode:
- Use in yml - separate different configurations
- Multiple profile file mode: multiple profiles are provided, each representing an environment.
- profile activation mode
- Configuration file: configure spring.profiles.active=dev in the configuration file
- Virtual machine parameters: specify in VM options: - Dspring.profiles.active=dev
- Command line parameters: java – jar xxx.jar --spring.profiles.active=dev
Internal configuration loading sequence
When the Springboot program starts, the configuration file is loaded from the following location:
- file:./config /: under the / config directory of the current project
- file:. /: the root directory of the current project
- classpath:/config /: the / config directory of the classpath
- Classpath: /: the root directory of the classpath
The loading order is the above arrangement order, and the properties of high priority configuration will take effect
External configuration loading order
External command line configuration > internal configuration
SpringBoot integrates other frameworks
Spring boot integrates JUnit
- Build SpringBoot project
- Introducing starter test dependency
- Writing test classes
- Add test related notes
- @RunWith(SpringRunner.class)
- @SpringBootTest(classes = startup class. class)
- Writing test methods
Note: the advanced version of SpringBoot uses junit5 for unit testing and can be tested without RunWith annotation. It should be 2.0 and above, at least 2.4.0.
Spring boot integrates redis
- Build SpringBoot project
- Introducing redis start dependency
- Configure redis related properties
- Inject RedisTemplate template template
- Write test method, test
@Autowiredprivate RedisTemplate redisTemplate;@Testpublic void setTest() { redisTemplate.boundValueOps("name").set("tom");}@Testpublic void getTest() { Object name = redisTemplate.boundValueOps("name").get(); System.out.println("name = " + name);}
SpringBoot integrates MyBatis
- Build SpringBoot project
- Introduce MyBatis startup dependency and add mysql driver
- Write DataSource and MyBatis related configuration
- Define tables and entity classes
- Write dao and mapper files / pure annotation development
- test
Step 2:
Add MyBatis Framework and MySQL Driver
Step 3:
# dataSourcespring: datasource: url: jdbc:mysql://127.0.0.1:3306/test?serverTimezone=GMT%2B8 username: root password: root driver-class-name: com.mysql.cj.jdbc.Driver
Consolidate Driud data sources
1. Introducing druid dependency
2. Update profile
spring: datasource: url: jdbc:mysql://127.0.0.1:3306/test?serverTimezone=GMT%2B8 username: root password: root driver-class-name: com.mysql.cj.jdbc.Driver type: com.alibaba.druid.pool.DruidDataSource
druid detailed configuration
# Data source configuration spring: datasource: type: com.alibaba.druid.pool.DruidDataSource driverClassName: com.mysql.cj.jdbc.Driver druid: # Master database data source master: url: jdbc:mysql://Localhost: 3306 / ry? Useunicode = true & characterencoding = utf8 & zerodatetimebehavior = converttonull & usessl = true & servertimezone = GMT% 2B8 Username: root password: root # from library data source slave: # from data source switch / default off enabled: false URL: Username: Password: # initial number of connections initialSize: 5 # minimum number of connection pools minIdle: 10 # maximum number of connection pools maxActive: 20 # configure the timeout time for obtaining connections maxWait: 60000 # configure how often to detect, Detect idle connections that need to be closed. The unit is milliseconds. Timebetween evictionrunsmillis: 60000 # configure the minimum survival time of a connection in the pool. The unit is milliseconds. minEvictableIdleTimeMillis: 300000 # configure the maximum survival time of a connection in the pool, The unit is milliseconds maxEvictableIdleTimeMillis: 900000 # configuration to detect whether the connection is valid validationquery: select 1 from dual testwhiteidle: true testonmirror: false testonreturn: false webstatfilter: enabled: true statviewservlet: Enable Led: true # sets the white list, If it is not filled in, all users are allowed to access allow: URL pattern: / Druid / * # console management user name and password login Username: ruoyi login password: 123456 filter: stat: enabled: true # slow SQL record log-slow-s ql: true slow-sql-millis: 1000 merge-sql: true wall: config: multi-statement-allow: true
Through annotation development, MyBatis does not need to be configured
Step 5
@Mapper@Repositorypublic interface UserMapper { @Select("select * from userinfo") List<User> findAll();}
Step 6: Test
@SpringBootTestclass SpringbootMybatisApplicationTests { @Autowired private UserMapper userMapper; @Test void findAllTest() { List<User> list = userMapper.findAll(); System.out.println(list); }}
Xml development
@Mapper@Repositorypublic interface UserXmlMapper { List<User> findAll(); }
UserMapper.xml
<?xml version="1.0" encoding="UTF-8" ?><!DOCTYPE mapper PUBLIC "-//mybatis.org//DTD Mapper 3.0//EN" "http://mybatis.org/dtd/mybatis-3-mapper.dtd"><mapper namespace="com.example.springbootmybatis.mapper.UserXmlMapper"> <select id="findAll" resultType="user"> select * from userinfo </select></mapper>
application.yml configure MyBatis information
# mybatismybatis: mapper-locations: classpath:mapper/*Mapper.xml # mapper Map file path type-aliases-package: com.example.springbootmybatis.domain# config-location: # Specify core profile
SpringBoot JPA mode
- Introduce spring boot starter data JPA
- Configuration file print SQL statement
- Create Entity annotation JPA annotation
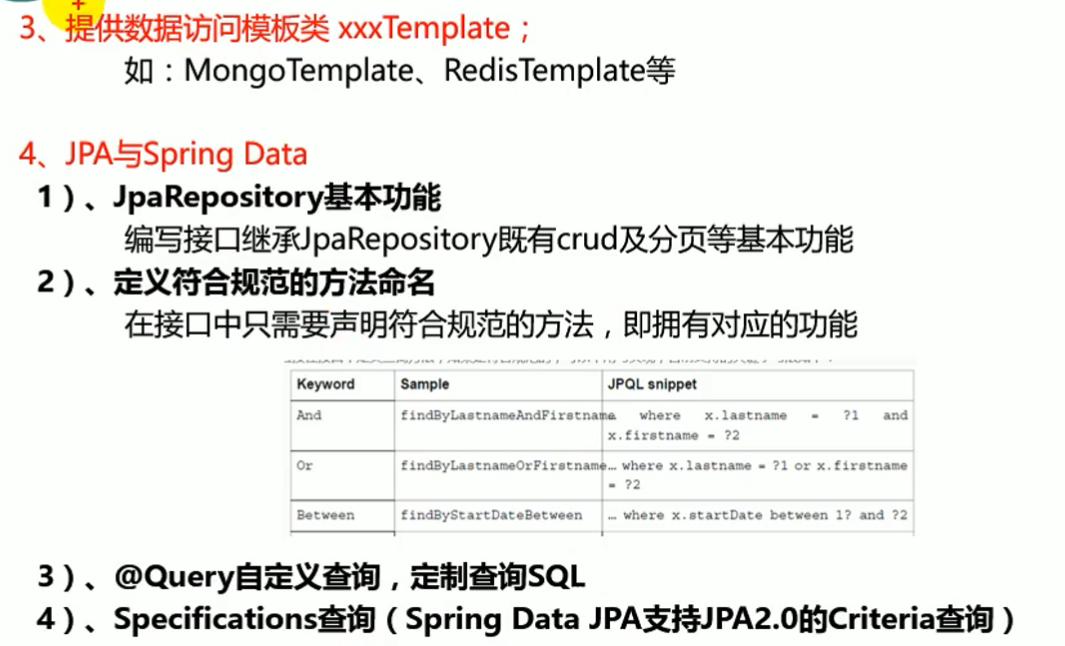
- Create a Repository interface to inherit JpaRepository
- test
Spring Data
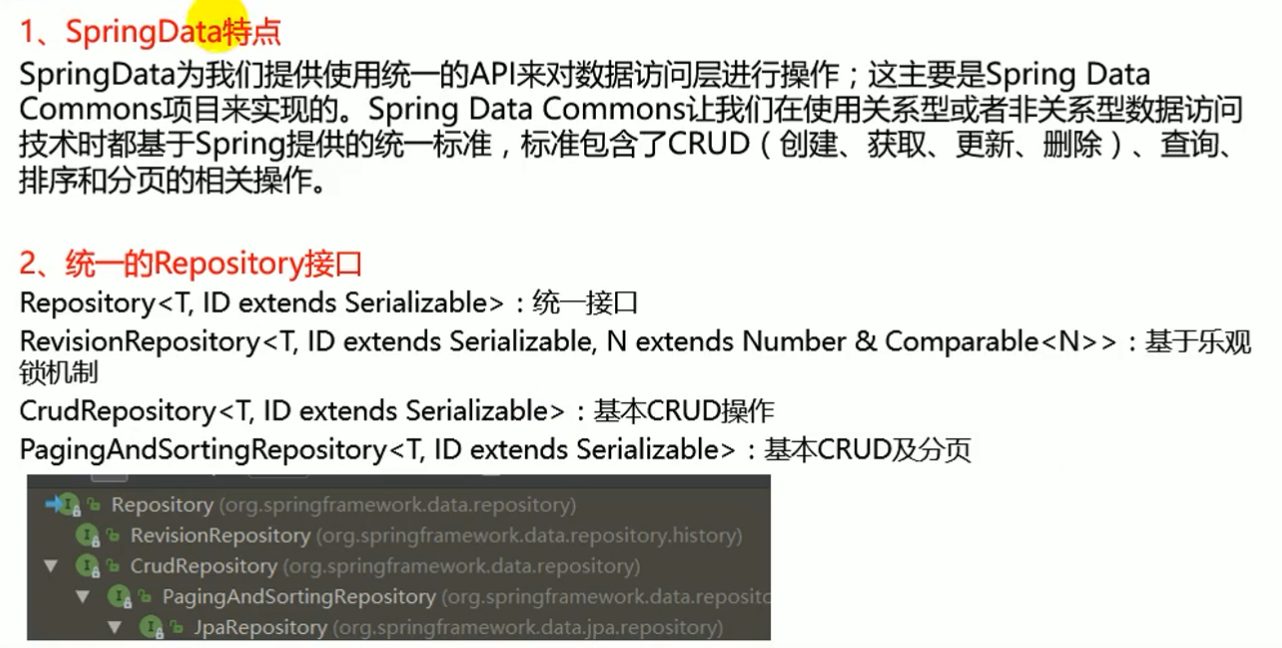
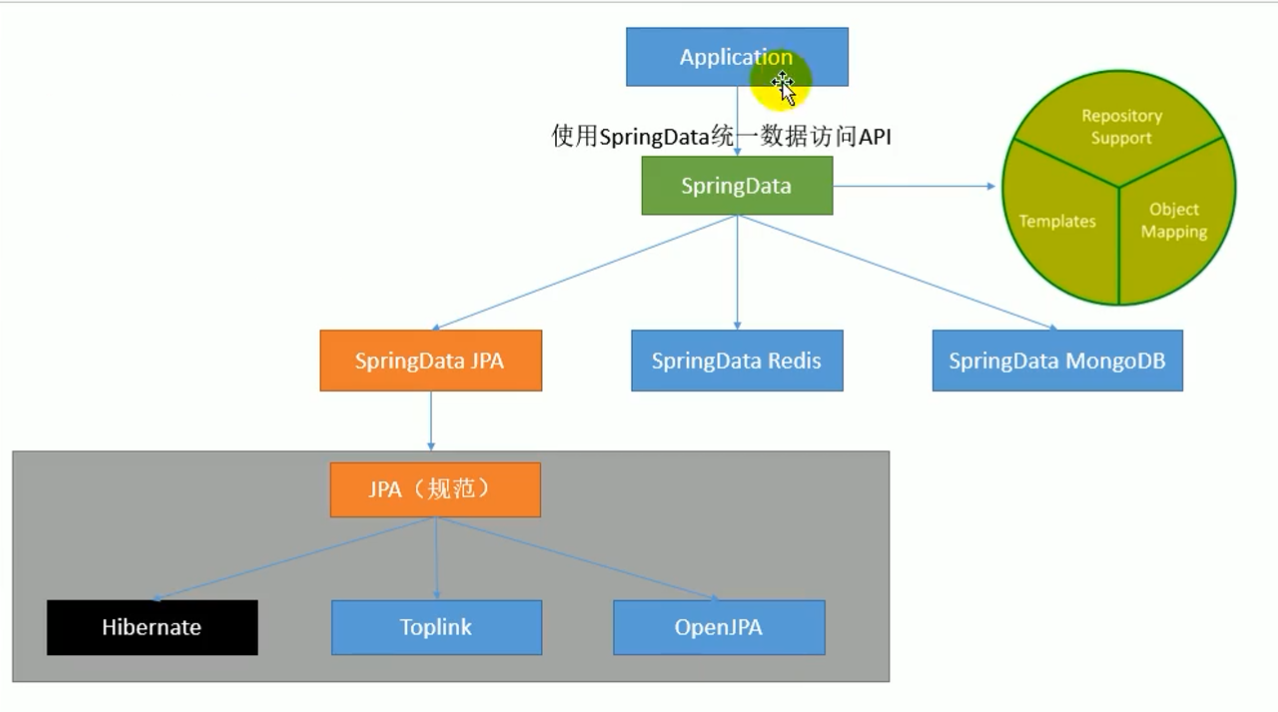
The purpose of Spring Data project is to simplify the construction of data access technologies based on Spring framework applications, including non relational databases, relational databases, cloud data services, etc.


Consolidate SpingData JPA
JPA : ORM(Object Relational Mapping)
1. Write an entity class (Bean) to map with the data table, and configure the mapping relationship
//Use the JPA annotation to configure the mapping relationship @ Entity / / tell JPA that this is an Entity class (the class mapped to the data table) @ Table(name = "userinfo") //@Table to specify which data table corresponds to it; If omitted, the default is public class user {@ ID @ generatedvalue (strategy = generationtype. Identity) / / self incremented primary key private integer userid; @ column (name = "username", length = 50) / / this is a column corresponding to the data table private string username; @ column / / if omitted, the default column name is the attribute private String password;
2. Write a Dao interface to operate the data table corresponding to the entity class
//Inherit JpaRepository to complete database operations public interface userrepository extensions JpaRepository < user, integer > {}
3. Basic configuration
spring: datasource: url: jdbc:mysql://127.0.0.1:3306 / test? Servertimezone = GMT% 2B8 Username: root password: root driver class name: com.mysql.cj.jdbc.driver type: com.alibaba.druid.pool.druiddatasource JPA: Hibernate: # update or create data table structure DDL Auto: update # console print SQL show SQL: true
4. Testing
@Testvoid getUserTest() { User user = userRepository.findById(1).get(); System.out.println(user);}
JPA multi table query
@OneToMany,@ManyToOne
Take Author and book as examples
Author.java
package com.example.demo;import javax.persistence.*;import java.util.List;@Entitypublic class Author { @Id @GeneratedValue(strategy = GenerationType.IDENTITY) private int Id; private String name; private int age; @OneToMany( mappedBy = "author" )//The relationship between author and book is one to many. mappedBy refers to mapping through the author field in the book table. mappedBy is generally used to set as the foreign key field of the associated table. Here, if the foreign key field in the book entity is author, it is set as author. If it is set as other fields, it is impossible to connect and query private list < book > books; public void setId(int id) { Id = id; } public void setName(String name) { this.name = name; } public void setAge(int age) { this.age = age; } public void setBooks(List<Book> books) { this.books = books; } public int getId() { return Id; } public String getName() { return name; } public int getAge() { return age; } public List<Book> getBooks() { return books; }}
Book.java
package com.example.demo;import javax.persistence.*;@Entitypublic class Book { @javax.persistence.Id @GeneratedValue(strategy = GenerationType.IDENTITY) private int Id; private String name; private float price; @JoinColumn @ManyToOne(cascade = CascadeType.ALL) //The relationship between book and author is many to one. JoinColumn is used to add foreign keys, and cascade is used to cascade. CascadeType.Remove refers to cascade deletion, which is deleted by the ancestor of the associated table, and the corresponding ancestor of the associated table will also be deleted. Here, book is the associated table through the foreign key field author (the author_id foreign key in the database) associates the author table. Author is the associated table. / / similarly, CascadeType.Persist is a cascade storage, and the other words correspond to their own meanings / / CascadType.ALL contains all cascading operations private author author; public void setid (int ID) {id = ID;} public void setname (string name) { this.name = name; } public void setPrice(float price) { this.price = price; } public void setAuthor(Author author) { this.author = author; } public int getId() { return Id; } public String getName() { return name; } public float getPrice() { return price; } public Author getAuthor() { return author; }}
BookRepository.java
package com.example.demo;import org.springframework.data.repository.CrudRepository;public interface AuthorRepository extends CrudRepository<Author,Integer> {}
AuthorRepository.java
package com.example.demo;import org.springframework.data.repository.CrudRepository;public interface BookRepository extends CrudRepository<Book,Integer> {}