summary
Background: in traditional Web applications, session is used to store user information. Every time a user passes authentication, the server needs to create a record
Save user information, usually in memory.
As more and more users pass the authentication, the cost of the server here will be greater and greater. Because the Session is in memory, this brings some scalability problems
Servlets depend on web containers
Description: JSON web token (JWT, a kind of token) is an open standard (RFC 7519). It defines a compact and self-contained way to safely transmit information between parties as JSON objects. This information can be verified and trusted because it is digitally signed.
JWT It is stored in the client (front end) and carried in the request header of each request JWT Send it to the server, and the server is responsible for receiving it
 And verification
 The server side can be used without storage JWT,This can reduce the memory overhead of the server
JWT It has nothing to do with language and is very convenient to expand, whether it is PC End or mobile end can be easily used
 Not affected cookie Limitations of
The main difference between session and JWT is the save location. Session is saved on the server, while JWT is saved on the client
JWT is a fixed format string. The official website of JWT is: https://jwt.io/
structure
JWT fixes various strings and consists of three parts:
Header, head
Payload, load
Signature
Connecting the three parts using the dot (.) is a JWT string
head
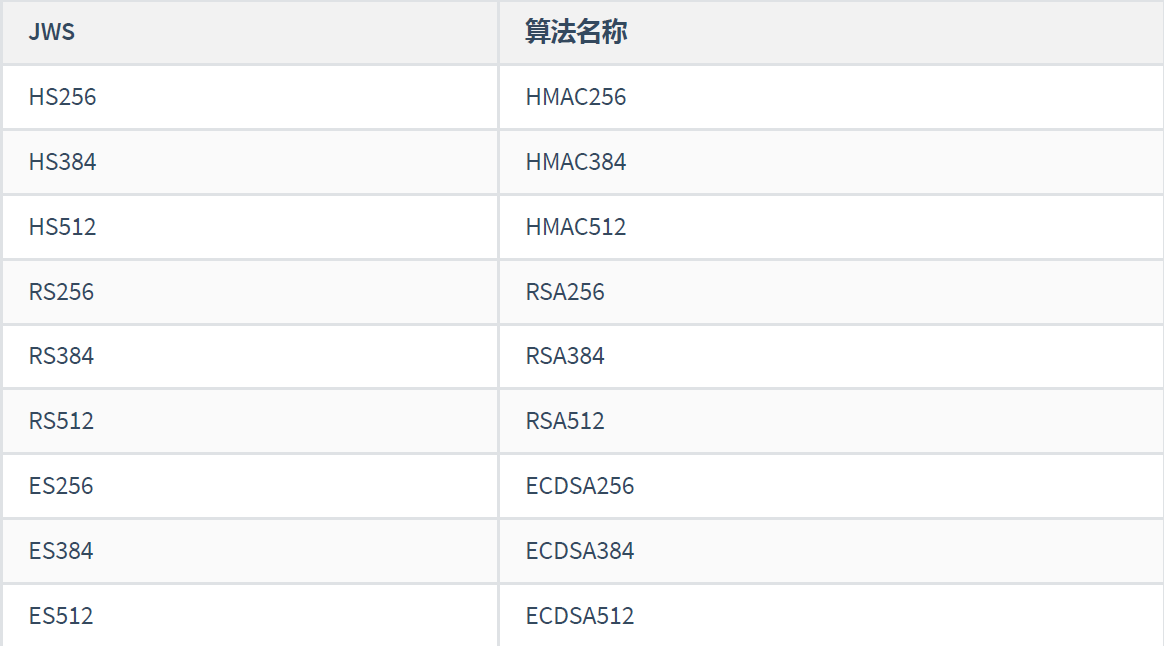
The header generally consists of two parts: the type of token ("JWT") and the algorithm name (such as HMAC SHA256 or RSA, etc.).
The algorithms used for verification and signature in JWT are listed below:
{
  "alg": "HS256",
  "typ": "JWT"
}
load
payload is mainly used to contain claims, which are generally statements about entities (usually users) and other data.
There are three types of declarations:
registered
public
private
The details are as follows:
Registered claims: here is a set of predefined declarations, which are not mandatory but recommended.
iss: jwt Issuer
sub: jwt Target users
aud: receive jwt Party of
exp: jwt The expiration time of must be greater than the issuing time
nbf: Define the time before which the jwt Are not available
iat: jwt Date of issue
jti: jwt The unique ID of the, which is mainly used as a one-time ID token,To avoid replay attacks
Public claims: can be defined at will
Custom data:Store in token Stored in key-value value
Private claims: a statement used to share information between parties who agree to use them and is not registered or public
{
    "iss": "briup",
    "iat": 1446593502,
    "exp": 1446594722,
    "aud": "www.briup.com",
    "sub": "briup@briup.com",
    "username": "tom"
}
Note that do not place sensitive information in JWT's payload or header unless they are encrypted
After Base64 encoding the header and payload respectively, two strings are obtained, and then the two encoded strings are connected together with English periods (the header is in the front) to form a new string: aaa.bbb
autograph
Finally, encrypt the spliced string with HS256 algorithm. When encrypting, you also need to provide a secret. The encrypted content is also a string, which is the signature.
Splice this signature after the string just now to get the complete JWT string.
If the header part and payload part are tampered with, the tamper cannot generate a new signature part because he does not know what the key is,
The server cannot pass.
stay JWT In, the message body is transparent, and the use of signature can ensure that the message is not tampered with.

Ensure that the key is not compromised,Otherwise it will be tampered with
For example, the HMACSHA256 encryption algorithm is used to encrypt the first two parts with a secret key to generate a signature
HMACSHA256(base64UrlEncode(header) + "." + base64UrlEncode(payload), secret)
For example, connect the usage points (.) of Header, Payload and Signature
eyJ0eXAiOiJKV1QiLCJhbGciOiJIUzI1NiJ9.eyJhdWQiOiI2MmI2OWNlZC02YWNlLTRmYzAtOTk5MS00Y WUwMjIxODQ0OTciLCJleHAiOjE2MDYwNTQzNjl9.DNVhr36j66JpQBfcYoo64IRp84dKiQeaq7axHTBcP9 E
For example, the JWT can be verified and parsed using the tools provided on the official website

We can also do this by using JWT encapsulated tool classes
integration
rely on
<dependency>
		    <groupId>com.auth0</groupId>
		    <artifactId>java-jwt</artifactId>
		    <version>3.11.0</version>
		</dependency>
Tool class
public class JwtUtil {
	/**
     * Expiration time 5 minutes
     */
    private static final long EXPIRE_TIME = 5 * 60 * 1000;
    /**
     * jwt secret key
     */
    private static final String SECRET = "jwt_secret";

    /**
     * Generate a signature that expires in five minutes
     * @param userId
     * @param info,Map The value of can only store values of types: Map, List, Boolean, Integer, Long, Double, String and Date
     * @return
     */
    public static String sign(String userId,Map<String,Object> info) {
        try {
            Date date = new Date(System.currentTimeMillis() + EXPIRE_TIME);
            Algorithm algorithm = Algorithm.HMAC256(SECRET);
            return JWT.create()
                    // Save the user id in the token
                    .withAudience(userId)
                    // Store custom data
                    .withClaim("info", info)
                    // The token expires in five minutes
                    .withExpiresAt(date)
                    // Key of token
                    .sign(algorithm);
        } catch (Exception e) {
        	e.printStackTrace();
            return null;
        }
    }

    /**
     * Get userId according to token
     * @param token
     * @return
     */
    public static String getUserId(String token) {
        try {
            String userId = JWT.decode(token).getAudience().get(0);
            return userId;
        } catch (JWTDecodeException e) {
            return null;
        }
    }

    /**
     * Get custom data info according to token
     * @param token
     * @return
     */
    public static Map<String,Object> getInfo(String token) {
        try {
            return JWT.decode(token).getClaim("info").asMap();
        } catch (JWTDecodeException e) {
            return null;
        }
    }


    /**
     * Verification token
     * @param token
     * @return
     */
    public static boolean checkSign(String token) {
        try {
            Algorithm algorithm = Algorithm.HMAC256(SECRET);
            JWTVerifier verifier = JWT.require(algorithm)
                    // .withClaim("username", username)
                    .build();
            verifier.verify(token);
            return true;
        } catch (JWTVerificationException exception) {
            throw new RuntimeException("token Invalid, please get again");
        }
    }
}
Interceptor
// Intercept authentication resources
public class JwtInteceptors implements HandlerInterceptor{

	@Override
	public boolean preHandle(HttpServletRequest request, HttpServletResponse response, Object handler)
			throws Exception {
		// Judge whether it is an authentication resource (according to the interceptor configuration auth / *). If not, release it directly
		//System.out.println(handler); //class org.springframework.web.method.HandlerMethod
		if(!(handler instanceof HandlerMethod)){
			return true;
		}
		// Get token from request header
		String token = request.getHeader("token");
		// Judge whether the token is empty and throw an exception directly
		if(token == null) {
			throw new RuntimeException("nothing token,Please login");
		}
		// Verification token
		JwtUtil.checkSign(token);
		// Retrieve the information in the token
		String userId = JwtUtil.getUserId(token);
		System.out.println(userId);
		Map<String, Object> info = JwtUtil.getInfo(token);
		info.forEach((k,v)->{
			System.out.println(k+"="+v);
		});
		// Release
		return true;
	}

}
mvc configuration
@Configuration
public class MvcConfig implements WebMvcConfigurer{

	@Override
	public void addInterceptors(InterceptorRegistry registry) {
		registry.addInterceptor(new JwtInteceptors())
		.addPathPatterns("/auth/**");
	}
}
resources
@RestController
@RequestMapping("/auth")
@Api(tags = "Test module")
public class AuthController {
	@GetMapping("/hello")
	public String hello() {
		return "hello";
	}
}
test
Direct access

Get token

Carry request header

3
gender=0
username=wangsidandan
Modify the token, and then access the test after deliberately making a mistake
{"code":500,"msg":"Server exception: token Invalid, please get again","data":null}
After the new token test is passed, wait for 5 minutes and visit again
{"code":500,"msg":"Server exception: token Invalid, please get again","data":null}
swagger
@RestController
@RequestMapping("/auth")
@Api(tags = "Test module")
public class AuthController {
	@ApiOperation(value = "test",notes = "token Put request header")
	@ApiImplicitParams({
		@ApiImplicitParam(name = "token",value = "token value",dataType = "string",paramType = "header",required = true)
	})
	@GetMapping("/hello")
	public String hello() {
		return "hello";
	}
}
Each resource that needs to be intercepted must be manually configured with a token?
Global configuration
Mode 1
The first way to set global variables:
Note that before copying springboot-swagger Project, add a small amount of modification
Modify the configuration class SwaggerConfig2.java
package com.briup.cms.config;

import java.util.ArrayList;
import java.util.List;

import javax.servlet.http.HttpServletRequest;
import javax.servlet.http.HttpServletResponse;

import org.springframework.context.annotation.Bean;
import org.springframework.context.annotation.Configuration;

import springfox.documentation.builders.ApiInfoBuilder;
import springfox.documentation.builders.ParameterBuilder;
import springfox.documentation.builders.PathSelectors;
import springfox.documentation.builders.RequestHandlerSelectors;
import springfox.documentation.schema.ModelRef;
import springfox.documentation.service.ApiInfo;
import springfox.documentation.service.Contact;
import springfox.documentation.service.Parameter;
import springfox.documentation.spi.DocumentationType;
import springfox.documentation.spring.web.plugins.Docket;
import springfox.documentation.swagger2.annotations.EnableSwagger2;
@Configuration
@EnableSwagger2
public class Swagger2Config {
	// ApiSelectorBuilder select() api selector
	// Specify any path to the processor
	@Bean
	public Docket createDocket() {
		//Configure global parameters
				ParameterBuilder tokenPar = new ParameterBuilder();
				Parameter param = tokenPar.name("token")
							        	  .description("JWT token")
							        	  .modelRef(new ModelRef("string"))
							        	  .parameterType("header")
							        	  .required(false)
							        	  .build();

		        List<Parameter> pars = new ArrayList<Parameter>();
		        pars.add(param);

		return new Docket(DocumentationType.SWAGGER_2)
				.apiInfo(apiInfo())
				.select()
				.apis(RequestHandlerSelectors.basePackage("com.briup.cms.controller"))
				.paths(PathSelectors.any())
				.build()
				.globalOperationParameters(pars)
				.ignoredParameterTypes(HttpServletRequest.class,HttpServletResponse.class);
	}

	// Basic information displayed in the swagger page
	//@Bean
	private ApiInfo apiInfo() {
		return new ApiInfoBuilder()
				.title("cms")
				.description("Press release system")
				.version("1.0")
				.contact(new Contact("vanse", "http://wangsidandan.github.io", "wangsidandan@gmail.com"))
				.build();
	}


}
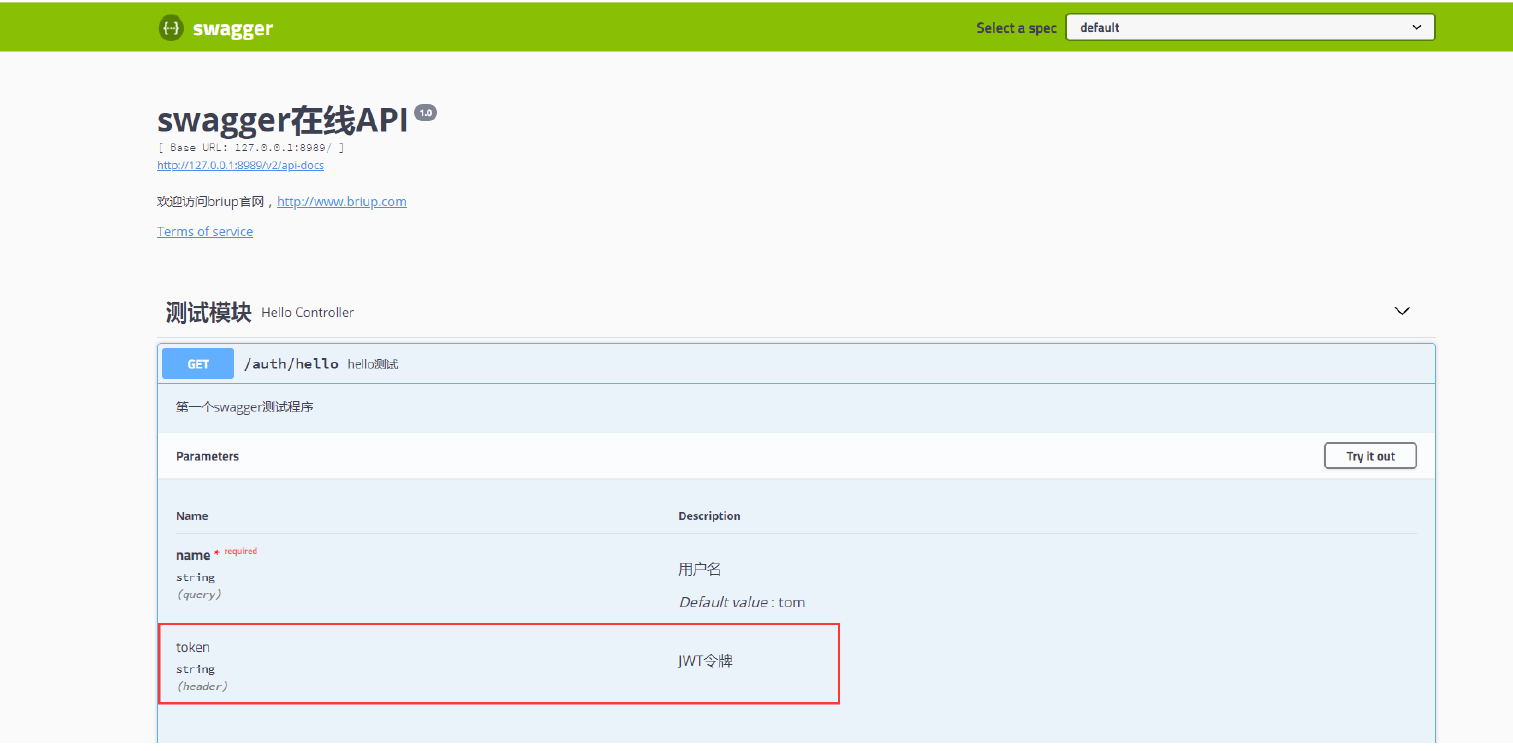
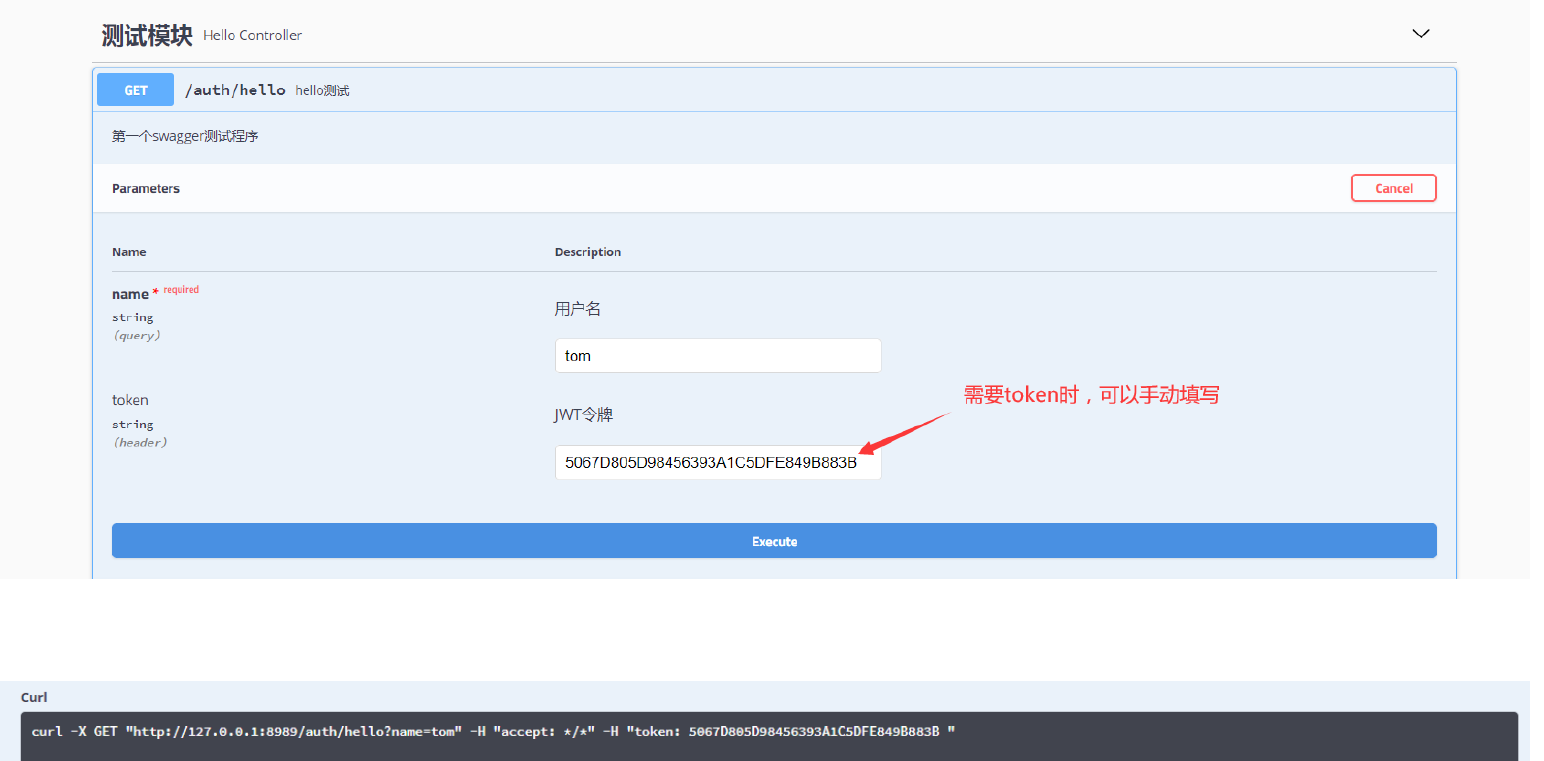
At this time, the global parameter token is automatically added to all interfaces in swagger
The token is also carried in the request
Tokens are also added to interfaces that do not require authentication, such as login interfaces, so this is not suitable for actual use
Mode 2
Copy the previous springboot swagger project with minor modifications
package com.briup.cms.config;

import java.util.ArrayList;
import java.util.Collections;
import java.util.List;

import javax.servlet.http.HttpServletRequest;
import javax.servlet.http.HttpServletResponse;

import org.springframework.context.annotation.Bean;
import org.springframework.context.annotation.Configuration;

import com.google.common.base.Predicate;
import com.google.common.base.Predicates;

import springfox.documentation.builders.ApiInfoBuilder;
import springfox.documentation.builders.PathSelectors;
import springfox.documentation.builders.RequestHandlerSelectors;
import springfox.documentation.service.ApiInfo;
import springfox.documentation.service.ApiKey;
import springfox.documentation.service.AuthorizationScope;
import springfox.documentation.service.Contact;
import springfox.documentation.service.SecurityReference;
import springfox.documentation.spi.DocumentationType;
import springfox.documentation.spi.service.contexts.SecurityContext;
import springfox.documentation.spring.web.plugins.Docket;
import springfox.documentation.swagger2.annotations.EnableSwagger2;

@Configuration
@EnableSwagger2
public class Swagger2Config {
	// ApiSelectorBuilder select() api selector
	// Specify any path to the processor
	@Bean
	public Docket createDocket() {
		return new Docket(DocumentationType.SWAGGER_2).apiInfo(apiInfo()).select()
				.apis(RequestHandlerSelectors.basePackage("com.briup.cms.controller")).paths(PathSelectors.any())
				.build().securitySchemes(security()).securityContexts(securityContexts())
				.ignoredParameterTypes(HttpServletRequest.class, HttpServletResponse.class);
	}

	// Basic information displayed in the swagger page
	// @Bean
	private ApiInfo apiInfo() {
		return new ApiInfoBuilder().title("cms").description("Press release system").version("1.0")
				.contact(new Contact("vanse", "http://wangsidandan.github.io", "wangsidandan@gmail.com")).build();
	}

	/**
	 * Set the basic information displayed in the authentication
	 */
	private List<ApiKey> security() {
		return Collections.singletonList(new ApiKey("Authorization", "token", "header"));
	}

	/**
	 * Set authentication rules
	 */
	private List<SecurityContext> securityContexts() {

		List<String> antPaths = new ArrayList<String>();
		antPaths.add("/auth/**");

		return Collections.singletonList(SecurityContext.builder().securityReferences(defaultAuth())
				.forPaths(antPathsCondition(antPaths)).build());
	}

	/**
	 * Conditions for returning the authentication path
	 */
	private Predicate<String> antPathsCondition(List<String> antPaths) {

		List<Predicate<String>> list = new ArrayList<>();

		antPaths.forEach(path -> list.add(PathSelectors.ant(path)));

		return Predicates.or(list);

	}

	/**
	 * Set the scope of authentication and the type of authentication
	 */
	private List<SecurityReference> defaultAuth() {
		AuthorizationScope authorizationScope = new AuthorizationScope("global", "accessEverything");
		AuthorizationScope[] authorizationScopes = new AuthorizationScope[1];
		authorizationScopes[0] = authorizationScope;
		return Collections.singletonList(new SecurityReference("Authorization", authorizationScopes));
	}

}
The newly added codes here are as follows:
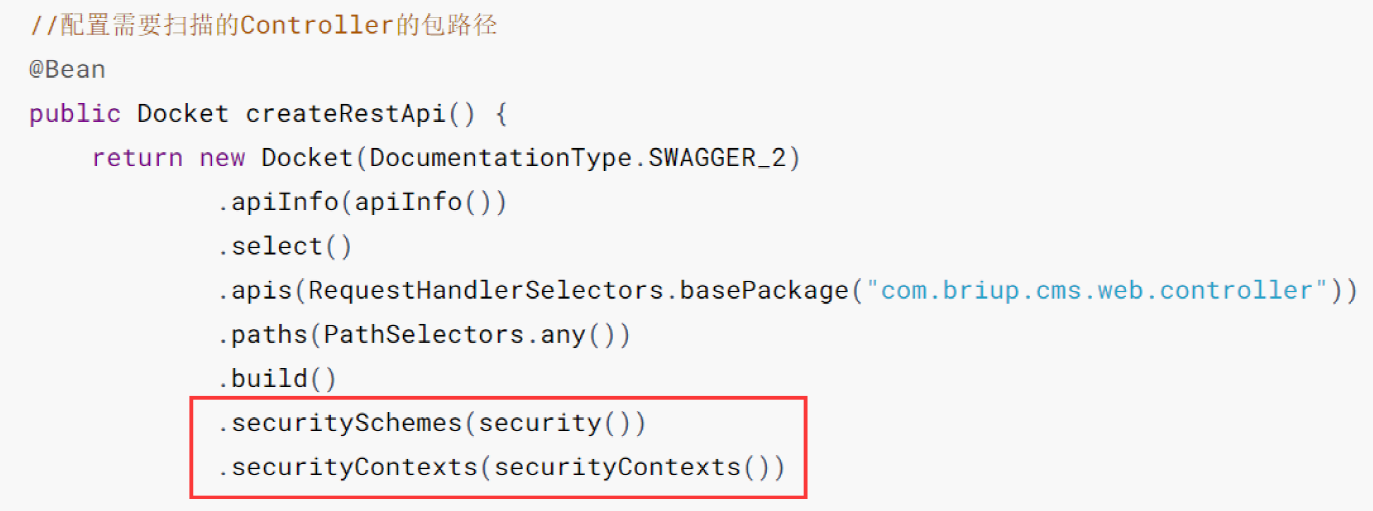
The new code is shown in the figure, as well as the following new methods

A "lock" icon will be displayed here, indicating that some interfaces need authentication
After expanding the module, if the access path meets the required interface, the "lock" icon will also be displayed

Click the lock icon to add the unified authentication information (token) in the request header:
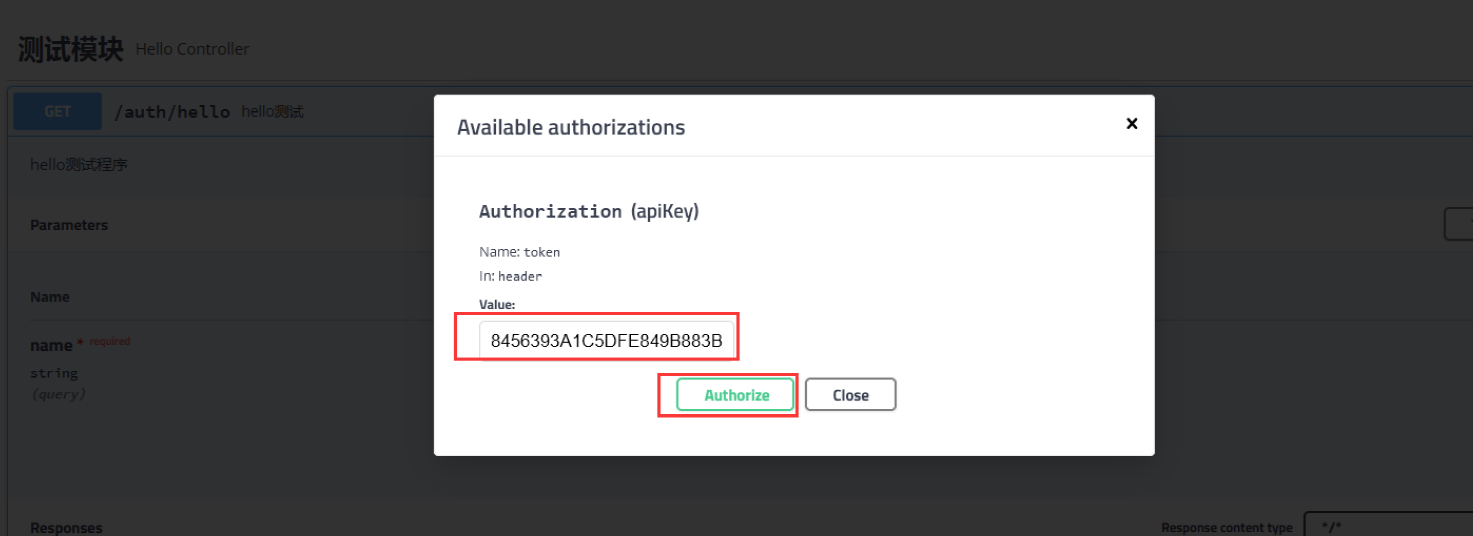
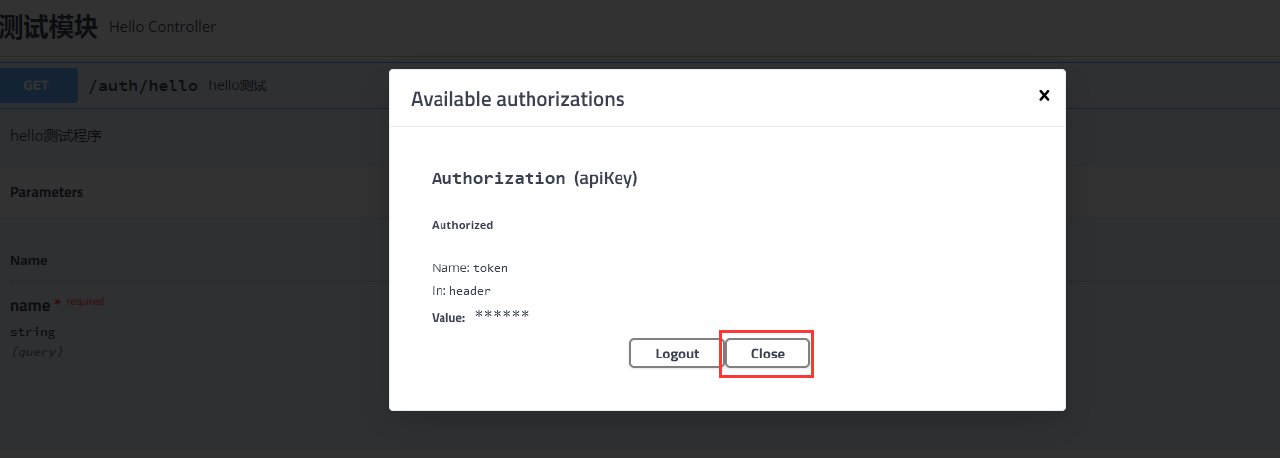
Click the authentication button to conduct the access test:

At this time, the interface with "lock" icon will carry the authentication information token value just set in the request header when accessing

At this time, the interface without "lock" icon will not carry the set request header information by default when accessing