Reprinted from: https://blog.csdn.net/iku5200/article/details/82856621
IDE: idea,DB: mysql
-
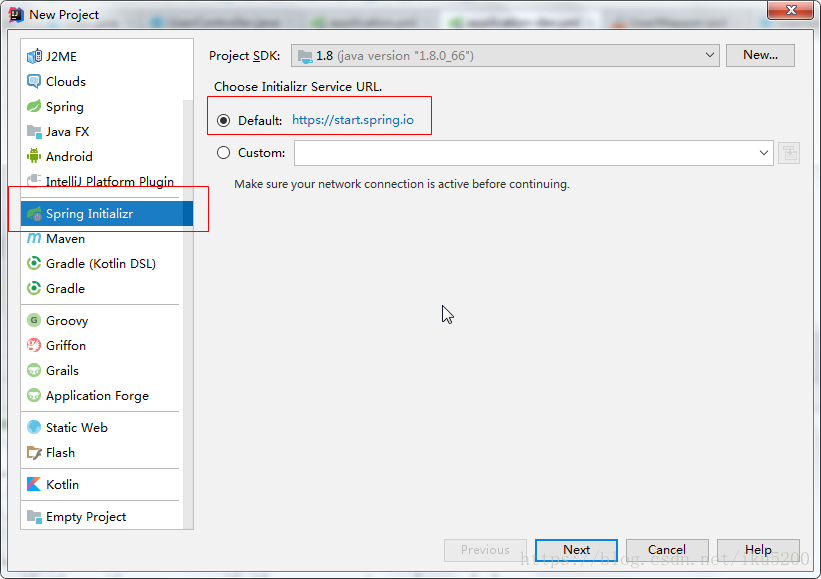
Create a new Spring Initializr project
-
Create the file structure of the project and the version of the jdk

-
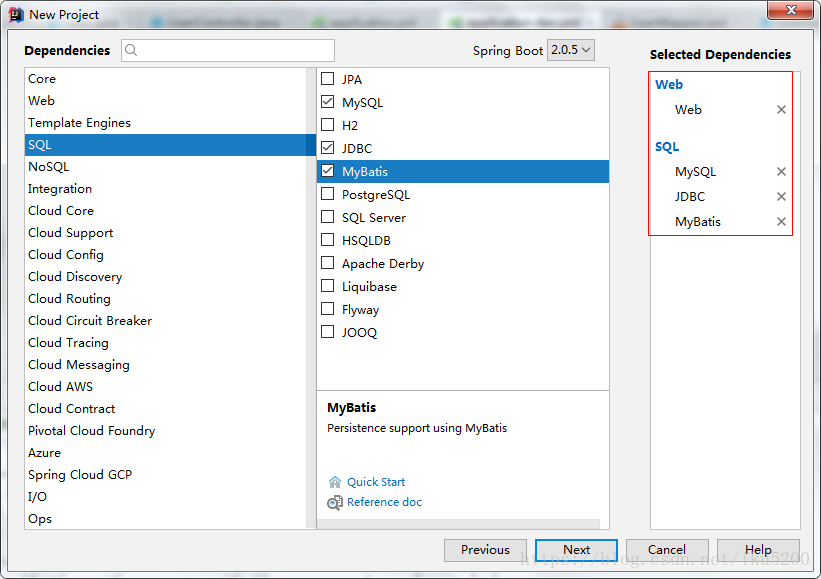
Select the dependencies required by the project
-
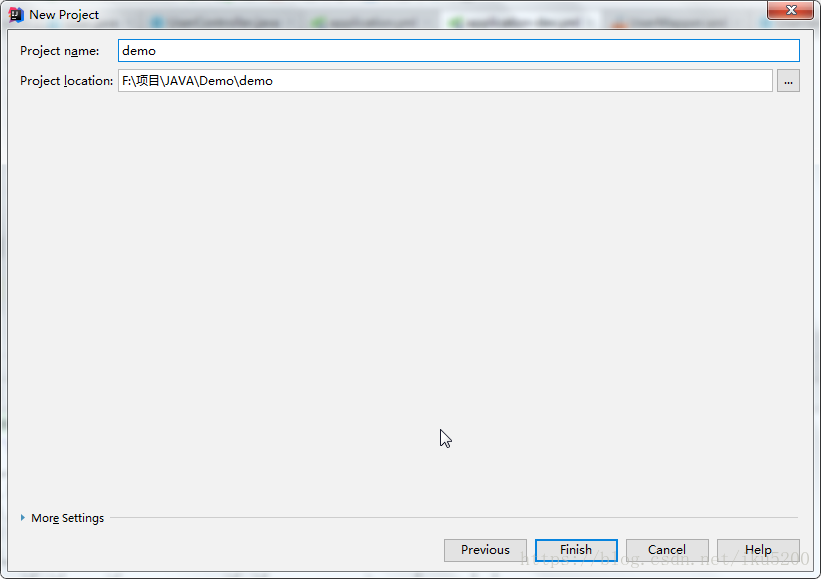
Modify the project name and finish
-
Take a look at the pom.xml after it is built
<?xml version="1.0" encoding="UTF-8"?>
<project xmlns="http://maven.apache.org/POM/4.0.0" xmlns:xsi="http://www.w3.org/2001/XMLSchema-instance"
	xsi:schemaLocation="http://maven.apache.org/POM/4.0.0 http://maven.apache.org/xsd/maven-4.0.0.xsd">
	<modelVersion>4.0.0</modelVersion>

	<groupId>com.example</groupId>
	<artifactId>demo</artifactId>
	<version>0.0.1-SNAPSHOT</version>
	<packaging>jar</packaging>

	<name>demo</name>
	<description>Demo project for Spring Boot</description>

	<parent>
		<groupId>org.springframework.boot</groupId>
		<artifactId>spring-boot-starter-parent</artifactId>
		<version>2.0.5.RELEASE</version>
		<relativePath/> <!-- lookup parent from repository -->
	</parent>

	<properties>
		<project.build.sourceEncoding>UTF-8</project.build.sourceEncoding>
		<project.reporting.outputEncoding>UTF-8</project.reporting.outputEncoding>
		<java.version>1.8</java.version>
	</properties>

	<dependencies>
		<dependency>
			<groupId>org.springframework.boot</groupId>
			<artifactId>spring-boot-starter-jdbc</artifactId>
		</dependency>
		<dependency>
			<groupId>org.springframework.boot</groupId>
			<artifactId>spring-boot-starter-web</artifactId>
		</dependency>
		<dependency>
			<groupId>org.mybatis.spring.boot</groupId>
			<artifactId>mybatis-spring-boot-starter</artifactId>
			<version>1.3.2</version>
		</dependency>

		<dependency>
			<groupId>mysql</groupId>
			<artifactId>mysql-connector-java</artifactId>
			<scope>runtime</scope>
		</dependency>
		<dependency>
			<groupId>org.springframework.boot</groupId>
			<artifactId>spring-boot-starter-test</artifactId>
			<scope>test</scope>
		</dependency>
	</dependencies>

	<build>
		<plugins>
			<plugin>
				<groupId>org.springframework.boot</groupId>
				<artifactId>spring-boot-maven-plugin</artifactId>
			</plugin>
		</plugins>
	</build>


</project>
- Modify profile
Instead of using the application. Properties file, this article uses the more concise application. YML file. Delete the original application.properties file in the resource folder and create the application.yml configuration file (Note: in fact, the bottom layer of SpringBoot will parse the application.yml file into application.properties). This paper has created two YML files (application.yml and application dev.yml). Let's take a look at the contents respectively
application.yml
spring:
  profiles:
    active: dev
application-dev.yml
server:
  port: 8080

spring:
  datasource:
    username: root
    password: ok123
    url: jdbc:mysql://localhost:3306/springboot?useUnicode=true&characterEncoding=utf-8&useSSL=true&serverTimezone=UTC
    driver-class-name: com.mysql.jdbc.Driver

mybatis:
  mapper-locations: classpath:mapper/*Mapper.xml
  type-aliases-package: com.example.entity

#showSql
logging:
  level:
    com:
      example:
        mapper : debug
Two documents mean:
How to configure multiple sets of environments in a project.
Now a project has many environments, development environment, test environment, quasi production environment and production environment. The parameters of each environment are different, so we can configure the parameters of each environment into the YML file. In this way, when we want to use which environment, we only need to write the configuration file in the main configuration file, such as application.yml
Note: in Spring Boot, the multi environment configuration file name needs to meet the format of application-{profile}.yml, where {profile} corresponds to your environment ID, such as:
application-dev.yml: development environment
application-test.yml: Test Environment
application-prod.yml: production environment
As for which specific configuration file will be loaded, you need to set the spring.profiles.active attribute in the application.yml file, and its value corresponds to the {profile} value.
In addition, it is better not to have Chinese comments in the configuration file, which will report errors.
Next, move the startup file to com.example, and the startup class of springboot cannot be placed in the java directory!!! You have to have a bag to wrap it in
Otherwise, an error will be reported:
Your ApplicationContext is unlikely to start due to a @ComponentScan of the default package.
The reason for this is that sometimes it is difficult to recognize this error in the project directory in the IDEA, and it is easy to scan some classes


- Then start creating entity classes to implement the business process
Create packages controller, entity, mapper and service. Create a mapper folder under resources to write sql statements, or directly write them in the mapper file in the form of annotations. Paste the code directly below
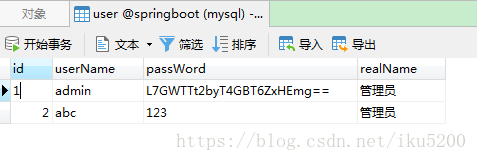
Database table structure
CREATE TABLE `t_user` (
  'id' int(32) NOT NULL AUTO_INCREMENT,
  'userName' varchar(32) NOT NULL,
  'passWord' varchar(50) NOT NULL,
  'realName' varchar(32) DEFAULT NULL,
  PRIMARY KEY ('id')
) ENGINE=InnoDB AUTO_INCREMENT=3 DEFAULT CHARSET=utf8;
entity.java
package com.example.entity;

public class User {
    private Integer id;
    private String userName;
    private String passWord;
    private String realName;

    public Integer getId() {
        return id;
    }

    public void setId(Integer id) {
        this.id = id;
    }

    public String getUserName() {
        return userName;
    }

    public void setUserName(String userName) {
        this.userName = userName;
    }

    public String getPassWord() {
        return passWord;
    }

    public void setPassWord(String passWord) {
        this.passWord = passWord;
    }

    public String getRealName() {
        return realName;
    }

    public void setRealName(String realName) {
        this.realName = realName;
    }

    @Override
    public String toString() {
        return "User{" +
                "id=" + id +
                ", userName='" + userName + '\'' +
                ", passWord='" + passWord + '\'' +
                ", realName='" + realName + '\'' +
                '}';
    }
}
UserMapper.xml
<?xml version="1.0" encoding="UTF-8"?>
<!DOCTYPE mapper PUBLIC "-//mybatis.org//DTD Mapper 3.0//EN" "http://mybatis.org/dtd/mybatis-3-mapper.dtd">

<mapper namespace="com.example.mapper.UserMapper">
    <select id="selectUserById" parameterType="int" resultType="User">
        SELECT * FROM t_user WHERE id = #{id}
    </select>
</mapper>
UserMapper.java
package com.example.mapper;

import com.example.entity.User;
import org.springframework.stereotype.Repository;

@Repository
public interface UserMapper {

    public User selectUserById(int id);
}
UserService.java
package com.example.service;

import com.example.entity.User;

public interface UserService {

    public User selectUserById(int id);
}
UserServiceImpl.java
package com.example.service.Impl;

import com.example.entity.User;
import com.example.mapper.UserMapper;
import com.example.service.UserService;
import org.springframework.beans.factory.annotation.Autowired;
import org.springframework.stereotype.Service;


@Service
public class UserServiceImpl implements UserService {

    @Autowired
    private UserMapper userMapper;

    @Override
    public User selectUserById(int id) {
        return userMapper.selectUserById(id);
    }
}
UserController.java
package com.example.controller;

import com.example.service.UserService;
import org.springframework.beans.factory.annotation.Autowired;
import org.springframework.web.bind.annotation.PathVariable;
import org.springframework.web.bind.annotation.RequestMapping;
import org.springframework.web.bind.annotation.RestController;

@RestController
public class UserController {

    @Autowired
    private UserService userService;

    @RequestMapping("/getUser/{id}")
    public String getUser(@PathVariable("id") int id){
        return userService.selectUserById(id).toString();
    }
}

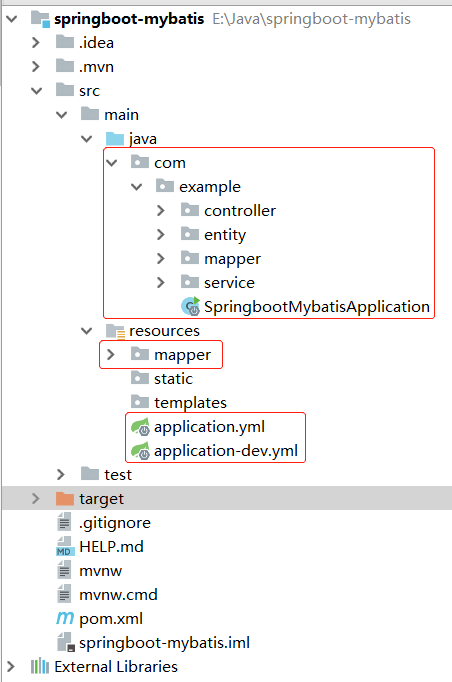
- After completing the above, the following comments are added in the startup class to give the mapper file path to be scanned @ MapperScan("com.example.mapper")
package com.example;

import org.mybatis.spring.annotation.MapperScan;
import org.springframework.boot.SpringApplication;
import org.springframework.boot.autoconfigure.SpringBootApplication;

@MapperScan("com.example.mapper")  //Scan mapper interface
@SpringBootApplication
public class SpringbootMybatisApplication {

	public static void main(String[] args) {

		SpringApplication.run(SpringbootMybatisApplication.class, args);
	}

}
- Finally, start the browser and enter the address: http://localhost:8080/getUser/3

The test is successful, so the basic framework is built successfully