Springboot integrates RabbitMQ
Installing RabbitMQ
1. Install Erlang language pack
https://www.erlang.org/downloads [official website download address]
2. Install rabbitMq
https://www.rabbitmq.com/download.html
The installation path cannot have Chinese, otherwise the path cannot be found


3. Restart rabbitmq program
net stop RabbitMQ && net start RabbitMQ
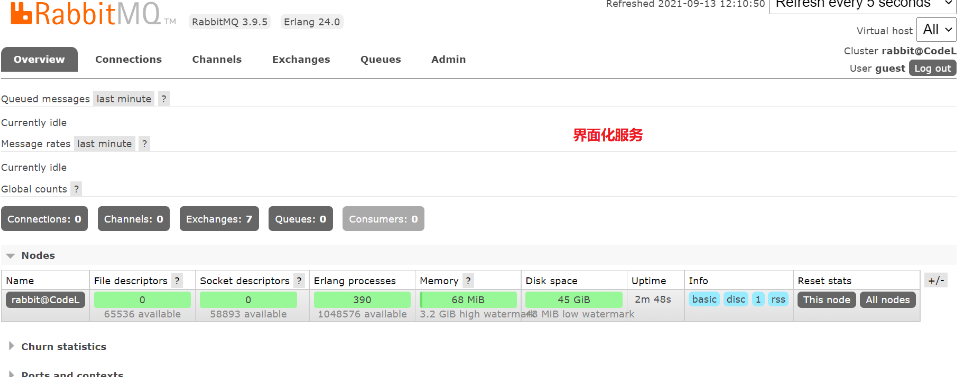
The login account and password of the page are guest
Service port: 5672
Interface port: 15672
4. Problems encountered while configuring custom serialization:
solve
rabbitmq cannot set messageconverter. An error is reported when setting Jackson2JsonMessageConverter. The problem is solved.
org.springframework.beans.factory.BeanCreationException: Error creating bean with name 'messageConverter' defined in class path resource [com/cyberbim/modbusdriver/config/MyAMQPconfig.class]: Bean instantiation via factory method failed; nested exception is org.springframework.beans.BeanInstantiationException: Failed to instantiate [org.springframework.amqp.support.converter.MessageConverter]: Factory method 'messageConverter' threw exception; nested exception is java.lang.NoClassDefFoundError: com/fasterxml/jackson/databind/ObjectMapper
This error is the lack of dependency
<dependency>
<groupId>com.fasterxml.jackson.core</groupId>
<artifactId>jackson-databind</artifactId>
<version>2.11.3</version>
</dependency>

Just add this!
5. Understand the process of pushing and receiving a message

The yellow circle is the message push service, which pushes the message to the middle box, that is, the rabbitMq server, and then processes the data into the column through various relationships such as switches and queues in the server. Finally, the consumers in the blue circle on the right get the corresponding monitored message.
There are three types of switches in common use. Because consumers obtain information from the queue and the queue is bound to the switch (general), the corresponding message push / receive modes also include the following:
Direct Exchange direct attached switch
The direct connected switch delivers the message to the corresponding queue according to the routing key carried by the message.
Generally, a queue is bound to a direct connected switch, and a routing key is given at the same time.
Then, when a message carries a route value of X and the message is sent to the switch through the producer, the switch will find a queue with a binding value of X according to the route value X.
Fanout Exchange fan switch
Fan switch, this switch has no routing key concept, even if you bind the routing key, it is ignored. After receiving the message, the switch will directly forward it to all queues bound to it.
Topic Exchange theme switch
In fact, the flow of the theme switch is similar to that of the direct connection switch, but its feature is that there are rules between its routing keys and binding keys.
Briefly introduce the following rules:
*(asterisk) used to indicate a word (must appear)
*#(pound sign) used to represent any number (zero or more) of words
The generic binding key is bound to the queue, for example
The binding key of queue Q1 is. TT. The binding key of queue Q2 is TT#
If the routing key carried by a message is A.TT.B, queue Q1 will receive it;
If the routing key carried by a message is TT.AA.BB, queue Q2 will receive it;

The theme switch is very powerful. Why is it so inflated?
When the binding key of a queue is "#" (pound sign), the queue will ignore the message routing key and receive all messages.
When the two special characters * (asterisk) and # (pound sign) do not appear in the binding key, the subject switch has the behavior of the direct connected switch.
Therefore, the theme switch realizes the functions of fan-shaped switch and direct connected switch.
Integrated use of RabbitMq
1. Add consolidation dependency
 <dependency>
            <groupId>org.springframework.boot</groupId>
            <artifactId>spring-boot-starter-amqp</artifactId>
        </dependency>
2. Configure application.properties
#Basic configuration of rabitmq
spring.rabbitmq.host=localhost
spring.rabbitmq.port=5672
spring.rabbitmq.username=guest
spring.rabbitmq.password=guest

#Configure the virtual host path of rabbitmq
spring.rabbitmq.virtual-host=/
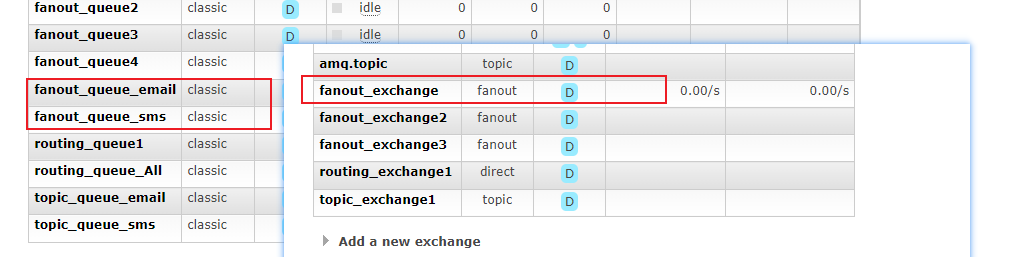
3. Create switches and queues based on API
One switch and two queues were created.
  //   1. Integrate rabbitmq and springboot API custom components based on API
    @Test
    public void test() {

//        1. Define the switch machine of fanout type
        amqpAdmin.declareExchange(new FanoutExchange("fanout_exchange"));

//        2. Define two default persistence queues to process email and sms respectively
        amqpAdmin.declareQueue(new Queue("fanout_queue_email"));
        amqpAdmin.declareQueue(new Queue("fanout_queue_sms"));

//        3. Bind the queue to the switch respectively
        amqpAdmin.declareBinding(new Binding("fanout_queue_email", Binding.DestinationType.QUEUE, "fanout_exchange", "", null));
        amqpAdmin.declareBinding(new Binding("fanout_queue_sms", Binding.DestinationType.QUEUE, "fanout_exchange", "", null));
    }
Run this test class and find that the rabbitMq page is added successfully.
Add information to the message queue.
  //   2. Inject information into the message converter
    //   If you start directly in this way, an error will be reported because the stored information is not serialized and the converter does not support it. You can use the jdk's own serialization interface or customize the serialization configuration class
    @Test
    public void testUser() {
        User user = new User();
        user.setName("codeL");
        user.setAge("22");
       // Convert and send=============================

        /*api based*/
        rabbitTemplate.convertAndSend("fanout_exchange", "", user);}
Run this test class and find an error
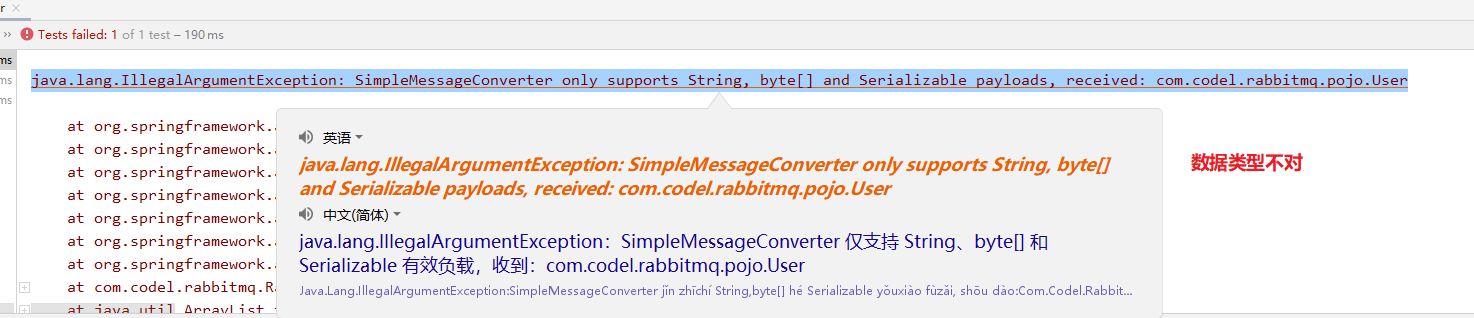
Because there is no serialization, we need to configure a serialization to be added to the configuration class of rabbitMq.
package com.codel.rabbitmq.config;

import org.springframework.amqp.support.converter.Jackson2JsonMessageConverter;
import org.springframework.amqp.support.converter.MessageConverter;
import org.springframework.context.annotation.Bean;
import org.springframework.context.annotation.Configuration;

/**
 * Rabbitmq configuration based on configuration class
 *
 * @author codel
 * @date 2021/09/22
 */
@Configuration
public class RabbitMqConfig {
    //    Custom message converter serialization
    @Bean
    public MessageConverter messageConverter() {
        return new Jackson2JsonMessageConverter();
    }
 }
Once the configuration is complete, restart

Configure consumer
package com.codel.rabbitmq.service;

import org.springframework.amqp.core.Message;
import org.springframework.amqp.rabbit.annotation.RabbitListener;
import org.springframework.stereotype.Service;

@Service
public class RabbitMqService {

    /*Listen to the queue named fanout through annotations_ queue_ Email message*/

    @RabbitListener(queues = "fanout_queue_email")
    public void psubConsumerEmail(Message message) {
        byte[] body = message.getBody();
        String s = new String(body);
        System.out.println("API Message received by mailbox service:" + s);
    }

    @RabbitListener(queues = "fanout_queue_sms")
    public void psubConsumerSms(Message message) {
        byte[] body = message.getBody();
        String s = new String(body);
        System.out.println("API Method: message received from short message service:" + s);
    }}
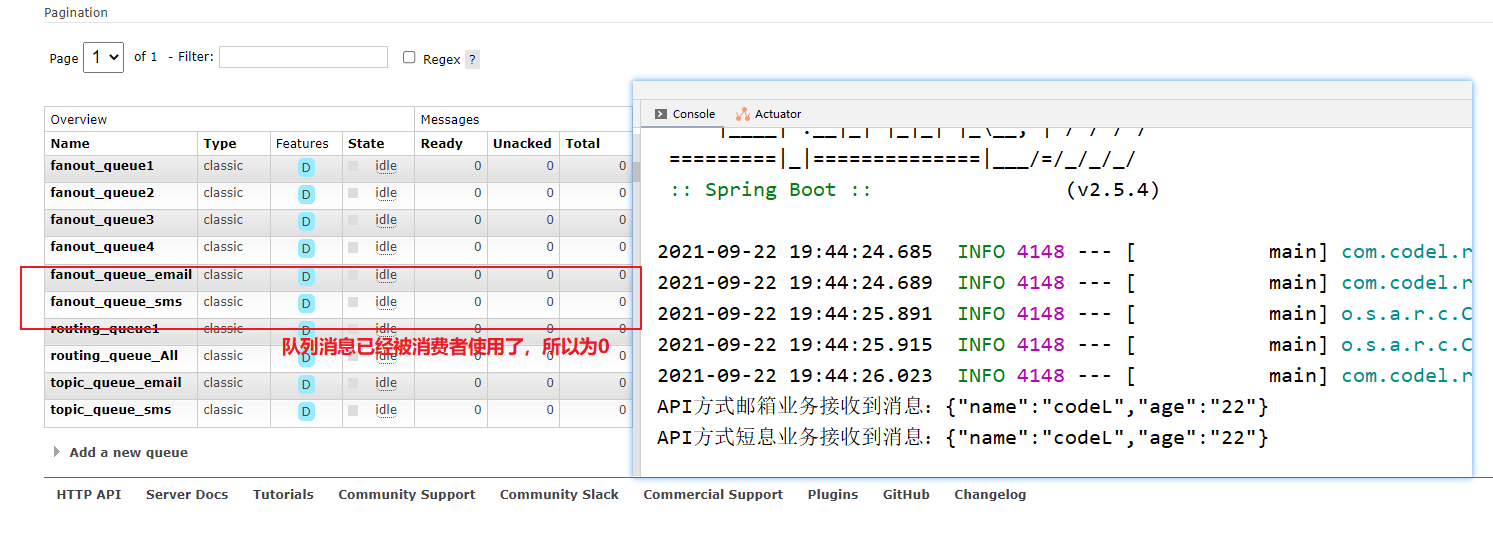
When you restart the project, you will find that consumers will automatically get data from the message queue.
4. Method based on configuration class
Configure new switches and queues in the RabbitMqConfig configuration class
 /*      2.This is to configure the middleware based on the configuration class,
        That is, define the switch and message queue and bind them by configuring the class
*/

    //    1. Define fan out switch of fan out type
    @Bean
    public Exchange fanout_exchange2() {
        return ExchangeBuilder.fanoutExchange("fanout_exchange2").build();
    }

    //2. Define two message queues
    @Bean
    public Queue fanout_queue1() {
        return new Queue("fanout_queue1");
    }

    @Bean
    public Queue fanout_queue2() {
        return new Queue("fanout_queue2");
    }

    //    3. Bind the two message queues to the switch
    @Bean
    public Binding binding1() {
//        routing is empty because there is no route
        return BindingBuilder.bind(fanout_queue1()).to(fanout_exchange2()).with("").noargs();
    }

    @Bean
    public Binding binding2() {
        return BindingBuilder.bind(fanout_queue2()).to(fanout_exchange2()).with("").noargs();
    }
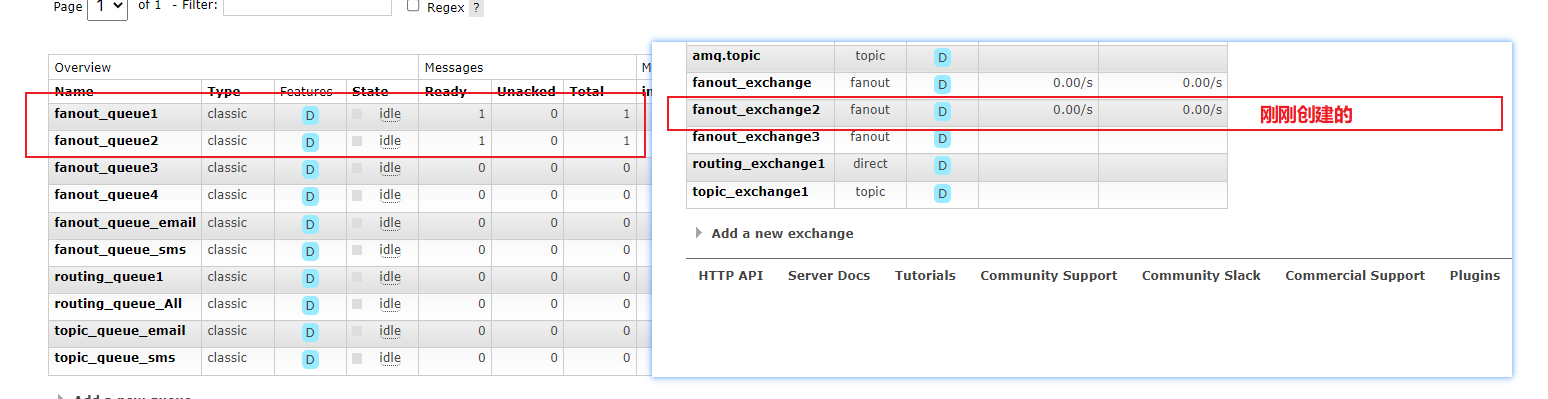
Add test data user in the test class and transfer the data to fanout_exchange2 is in the exchange.
 //Add a configuration class to create test data for the switch
        User user2 = new User();
        user2.setName("codeL2");
        user2.setAge("223"
         /*Configuration based classes*/
        rabbitTemplate.convertAndSend("fanout_exchange2", "", user2);
//
After running rabbitmq in the background, it is found that the switch, queue and data page are passed in.
Then create a consumer and take out the data in the queue
  //    Testing: configuration class based approach
    @RabbitListener(queues = "fanout_queue1")
    public void psubConsumerEmail2(Message message) {
        byte[] body = message.getBody();
        String s = new String(body);
        System.out.println("Configuration class=Received message from mailbox service of:" + s);
    }

    @RabbitListener(queues = "fanout_queue2")
    public void psubConsumerSms2(Message message) {
        byte[] body = message.getBody();
        String s = new String(body);
        System.out.println("Configuration class=Message received by short message service:" + s);
    }
Then restart the application. The results are as follows:

5. Annotation based construction
Configure switches and queues in the RabbitMqService class
 /* 3. Create components based on annotations*/
    @RabbitListener(bindings = @QueueBinding(value = @Queue("fanout_queue3"), exchange = @Exchange(value = "fanout_exchange3", type = "fanout")))
    public void psubConsumerEmailAno(Message message) {
        byte[] body = message.getBody();
        String s = new String(body);
        System.out.println("annotation==Create component mailbox service receiving information:" + s);

    }

    @RabbitListener(bindings = @QueueBinding(value = @Queue("fanout_queue4"), exchange = @Exchange(value = "fanout_exchange3", type = "fanout")))
    public void psubConsumerSmsAno(Message message) {
        byte[] body = message.getBody();
        String s = new String(body);
        System.out.println("annotation==Create component information service and receive information:" + s);
    }
Add test data user in the test class and transfer the data to fanout_exchange3 is in the exchange.
//Create test data based on annotations
        User user3 = new User();
        user3.setName("codeL3");
        user3.setAge("2233");
          /* Annotation based */
        rabbitTemplate.convertAndSend("fanout_exchange3", "", user3);
The result is the same as above.
6.routing mode
        routing Mode, the routing key cannot be empty
  User user4 = new User();
        user4.setName("codeL4");
        user4.setAge("22334");

//        Routing mode consumer
       rabbitTemplate.convertAndSend("routing_exchange1", "error_routing_key1", user4);
//
//
7.topics wildcard mode
Configure switches and queues in Wildcard mode and custom rules
  //    ==================================topics wildcard mode
    @RabbitListener(bindings = @QueueBinding(value = @Queue("topic_queue_email"), exchange = @Exchange(value = "topic_exchange1", type = "topic"), key = "info.#.email.#"))

    public void topicConsumerEmail(String message) {
        System.out.println("topics=Receive mailbox subscription demand processing information:" + message);

    }

    @RabbitListener(bindings = @QueueBinding(value = @Queue("topic_queue_sms"), exchange = @Exchange(value = "topic_exchange1", type = "topic"), key = "info.#.sms.#"))

    public void topicConsumerSms(String message) {
        System.out.println("topics=Received SMS subscription demand processing information:" + message);

    }
Messages that deliver data to specified switches and queues and producers.
//        //topics wildcard mode
//        1. Only send mail subscription user information
        rabbitTemplate.convertAndSend("topic_exchange1", "info.email", "topics send email message");
//        2. Only subscribed to SMS messages
        rabbitTemplate.convertAndSend("topic_exchange1", "info.sms", "topics send  sms message");

//        To comment out the above two, the following cancellation information can be successfully output
//          3. Both subscribed
      rabbitTemplate.convertAndSend("topic_exchange1", "info.email.sms", "topics send email and sms message");

    }