Last article One Minute to Learn about JWT Certification!" The composition and authentication principle of JWT are introduced. This paper will introduce the process of integrating JWT with SpringBoot to achieve authentication, which will give you a better understanding of JWT.
1. JWT Certification Process

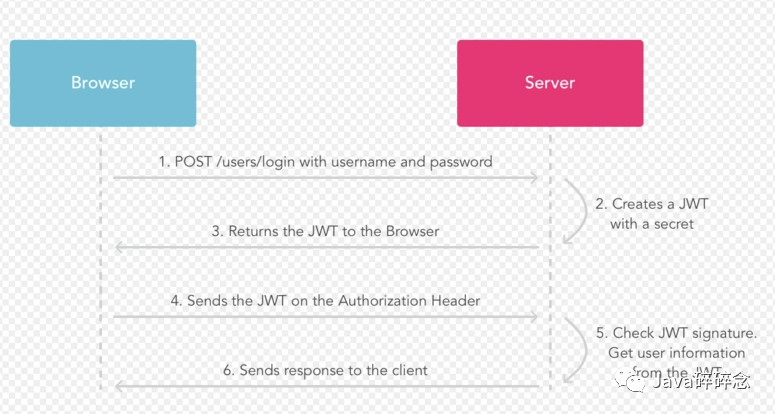
The authentication process is as follows:
- Users make post requests with accounts and passwords;
- The server uses the private key to create a jwt;
- The server returns this jwt to the browser;
- The browser sends the request in the request header like a server;
- The server validates the jwt;
- Return the resource for the response to the browser.
2. SpringBoot Integration JWT
Create a new spring boot project, spring-boot-jwt, and follow the steps below.
1.pom.xml introduces jar packages
<!-- Introduce jwt-->
<dependency>
    <groupId>com.auth0</groupId>
    <artifactId>java-jwt</artifactId>
    <version>3.8.2</version>
</dependency>
2. New Jwt Tool Class
The Jwt tool class is used to generate and authenticate token s, and the tool class code is as follows:
/**
 * @description: Jwt Tool class, generating JWT and authentication
 * @author: Java Broken thoughts
 */
public class JwtUtil {

    private static final Logger logger = LoggerFactory.getLogger(JwtUtil.class);
    /**
     * secret key
     */
    private static final String SECRET = "my_secret";

    /**
     * Expiration Time
     **/
    private static final long EXPIRATION = 1800L;//Unit in seconds

    /**
     * Generate user token, set token timeout
     */
    public static String createToken(User user) {
        //Expiration Time
        Date expireDate = new Date(System.currentTimeMillis() + EXPIRATION * 1000);
        Map<String, Object> map = new HashMap<>();
        map.put("alg", "HS256");
        map.put("typ", "JWT");
        String token = JWT.create()
                .withHeader(map)// Add Header
                //You can put basic information in claims
                .withClaim("id", user.getId())//userId
                .withClaim("userName", user.getUserName())//userName
                .withClaim("name", user.getName())//name
                .withExpiresAt(expireDate) //Timeout setting, set expiration date
                .withIssuedAt(new Date()) //Time filed
                .sign(Algorithm.HMAC256(SECRET)); //SECRET Encryption
        return token;
    }

    /**
     * Check token and parse it
     */
    public static Map<String, Claim> verifyToken(String token) {
        DecodedJWT jwt = null;
        try {
            JWTVerifier verifier = JWT.require(Algorithm.HMAC256(SECRET)).build();
            jwt = verifier.verify(token);
        } catch (Exception e) {
            logger.error(e.getMessage());
            logger.error("token Decode Exception");
            //Decode exception throws exception
            return null;
        }
        return jwt.getClaims();
    }

}
3. Add a JWT filter
In JWT filters, token is checked and judged, and it is not valid to return directly. Legal rules decrypt data and put it in request for later use.
For the filter to work, you need to add the comment @ServletComponentScan(basePackages = "com.example.springbootjwt.filter" to the startup class.
The JWT filter code is as follows:
/**
 * JWT Filter, intercept/secure requests
 */
@Slf4j
@WebFilter(filterName = "JwtFilter", urlPatterns = "/secure/*")
public class JwtFilter implements Filter {
    @Override
    public void init(FilterConfig filterConfig) throws ServletException {
    }

    @Override
    public void doFilter(ServletRequest req, ServletResponse res, FilterChain chain) throws IOException, ServletException {
        final HttpServletRequest request = (HttpServletRequest) req;
        final HttpServletResponse response = (HttpServletResponse) res;

        response.setCharacterEncoding("UTF-8");
        //Get token from header
        final String token = request.getHeader("authorization");

        if ("OPTIONS".equals(request.getMethod())) {
            response.setStatus(HttpServletResponse.SC_OK);
            chain.doFilter(request, response);
        }
        // Except OPTIONS, other request should be checked by JWT
        else {

            if (token == null) {
                response.getWriter().write("No, token!");
                return;
            }

            Map<String, Claim> userData = JwtUtil.verifyToken(token);
            if (userData == null) {
                response.getWriter().write("token Wrongful!");
                return;
            }
            Integer id = userData.get("id").asInt();
            String name = userData.get("name").asString();
            String userName = userData.get("userName").asString();
            //Interceptor gets user information and puts it in request
            request.setAttribute("id", id);
            request.setAttribute("name", name);
            request.setAttribute("userName", userName);
            chain.doFilter(req, res);
        }
    }

    @Override
    public void destroy() {
    }
}
4. Add Login Controller
Log in to Controller for login operation, and produce token and return after successful login.
The login Controller code is as follows:
/**
 * Log on to Controller
 */
@Slf4j
@RestController
public class LoginController {

    static Map<Integer, User> userMap = new HashMap<>();

    static {
        //Simulate Database
        User user1 = new User(1, "zhangsan", "Zhang San", "123456");
        userMap.put(1, user1);
        User user2 = new User(2, "lisi", "Li Si", "123123");
        userMap.put(2, user2);
    }

    /**
     * Simulate user login
     */
    @RequestMapping("/login")
    public String login(User user) {
        for (User dbUser : userMap.values()) {
            if (dbUser.getUserName().equals(user.getUserName()) && dbUser.getPassword().equals(user.getPassword())) {
                log.info("Login successful!generate token!");
                String token = JwtUtil.createToken(dbUser);
                return token;
            }
        }
        return "";
    }
}
5. Add SecureController
Requests in SecureController are blocked by a JWT filter and cannot be accessed until they are legitimate.
The SecureController code is as follows:
/**
 * Logon is required to access
 */
@Slf4j
@RestController
public class SecureController {

    /**
     * Query user information before logging in
     */
    @RequestMapping("/secure/getUserInfo")
    public String login(HttpServletRequest request) {
        Integer id = (Integer) request.getAttribute("id");
        String name = request.getAttribute("name").toString();
        String userName = request.getAttribute("userName").toString();
        return "Current User Information id=" + id + ",name=" + name + ",userName=" + userName;
    }
}
3. Testing
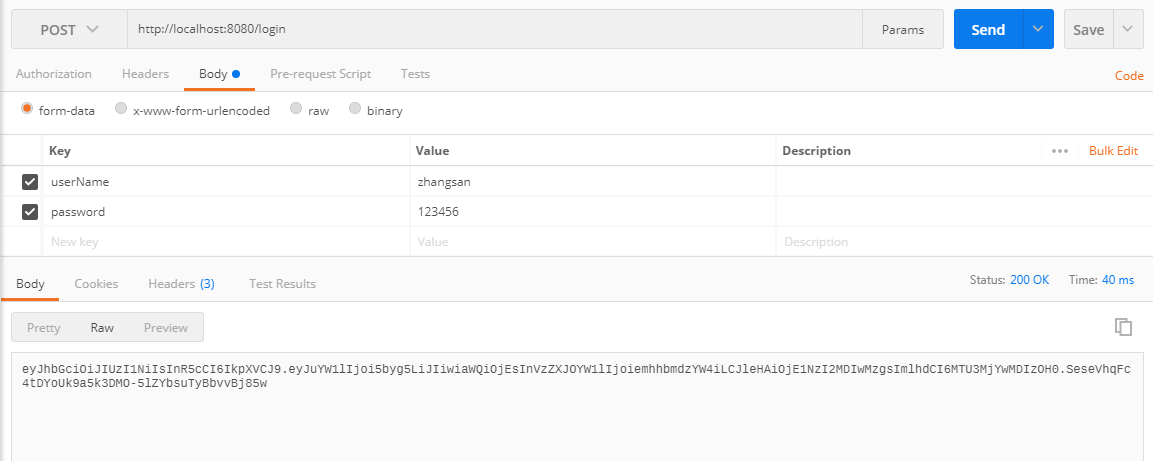
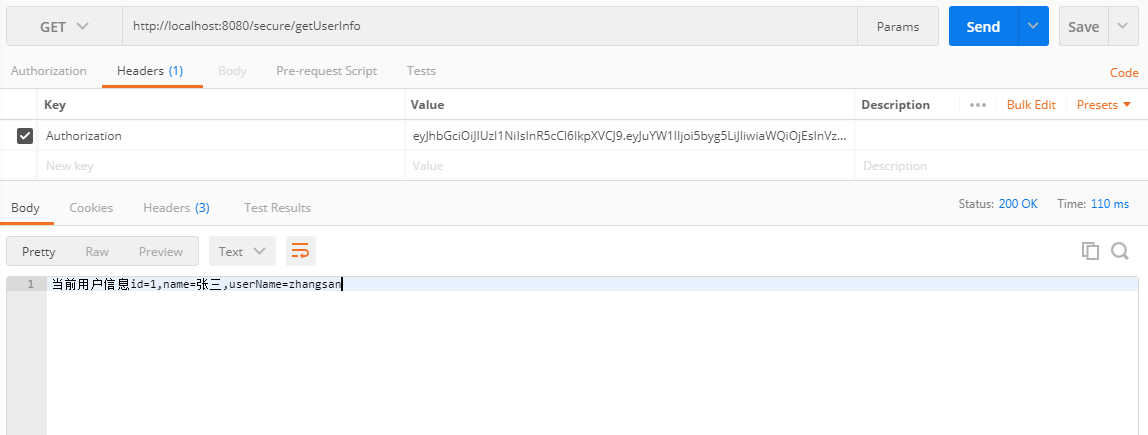
The test consists of two steps, accessing the login interface first, obtaining the token after successful login, and then holding the token to access the query user information interface.
1. Access login interface
Open PostMan and visit http://localhost:8080/login?UserName=zhangsan&password=123456. After successful login, the interface returns token, requesting a successful screenshot as follows:

2. Access User Information Interface
Open PostMan, visit http://localhost:8080/secure/getUserInfo, need to carry token in header, request successful screenshot as follows:

By now SpringBoot's function of integrating JWT has been fully implemented. If you have any questions, please leave a message to communicate.
Full source address: https://github.com/suisui2019/springboot-study
Recommended reading
1.1 minute to learn about JWT certification!
2. How do you read yml profiles gracefully in SpringBoot?
3. How can SpringBoot flexibly encrypt and decrypt interface data?
4. Amazing @Enable* annotation in SpringBoot?
5. Are you silly about Integer.parseInt and Integer.valueOf in Java?
Free Java-related materials are available within a time limit, covering technologies such as Java, Redis, MongoDB, MySQL, Zookeeper, Spring Cloud, Dubbo/Kafka, Hadoop, Hbase, Flink, high concurrent distribution, big data, machine learning, etc.
Pay free attention to the following public numbers:
