1. springboot features
1.1 dependency management
The parent project does dependency management. The in the parent project collects almost all the jar packages required by the Spring framework for web development.
Dependency management
<parent>
        <groupId>org.springframework.boot</groupId>
        <artifactId>spring-boot-starter-parent</artifactId>
        <version>2.3.4.RELEASE</version>
</parent>

spring-boot-starter-parent Parent project of
 <parent>
    <groupId>org.springframework.boot</groupId>
    <artifactId>spring-boot-dependencies</artifactId>
    <version>2.3.4.RELEASE</version>
  </parent>

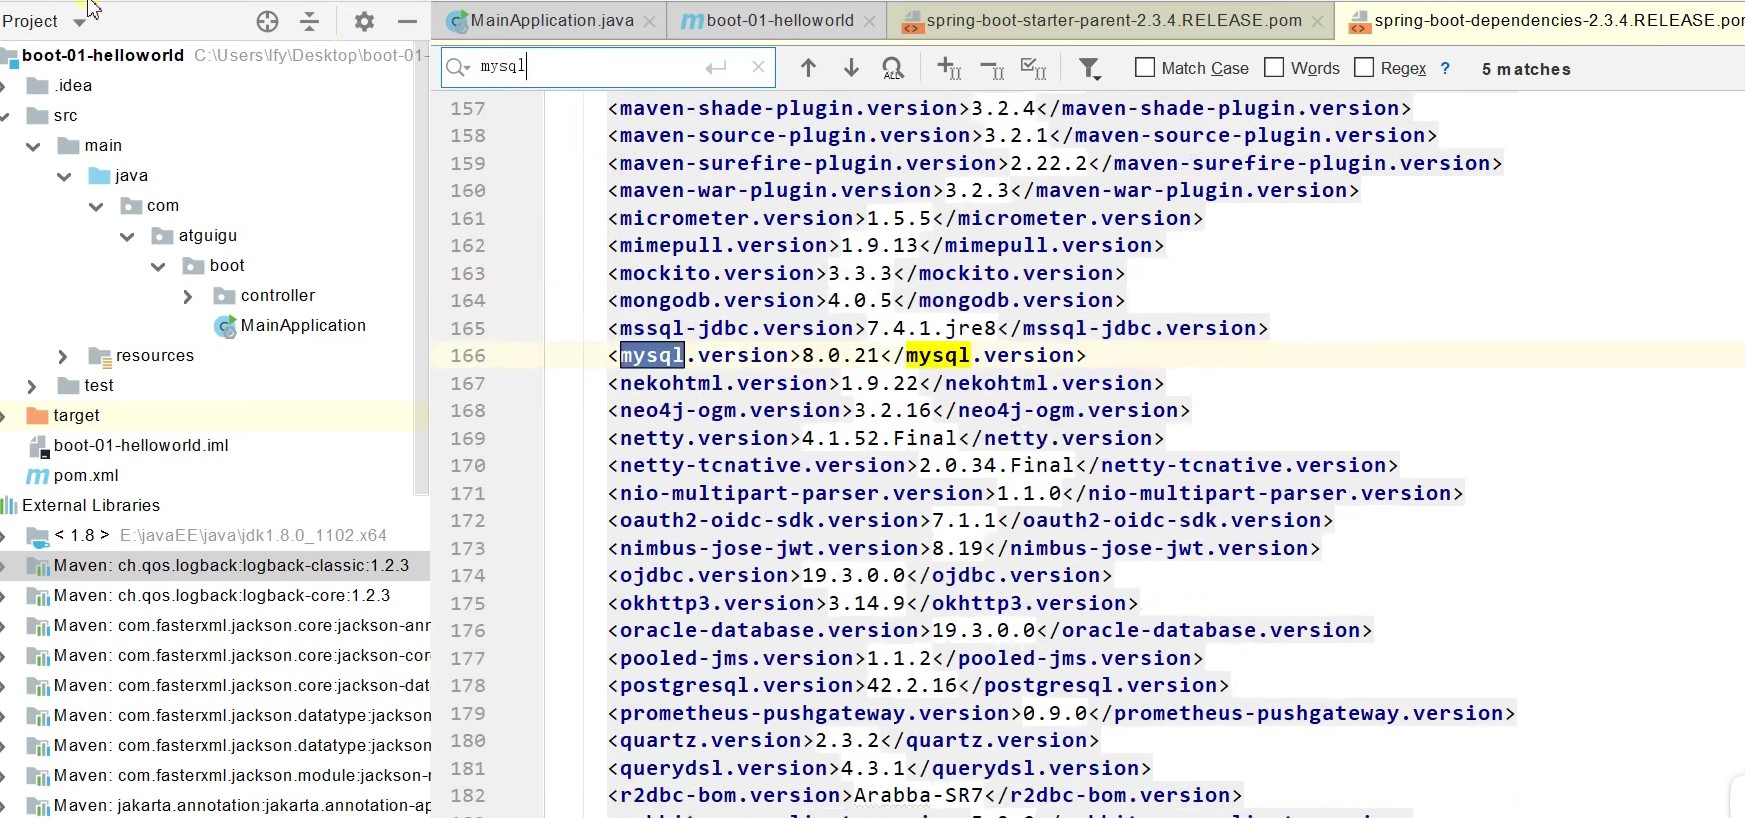
It declares the version number of almost all dependencies commonly used in development,With automatic version arbitration mechanism
When you open the parent project, you can see that all jar package dependencies are densely distributed in the source code:

About the imported starter scenario launcher:
1,See a lot of spring-boot-starter-* (A scenario launcher): *It means a certain scene
2,Just introduce starter,We will automatically introduce all the dependencies required for this scenario
3,SpringBoot All supported scenarios are described in the following official documents
https://docs.spring.io/spring-boot/docs/current/reference/html/using-spring-boot.html#using-boot-starter
4,We'll see it later  *-spring-boot-starter: They are scenario initiators for simplified development provided by third parties. Only the official scene initiator is called spring-boot-starter-*
5,The lowest level dependency of all scenario initiators
<dependency>
  <groupId>org.springframework.boot</groupId>
  <artifactId>spring-boot-starter</artifactId>
  <version>2.3.4.RELEASE</version>
  <scope>compile</scope>
</dependency>
In the development of springboot, we don't need to pay attention to the version number, because springboot has a version arbitration mechanism, and the version numbers of all jar packages are automatically arbitrated in the parent project.
1,Introducing dependencies is springboot The default version number can be omitted
2,But if yes and no are introduced springboot Version arbitrated jar Package, the version number shall be indicated.
We can also modify the jar package version number to be used:
1,see spring-boot-dependencies It specifies the current dependent version key,Then use key.To modify the version number.
2,as mysql The version of rewrites the configuration in the current project
    <properties>
        <mysql.version>5.1.43</mysql.version>
    </properties>
1.2 automatic configuration
From the source code of the parent project in the figure above, we can clearly see:
1. Spring boot automatically configures tomcat, and Tomcat dependency is introduced into the parent project.
to configure Tomcat
<dependency>
      <groupId>org.springframework.boot</groupId>
      <artifactId>spring-boot-starter-tomcat</artifactId>
      <version>2.3.4.RELEASE</version>
      <scope>compile</scope>
    </dependency>
2. Spring boot is automatically configured with spring MVC
springboot introduces a full set of spring MVC components
Spring MVC common components (functions) are automatically configured
3. Automatically configure common Web functions, such as character coding
SpringBoot helped us configure all the common scenarios for web development
4. Default package structure
The components in the package of the springboot default main application and all its sub packages will be scanned by default
Therefore, we do not need to perform the previous packet scanning configuration operation
If we want to change the scanning path, we can use the following two methods @ SpringBootApplication(scanBasePackages = "com.atguigu")
Or @ ComponentScan specifies the scan path
@SpringBootApplication This is a comment
 Equivalent to the combination of the following three annotations
@SpringBootConfiguration
@EnableAutoConfiguration
@ComponentScan("com.atguigu.boot")
5. Various configurations have default values
The default configuration is ultimately mapped to a class, such as MultipartProperties
The value of the configuration file will eventually be bound to each class, which will create objects in the container
6. Load all auto configuration items on demand
Many starter s don't start all of them
Only the imported scenario launcher can enable the automatic configuration of this scenario
All spring boot autoconfigure functions are in the spring boot autoconfigure package
2. Container function
2.1 component addition
In order to understand the automatic configuration principle of springboot, let's take a look at some underlying annotations of springboot, and how they complete relevant functions.
First, let's look at how to add components to the container.
We have prepared two components, a Pet class and a User class.
package com.atguigu.boot.bean;

public class User {
    private String name;
    private int age;

    public String getName() {
        return name;
    }

    public void setName(String name) {
        this.name = name;
    }

    public int getAge() {
        return age;
    }

    public void setAge(int age) {
        this.age = age;
    }

    @Override
    public String toString() {
        return "User{" +
                "name='" + name + '\'' +
                ", age=" + age +
                '}';
    }
}
package com.atguigu.boot.bean;

public class Pet {
    private String name;

    public String getName() {
        return name;
    }

    public void setName(String name) {
        this.name = name;
    }

    @Override
    public String toString() {
        return "Pet{" +
                "name='" + name + '\'' +
                '}';
    }
}
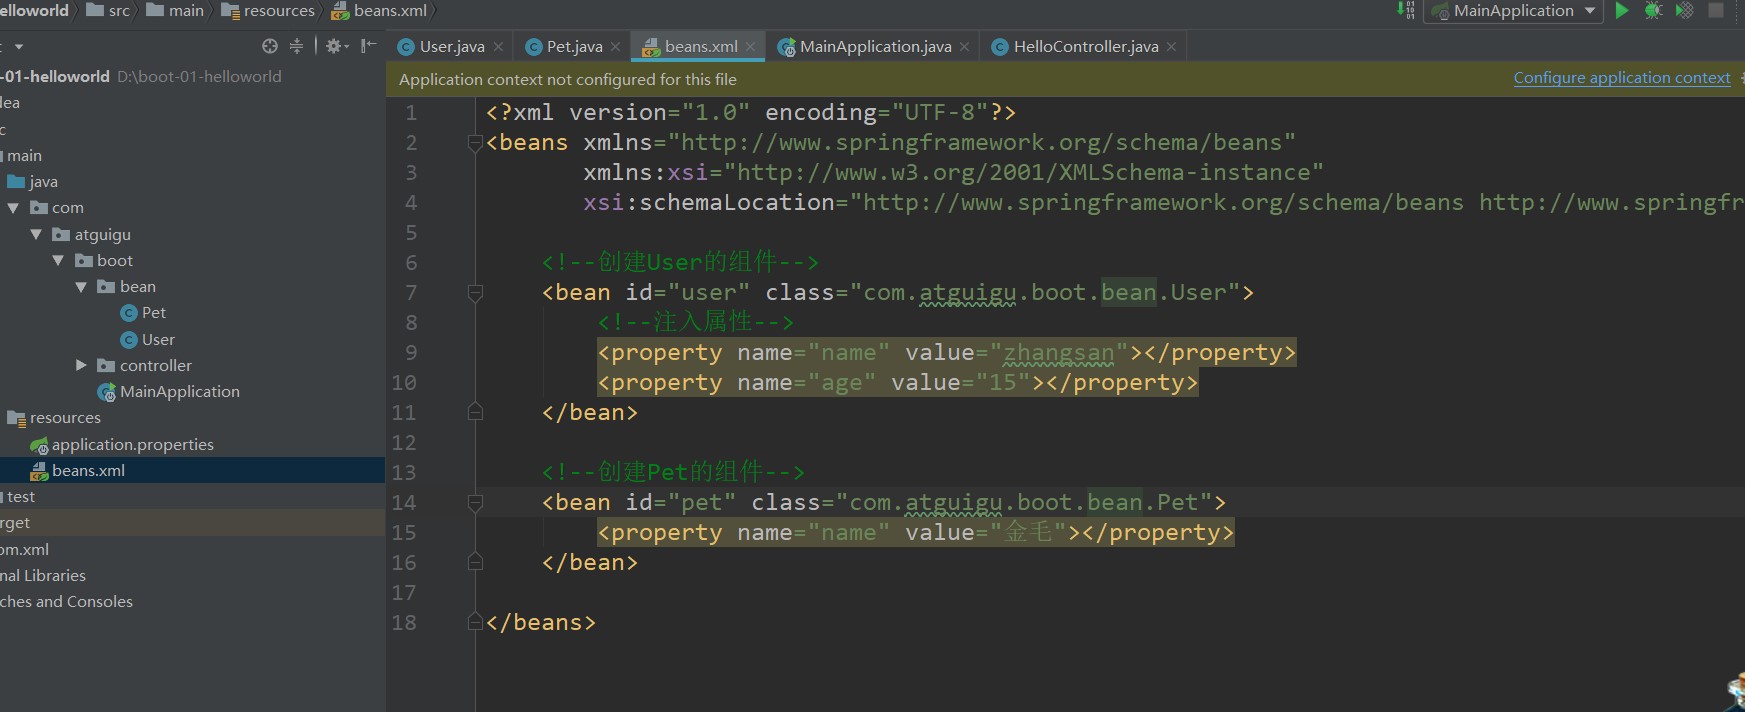
If we want to use native Spring to add components to the container, we will create a Spring configuration file in the root folder of resources, such as beans.xml

At this point, there will be two components in our Spring container, one user and one pet. But now we don't write xml in springboot. How do we put components in? boot gives several solutions.
The first is to declare the Configuration class with @ Configuration annotation
We create a config package and store all our configuration classes in this package. Then create the first configuration class MyConfig:
package com.atguigu.boot.config;

import com.atguigu.boot.bean.User;
import org.springframework.context.annotation.Bean;
import org.springframework.context.annotation.Configuration;

/**
 * 1,The @ Bean annotation is used in the configuration class to register components for the container on the method. The default is single instance
 * 2,The configuration class itself is also a component
 * 3,proxyBeanMethods: Method of proxy bean. The default value is true
 *      Full(proxyBeanMethods == true)
 *      Lite(proxyBeanMethods == false)
 *      Component dependency problem
 */
@Configuration(proxyBeanMethods = true) //Tell springboot that this is a configuration class, which is equivalent to the configuration file previously written in SSM
public class MyConfig {

    /**
     * No matter how many external calls are made to the registration method of this component in the configuration class, the information obtained is registered in the container before
     * Single instance object
     * @return
     */

//    Component declaration, using @ bean, is equivalent to the bean tag written in the configuration file before
//    Add a component to the container with the method name as the id of the component. The return value type is the component type
//    The returned value is the instance of the component in the container
    @Bean
    public User user(){
//        Equivalent to previously written
//          <property name="name" value="zhangsan"></property>
//        <property name="age" value="15"></property>
        return new User("zhangsan",25);
    }
}
The above is my notes, but you can also look at the teacher's notes to check and make up for deficiencies:
#############################Configuration Use example######################################################
/**
 * 1,The @ Bean annotation is used in the configuration class to register components for the container on the method. By default, it is also single instance
 * 2,The configuration class itself is also a component
 * 3,proxyBeanMethods: Method of proxy bean
 *      Full(proxyBeanMethods = true),[How many times each @ Bean method is called and the returned component is single instance]
 *      Lite(proxyBeanMethods = false)[How many times is each @ Bean method called and the returned component is newly created]
 *      Component dependencies must use the Full mode default. Other default Lite modes
 *
 *
 *
 */
@Configuration(proxyBeanMethods = false) //Tell SpringBoot that this is a configuration class = = configuration file
public class MyConfig {

    /**
     * Full:No matter how many external calls are made to the component registration method in the configuration class, the single instance object in the previous registration container is obtained
     * @return
     */
    @Bean //Add components to the container. Take the method name as the id of the component. The return type is the component type. The returned value is the instance of the component in the container
    public User user01(){
        User zhangsan = new User("zhangsan", 18);
        //The user component depends on the Pet component
        zhangsan.setPet(tomcatPet());
        return zhangsan;
    }

    @Bean("tom")
    public Pet tomcatPet(){
        return new Pet("tomcat");
    }
}


################################@Configuration The test code is as follows########################################
@SpringBootConfiguration
@EnableAutoConfiguration
@ComponentScan("com.atguigu.boot")
public class MainApplication {

    public static void main(String[] args) {
        //1. Return to our IOC container
        ConfigurableApplicationContext run = SpringApplication.run(MainApplication.class, args);

        //2. View the components in the container
        String[] names = run.getBeanDefinitionNames();
        for (String name : names) {
            System.out.println(name);
        }

        //3. Get component from container

        Pet tom01 = run.getBean("tom", Pet.class);

        Pet tom02 = run.getBean("tom", Pet.class);

        System.out.println("Components:"+(tom01 == tom02));


        //4,com.atguigu.boot.config.MyConfig$$EnhancerBySpringCGLIB$$51f1e1ca@1654a892
        MyConfig bean = run.getBean(MyConfig.class);
        System.out.println(bean);

        //If the @ Configuration(proxyBeanMethods = true) proxy object calls the method. SpringBoot always checks whether the component is in the container.
        //Keep component single instance
        User user = bean.user01();
        User user1 = bean.user01();
        System.out.println(user == user1);


        User user01 = run.getBean("user01", User.class);
        Pet tom = run.getBean("tom", Pet.class);

        System.out.println("User's pet:"+(user01.getPet() == tom));


    }
}
To sum up:
@Basic use of Configuration
The best practice of Full mode and Lite mode
There is no dependency between configuration class components. Use Lite mode to accelerate the container startup process and reduce judgment
There are dependencies between configuration class components, and the method will be called to obtain the previous single instance component in Full mode
2,@Bean,@Component,@Controller,@Service,@Repository,@ComponentScan
These are the old knowledge learned before. springboot can also be used, but please describe it more.
@Import can nag:
 * 4,@Import({User.class, DBHelper.class})
 *      Automatically create these two types of components in the container. The name of the default component is the full class name
 *
 *
 *
 */

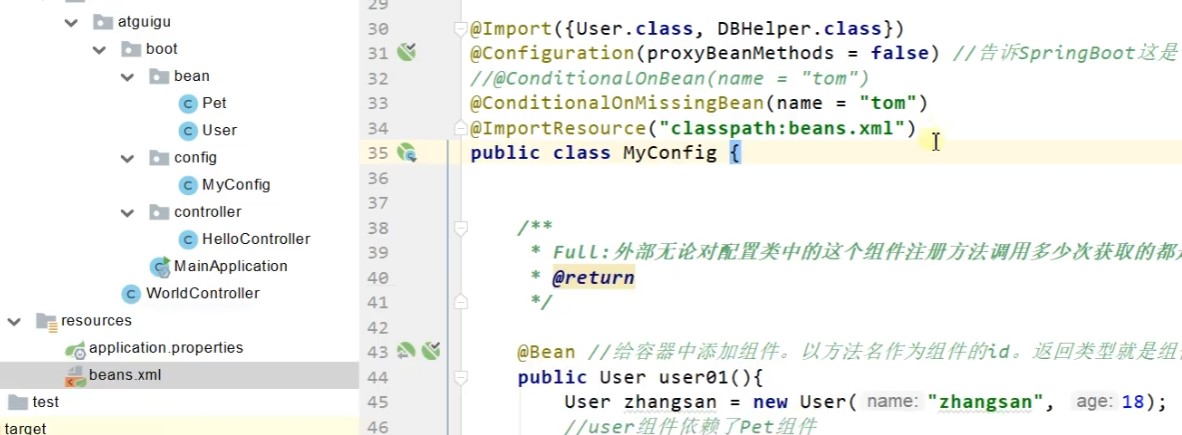
@Import({User.class, DBHelper.class})
@Configuration(proxyBeanMethods = false) //Tell SpringBoot that this is a configuration class = = configuration file
public class MyConfig {
}
3,@Conditional
Conditional assembly. If the conditions specified in conditional are met, component injection is performed.

Take ConditionalOnBean as an example: when we write @ ConditionalOnBean(name = "tom") on a bean component, it means that if there is a component named "tom" in the container, the bean component will be injected into the container, otherwise it will not be injected.
=====================Test condition assembly==========================
@Configuration(proxyBeanMethods = false) //Tell SpringBoot that this is a configuration class = = configuration file
//@ConditionalOnBean(name = "tom")
@ConditionalOnMissingBean(name = "tom")
public class MyConfig {


    /**
     * Full:No matter how many external calls are made to the component registration method in the configuration class, the single instance object in the previous registration container is obtained
     * @return
     */

    @Bean //Add components to the container. Take the method name as the id of the component. The return type is the component type. The returned value is the instance of the component in the container
    public User user01(){
        User zhangsan = new User("zhangsan", 18);
        //The user component depends on the Pet component
        zhangsan.setPet(tomcatPet());
        return zhangsan;
    }

    @Bean("tom22")
    public Pet tomcatPet(){
        return new Pet("tomcat");
    }
}

public static void main(String[] args) {
        //1. Return to our IOC container
        ConfigurableApplicationContext run = SpringApplication.run(MainApplication.class, args);

        //2. View the components in the container
        String[] names = run.getBeanDefinitionNames();
        for (String name : names) {
            System.out.println(name);
        }

        boolean tom = run.containsBean("tom");
        System.out.println("In container Tom Components:"+tom);

        boolean user01 = run.containsBean("user01");
        System.out.println("In container user01 Components:"+user01);

        boolean tom22 = run.containsBean("tom22");
        System.out.println("In container tom22 Components:"+tom22);


    }
2.2 native configuration file import
@ImportResource
Usage scenario: first of all, we need to know the fact that the bean components written in the spring configuration file are unknown to springboot and cannot be resolved into bean components by springboot. However, sometimes when we are developing in the company, we need to migrate the old project (this project is written in SSM) to springboot. However, because the project is too large to be completely migrated, some configuration files still need to be written. At this time, @ ImportResource can introduce the spring configuration file into springboot.

======================beans.xml=========================
<?xml version="1.0" encoding="UTF-8"?>
<beans xmlns="http://www.springframework.org/schema/beans"
       xmlns:xsi="http://www.w3.org/2001/XMLSchema-instance"
       xmlns:context="http://www.springframework.org/schema/context"
       xsi:schemaLocation="http://www.springframework.org/schema/beans http://www.springframework.org/schema/beans/spring-beans.xsd http://www.springframework.org/schema/context https://www.springframework.org/schema/context/spring-context.xsd">

    <bean id="haha" class="com.atguigu.boot.bean.User">
        <property name="name" value="zhangsan"></property>
        <property name="age" value="18"></property>
    </bean>

    <bean id="hehe" class="com.atguigu.boot.bean.Pet">
        <property name="name" value="tomcat"></property>
    </bean>
</beans>
@ImportResource("classpath:beans.xml")
public class MyConfig {}

======================test=================
        boolean haha = run.containsBean("haha");
        boolean hehe = run.containsBean("hehe");
        System.out.println("haha: "+haha);//true
        System.out.println("hehe: "+hehe);//true
2.3 configuration binding
In the past, many configuration files need to be bound in the SSM framework, so it is the same in springboot.
How to use Java to read the contents of the properties file and package it into JavaBean s for use at any time; The native mode is as follows, which is very cumbersome:
public class getProperties {
     public static void main(String[] args) throws FileNotFoundException, IOException {
         Properties pps = new Properties();
         pps.load(new FileInputStream("a.properties"));
         Enumeration enum1 = pps.propertyNames();//Get the name of the configuration file
         while(enum1.hasMoreElements()) {
             String strKey = (String) enum1.nextElement();
             String strValue = pps.getProperty(strKey);
             System.out.println(strKey + "=" + strValue);
             //Encapsulate into JavaBean s.
         }
     }
 }
In spring boot, this process is simplified a lot.
I now have a Car class under the bean package and write two properties in application.properties:

Now we need to import this configuration file:
1,@Component+@ConfigurationProperties
This is the first way to bind
/**
 * Only the components in the container can have the powerful functions provided by SpringBoot
 */
@Component
@ConfigurationProperties(prefix = "mycar")
//Prefix refers to the property prefix in the properties configuration file
//If it is not specified, springboot will not know who is to be introduced if there are so many properties in the configuration file
public class Car {

    private String brand;
    private Integer price;

    public String getBrand() {
        return brand;
    }

    public void setBrand(String brand) {
        this.brand = brand;
    }

    public Integer getPrice() {
        return price;
    }

    public void setPrice(Integer price) {
        this.price = price;
    }

    @Override
    public String toString() {
        return "Car{" +
                "brand='" + brand + '\'' +
                ", price=" + price +
                '}';
    }
}
2,@EnableConfigurationProperties + @ConfigurationProperties
@EnableConfigurationProperties(Car.class)
//1. Enable Car configuration binding function
//2. Automatically register the Car component into the container
public class MyConfig {
}
3. Best practices
Introduce scenario dependency (the official link below provides all scenario initiators for boot)
https://docs.spring.io/spring-boot/docs/current/reference/html/using-spring-boot.html#using-boot-starter
Check which files are automatically configured by boot (optional)
After self analysis, the automatic configuration corresponding to the imported scenario generally takes effect
debug=true in the configuration file enables the automatic configuration report. Negative \ Positive
Do you need to modify the default settings of boot
1. Modify configuration items by referencing documents
https://docs.spring.io/spring-boot/docs/current/reference/html/appendix-application-properties.html#common-application-properties
Analyze yourself. Which of the configuration files are bound by xxproperties.
2. Custom add or replace components
@Bean,@Component. . .
Customizer xxxxxxcustomizer;
...
4. Development tips
4.1,Lombok
It simplifies the development of JavaBean s (i.e. omitting the get and set methods, as well as some common methods, such as toString, with or without parameter constructors, etc.)
        <dependency>
            <groupId>org.projectlombok</groupId>
            <artifactId>lombok</artifactId>
        </dependency>


idea Remember to search for installation lombok Plug in, if you can't find it, it's possible idea The plug-in is already built in
===============================simplify JavaBean development===================================
@NoArgsConstructor //Generate parameterless constructor
//@AllArgsConstructor / / generate a constructor with all parameters
@Data //Generate set and get methods for all properties
@ToString //Generate toString method
@EqualsAndHashCode //Generate equals method and hash method
public class User {

    private String name;
    private Integer age;

    private Pet pet;

    public User(String name,Integer age){
        this.name = name;
        this.age = age;
    }


}


================================Simplified log development===================================
@Slf4j //Log generation method
@RestController
public class HelloController {
    @RequestMapping("/hello")
    public String handle01(@RequestParam("name") String name){

        log.info("The request came in....");

        return "Hello, Spring Boot 2!"+"Hello:"+name;
    }
}
4.2,dev-tools
In fact, it feels like restarting the project. It's not necessary to use it.
        <dependency>
            <groupId>org.springframework.boot</groupId>
            <artifactId>spring-boot-devtools</artifactId>
            <optional>true</optional>
        </dependency>
After modifying an item or page: Ctrl+F9;
4.3. Spring Initailizr (quickly build the SpringBoot project scenario)
1. Select the development scenarios we need

2. Automatic dependency import

3. Automatically created our project structure

4. Automatically write the main configuration class of our project
