brief introduction
In the Spring project, you can use Spring rabbit to operate RabbitMQ
https://github.com/spring-projects/spring-amqp
Especially in the spring boot project, you only need to introduce the corresponding amqp initiator dependency. It is convenient to use RabbitTemplate to send messages and use annotations to receive messages.
Generally during the development process:
Producer Engineering:
application.yml file configures RabbitMQ related information;
Write configuration classes in the producer project to create switches and queues and bind them
Inject rabbitemplate object and send message to switch through rabbitemplate object
Consumer Engineering:
application.yml file configuration RabbitMQ related information
Create a message processing class to receive and process messages in the queue
Build producer project
Create project
Create the producer project springboot? Rabbitmq? Producer. The project coordinates are as follows:
<artifactId>springboot_rabbitmq_producer</artifactId>
	<groupId>cn.com.javakf</groupId>
<version>1.0-SNAPSHOT</version>
pom files introduce the following dependencies
<dependencies>
	<dependency>
		<groupId>org.springframework.boot</groupId>
		<artifactId>spring-boot-starter-amqp</artifactId>
	</dependency>
</dependencies>
Startup class
Create the startup class cn.com.javakf.rabbitmq.Application. The code is as follows:
@SpringBootApplication
public class Application {
	public static void main(String[] args) {
		SpringApplication.run(Application.class, args);
	}
}
Configure RabbitMQ
(1)application.yml configuration file
Create application.yml as follows:
spring:
  rabbitmq:
    host: 192.168.80.131
    port: 5672
    virtual-host: javakf
    username: admin
    password: admin
(2) binding switch and queue
Create the configuration class cn.com.javakf.rabbitmq.config.RabbitMQConfig bound by RabbitMQ queue and switch. The code is as follows:
@Configuration
public class RabbitMQConfig {

	/***
	 * Claim switch
	 */
	@Bean(name = "itemTopicExchange")
	public Exchange topicExchange() {
		return ExchangeBuilder.topicExchange("item_topic_exchange").durable(true).build();
	}

	/***
	 * Declaration queue
	 */
	@Bean(name = "itemQueue")
	public Queue itemQueue() {
		return QueueBuilder.durable("item_queue").build();
	}

	/***
	 * Queue bound to switch
	 */
	@Bean
	public Binding itemQueueExchange(@Qualifier("itemQueue") Queue queue,
			@Qualifier("itemTopicExchange") Exchange exchange) {
		return BindingBuilder.bind(queue).to(exchange).with("item.#").noargs();
	}
}
Building consumer projects
Create project
Create a consumer project springboot? Rabbitmq? Consumer with the following project coordinates:
<artifactId>springboot_rabbitmq_consumer</artifactId>
	<groupId>cn.com.javakf</groupId>
<version>1.0-SNAPSHOT</version>
pom files introduce the following dependencies
<dependencies>
	<dependency>
		<groupId>org.springframework.boot</groupId>
		<artifactId>spring-boot-starter-amqp</artifactId>
	</dependency>
</dependencies>
Startup class
Create the startup class cn.com.javakf.rabbitmq.Application. The code is as follows:
@SpringBootApplication
public class Application {
	public static void main(String[] args) {
		SpringApplication.run(Application.class, args);
	}
}
Configure RabbitMQ
Create application.yml as follows:
spring:
  rabbitmq:
    host: 192.168.80.131
    port: 5672
    virtual-host: javakf
    username: admin
    password: admin
Message listening and processing class
Write message listener cn.com.javakf.rabbitmq.listener.MessageListener as follows:
@Component
public class MessageListener {

	/**
	 * Listening for messages from a queue
	 *
	 * @param message Messages received
	 */
	@RabbitListener(queues = "item_queue")
	public void myListener1(String message) {
		System.out.println("The message received by the consumer is:" + message);
	}
}
test
Create the test class com.itheima.test.RabbitMQTest in the producer project springboot rabbitmq producer, and send the message:
@RunWith(SpringRunner.class)
@SpringBootTest
public class RabbitMQTest {

	// Used for sending MQ news
	@Autowired
	private RabbitTemplate rabbitTemplate;

	/***
	 * Message production test
	 */
	@Test
	public void testCreateMessage() {
		rabbitTemplate.convertAndSend("item_topic_exchange", "item.insert", "New products, routing key by item.insert");
		rabbitTemplate.convertAndSend("item_topic_exchange", "item.update", "Modification of goods, routing key by item.update");
		rabbitTemplate.convertAndSend("item_topic_exchange", "item.delete", "Item deletion, routing key by item.delete");
	}
}
Run the above test program (switch and queue can be declared and bound first), and then start the consumer; check whether the corresponding message is received in the console of the consumer project springboot MQ { consumer.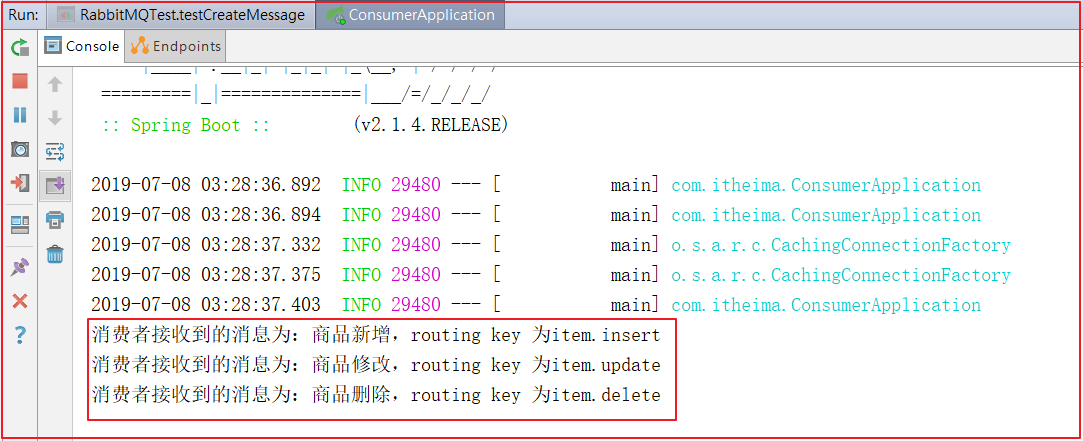
In addition, you can also view the binding between the switch and the queue in the management console of RabbitMQ: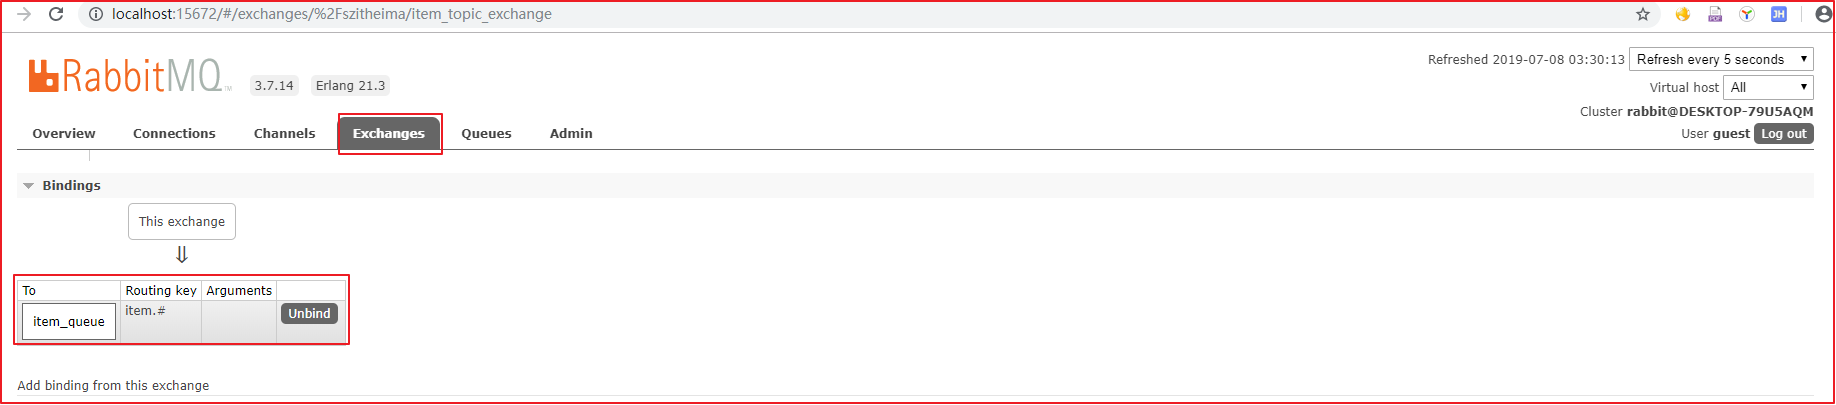
Code Hosting: springboot_rabbitmq_producer/consumer