1. Spring5
1.1 Introduction
- Spring - > brings spring to the software industry!
- The Spring framework is redesigned based on interface21!
- Spring concept: Making existing technology easier to use is a hodgepot that integrates existing technology frameworks!
- Spring is a lightweight framework for IoC and AOP containers. A framework for providing basic services for Java applications to simplify the development of enterprise applications, which allows developers to focus solely on business needs.
Spring website: Spring
Official download: Official download address
GitHub: GitHub
<!-- https://mvnrepository.com/artifact/org.springframework/spring-webmvc
 The following package is recommended for import,It will automatically import and Spring Many related packages -->
<dependency>
    <groupId>org.springframework</groupId>
    <artifactId>spring-webmvc</artifactId>
    <version>5.2.0.RELEASE</version>
</dependency>


<dependency>
    <groupId>org.springframework</groupId>
    <artifactId>spring-jdbc</artifactId>
    <version>5.2.0.RELEASE</version>
</dependency>
1.2 Advantages
- Spring is an open source, free framework (container)!
- Spring is a lightweight, non-invasive framework!
- Control Inversion (IOC), Face Oriented Programming (AOP)!
- Support transaction processing, support for framework integration!
That is, Spring is a lightweight framework for Control Inversion (IOC) and Aspect Oriented Programming (AOP)!
1.3 Composition
The Spring Framework is a hierarchical architecture composed of the following seven modules.
Seven modules
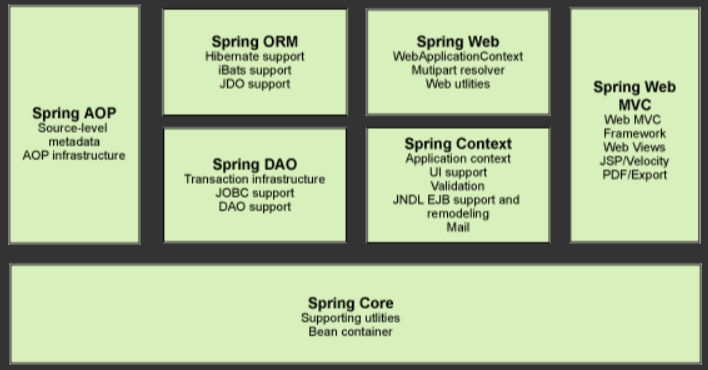
Each module (or component) that makes up the Spring framework can exist independently or in association with one or more other modules.
The functions of each module are as follows:
- Spring Core: Core containers provide the basic functionality of the Spring framework. The main component of the core container is the BeanFactory, which is the implementation of the factory pattern.
- Spring Context: The Spring context is a configuration file that provides context information to the Spring framework. The Spring context includes enterprise services such as JNDI, EJB, e-mail, internationalization, validation, and scheduling capabilities.
- Spring AOP: Through configuration management features, the Spring AOP module integrates facet-oriented programming directly into the Spring framework. Therefore, it is easy for the Spring framework to manage any AOP-enabled object. The Spring AOP module provides transaction management services for objects in Spring-based applications. By using Spring AOP, declarative transaction management can be integrated into applications without relying on components.
- The Spring DAO: Spring DAO abstraction layer provides a meaningful exception hierarchy that can be used to manage exception handling and error messages thrown by different database vendors. The exception hierarchy simplifies error handling and greatly reduces the number of exception code you need to write, such as opening and closing connections. The JDBC-oriented exception of Spring DAO follows a common DAO exception hierarchy.
- The Spring ORM: Spring framework inserts several ORM frameworks to provide object relationship tools for ORM, including JDO, Hibernate, and iBatis SQL Map. All of this follows Spring's generic transaction and DAO exception hierarchy.
- Spring Web: The Web module is built on the application context module to provide context for Web-based applications. The Web module simplifies processing multipart requests and binding request parameters to domain objects.
- Spring MVC: The Spring MVC framework is a full-featured implementation of building Web applications. It accommodates a large number of view technologies, including JSP, Velocity, and so on.
Remarks:
- Spring Boot
- A fast-developing scaffold,
- Single micro-services can be developed quickly based on springboot.
- The convention is greater than the configuration.
- Spring Cloud
- Spring Cloud is based on SpringBoot
So Spring's learning plays a connecting role.
The drawback of Spring: Configuration is cumbersome, "Configure Hell"!
2. Derivation of IOC Theory
In the previous Java Web phase, MVC development generally required:
-
UserDao interface
-
UserDaoImpl Implementation Class
-
UserService Business Tier Interface
-
UserServiceImpl Business Interface Implementation Class (where Dao Layer Logic needs to be invoked and a new Dao Layer Object is required)
-
Servlet Control Layer (where calling business-tier logic requires a new business-tier object)
...
In the Mvc phase of the business implementation of JavaWeb, changes in user needs may cause us to change the original code.
If the amount of code is very large, the cost of modifying the code will be high!
By providing a Set method to inject dynamic values, you do not have to change the source code directly.
//Dynamic Injection of Dao Layer Objects Using Set
public void setUserDao(UserDao userDao){
    this.userDao = userDao;
}
Previously, the program was actively creating objects, meaning control was in the hands of the program ape!
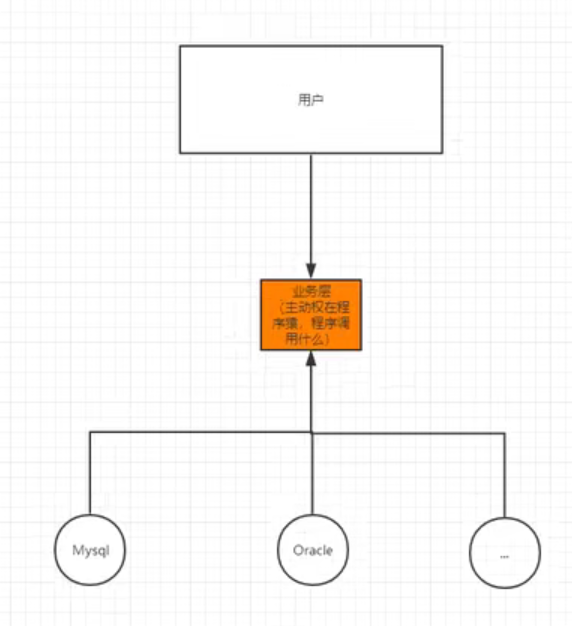
After the set method is used to dynamically inject values, the program is no longer active but a passive acceptor!
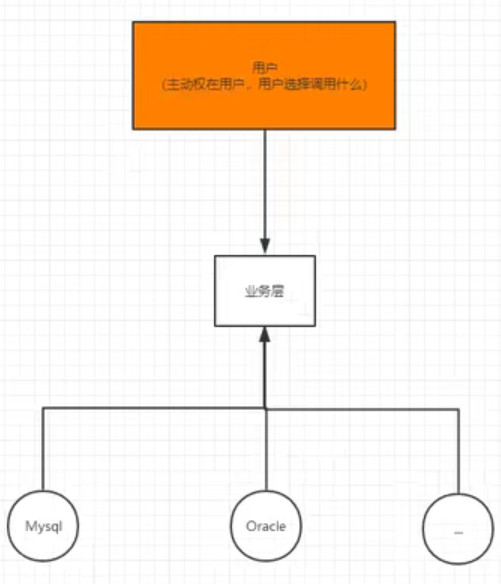
This idea essentially solves the original need to change the source code.
Programmers no longer need to manage object creation.
The coupling of the system is greatly reduced, and more attention can be paid to the implementation of business logic.
And this is the prototype of IOC control inversion!!
IOC Essence
Controlling Inversion of Control is actually a design idea.
DL (Dependent Injection) is a method to implement IOC.
In programs without IOC, we use object-oriented programming, where the creation of objects and the dependencies between objects are completely hard-coded, that is, the creation of objects is controlled by the program itself.
In programs with IOC control reversal, object creation and management are transferred to third parties.
IOC is commonly understood as: getting dependent objects is reversed!
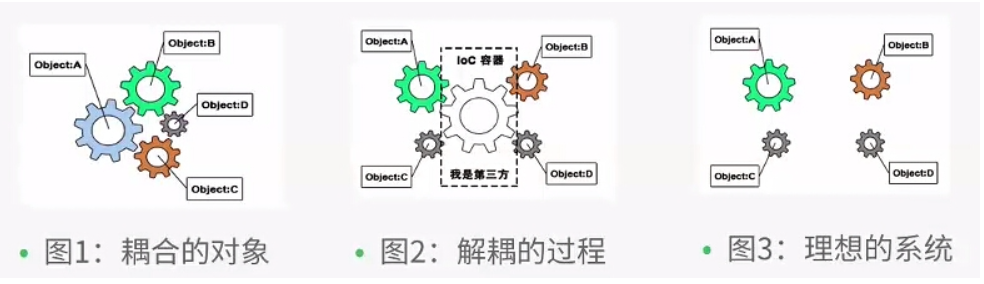
Controlling inversion is a way of describing things (XML or annotations) and producing or acquiring specific objects through third parties.
The IOC container that inverts control in Spring is implemented by Dependency Injection (DI).
IOC is the core content of the Spring Framework, which implements IOC perfectly in a variety of ways, from XML configuration to annotations and even zero configuration.
The Spring container reads the configuration file first when it is initialized, creates and organizes objects based on the configuration file or metadata into the container, and takes the objects out of the IOC container directly when the program needs to use them.
3. HelloSpring
- Import Spring-related jar packages
<!-- https://mvnrepository.com/artifact/org.springframework/spring-webmvc
Spring Need to import commons-logging Logging,We pass the maven Import the following package,It automatically downloads the corresponding dependencies -->
<dependency>
    <groupId>org.springframework</groupId>
    <artifactId>spring-webmvc</artifactId>
    <version>5.2.0.RELEASE</version>
</dependency>
- Write related code
2.1 Write a Hello entity class.
Hello.java
package com.carson.pojo;

public class Hello {
    private String str;

    public String getStr() {
        return str;
    }
//The object's properties are set through the Spring container, the property tag in the profile bean
//There must be a Set here, otherwise spring's profile property tag will be red
    public void setStr(String str) {
        this.str = str;
    }

    @Override
    public String toString() {
        return "Hello{" +
                "str='" + str + '\'' +
                '}';
    }
}
2.2 Write a spring configuration file by creating an xml file.
Example named: beans.xml
beans.xml
<?xml version="1.0" encoding="UTF-8"?>
<beans xmlns="http://www.springframework.org/schema/beans"
       xmlns:xsi="http://www.w3.org/2001/XMLSchema-instance" xmlns:context="http://www.springframework.org/schema/context"
       xsi:schemaLocation="http://www.springframework.org/schema/beans
       https://www.springframework.org/schema/beans/spring-beans.xsd">

    <!--bean Namely java object,from Spring Create and manage-->
    <!--
	id: java Object's Custom Variable Name
    class: new The full path of the object
    property: Equivalent to giving java Property incoming value in object,Use only if java Class must have attributes set Method
	-->
    <bean id="hello" class="com.carson.pojo.Hello">
        <!--
	property Label pass-by value has two attributes value and ref
  ref: The incoming is registered bean object id,That is, reference Spring Objects already created in the container
  value: Specific values such as basic data types are passed in-->
        <property name="str" value="Spring"/>
    </bean>
</beans>
2.3 Write test files for testing
public class MyTest {
    public static void main(String[] args) {
        //Get Spring's context object. The parameters passed in can be one or more xml profiles. The API function below creates an API for reading the configuration file to create the context object. Spring has other APIs related to reading annotations or files
        //The Spring Container is similar to a marriage agency in that it manages a large number of objects
        ApplicationContext context = new ClassPathXmlApplicationContext("beans.xml");
        //Now that our objects are managed in Spring, we need to use them, just go inside and take them out.
        //getBean(): The parameter passed in is the id of the bean label of the object in the spring configuration file
        Hello hello = (Hello)context.getBean("hello");
        System.out.println(hello.toString());//Test Output

    }
}
Note:
- Hello objects are created by Spring. [Spring profile]
- The properties of the Hello object are set through the Spring container, the property tag in the bean tag. The Set method is used only if the corresponding attributes exist in the original object.
The above process is called control inversion.
Control: Who controls the creation of objects. Objects in traditional applications are created under the control of the program itself, that is, manually new objects.
After using Spring, Spring is responsible for creating and managing objects.
Reverse: Instead of creating objects, the program itself becomes a passive acceptor.
DI Dependent Injection: The set method is used to inject property values for a particular property.
IOC control inversion is a programming idea, which changes from active programming to passive reception.
The so-called IOC, understand one sentence: objects are created, managed and assembled by Spring!!
4. Configuration of IOC creation objects
Create entity class User.java for testing
package com.carson.pojo;

public class User {
    private String name;

    public User() {
        System.out.println("User The parameterless construct was initialized!");
    }

    public User(String name) {
        this.name = name;
        System.out.println("User The parametric construct is initialized");
    }

    public String getName() {
        return name;
    }

    public void setName(String name) {
        this.name = name;
    }

    public void show(){
        System.out.println("name="+name);
    }
}
- Create objects using the Set method of parameterless constructor + attributes
That is, to create objects in this way, the original bean entity class must have a parameterless constructor and the corresponding properties of the Set method!
<!--Configuration of objects via parameterless constructors-->
<bean id="user" class="com.carson.pojo.User" >
    <!--name Property Parameter Name of Property Binding Object-->
    <property name="name" value="Carson Parameterless construction object"></property>
</bean>
-
Creating objects using a parametric constructor
That is, to create objects in this way, the original bean entity class must have a parametric constructor!
There are three ways to configure an object's attribute values, that is, how the attribute values are injected:
- Delivery Parameter Position Subscript Injection Attribute Value [Recommended]
<!-- Configuration by object properties with a parameter constructor Mode 1:Subscript by parameter position(Start from 0),To inject attribute values --> <bean id="user" class="com.carson.pojo.User"> <constructor-arg index="0" value="Carson Creating a parametric construction object with parameter Subscripts"></constructor-arg> </bean>- Delivery parameter type injection property value [not recommended]
(Simple data type direct write,Complex data types need to be written as full class names)
<!-- Configuration by object properties with a parameter constructor Mode 2:By parameter type(Simple data type direct write,Complex data types need to be written as full class names) Not recommended,Because in the event that more than one parameter has the same type, it becomes cumbersome --> <bean id="user" class="com.carson.pojo.User"> <constructor-arg type="java.lang.String" value="Carson Creating parametric construction objects from parameter types"></constructor-arg> </bean>- Parameter Name
<!-- Configuration by object properties with a parameter constructor Mode 3:adopt name Property binding parameter name --><bean id="user" class="com.carson.pojo.User"> <constructor-arg name="name" value="Carson adopt name Attribute binding parameter name creates a parametric construction object"></constructor-arg></bean>
Note:
1. When loading the spring configuration file, objects in the spring container (objects in the configuration file) are created, and when you need to use a specific object, you can use the getBean() method to get the object.
- Objects in the spring configuration file are created by default in the singleton mode, so if you use getBean() to get the same class object, they are all the same instance object.
The following is a test that uses getBean() to get the same class object:
public class MyTest {
    public static void main(String[] args) {
        //Get the Spring context object (the xml configuration file passed into Spring) and load the configuration file
        //When the configuration file is loaded, objects in the spring container (objects in the configuration file) are created, and each object has one and only one (singleton mode)
        ApplicationContext context = new ClassPathXmlApplicationContext("beans.xml");
        //getBean Get Object
        User user = (User) context.getBean("user");
        User user1 = (User) context.getBean("user");
        user.show();
        //That is, there is only one instance object (so the two objects obtained are the same and the result is true)
        System.out.println("Is the two objects obtained the same:"+(user==user1));
    }
}
5. Spring Configuration Notes
5.1 Alias [alias]
<!--adopt alias Tags to one bean Alias
        name:Correspond to the original bean Of id name
        alias: Corresponding Alias
    -->
<alias name="user" alias="user2"></alias>
//getBean gets the object (once the alias is taken, the object has more names and can be reached)
User user = (User) context.getBean("user");
User user2 = (User) context.getBean("user2");
5.2 Bean Configuration [bean]
<!-- bean Property description of label
    id: bean Unique identifier for,Identifier equivalent to the object created
    class: bean Fully qualified name of the class corresponding to the object,Name of package+Class name
    name: Yes, too bean Alias,Multiple aliases can be written at the same time,Separators between multiple aliases can be commas,Spaces,semicolon
    scope: Change object creation mode,Default is singleton Singleton Pattern Creation
        -->

<bean id="user" class="com.carson.pojo.User" name="user2 user3,user4;user5" scope="singleton">
    <property name="name" value="Carson"></property>
</bean>
Scope of 5.3 Bean s
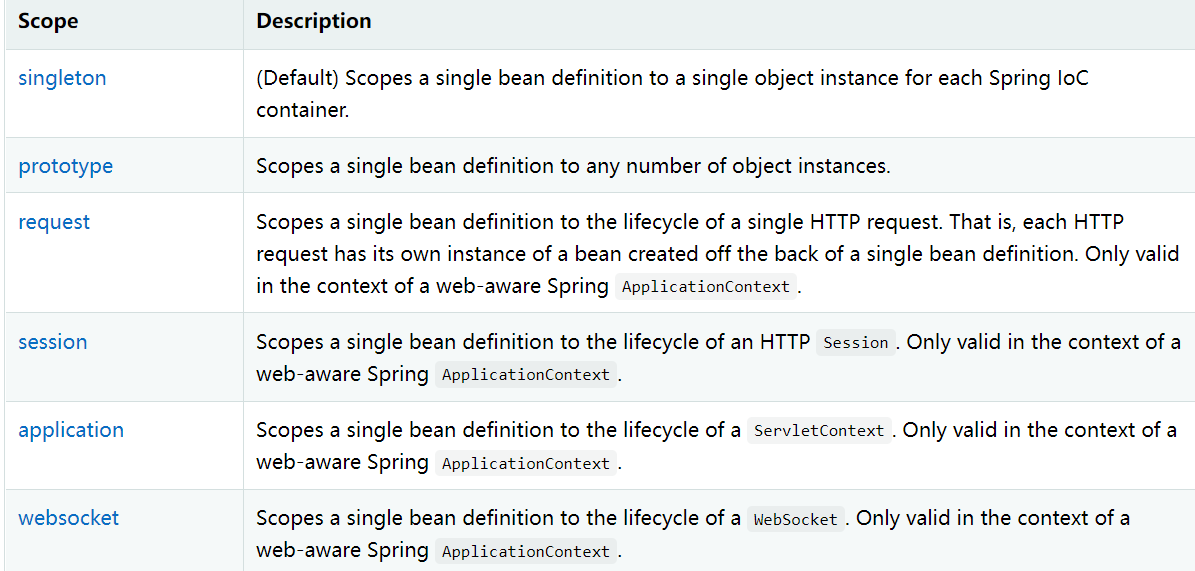
- Singleton (Spring's default mechanism)
Just as the nature of the singleton design pattern is general, there is one and only one object in the container.
So it is the same to get the same object multiple times through getBean().
<!--Explicit declaration bean Object is created as a single model-->
<bean id="user" class="com.carson.pojo.User"  scope="singleton">
</bean>
- Prototype
Just like the nature of a prototype design pattern, there is more than one object in a container, and other objects are created by copying one object as a prototype.
So getting the same object multiple times through getBean() is different!
- The rest of request, session, application, etc. can only be used in web development!
5.4 import
The import tag, commonly used for team development, combines multiple spring profiles, such as beans.xml, into a single total spring profile, commonly named applicationContext.xml.
Suppose there are many people developing in the project now, and each person is responsible for the development of different classes, and each person has a configuration file of beans.xml, which causes different classes to be registered in different configuration files, so we can use import to merge all beans.xml into a total applicationContext.xml!
This allows you to import the total profile when loading the spring profile.
<!--bean Imports will be based on the order in which configuration files are imported-->
<import resource="beans.xml"/>
<import resource="beans2.xml"/>
<import resource="beans3.xml"/>
Note:
When multiple beans.xml configuration files are merged, it may occur that beans in multiple beans.xml files have the same id, and beans in later configuration files will overwrite beans in the earlier configuration files!
6. Dependent Injection (DI)
What is dependency?
bean object creation depends on container!
What is injection?
All attribute values in the bean object are injected by the container!
6.1 parametric constructor property injection
By creating objects in this way with a parametric constructor, the original bean entity class must have a parametric constructor!
Here are three ways to inject attribute values with a parameter constructor:
- Delivery Parameter Position Subscript Injection Attribute Value [Recommended]
<!--    Configuration by object properties with a parameter constructor
        Mode 1:Subscript by parameter position(Start from 0),To inject attribute values
        -->
<bean id="user" class="com.carson.pojo.User">
    <constructor-arg index="0" value="Carson Creating a parametric construction object with parameter Subscripts"></constructor-arg>
</bean>
- Delivery parameter type injection property value [not recommended]
(Simple data type direct write,Complex data types need to be written as full class names)
<!--    Configuration by object properties with a parameter constructor
        Mode 2:By parameter type(Simple data type direct write,Complex data types need to be written as full class names)
              Not recommended,Because in the event that more than one parameter has the same type, it becomes cumbersome
        -->
<bean id="user" class="com.carson.pojo.User">
    <constructor-arg type="java.lang.String" value="Carson Creating parametric construction objects from parameter types"></constructor-arg>
</bean>
- Parameter Name
<!--    Configuration by object properties with a parameter constructor
        Mode 3:adopt name Property binding parameter name
        -->
<bean id="user" class="com.carson.pojo.User">
    <constructor-arg name="name" value="Carson adopt name Attribute binding parameter name creates a parametric construction object"></constructor-arg>
</bean>
6.2 Parametric Constructor+Set Injection [Key]
Because the original bean entity class has its own parameterless constructor by default, the parameterless constructor will not be overwritten as long as it is not written!
So when using Set injection, be careful not to write a parameter constructor for the original bean class!
Test environment setup
- Referenced Data Objects
Address.java
package com.carson.pojo;

public class Address {
    //Properties of the value to be injected
    private String address;

    //1. Want parametric constructors
    public String getAddress() {
        return address;
    }

    //2. set method with attribute value
    public void setAddress(String address) {
        this.address = address;
    }

    @Override
    public String toString() {
        return "Address{" +
                "address='" + address + '\'' +
                '}';
    }
}
- Really Created Objects
Student.java
package com.carson.pojo;

import java.util.*;

public class Student {
    //Common simple data types
    private String name;
    //Reference data type
    private Address address;
    //array
    private String[] books;
    //List
    private List<String> hobbies;
    //Map
    private Map<String,String> card;
    //Set
    private Set<String> games;
    //Set null
    private String wife;
    //Properties
    private Properties info;


    public String getName() {
        return name;
    }

    public void setName(String name) {
        this.name = name;
    }

    public Address getAddress() {
        return address;
    }

    public void setAddress(Address address) {
        this.address = address;
    }

    public String[] getBooks() {
        return books;
    }

    public void setBooks(String[] books) {
        this.books = books;
    }

    public List<String> getHobbies() {
        return hobbies;
    }

    public void setHobbies(List<String> hobbies) {
        this.hobbies = hobbies;
    }

    public Map<String, String> getCard() {
        return card;
    }

    public void setCard(Map<String, String> card) {
        this.card = card;
    }

    public Set<String> getGames() {
        return games;
    }

    public void setGames(Set<String> games) {
        this.games = games;
    }

    public String getWife() {
        return wife;
    }

    public void setWife(String wife) {
        this.wife = wife;
    }

    public Properties getInfo() {
        return info;
    }

    public void setInfo(Properties info) {
        this.info = info;
    }

    @Override
    public String toString() {
        return "Student{" +
                "name='" + name + '\'' +
                ", address=" + address +
                ", books=" + Arrays.toString(books) +
                ", hobbies=" + hobbies +
                ", card=" + card +
                ", games=" + games +
                ", wife='" + wife + '\'' +
                ", info=" + info +
                '}';
    }
}
- configuration file
beans.xml
<?xml version="1.0" encoding="UTF-8"?>
<beans xmlns="http://www.springframework.org/schema/beans"
       xmlns:xsi="http://www.w3.org/2001/XMLSchema-instance" xmlns:context="http://www.springframework.org/schema/context"
       xsi:schemaLocation="http://www.springframework.org/schema/beans
       https://www.springframework.org/schema/beans/spring-beans.xsd">

    <bean id="addressBean" class="com.carson.pojo.Address">
        <property name="address" value="Shenzhen"/>
    </bean>

    <bean id="student" class="com.carson.pojo.Student">
        <!--Normal Simple Data Type Value Injection,adopt value-->
        <property name="name" value="Carson"/>
        <!--It is equivalent to the following form-->
        <property name="name">
            <value>Carson</value>
        </property>

        <!--bean injection,Attribute value injection referencing a data type,Need to pass ref-->
        <property name="address" ref="addressBean"/>

        <!--array-->
        <property name="books">
            <array>
                <value>JAVA</value>
                <value>Spring</value>
                <value>Python</value>
                <value>NOdeJS</value>
            </array>
        </property>

        <!--List-->
        <property name="hobbies">
            <list>
                <value>Code code</value>
                <value>Listen to the music</value>
                <value>Bodybuilding</value>
            </list>
        </property>

        <!--Map-->
        <property name="card">
            <map>
                <entry key="Full name" value="Carson"/>
                <entry key="School Number" value="1111111"/>
            </map>
        </property>

        <!--Set-->
        <property name="games">
            <set>
                <value>Zhang San</value>
                <value>Li Si</value>
                <value>King Five</value>
            </set>
        </property>

        <!--transmit null value-->
        <property name="wife">
            <null/>
        </property>

        <!--Properties-->
        <property name="info">
            <props>
                <prop key="driver">com.mysql.jdbc.Driver</prop>
                <prop key="url">http://localhost:3306</prop>
                <prop key="username">root</prop>
                <prop key="password">root</prop>
            </props>
        </property>
    </bean>
</beans>
- Test Class
public class MyTest {
    public static void main(String[] args) {
        //Read configuration file, create context object
        ApplicationContext context = new ClassPathXmlApplicationContext("beans.xml");
        //getBean() Gets the object
        Student student = (Student) context.getBean("student");
        //Print Output
        System.out.println(student.toString());
    }
}
6.3 Extended Mode Injection
We can also use the p and c namespaces for dependency injection!
c Namespace: A simplified version of the injected parameter constructor!
p Namespace: A simplified version of the corresponding parameterless constructor + Set method injection!
Note:
The c and p namespaces are not directly usable and need to be imported over the xml file!
bean entity classes used:
User.java
public class User {
    private String name;
    private int age;

    public User() {
    }

    public User(String name, int age) {
        this.name = name;
        this.age = age;
    }

    public String getName() {
        return name;
    }

    public void setName(String name) {
        this.name = name;
    }

    public void setAge(int age) {
        this.age = age;
    }

    public int getAge() {
        return age;
    }


    @Override
    public String toString() {
        return "User{" +
                "name='" + name + '\'' +
                ", age=" + age +
                '}';
    }
}
Test:
@Test
public void test(){
    //Read Configuration File to Get Context Object
    ApplicationContext context = new ClassPathXmlApplicationContext("userbeans.xml");
    //getBean() gets the object and returns the Object, so if the parameter passes the class object of the bean, the object is no longer forced to convert
    User user = context.getBean("user", User.class);
    System.out.println(user);
}
6.3.1 c Namespace Injection
Import the c namespace in beans.xml and configure the bean object
<?xml version="1.0" encoding="UTF-8"?>
<beans ....
       xmlns:c="http://www.springframework.org/schema/c"
       ....

    <!--c Namespace Injection:
        essence: c Corresponding construct-args,Essentially injected by means of a parametric constructor
        Use Format: c:Property Name="Attribute Value"  -->
    <bean id="user" class="com.carson.pojo.User" c:name="C: carson" c:age="21" />

</beans>
Note:
- The essence of c namespace injection is: injection through a parametric constructor!
- So there must be a parametric construction method in the bean entity class!
6.3.2 p Namespace Injection
Import the p namespace in beans.xml and configure the bean object
<?xml version="1.0" encoding="UTF-8"?>
<beans ....
       xmlns:p="http://www.springframework.org/schema/p"
       ....

   <!--p Namespace Injection:
        essence: p Corresponding property attribute,Essentially through set Method Injection
        Use Format: p:Property Name="Attribute Value"-->
    <bean id="user" class="com.carson.pojo.User" p:name="P: carson" p:age="21"/>

</beans>
Note:
- The essence of p namespace injection is: injection through the parameterless constructor + Set method!
- So there must be a set method with or without a parameter constructor and corresponding attributes in the bean entity class!
7. Bean auto-assembly
What is Bean's automatic assembly?
That is, the bean s'attributes are automatically assembled with values.
Spring automatically looks for it in the context and automatically assembles the corresponding attribute values to the bean s that reference the data type variables!
There are three ways to assemble attribute values for bean s in Spring:
- Manually and explicitly configure bean s and their attribute values in spring's xml configuration file, which is what you did above!
- Assemble attribute values to bean s through a Java program.
- Implicit value of auto-assembly bean s property [Important] [Assembling assignments for attributes referencing data types]
7.1 No auto-assembly used
Sample Test
- Create related entity classes for testing
Car.java
public class Cat {
    public void shout(){
        System.out.println("The kitten called!");
    }
}
Dog.java
public class Dog {
    public void shout(){
        System.out.println("The puppy barked!");
    }
}
People.java
public class People {
    //Reference data type
    private Cat cat;
    //Reference data type
    private Dog dog;
    //Basic data types
    private String name;

    public Cat getCat() {
        return cat;
    }

    public void setCat(Cat cat) {
        this.cat = cat;
    }

    public Dog getDog() {
        return dog;
    }

    public void setDog(Dog dog) {
        this.dog = dog;
    }

    public String getName() {
        return name;
    }

    public void setName(String name) {
        this.name = name;
    }
}
- Writing a beans.xml configuration file requires manually configuring the beans corresponding to the reference data type
<bean id="cat" class="com.carson.pojo.Cat"/>

<bean id="dog" class="com.carson.pojo.Dog"/>

<bean id="people" class="com.carson.pojo.People" >
        <property name="name" value="Carson"/>
    	<!--You need to manually configure the corresponding reference data type bean,as follows:-->
        <property name="cat" ref="cat"/>
        <property name="dog" ref="dog"/>
    </bean>
7.2 byName Auto-assembly
How do I use byName for automatic assembly?
Answer: Configure the autowire property of the bean tag and select the value of the property as byName.
<bean id="cat" class="com.carson.pojo.Cat"/>

<bean id="dog" class="com.carson.pojo.Dog"/>

<!--Use byName Words,Injected bean Of id To the specific reference data type property of the current object set Method set Following words are identical and initial letters are lowercase-->

    <bean id="people" class="com.carson.pojo.People" autowire="byName">
        <property name="name" value="Carson"/>
    </bean>
Note:
- Using byName auto-assembly eliminates manual transfer of reference data type attribute values.
- With byName, the bean's id should be the same as the word following the set method set for the object's specific properties and the first letter should be lowercase.
- In this case, the id attribute cat of the first bean corresponds to the lowercase form of the cat in the setCat method of the cat attribute in the People class.
- In this case, the id attribute of the second bean, the dog, corresponds to the setDog of the dog attribute in the People class, which is the lowercase form of the Dog in this method.
7.3 byType Automatic Assembly
How do I use byType for automatic assembly?
Answer: Configure the autowire property of the bean tag and select the value of the property as byType.
<bean  class="com.carson.pojo.Cat"/>

<bean  class="com.carson.pojo.Dog"/>

<!--Use byType Words,bean Of class The full path must correspond to the type of the object's specific properties
        1:Use byType Make sure bean Globally unique,Can't appear class Same duplicate bean
        2: Use byType Words,bean Can be omitted id Attribute Matching
        -->

    <bean id="people" class="com.carson.pojo.People" autowire="byType">
        <property name="name" value="Carson"/>
    </bean>
Note:
- Using byType auto-assembly eliminates the need to manually pass attribute values that refer to data types.
- To ensure that beans are globally unique when using byType, no duplicate beans with the same class can appear.
- With byType, the bean can omit the id attribute, as shown above.
- With byType, the class full path of the bean should correspond to the type of the object's specific properties.
7.4 Auto-assembly using annotations
What are the common notes for automatic assembly using annotations?
- @Autowired [Comment to Spring]
- @Resource [Java Notes]
Note:
Automatic assembly of objects is required.
[that is, assembly assignments only for attributes that reference data types]
Comparison of 7.4.1 @Autowired and @Resource
Same:
- They are automatic assemblies of data attribute values referencing data types.
- Annotations can either be placed on property fields or on the Set method corresponding to the property.
Difference:
- @Autowired matches first by byType, and then by Name if it does not match the corresponding bean tag in the container; If it doesn't match yet, you need to match the specified specific beans with another comment @Qualifier(value="id name of the beans to match").
- @Resource matches first by byName, and then by byType if it does not match the corresponding bean label in the container; If it doesn't match yet, you need to assign a value to the name attribute in the @Resource annotation to match the specified specific beans, that is, @Resource(name="id of matching beans")
7.4.2 @Autowired [Comments for Spring]
Since @Autowired is a Spring annotation, you need to configure it in beans.xml before using Spring's annotation
Configuring beans.xml configuration file steps using Spring annotations
- Import constraints related to annotations in the beans tag as follows:
<beans xmlns="http://www.springframework.org/schema/beans"
       xmlns:xsi="http://www.w3.org/2001/XMLSchema-instance"
       xmlns:context="http://www.springframework.org/schema/context"
       xsi:schemaLocation="http://www.springframework.org/schema/beans
        https://www.springframework.org/schema/beans/spring-beans.xsd
        http://www.springframework.org/schema/context
        https://www.springframework.org/schema/context/spring-context.xsd">

</beans>
- beans tags need to be configured with tags that use Spring annotations as follows:
<beans>
	.....
	<!--Spring Use labels that need to be configured for annotations-->
	<context:annotation-config/>

    ....
</beans>
- The beans.xml that is ultimately completed with the initial configuration of the Spring annotation is as follows:
<?xml version="1.0" encoding="UTF-8"?>
<beans xmlns="http://www.springframework.org/schema/beans"
       xmlns:xsi="http://www.w3.org/2001/XMLSchema-instance"  xmlns:context="http://www.springframework.org/schema/context"
 xsi:schemaLocation="http://www.springframework.org/schema/beans
        https://www.springframework.org/schema/beans/spring-beans.xsd
        http://www.springframework.org/schema/context
        https://www.springframework.org/schema/context/spring-context.xsd">

    <!--Spring Use labels that need to be configured for annotations-->
    <context:annotation-config/>

    <!--Configuration-related bean object-->
    <bean id="cat" class="com.carson.pojo.Cat"></bean>
    <bean id="dog" class="com.carson.pojo.Dog"></bean>
    <bean id="people" class="com.carson.pojo.People"></bean>

</beans>
Specific use of the @Autowired annotation:
- @Autowired matches and assembles bean s tags in containers by default, as shown in the following example:
beans.xml
<!--Spring Use labels that need to be configured for annotations-->
<context:annotation-config/>

<!--bean Object Configuration-->
<bean id="cat" class="com.carson.pojo.Cat"></bean>
<bean id="dog" class="com.carson.pojo.Dog"></bean>
People.java
public class People {
    @Autowired
    private Cat cat;
    @Autowired
    private Dog dog;
}
- When multiple bean s of the same type appear, they are matched by Name and assembled automatically, as shown in the following example:
beans.xml
<!--Spring Use labels that need to be configured for annotations-->
<context:annotation-config/>

<!--bean Object Configuration-->
<bean id="cat" class="com.carson.pojo.Cat"></bean>
<bean id="cat1" class="com.carson.pojo.Cat"></bean>
<bean id="dog" class="com.carson.pojo.Dog"></bean>
<bean id="dog1" class="com.carson.pojo.Dog"></bean>
People.java
public class People {
    @Autowired
    private Cat cat;
    @Autowired
    private Dog dog;
}
-
If byName does not match at this time, you can add an @Qualifier(value="id name of the beans to match") to specify a specific bean to match.
Examples are as follows:
beans.xml
<!--Spring Use labels that need to be configured for annotations-->
<context:annotation-config/>

<!--bean Object Configuration-->
<bean id="cat1" class="com.carson.pojo.Cat"></bean>
<bean id="cat2" class="com.carson.pojo.Cat"></bean>
<bean id="dog1" class="com.carson.pojo.Dog"></bean>
<bean id="dog2" class="com.carson.pojo.Dog"></bean>
People.java
public class People {
    @Autowired
    @Qualifier("cat1")
    private Cat cat;
    @Autowired
    @Qualifier("dog1")
    private Dog dog;
}
- Special use of the @Autowired annotation
@Autowired(required=false)
When beans.xml does not have a bean tag configured for the corresponding object, take the Cat attribute for example.
<!--To configure bean,No Configuration Cat Corresponding bean Label-->
<bean id="dog" class="com.carson.pojo.Dog"></bean>
<bean id="people" class="com.carson.pojo.People"></bean>
The original People.javaCat field was annotated with @Autowired, but the required property was not explicitly specified as false:

Discover the Cat attribute and run the test program:
Test program
public class MyTest {
    public static void main(String[] args) {
        //Read Configuration File to Create Context Object
        ApplicationContext context = new ClassPathXmlApplicationContext("beans.xml");
        //getBean() Gets the object
        People people = context.getBean("people", People.class);
        //Print Reference Data Type Objects
        System.out.println(people.getCat());
        System.out.println(people.getDog());
    }

Errors were also found when running test programs.
But if the required property of Autowired is explicitly defined as false, the Cat object can be null.

Cat attribute found will not be reddened.
Run the above test program at the same time:
Test program
public class MyTest {
    public static void main(String[] args) {
        //Read Configuration File to Create Context Object
        ApplicationContext context = new ClassPathXmlApplicationContext("beans.xml");
        //getBean() Gets the object
        People people = context.getBean("people", People.class);
        //Print Reference Data Type Objects
        System.out.println(people.getCat());
        System.out.println(people.getDog());
    }

Running the test program to print object property values will not cause errors.
The discoverer is working properly and the Cat property can be null.
7.4.3 @Resource [Java Notes]
Since @Resource is a Java annotation, there is no need to configure it in beans.xml
Specific use of the @Resource annotation:
-
@Resource defaults to byName first matching
Examples are as follows:
beans.xml
<!--bean Object Configuration-->
<bean id="cat" class="com.carson.pojo.Cat"></bean>
<bean id="dog" class="com.carson.pojo.Dog"></bean>
People.java
public class People {
    @Resource
    private Cat cat;
    @Resource
    private Dog dog;
}
-
byName matches no longer match by byType.
Examples are as follows:
beans.xml
<!--bean Object Configuration-->
<bean id="cat1212" class="com.carson.pojo.Cat"></bean>
<bean id="dog1212" class="com.carson.pojo.Dog"></bean>
<bean id="people" class="com.carson.pojo.People"></bean>
People.java
public class People {
    @Resource
    private Cat cat;
    @Resource
    private Dog dog;
}
Although the IDs of the bean s above are different, the Type is unique, so the attribute values can be injected normally!
-
If @Resource does not match by byType, you need to assign a value to the name attribute in the @Resource annotation to specify the matching bean.
The format is: @Resource(name="id of matching bean")
Examples are as follows:
beans.xml
<bean id="cat1" class="com.carson.pojo.Cat"></bean>
<bean id="cat2" class="com.carson.pojo.Cat"></bean>
<bean id="dog1" class="com.carson.pojo.Dog"></bean>
<bean id="dog2" class="com.carson.pojo.Dog"></bean>
People.java
@Resource(name="cat1")
private Cat cat;
@Resource(name="dog1")
private Dog dog;
8.Spring is developed using annotations
Prerequisites for Spring annotations?
- beans.xml configuration file import context constraints and annotation support
<beans xmlns="http://www.springframework.org/schema/beans"
       xmlns:xsi="http://www.w3.org/2001/XMLSchema-instance"
       xmlns:context="http://www.springframework.org/schema/context"
       xmlns:Context="http://www.springframework.org/schema/context"
       xsi:schemaLocation="http://www.springframework.org/schema/beans
        https://www.springframework.org/schema/beans/spring-beans.xsd
        http://www.springframework.org/schema/context
        https://www.springframework.org/schema/context/spring-context.xsd">

    <!--context:component-scan Specify the package to scan,Comments under this package will take effect-->
    <context:component-scan base-package="com.carson.pojo"/>
    <!--context:annotation-config Use it to assign Spring Comments take effect-->
    <context:annotation-config/>

</beans>
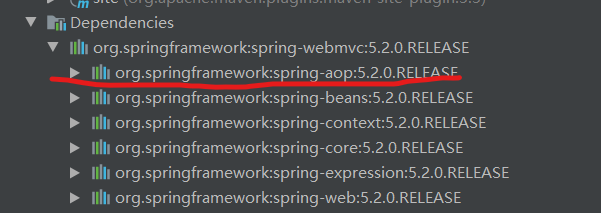
- After Spring 4, to use annotation development, you must ensure that aop's packages are imported.
- Set up entity classes for testing
User.java
public class User {
    private String name;

    public String getName() {
        return name;
    }
    public void setName(String name) {
        this.name = name;
    }
}
8.1 Use annotations for bean registration
The comment used: @Component, above the class, indicates that the class is managed by Spring!
Note:
- @Component annotation, equivalent to <bean id="user" class=""com.carson.pojo.User"/>
- The id name of the registered bean defaults to lowercase for this class name
Examples are as follows:
applicationContext.xml
<!--context:component-scan Specify the package to scan,Comments under this package will take effect-->
<context:component-scan base-package="com.carson.pojo"/>
<!--context:annotation-config Use Spring Configuration of Notes-->
<context:annotation-config/>
User.java
//@Component comment
//Equivalent to <bean id="user" class=""com.carson.pojo.User"/>
//The id name of the registered bean defaults to the lowercase form of this class name, i.e., user

@Component
public class User {
    private String name;
    .....
}
8.2 Annotation Restricts bean Scope
The comment used: @Scope("specific value"), above the class.
Examples are as follows:
User.java
@Component
@Scope("singleton")//Singleton mode
@Scope("prototype")//Prototype mode
public class User {
    private String name;
    ....
}
8.3 Annotation for attribute value injection
Note used: @Value("property value")
Note:
- Attribute value injection for simple data type!
- @Value("property value") is equivalent <propertyname="name" value="property value"/>
- @Value("property value") can be added directly above the property
- @Value("property value") can also be added directly above the Set method corresponding to the property
Examples are as follows:
User.java
public class User {
    //@Value("property value") can be added directly above the property
    //Equivalent to <property name="name" value="property value"/>
    @Value("Carson")
    private String name;

    public String getName() {
        return name;
    }

    //@Value("property value") can also be added directly above the Set method corresponding to the property
    //@Value("Carson's Set Method!")
    public void setName(String name) {
        this.name = name;
    }
}
8.4 Auto-assembly
Note: The attributes are for automatic assembly of attribute values that refer to data types!
Notes for automatic assembly are recorded above, just refer to above.
8.5 Derived Notes
@Component has several derived comments.
It is commonly used in related Java classes/interfaces where the MVC three-tier architecture is layered in Web development.
<!--Change Scanned Packages,Expand scope to: com.carson Contents of all packages under-->
<context:component-scan base-package="com.carson"/>
<!--context:annotation-config Use Spring Configuration of Notes-->
<context:annotation-config/>
- dao layer. [Repository]
@Repository
public interface UserDao {
  ...
}
- Service layer. [Service]
@Service
public interface UserService {
    ...
}
- Controller layer. [Controller]
@Controller
public class UserController {

}
Note:
@Component, @Repository, @Service, @Controller
All four annotations have the same functionality and represent registering a class with Spring for management
8.6 COMPARISON SUMMARY
Configuring Spring versus Annotation Spring using XML
- XML configuration is more versatile and can be used anywhere! Easy maintenance!
- Note configuration, not their own class can not be used, maintenance is relatively complex!
- Recommend:
- XML is used to manage bean s.
- Annotations are only responsible for completing the property injection!
9. Configure Spring using Java
Configuring Spring in Java means that now we don't use Spring's XML configuration file at all, but leave it to Java!
Entity Class
package com.carson.pojo;

import org.springframework.beans.factory.annotation.Value;

public class User {
    @Value("Carson") //Use annotations for attribute value injection
    private String name;

    public String getName() {
        return name;
    }

    public void setName(String name) {
        this.name = name;
    }

    @Override
    public String toString() {
        return "User{" +
                "name='" + name + '\'' +
                '}';
    }
}
Spring Configuration Class
package com.carson.config;

import com.carson.pojo.User;
import org.springframework.context.annotation.Bean;
import org.springframework.context.annotation.ComponentScan;
import org.springframework.context.annotation.Configuration;
import org.springframework.context.annotation.Import;

//This is a Spring configuration class by using the @Configuration annotation, which is equivalent to the previous beans.xml configuration file
//This Spring configuration class is also taken over by the Spring container and registered with the container because the @Configuration comment contains @Component
@Configuration
//Using the @ComponentScan("com.carson.pojo") annotation is a scan package, which is equivalent to <context:component-scan base-package="com.carson.pojo"/>
@ComponentScan("com.carson.pojo")
//Other Spring configuration classes can be imported using the @Import(xx.class) annotation, which is equivalent to the import tag <import resource="beans.xml"/>
@Import(CarsonConfig2.class)
public class CarsonConfig {
    //The @Bean annotation represents the registration of a Bean, which is equivalent to the bean label registered in the container
    //The @Bean comment can only be used on Methods
    //The name of this method corresponds to the id attribute in the bean tag
    //The return value of this method is equivalent to the class attribute in the bean tag
    @Bean
    public User user(){
        return new User(); //Is to return the object to be injected into the bean
    }

}
Test Class
public class MyTest {
    public static void main(String[] args) {
        //If Spring is fully configured using the configuration class method, we can only get the container's context object (by passing in the Class object of the configuration class) via the following AnnotationConfig
        ApplicationContext context = new AnnotationConfigApplicationContext(CarsonConfig.class);
        User user = context.getBean("user", User.class);
        System.out.println(user.toString());
    }
}
This pure Java configuration is everywhere in SpringBoot!!
10. Agent mode
10.1 Introduction
Why study agent mode?
A: It's the underlying principle of Spring AOP!
Classification of agent modes?
- Static Proxy Mode
- Dynamic Proxy Mode
Diagram of agent mode, taking customer rental as an example:
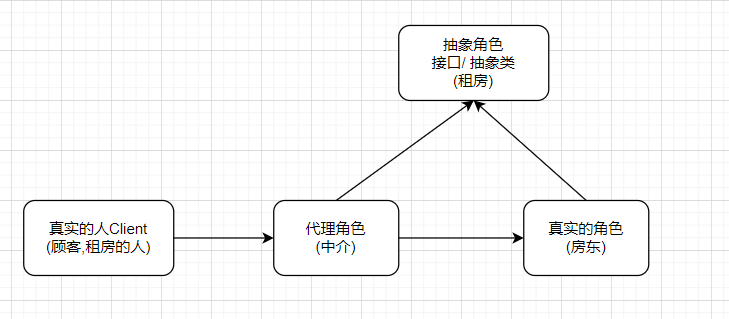
Role in proxy mode
- Abstract roles: Usually implemented using interfaces or abstract classes.
- Real Role: The Role to be Agented
- Agent role: Agent real role, there are usually some subsidiary operations!
- Customer: People who access the proxy role
10.2 Static Proxy Mode
Static Agent Implementation of Customer Rental
- Interface
//Abstract roles: the way in which proxy and real roles need to be implemented together
//Rental
public interface Rent {
    //Method of renting
    public void rent();
}
- Real Role
//Real role: landlord. Need a way to implement proxy roles as interfaces
//Landlord wants to rent
public class Host implements Rent {
    public void rent() {
        System.out.println("Landlord rents a house!");
    }
}
- delegable role
//Proxy roles: Require methods to implement Abstract roles as interfaces
//Intermediary wants to rent house as agent
public class Proxy implements Rent {

    //According to the principle of composite reuse, instead of inheriting classes, internally instantiating classes
    private Host host;

    public Proxy() {
    }

    public Proxy(Host host) {

        this.host = host;
    }

    //Intermediaries help landlords rent houses
    public void rent() {
        /*Mediators can also have other ancillary operations*/
        seeHouse();
        signContract();
        //Agent landlord to rent house
        host.rent();
        fee();
    }

    /*Mediators can also have other ancillary operations*/
    //Housekeeping
    public void seeHouse(){
        System.out.println("Intermediate takes you to the room!");
    }

    //Sign Lease Contract
    public void signContract(){
        System.out.println("Sign Lease Contract!");
    }

    //Charge intermediary fee
    public void fee(){
        System.out.println("Intermediaries charge intermediary fees!");
    }
}
- Client Access Proxy Role
//The customer wants to rent a house
public class Client {
    public static void main(String[] args) {
        //Real role (landlord)
        Host host = new Host();
        //Agent role (acting as landlord to rent a house, there are usually some subsidiary operations)
        Proxy proxy = new Proxy(host);
        //Facing Intermediate Rental
        proxy.rent();

    }
}
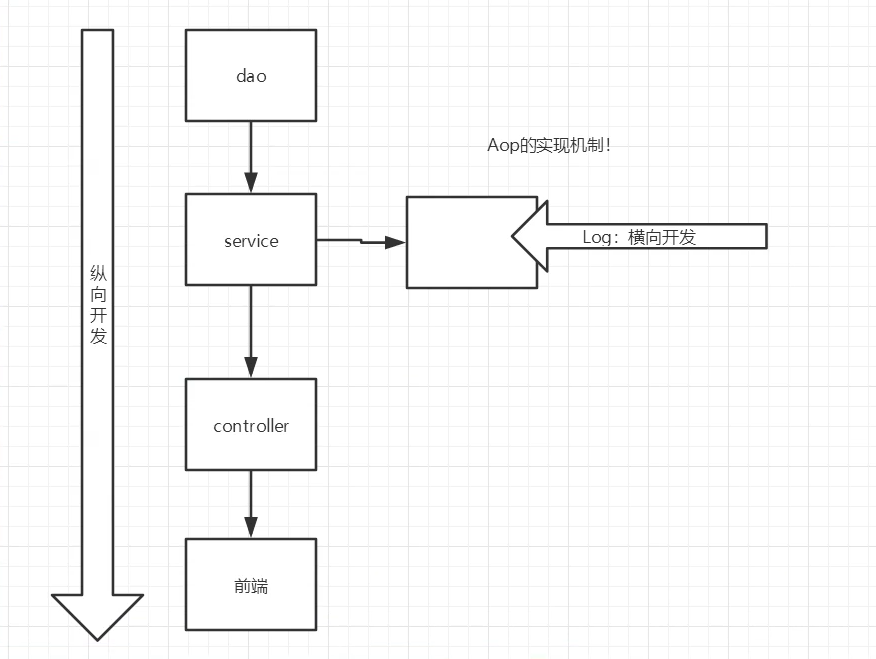
Control layer invokes static proxy implementation of business logic layer in MVC
Requirements: Now you need to add a log requirement for printing logs on each method of the CRUD method, but if you change the original code directly, the cost and risk are too high, so you need to extend the code through proxy mode instead of changing it.
This idea is AOP(Aspect Oriented Program) thought.

The code is as follows:
- Interface
//Abstract Role: Interface of Business Logic Layer
//That is, UserService
public interface UserService {
    //CRUD Method
    public void add();
    public void del();
    public void update();
    public void query();
}
- Real Role
//Real Role: UserServiceImpl
public class UserServiceImpl implements UserService {
    public void add() {
        System.out.println("Increased Method!");
    }

    public void del() {
        System.out.println("Method of deletion!");
    }

    public void update() {
        System.out.println("Changed Method!");
    }

    public void query() {
        System.out.println("Query Method!");
    }
}
- delegable role
//Agent role: UserServiceProxy
public class UserServiceProxy implements UserService {

    //Composite reuse principle, proxying a role for internal instantiation
    private UserService userServiceImpl;

    //Spring recommends injecting objects using the Set method instead of the construction method
    public void setUserServiceImpl(UserService userServiceImpl) {
        this.userServiceImpl = userServiceImpl;
    }

    public void add() {
        log("add");
        userServiceImpl.add();

    }

    public void del() {
        log("del");
        userServiceImpl.del();

    }

    public void update() {
        log("update");
        userServiceImpl.update();

    }

    public void query() {
        log("query");
        userServiceImpl.query();

    }

    //Examples need to be added: Print Log Method
    public void log(String msg){
        System.out.println("[Debug]: Used"+msg+"Method!");
    }
}
- Client Access Proxy Role
//Client Access Proxy Role
public class Client {
    public static void main(String[] args) {
        //Real Role
        UserService userServiceImpl = new UserServiceImpl();
        //delegable role
        UserServiceProxy userServiceProxy = new UserServiceProxy();
        //Agent role sets the object being proxied
        userServiceProxy.setUserServiceImpl(userServiceImpl);
        //Client interacts with proxy role
        userServiceProxy.add();
    }
}
Benefits of static proxy mode?
- It can make the operation of real characters simpler! Don't focus on public business.
- Public business, i.e. affiliated operations, is handed over to the proxy role! The division of business has been achieved.
- Convenient centralized management when public business expands!
Disadvantages of static proxy mode?
A real role creates a proxy role, which increases the amount of code and leads to inefficient development!
10.3 Dynamic Agent Mode
Dynamic proxy mode?
- Dynamic proxy and static proxy role components are the same.
- Dynamic proxy proxy classes are generated dynamically, not written directly like static proxy classes!
- Implementation of Dynamic Agent
- Dynamic proxy based on interface. Example: -> JDK dynamic proxy.
- Class-based dynamic proxy. Example: -> cglib
- Java byte code implementation. Example: -> javassist
Benefits of dynamic proxy?
- Solves the disadvantage of static proxy.
- A dynamic proxy class proxy is an interface, usually corresponding to a business.
- A dynamic proxy class can proxy multiple classes as long as it implements the same interface!
Dynamic Proxy Implementation Based on Interface
The dynamic proxy here involves the basics of reflection, which can be found in your personal blog.
Attached link: Reflection mechanism
Dynamic proxies need to understand and work with two classes:
-
Proxy: Used to generate dynamic proxy classes.
-
InvocationHandler: Automatically calls the invoke() handler and returns the result.
Dynamic Agent Implementation of Customer Rental
- Dynamic Proxy Class
//Dynamic proxy through interface
//Dynamic generation of proxy classes requires implementation: InvocationHandler interface
//Automatically generate proxy class instances from this handler class
public class ProxyInvocationHandler implements InvocationHandler {
    //Agented Interface
    private Rent rent;

	//Spring recommends injecting objects using the Set method instead of the construction method
    public void setRent(Rent rent) {
        this.rent = rent;
    }

    //Generate Proxy Class
    public Object getProxy(){
        return Proxy.newProxyInstance(this.getClass().getClassLoader(),rent.getClass().getInterfaces(),this);
    }

    //Process the proxy instance and return the results
    public Object invoke(Object proxy, Method method, Object[] args) throws Throwable {
        //The essence of dynamic proxy is to use reflection mechanism to implement
        //Here the method is the object under the java.lang.reflection mechanism package
        Object result = method.invoke(rent, args);
        return result;
    }
}
- Client access to dynamically generated proxy classes
public class Client {
    public static void main(String[] args) {
        //Real Role
        Host host = new Host();

        //Dynamically generate proxy roles
          // 1. Instantiate instance objects that dynamically generate proxy classes
        ProxyInvocationHandler proxyInvocationHandler = new ProxyInvocationHandler();
          // 2. Call a method to set its proxy role
        proxyInvocationHandler.setRent(host);
          // 3. Call the method to get the proxy class (where proxy is a dynamically generated proxy class that requires a cast of the object type)
        Rent proxy = (Rent) proxyInvocationHandler.getProxy();

        //Client Access Proxy Class
        proxy.rent();
    }
}
Control layer invokes dynamic proxy implementation of business logic layer in MVC
- Dynamic Proxy Class
//Dynamic proxy through interface
//Dynamic generation of proxy classes requires implementation: InvocationHandler interface
//Automatically generate proxy class instances from this handler class
public class ProxyInvocationHandler implements InvocationHandler {
    //Agented Interface
    private UserService userService;

    //Spring recommends the Set method
    public void setUserService(UserService userService) {
        this.userService = userService;
    }

    //Generate Proxy Class
    public Object getProxy(){
        return Proxy.newProxyInstance(this.getClass().getClassLoader(),userService.getClass().getInterfaces(),this);
    }

    //Process the proxy instance and return the results

    public Object invoke(Object proxy, Method method, Object[] args) throws Throwable {
        //Here the method is the object under the java.lang.reflection mechanism package
        log(method.getName());
        Object result = method.invoke(userService, args);
        return result;
    }

    //Increase Print Log
    public void log(String msg){
        System.out.println("[Debug]: Used"+msg+"Method!");
    }
}
- Client access to dynamically generated proxy classes
public class Client {
    public static void main(String[] args) {
        //Real Role
        UserServiceImpl userService = new UserServiceImpl();

        //Dynamically generate proxy roles
          // 1. Instantiate instance objects that dynamically generate proxy classes
        ProxyInvocationHandler proxyInvocationHandler = new ProxyInvocationHandler();
          // 2. Call a method to set its proxy role
        proxyInvocationHandler.setUserService(userService);
          // 3. Call the method to get the proxy class (where proxy is a dynamically generated proxy class that requires a cast of the object type)
        UserService proxy = (UserService) proxyInvocationHandler.getProxy();

        //Client Access Proxy Class
        proxy.del();
    }
}
Encapsulate dynamic proxy classes into tool classes
Dynamic proxy class, receiving Object s
//Dynamic proxy through interface
//Dynamic generation of proxy classes requires implementation: InvocationHandler interface
//Automatically generate proxy class instances from this handler class
public class ProxyInvocationHandler implements InvocationHandler {

    //Agented Interface [i.e., the interface implemented by the proxy mediator]
    private Object target;

    public void setTarget(Object target) {
        this.target = target;
    }

    //Generate to get proxy classes [that is, dynamically generate proxy classes]
      //Parameters of the method (ClassLoader loader, @NotNull Class<?>[] interfaces, @NotNull reflect.InvocationHandler h)
      // Loader: Which class loader is used to load the proxy object
      // interfaces: interfaces that dynamic proxy classes need to implement (obtained through reflection mechanism)
      // H: When a dynamic proxy method executes, it invokes the invoke() method inside h to execute it
    public Object getProxy(){
        return Proxy.newProxyInstance(this.getClass().getClassLoader(),target.getClass().getInterfaces(),this);
    }

    //Processing the proxy instance and returning the result [that is, this method is called automatically, so the code that needs to be executed needs to be placed inside this method]
    public Object invoke(Object proxy, Method method, Object[] args) throws Throwable {
        //The essence of dynamic proxy is to use reflection mechanism to implement
        Object result = method.invoke(target,args);
        return result;

    }
}
Client
public class Client {
    public static void main(String[] args) {
        //Real Role
        UserServiceImpl userServiceImpl = new UserServiceImpl();

        //Dynamically generate proxy roles
          // 1. Instantiate instance objects that dynamically generate proxy classes
        ProxyInvocationHandler proxyInvocationHandler = new ProxyInvocationHandler();
          // 2. Call a method to set its proxy role
        proxyInvocationHandler.setTarget(userServiceImpl);
          // 3. Call the method to get the proxy class (where proxy is a dynamically generated proxy class that requires a cast of the object type)
        UserService proxy = (UserService) proxyInvocationHandler.getProxy();

        //Client Access Proxy Class
        proxy.del();
    }
}
11. AOP
11.1 What is AOP
-
AOP is the continuation of OOP(Object Oriented Programming), a hot spot in software development, and an important content in Spring framework.
-
AOP(Aspect Oriented Programming) means face-to-face programming.
-
AOP: is a horizontal programming idea. It can enhance business logic without affecting the original business logic. AOP is a powerful decoupler for code decoupling.
-
AOP makes adding new functions without changing the original code function flow. In fact, it is a kind of extensibility performance. The basic principle of AOP is the "dynamic proxy" technology mentioned above, which is the same as the idea of "proxy mode" in design mode.
-
With AOP, each part of business logic can be isolated, which reduces the coupling between parts of business logic, improves the reusability of programs, and improves the development efficiency.
11.2 Role of AOP in Spring
Allows users to customize facets.
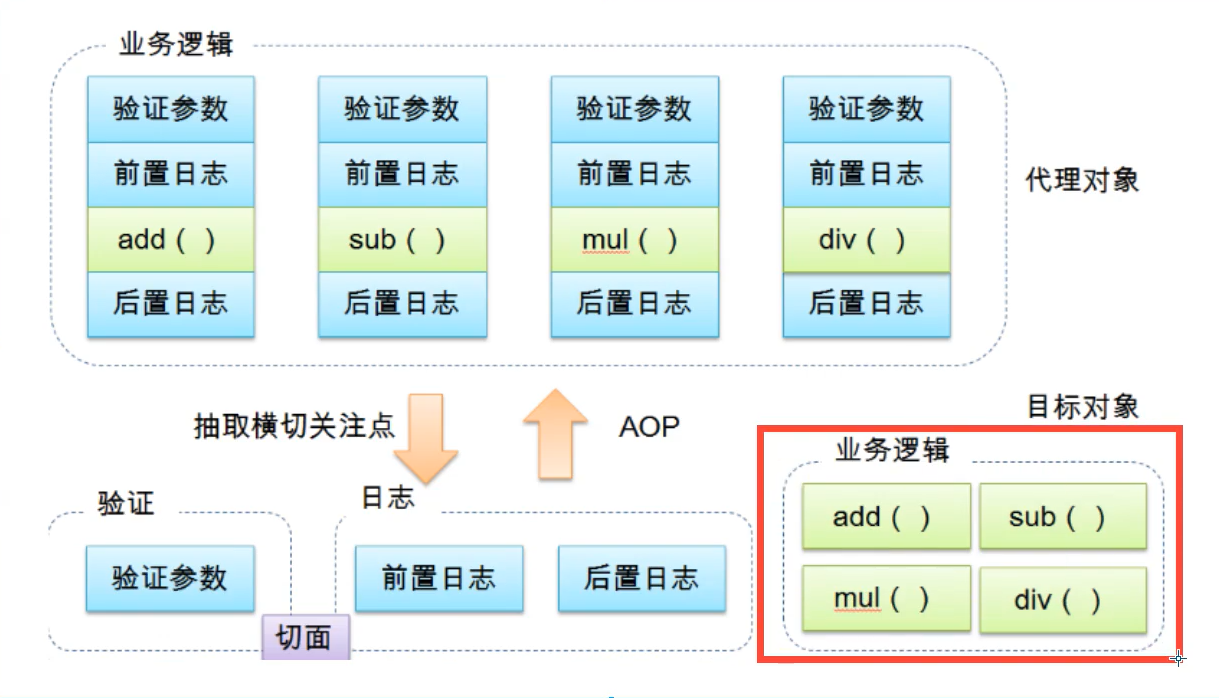
- Cross-cutting concerns: Methods or functions that span multiple modules of an application. That is, it has nothing to do with the business logic that we have implemented, but what we need to focus on. Examples include logging, security, caching, transactions, and so on.
- Aspect: A special object whose focus is modularized. That is, cross-cutting concerns are treated as a class.
- Advice: The work that must be done on the facet. That is, it is a method in the tangent class.
- Target: The object to be notified of.
- Proxy: An object created after notification is applied to the target object.
- PointCut: Definition of "place" for facet notification execution.
- Joint: The execution point that matches the entry point.
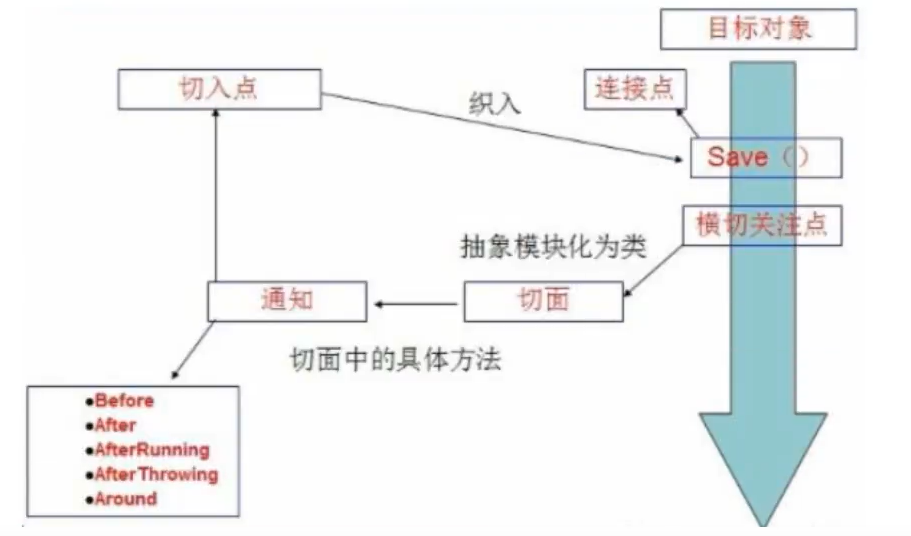
In Spring AOP, cross-cutting logic is defined by Advice, which is a method. Five types of Advice are supported in Spring:
| Notification Type | Connection Point | Interfaces in Spring AOP that correspond to what needs to be implemented |
|---|---|---|
| Before advice | Pre-method | org.springframework.aop.MethodBeforeAdvice |
| after returning advise | After method | org.springframework.aop.AfterReturningAdvice |
| Around Advice | Before and after method | org.aopalliance.intercept.MethodInterceptor |
| Exception throw notification | Method throws an exception | org.springframework.aop.ThrowAdvice |
| Introduction Notice | Add new method properties to the class | org.springframework.aop.IntroductionInterceptor |
AOP adds new functionality without changing the original code.
11.3 Implement AOP using Spring
[Key] Using AOP weaving, you need to import a dependent package first!
<!--Use Spring AOP Dependencies that must be introduced aop Weaving-->
<!-- https://mvnrepository.com/artifact/org.aspectj/aspectjweaver -->
<dependency>
    <groupId>org.aspectj</groupId>
    <artifactId>aspectjweaver</artifactId>
    <version>1.9.6</version>
</dependency>
Ways to implement AOP
Mode 1: Implement AOP using Spring's API interface
- Agented interfaces (abstract roles)
UserService.java
public interface UserService {
    //Add, delete, and change detection methods
    public void add();
    public void del();
    public void update();
    public void select();
}
- Real roles (that is, the original code, the existing business logic, cannot be changed)
public class UserServiceImpl implements UserService {
    public void add() {
        System.out.println("Increased Method!");
    }

    public void del() {
        System.out.println("Method of deletion!");
    }

    public void update() {
        System.out.println("Changed Method!");
    }

    public void select() {
        System.out.println("Query Method!");
    }
}
- The method functionality to be added, Advice, requires each to be a separate class
Log.java, prints the log before the existing method, the pre-log
//Execute before our method executes
//API interface for Spring to inherit: MethodBeforeAdvice
public class Log implements MethodBeforeAdvice {
//Override method (this method is called automatically before we execute the method)
//method: method of the target object to execute
//args:parameter
//target:Target Object
public void before(Method method, Object[] args, Object target) throws Throwable {
//This method focuses on what needs to be done before we can implement our method
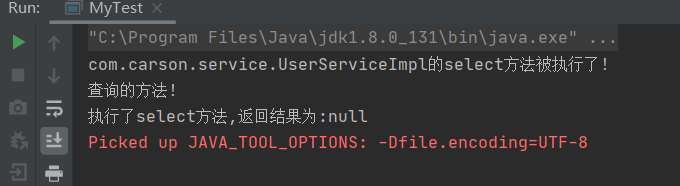
System.out.println(target.getClass().getName()+"Of"+method.getName()+"Method was executed!");
}
}
AfterLog.java, prints the log after an existing method, the post log
//Execute after execution of our method
//API interface of Spring to inherit: AfterReturningAdvice or AfterAdvice
public class AfterLog implements AfterReturningAdvice {
    //Override method (this method will be executed after the method we execute, and it will receive a return value)
    //returnValue:Return value
    //method: method of the target object to execute
    //args:parameter
    //target:Target Object
    public void afterReturning(Object returnValue, Method method, Object[] args, Object target) throws Throwable {
        System.out.println("Executed"+method.getName()+"Method,The result is:"+returnValue);
    }
}
- Configuration file (proxy role configuration, that is, the proxy role implementation is handed over to Spring AOP)
applicationContext.xml
<?xml version="1.0" encoding="UTF-8"?>
<beans xmlns="http://www.springframework.org/schema/beans"
       xmlns:xsi="http://www.w3.org/2001/XMLSchema-instance"

       xmlns:aop="http://www.springframework.org/schema/aop"
       xsi:schemaLocation="http://www.springframework.org/schema/beans
       https://www.springframework.org/schema/beans/spring-beans.xsd

       http://www.springframework.org/schema/aop
       https://www.springframework.org/schema/aop/spring-aop.xsd
">

    <!--register bean object-->
    <bean id="userServiceImpl" class="com.carson.service.UserServiceImpl"></bean>
    <bean id="log" class="com.carson.log.Log"></bean>
    <bean id="afterLog" class="com.carson.log.AfterLog"></bean>

    <!--To configure aop: Need to import at the top of the file aop Related Constraints-->
    <!--Mode 1: Use Native Spring API Interface implementation AOP-->
    <aop:config>
        <!--1. Define entry points (That is, configure which class to insert some methods into)
        among expression format: execution(Modifier Return Value Class Name Method Name Parameter)  *Symbols represent arbitrary, and.. Represents can have any number of parameters
                          execution()Filled in represents: Location to execute!
                          Consider this in the order in which the methods are defined: That is execution(Return Value Class Full Path.Method Name(parameter))
        -->
        <aop:pointcut id="pointcut" expression="execution(* com.carson.service.UserServiceImpl.*(..))"/>
        <!--2.The notification corresponds to the entry point ( advice-ref Corresponds to the corresponding method class pointcut-ref The corresponding method representing the entry point)-->
        <aop:advisor advice-ref="log" pointcut-ref="pointcut"/>
        <aop:advisor advice-ref="afterLog" pointcut-ref="pointcut"/>
    </aop:config>
</beans>
- Test Class
public class MyTest {
    public static void main(String[] args) {
        ApplicationContext context = new ClassPathXmlApplicationContext("applicationContext.xml");
        //Note: Dynamic proxy proxies are interfaces (so you must return the interface below, that is, to return the proxy role)
        UserService userService = context.getBean("userServiceImpl", UserService.class);
        //Client Access Proxy Role
        userService.select();
    }
}
Mode 2: Use custom classes to implement AOP [Recommended]
- Agented interfaces (abstract roles)
UserService.java
public interface UserService {
    //Add, delete, and change detection methods
    public void add();
    public void del();
    public void update();
    public void select();
}
- Real roles (that is, the original code, the existing business logic, cannot be changed)
public class UserServiceImpl implements UserService {
    public void add() {
        System.out.println("Increased Method!");
    }

    public void del() {
        System.out.println("Method of deletion!");
    }

    public void update() {
        System.out.println("Changed Method!");
    }

    public void select() {
        System.out.println("Query Method!");
    }
}
- Custom Face Class (which writes new functional methods to be added)
//Custom classes, as facets
public class DiyPointCut {
public void before(){
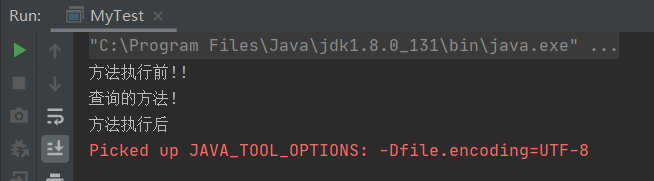
System.out.println("Before method execution!!");
}
public void after(){
System.out.println("After method execution");
}
}
- Configuration file (proxy role configuration, that is, the proxy role implementation is handed over to Spring AOP)
applicationContext.xml
<?xml version="1.0" encoding="UTF-8"?>
<beans xmlns="http://www.springframework.org/schema/beans"
       xmlns:xsi="http://www.w3.org/2001/XMLSchema-instance"
       xmlns:aop="http://www.springframework.org/schema/aop"
       xsi:schemaLocation="http://www.springframework.org/schema/beans
       https://www.springframework.org/schema/beans/spring-beans.xsd
       http://www.springframework.org/schema/aop
       https://www.springframework.org/schema/aop/spring-aop.xsd
">

    <!--register bean object-->
    <bean id="userServiceImpl" class="com.carson.service.UserServiceImpl"></bean>
    <bean id="diy" class="com.carson.diy.DiyPointCut"></bean>

    <!--Mode 2:Using a custom class implementation AOP-->
    <aop:config>
        <!--Custom Face,among ref:Represents the class to be referenced-->
        <aop:aspect ref="diy">
            <!--1.Set entry point -->
            <aop:pointcut id="pointcut" expression="execution(* com.carson.service.UserServiceImpl.*(..))"/>
            <!--2.Configure notifications to entry point,Correspondence of new methods and entry points-->
            <aop:before method="before" pointcut-ref="pointcut"/>
            <aop:after method="after" pointcut-ref="pointcut"/>
        </aop:aspect>
    </aop:config>
</beans>
- Test Class
public class MyTest {
    public static void main(String[] args) {
        ApplicationContext context = new ClassPathXmlApplicationContext("applicationContext.xml");
        //Note: Dynamic proxy proxies are interfaces (so you must return the interface below, that is, to return the proxy role)
        UserService userService = context.getBean("userServiceImpl", UserService.class);
        //Client Access Proxy Role
        userService.select();
    }
}
Mode 3: Using annotations to implement AOP
- Agented interfaces (abstract roles)
UserService.java
public interface UserService {
    //Add, delete, and change detection methods
    public void add();
    public void del();
    public void update();
    public void select();
}
- Real roles (that is, the original code, the existing business logic, cannot be changed)
public class UserServiceImpl implements UserService {
    public void add() {
        System.out.println("Increased Method!");
    }

    public void del() {
        System.out.println("Method of deletion!");
    }

    public void update() {
        System.out.println("Changed Method!");
    }

    public void select() {
        System.out.println("Query Method!");
    }
}
- Tangent class using AOP annotations
//The @Aspect annotation states that this class is a facet
@Aspect
public class AnnotationPointCut {
//The content of the @Before comment is the starting point for the new approach
@Before("execution(* com.carson.service.UserServiceImpl.*(..))")
public void before(){
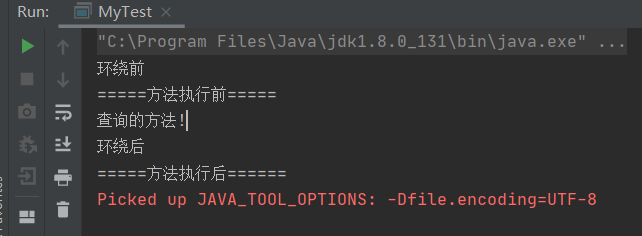
System.out.println("=====Before method execution=====");
}
//The @After comment is the starting point for the new approach
@After("execution(* com.carson.service.UserServiceImpl.*(..))")
public void after(){
System.out.println("=====After method execution======");
}
//@Around is a surround notification
//In wrapping, we can add a parameter to the method to represent the starting point for processing
@Around("execution(* com.carson.service.UserServiceImpl.*(..))")
public void around(ProceedingJoinPoint jp) throws Throwable {
System.out.println("Before Surround");
//Execution method, which is equivalent to the doFilter() of the filter
Object proceed = jp.proceed();
System.out.println("After Surround");
}
}
- Configuration file (proxy role configuration, that is, the proxy role implementation is handed over to Spring AOP)
applicationContext.xml
<?xml version="1.0" encoding="UTF-8"?>
<beans xmlns="http://www.springframework.org/schema/beans"
       xmlns:xsi="http://www.w3.org/2001/XMLSchema-instance"
       xmlns:aop="http://www.springframework.org/schema/aop"
       xsi:schemaLocation="http://www.springframework.org/schema/beans
       https://www.springframework.org/schema/beans/spring-beans.xsd
       http://www.springframework.org/schema/aop
       https://www.springframework.org/schema/aop/spring-aop.xsd
">

    <!--register bean object-->
    <bean id="userServiceImpl" class="com.carson.service.UserServiceImpl"></bean>
    <bean id="annotationPointCut" class="com.carson.diy.AnnotationPointCut"></bean>

    <!--Mode 3: Using annotations to implement AOP-->
    <!--open AOP Annotation Support proxy-target-class Parameters can configure the implementation of dynamic agents: JDK(default,Corresponding false) cglib(Corresponding true)-->
    <aop:aspectj-autoproxy proxy-target-class="false"/>

</beans>
- Test Class
public class MyTest {
    public static void main(String[] args) {
        ApplicationContext context = new ClassPathXmlApplicationContext("applicationContext.xml");
        //Note: Dynamic proxy proxies are interfaces (so you must return the interface below, that is, to return the proxy role)
        UserService userService = context.getBean("userServiceImpl", UserService.class);
        //Client Access Proxy Role
        userService.select();
    }
}
12. Integrate Mybatis
12.1 Review of Mybatis Basic Usage
- Write entity classes in the pojo directory.
User.java
public class User {
    private int id;
    private String name;
    private String pwd;

    public int getId() {
        return id;
    }

    public void setId(int id) {
        this.id = id;
    }

    public String getName() {
        return name;
    }

    public void setName(String name) {
        this.name = name;
    }

    public String getPwd() {
        return pwd;
    }

    public void setPwd(String pwd) {
        this.pwd = pwd;
    }

    @Override
    public String toString() {
        return "User{" +
                "id=" + id +
                ", name='" + name + '\'' +
                ", pwd='" + pwd + '\'' +
                '}';
    }
}
- Write the mybatis core configuration file in the resources directory.
mybatis-config.xml
<?xml version="1.0" encoding="UTF-8" ?>
<!DOCTYPE configuration
PUBLIC "-//mybatis.org//DTD Config 3.0//EN"
"http://mybatis.org/dtd/mybatis-3-config.dtd">
<!--configuration Core Profile-->
<configuration>
<!--Alias Management: Setting aliases by scanning packages-->
<typeAliases>
<!--name Property corresponds to the location of the package-->
<package name="com.carson.pojo"/>
</typeAliases>
<environments default="development">
<environment id="development">
<transactionManager type="JDBC"/> <!--Transaction management is JDBC-->
<dataSource type="POOLED">
<!--Replace each property value that connects to the database-->
<property name="driver" value="com.mysql.cj.jdbc.Driver"/>
<!--notes:There&Connector to be used&To express,& yes HTML in & Representation methods-->
<property name="url" value="jdbc:mysql://localhost:3306/mybatis?serverTimezone=UTC&useUnicode=true&characterEncoding=utf-8&useSSL=true"/>
<property name="username" value="root"/>
<property name="password" value="root"/>
</dataSource>
</environment>
</environments>
<!--Every last Mapper.xml Need to be in mybatis Register in Core Profile-->
<mappers>
<!--Path to use/Split-->
<mapper resource="com/carson/mapper/UserMapper.xml"/>
</mappers>
</configuration>
- Write interface files in mapper directory
UserMapper.java
public interface UserMapper {
    public List<User> getUsers();
}
- Write Mapper.xml for the interface in the mapper directory (one XML file for each interface in mybatis)
[Note: Each Mapper.xml needs to be registered in the core configuration file of mybatis, which is already registered above]
UserMapper.xml
<?xml version="1.0" encoding="UTF-8" ?>
<!DOCTYPE mapper
        PUBLIC "-//mybatis.org//DTD Mapper 3.0//EN"
        "http://mybatis.org/dtd/mybatis-3-mapper.dtd">

<!--namespace Full path to corresponding interface file-->
<mapper namespace="com.carson.mapper.UserMapper">
    <select id="getUsers" resultType="user">
        select * from user;
    </select>
</mapper>
- test
public class MyTest {
    public static void main(String[] args) throws IOException {
        //Read mybatis-config configuration file
        String resources = "mybatis-config.xml";
        InputStream inputStream = Resources.getResourceAsStream(resources);
        //Create sqlSessionFactory instance object
        SqlSessionFactory sqlSessionFactory = new SqlSessionFactoryBuilder().build(inputStream);
        //Create a sqlSession object, which is equivalent to a Connection database connection object, with a true parameter representing an automatic commit transaction
        SqlSession sqlSession = sqlSessionFactory.openSession(true);
        try{
            //Fill in the class object of the interface class
            UserMapper mapper = sqlSession.getMapper(UserMapper.class);
            //Calling methods with objects
            List<User> users = mapper.getUsers();

            //Print Test
            for(User user:users){
                System.out.println(user);
            }
        }catch (Exception e){
            e.printStackTrace();
        }finally {
            //Close sqlSession
            sqlSession.close();
        }
    }
}
12.2 Spring Integration Mybatis
Attached is a link to Spring's Official Learning document for integrating mybatis: mybatis-spring
Note: There is a certain dependency between dependent versions, as follows:

Dependencies and configurations need to be imported and configured in the pom.xml file before spring and mybatis can be used together as follows:
pom.xml
<?xml version="1.0" encoding="UTF-8"?>
<project xmlns="http://maven.apache.org/POM/4.0.0"
         xmlns:xsi="http://www.w3.org/2001/XMLSchema-instance"
         xsi:schemaLocation="http://maven.apache.org/POM/4.0.0 http://maven.apache.org/xsd/maven-4.0.0.xsd">
    <parent>
        <artifactId>Spring-study</artifactId>
        <groupId>org.example</groupId>
        <version>1.0-SNAPSHOT</version>
    </parent>
    <modelVersion>4.0.0</modelVersion>

    <artifactId>Spring-10-mybatis</artifactId>

    <!--Import Dependencies-->
    <dependencies>
        <dependency>
            <groupId>junit</groupId>
            <artifactId>junit</artifactId>
            <version>4.12</version>
        </dependency>
        <!--mysql rely on-->
        <dependency>
            <groupId>mysql</groupId>
            <artifactId>mysql-connector-java</artifactId>
            <version>8.0.19</version>
        </dependency>
        <!--mybatis rely on-->
        <dependency>
            <groupId>org.mybatis</groupId>
            <artifactId>mybatis</artifactId>
            <version>3.5.6</version>
        </dependency>
        <!--Import spring-->
        <dependency>
            <groupId>org.springframework</groupId>
            <artifactId>spring-webmvc</artifactId>
            <version>5.2.0.RELEASE</version>
        </dependency>
        <!--Spring Operating the database,One more is needed spring-jdbc Dependency on-->
        <dependency>
            <groupId>org.springframework</groupId>
            <artifactId>spring-jdbc</artifactId>
            <version>5.2.0.RELEASE</version>
        </dependency>
        <!--Spring AOP Woven bag of-->
        <dependency>
            <groupId>org.aspectj</groupId>
            <artifactId>aspectjweaver</artifactId>
            <version>1.9.6</version>
        </dependency>
        <!--mybatis and spring Integrated Package-->
        <dependency>
            <groupId>org.mybatis</groupId>
            <artifactId>mybatis-spring</artifactId>
            <version>2.0.6</version>
        </dependency>
    </dependencies>

    <!--Resolve resources not in place resources Resource export failure caused by directory-->
    <build>
        <resources>
            <resource>
                <directory>src/main/resources</directory>
                <includes>
                    <include>**/*.properties</include>
                    <include>**/*.xml</include>
                </includes>
                <filtering>true</filtering>
            </resource>
            <resource>
                <directory>src/main/java</directory>
                <includes>
                    <include>**/*.properties</include>
                    <include>**/*.xml</include>
                </includes>
                <filtering>true</filtering>
            </resource>
        </resources>
    </build>
</project>
Integrating mybatis approach one
- Entity classes that write tests in the pojo directory.
User.java
public class User {
    private int id;
    private String name;
    private String pwd;

    public int getId() {
        return id;
    }

    public void setId(int id) {
        this.id = id;
    }

    public String getName() {
        return name;
    }

    public void setName(String name) {
        this.name = name;
    }

    public String getPwd() {
        return pwd;
    }

    public void setPwd(String pwd) {
        this.pwd = pwd;
    }

    @Override
    public String toString() {
        return "User{" +
                "id=" + id +
                ", name='" + name + '\'' +
                ", pwd='" + pwd + '\'' +
                '}';
    }
}
- Write interface files in mapper directory
usermapper.java
public interface UserMapper {
    public List<User> getUsers();

}
- Write Mapper.xml for the interface in the mapper directory (one XML file for each interface in mybatis)
UserMapper.xml
<?xml version="1.0" encoding="UTF-8" ?>
<!DOCTYPE mapper
        PUBLIC "-//mybatis.org//DTD Mapper 3.0//EN"
        "http://mybatis.org/dtd/mybatis-3-mapper.dtd">

<!--namespace Full path to corresponding interface file-->
<mapper namespace="com.carson.mapper.UserMapper">
    <select id="getUsers" resultType="user">
        select * from user;
    </select>
</mapper>
- Write the mybatis core configuration file in the resources directory.
mybatis-config.xml
<?xml version="1.0" encoding="UTF-8" ?>
<!DOCTYPE configuration
        PUBLIC "-//mybatis.org//DTD Config 3.0//EN"
        "http://mybatis.org/dtd/mybatis-3-config.dtd">

<!--Because spring Related can be done in the configuration file mybatis Set up,So original mybatis Core Profiles Keep Only Partial Settings-->
	<!--Generally in mybatis The configuration file leaves only two configurations: That is, alias management and setup items-->

<!--configuration Tags are core profiles-->
<configuration>

    <!--1.Alias Management: Setting aliases by scanning packages-->
    <typeAliases>
        <!--name Property corresponds to the location of the package-->
        <package name="com.carson.pojo"/>
    </typeAliases>

    <!--2.settings Labels are right mybatis Related Settings-->
    <!--<settings>
        <setting name="" value=""/>
    </settings>-->

</configuration>
- Create the spring configuration file spring-dao.xml in the resources directory
The following configurations are made in spring-dao.xml:
Note: Because this type of related content is fixed write-to-death, it can be used directly as a tool class to connect to the database!
-
Data Source Configuration
-
sqlSessionFactory
-
sqlSessionTemplate
spring-dao.xml
<?xml version="1.0" encoding="UTF-8"?>
<beans xmlns="http://www.springframework.org/schema/beans"
xmlns:xsi="http://www.w3.org/2001/XMLSchema-instance" xmlns:context="http://www.springframework.org/schema/context"
xsi:schemaLocation="http://www.springframework.org/schema/beans
https://www.springframework.org/schema/beans/spring-beans.xsd">
<!--1 DataSource:Use spring-jdbc Dependent on supplied data source class substitution Mybatis Original Data Source Class-->
<bean id="dataSource" class="org.springframework.jdbc.datasource.DriverManagerDataSource">
<!--Attribute values of related parameters injected into the class to connect to the database-->
<property name="driverClassName" value="com.mysql.cj.jdbc.Driver"/>
<property name="url" value="jdbc:mysql://localhost:3306/mybatis?serverTimezone=UTC&useUnicode=true&characterEncoding=utf-8&useSSL=true"/>
<property name="username" value="root"/>
<property name="password" value="root"/>
</bean>
<!--2.sqlSessionFactory-->
<bean id="sqlSessionFactory" class="org.mybatis.spring.SqlSessionFactoryBean">
<!--injection dataSource Attribute Value-->
<property name="dataSource" ref="dataSource"/>
<!--binding Mybatis Configuration files can also be used unbound property Label to replace mybatis Configuration in Configuration File
If bound mybatis Profile,that mybatis Configuration Files and spring The configuration files are connected-->
<!--notes: Labeled below value Fixed form of value: classpath:File path.(If the file is located in the resource directory,Write the file name directly)-->
<property name="configLocation" value="classpath:mybatis-config.xml"/>
<!--Because of each Mapper.xml Need to be in mybatis Register in Core Profile,The following is equivalent to registering each Mapper.xml-->
<!-- Be careful:classpath:Use the following file path/Split-->
<property name="mapperLocations" value="classpath:com/carson/mapper/*.xml"/>
</bean>
<!-- 3. SqlSessionTemplate-->
<!--There SqlSessionTemplate:Just before us mybatis Used in sqlSession-->
<bean id="sqlSessionTemplate" class="org.mybatis.spring.SqlSessionTemplate">
<!--Injection can only be done using a parametric constructor sqlSessionFactory,because SqlSessionTemplate Not in set Method-->
<constructor-arg index="0" ref="sqlSessionFactory"/>
</bean>
</beans>
- The corresponding implementation class UserMapperImpl.java needs to be added to the corresponding interface
UserMapperImpl.java
//Now write an additional interface implementation class
public class UserMapperImpl implements UserMapper {

    //All of our operations are performed using sqlSessionTemplate, which is equivalent to sqlSession in mybatis before
    private SqlSessionTemplate sqlSessionTemplate;

    //set method for easy injection into the spring configuration file
    public void setSqlSessionTemplate(SqlSessionTemplate sqlSessionTemplate) {
        this.sqlSessionTemplate = sqlSessionTemplate;
    }

    public List<User> getUsers() {
        //Here the getMapper and method calls are the same as they were in mybatis before
        UserMapper mapper = sqlSessionTemplate.getMapper(UserMapper.class);
        return mapper.getUsers();
    }
}
- Create a new spring's total configuration file applicationContext.xml in the resources directory
- Spring configuration file spring-dao.xml created before it was imported
- The implementation class object in which the interface is registered
applicationContext.xml
<?xml version="1.0" encoding="UTF-8"?>
<beans xmlns="http://www.springframework.org/schema/beans"
       xmlns:xsi="http://www.w3.org/2001/XMLSchema-instance" xmlns:context="http://www.springframework.org/schema/context"
       xsi:schemaLocation="http://www.springframework.org/schema/beans
       https://www.springframework.org/schema/beans/spring-beans.xsd">

    <!--Created before importing spring-dao.xml-->
    <import resource="spring-dao.xml"/>

    <!--Implementation Class for Register Interface -->
    <bean id="userMapperImpl" class="com.carson.mapper.UserMapperImpl">
        <property name="sqlSessionTemplate" ref="sqlSessionTemplate"/>
    </bean>

</beans>
- test
public class MyTest2 {
    public static void main(String[] args) {
        //Read the total spring configuration file and create context objects
        ApplicationContext context = new ClassPathXmlApplicationContext("applicationContext.xml");
        //getBean() to get the object of the interface's implementation class
        UserMapperImpl userMapperImpl = context.getBean("userMapperImpl", UserMapperImpl.class);
        //Call methods that implement class objects
        List<User> users = userMapperImpl.getUsers();
        //Print Output
        for(User user:users){
            System.out.println(user);
        }
    }
}

Integrating mybatis approach two
Note:
- Mode two obtains the sqlSession object by inheriting the SqlSessionDaoSupport class and calling its getSqlSession() method.
- Therefore, the configuration of sqlSessionTemplate can be omitted from the spring-dao.xml configuration file!
- Entity classes that write tests in the pojo directory.
User.java
public class User {
    private int id;
    private String name;
    private String pwd;

    public int getId() {
        return id;
    }

    public void setId(int id) {
        this.id = id;
    }

    public String getName() {
        return name;
    }

    public void setName(String name) {
        this.name = name;
    }

    public String getPwd() {
        return pwd;
    }

    public void setPwd(String pwd) {
        this.pwd = pwd;
    }

    @Override
    public String toString() {
        return "User{" +
                "id=" + id +
                ", name='" + name + '\'' +
                ", pwd='" + pwd + '\'' +
                '}';
    }
}
- Write interface files in mapper directory
usermapper.java
public interface UserMapper {
    public List<User> getUsers();

}
- Write Mapper.xml for the interface in the mapper directory (one XML file for each interface in mybatis)
UserMapper.xml
<?xml version="1.0" encoding="UTF-8" ?>
<!DOCTYPE mapper
        PUBLIC "-//mybatis.org//DTD Mapper 3.0//EN"
        "http://mybatis.org/dtd/mybatis-3-mapper.dtd">

<!--namespace Full path to corresponding interface file-->
<mapper namespace="com.carson.mapper.UserMapper">
    <select id="getUsers" resultType="user">
        select * from user;
    </select>
</mapper>
- Write the mybatis core configuration file in the resources directory.
mybatis-config.xml
<?xml version="1.0" encoding="UTF-8" ?>
<!DOCTYPE configuration
        PUBLIC "-//mybatis.org//DTD Config 3.0//EN"
        "http://mybatis.org/dtd/mybatis-3-config.dtd">

<!--Because spring Related can be done in the configuration file mybatis Set up,So original mybatis Core Profiles Keep Only Partial Settings-->
	<!--Generally in mybatis The configuration file leaves only two configurations: That is, alias management and setup items-->

<!--configuration Tags are core profiles-->
<configuration>

    <!--1.Alias Management: Setting aliases by scanning packages-->
    <typeAliases>
        <!--name Property corresponds to the location of the package-->
        <package name="com.carson.pojo"/>
    </typeAliases>

    <!--2.settings Labels are right mybatis Related Settings-->
    <!--<settings>
        <setting name="" value=""/>
    </settings>-->

</configuration>
- Create the spring configuration file spring-dao.xml in the resources directory
The following configurations are made in spring-dao.xml:
Note: Mode 2 does not configure sqlSessionTemplate objects in the configuration file anymore!
-
Data Source Configuration
-
sqlSessionFactory
spring-dao.xml
<?xml version="1.0" encoding="UTF-8"?>
<beans xmlns="http://www.springframework.org/schema/beans"
xmlns:xsi="http://www.w3.org/2001/XMLSchema-instance" xmlns:context="http://www.springframework.org/schema/context"
xsi:schemaLocation="http://www.springframework.org/schema/beans
https://www.springframework.org/schema/beans/spring-beans.xsd">
<!--1 DataSource:Use spring-jdbc Dependent on supplied data source class substitution Mybatis Original Data Source Class-->
<bean id="dataSource" class="org.springframework.jdbc.datasource.DriverManagerDataSource">
<!--Attribute values of related parameters injected into the class to connect to the database-->
<property name="driverClassName" value="com.mysql.cj.jdbc.Driver"/>
<property name="url" value="jdbc:mysql://localhost:3306/mybatis?serverTimezone=UTC&useUnicode=true&characterEncoding=utf-8&useSSL=true"/>
<property name="username" value="root"/>
<property name="password" value="root"/>
</bean>
<!--2.sqlSessionFactory-->
<bean id="sqlSessionFactory" class="org.mybatis.spring.SqlSessionFactoryBean">
<!--injection dataSource Attribute Value-->
<property name="dataSource" ref="dataSource"/>
<!--binding Mybatis Configuration files can also be used unbound property Label to replace mybatis Configuration in Configuration File
If bound mybatis Profile,that mybatis Configuration Files and spring The configuration files are connected-->
<!--notes: Labeled below value Fixed form of value: classpath:File path.(If the file is located in the resource directory,Write the file name directly)-->
<property name="configLocation" value="classpath:mybatis-config.xml"/>
<!--Because of each Mapper.xml Need to be in mybatis Register in Core Profile,The following is equivalent to registering each Mapper.xml-->
<!-- Be careful:classpath:Use the following file path/Split-->
<property name="mapperLocations" value="classpath:com/carson/mapper/*.xml"/>
</bean>
</beans>
- The corresponding implementation class UserMapperImpl2.java needs to be added to the corresponding interface
UserMapperImpl2.java
//Now write an additional interface implementation class
//Mode 2 needs to inherit the SqlSessionDaoSupport class
public class UserMapperImpl2 extends SqlSessionDaoSupport implements UserMapper{
    public List<User> getUsers() {
        //Get sqlSession object from getSqlSession() in SqlSessionDaoSupport class
        return getSqlSession().getMapper(UserMapper.class).getUsers();
    }
}
- Create a new spring's total configuration file applicationContext.xml in the resources directory
- Spring configuration file spring-dao.xml created before it was imported
- The implementation class object in which the interface is registered
applicationContext.xml
<?xml version="1.0" encoding="UTF-8"?>
<beans xmlns="http://www.springframework.org/schema/beans"
       xmlns:xsi="http://www.w3.org/2001/XMLSchema-instance" xmlns:context="http://www.springframework.org/schema/context"
       xsi:schemaLocation="http://www.springframework.org/schema/beans
       https://www.springframework.org/schema/beans/spring-beans.xsd">

    <!--Created before importing spring-dao.xml-->
    <import resource="spring-dao.xml"/>

    <!--Implementation Class for Register Interface -->
    <bean id="userMapperImpl2" class="com.carson.mapper.UserMapperImpl2">
        <!--injection sqlSessionFactory-->
        <property name="sqlSessionFactory" ref="sqlSessionFactory"/>
    </bean>

</beans>
- test
public class MyTest3 {
    public static void main(String[] args) {
        //Read the total spring configuration file and create context objects
        ApplicationContext context = new ClassPathXmlApplicationContext("applicationContext.xml");
        //getBean() to get the object of the interface's implementation class
        UserMapper userMapper = context.getBean("userMapperImpl2", UserMapper.class);
        //Call methods that implement class objects
        List<User> users = userMapper.getUsers();
        //Print Output
        for(User user:users){
            System.out.println(user);
        }
    }
}
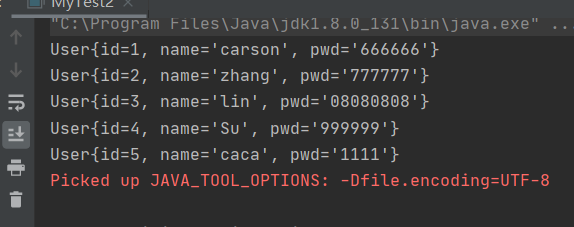
13. Declarative Transactions
Why do I need to configure transaction management?
- If you do not configure transactions, there may be inconsistent data submissions!
- If you do not configure declarative transactions in Spring, you need to manually configure transaction management in the original code.
- Transactions are very important in the development of projects, involving the consistency and integrity of data and other issues!
Transaction management in spring:
- Declarative transactions (focus): Transactions are combined with the application of AOP and are managed by the Spring container.
- Usually better than programmatic transactions.
- Separate transaction management code from business methods to implement transaction management declaratively.
- Transaction management is a cross-cutting focus and modularized through the aop method. Declarative transaction management is supported in Spring through the Spring AOP framework.
- Programmatic transactions: Transactions need to be managed manually in the original Java code.
- Embedding transaction management code into business methods to control transaction submission and rollback
- Disadvantages: Additional transaction management code must be included in each transaction operation business logic
Dependencies and related configurations that need to be imported in pom.xml due to the need to operate the database are as follows:
pom.xml
<?xml version="1.0" encoding="UTF-8"?>
<project xmlns="http://maven.apache.org/POM/4.0.0"
         xmlns:xsi="http://www.w3.org/2001/XMLSchema-instance"
         xsi:schemaLocation="http://maven.apache.org/POM/4.0.0 http://maven.apache.org/xsd/maven-4.0.0.xsd">
    <parent>
        <artifactId>Spring-study</artifactId>
        <groupId>org.example</groupId>
        <version>1.0-SNAPSHOT</version>
    </parent>
    <modelVersion>4.0.0</modelVersion>

    <artifactId>Spring-11-transaction</artifactId>

    <!--Import Dependencies-->
    <dependencies>
        <dependency>
            <groupId>junit</groupId>
            <artifactId>junit</artifactId>
            <version>4.12</version>
        </dependency>
        <!--mysql rely on-->
        <dependency>
            <groupId>mysql</groupId>
            <artifactId>mysql-connector-java</artifactId>
            <version>8.0.19</version>
        </dependency>
        <!--mybatis rely on-->
        <dependency>
            <groupId>org.mybatis</groupId>
            <artifactId>mybatis</artifactId>
            <version>3.5.6</version>
        </dependency>
        <!--Import spring-->
        <dependency>
            <groupId>org.springframework</groupId>
            <artifactId>spring-webmvc</artifactId>
            <version>5.2.0.RELEASE</version>
        </dependency>
        <!--Spring Operating the database,One more is needed spring-jdbc Dependency on-->
        <dependency>
            <groupId>org.springframework</groupId>
            <artifactId>spring-jdbc</artifactId>
            <version>5.2.0.RELEASE</version>
        </dependency>
        <!--Spring AOP Woven bag of-->
        <dependency>
            <groupId>org.aspectj</groupId>
            <artifactId>aspectjweaver</artifactId>
            <version>1.9.6</version>
        </dependency>
        <!--mybatis and spring Integrated Package-->
        <dependency>
            <groupId>org.mybatis</groupId>
            <artifactId>mybatis-spring</artifactId>
            <version>2.0.6</version>
        </dependency>
    </dependencies>

    <!--Resolve resources not in place resources Resource export failure caused by directory-->
    <build>
        <resources>
            <resource>
                <directory>src/main/resources</directory>
                <includes>
                    <include>**/*.properties</include>
                    <include>**/*.xml</include>
                </includes>
                <filtering>true</filtering>
            </resource>
            <resource>
                <directory>src/main/java</directory>
                <includes>
                    <include>**/*.properties</include>
                    <include>**/*.xml</include>
                </includes>
                <filtering>true</filtering>
            </resource>
        </resources>
    </build>
</project>
No Transaction Management Application Example
Example steps:
- Entity classes that write tests in the pojo directory.
User.java
public class User {
    private int id;
    private String name;
    private String pwd;

    public User() {
    }

    public User(int id, String name, String pwd) {
        this.id = id;
        this.name = name;
        this.pwd = pwd;
    }

    public int getId() {
        return id;
    }

    public void setId(int id) {
        this.id = id;
    }

    public String getName() {
        return name;
    }

    public void setName(String name) {
        this.name = name;
    }

    public String getPwd() {
        return pwd;
    }

    public void setPwd(String pwd) {
        this.pwd = pwd;
    }

    @Override
    public String toString() {
        return "User{" +
                "id=" + id +
                ", name='" + name + '\'' +
                ", pwd='" + pwd + '\'' +
                '}';
    }
}
- Write interface files in mapper directory
Add two new ways to add and remove users!
usermapper.java
public interface UserMapper {
    //query
    public List<User> getUsers();
    //increase
    public int insertUser(User user);
    //Delete (simple data type with @param())
    public int delUser(@Param("id") int id);
}
- Write Mapper.xml for the interface in the mapper directory (one XML file for each interface in mybatis)
mapper file, we deliberately delete the sql statement written wrong, easy to test!
UserMapper.xml
<?xml version="1.0" encoding="UTF-8" ?>
<!DOCTYPE mapper
        PUBLIC "-//mybatis.org//DTD Mapper 3.0//EN"
        "http://mybatis.org/dtd/mybatis-3-mapper.dtd">

<mapper namespace="com.carson.mapper.UserMapper">
    <select id="getUsers" resultType="user">
        select * from user;
    </select>

    <!--id Corresponding Method Name-->
    <insert id="addUser" parameterType="user">
        insert into user values(#{id},#{name},#{pwd});
    </insert>

	<!--Deleted intentionally here sql Statement Writing Error,to delete Add s-->
    <delete id="delUser" parameterType="int">
        deletes from user where id=#{id};
    </delete>

</mapper>
- Write the mybatis core configuration file in the resources directory.
mybatis-config.xml
<?xml version="1.0" encoding="UTF-8" ?>
<!DOCTYPE configuration
        PUBLIC "-//mybatis.org//DTD Config 3.0//EN"
        "http://mybatis.org/dtd/mybatis-3-config.dtd">

<!--Because spring Related can be done in the configuration file mybatis Set up,So original mybatis Core Profiles Keep Only Partial Settings-->
	<!--Generally in mybatis The configuration file leaves only two configurations: That is, alias management and setup items-->

<!--configuration Tags are core profiles-->
<configuration>

    <!--1.Alias Management: Setting aliases by scanning packages-->
    <typeAliases>
        <!--name Property corresponds to the location of the package-->
        <package name="com.carson.pojo"/>
    </typeAliases>

    <!--2.settings Labels are right mybatis Related Settings-->
    <!--<settings>
        <setting name="" value=""/>
    </settings>-->

</configuration>
- Increase transaction management configuration in the spring configuration file spring-dao.xml under the resources directory
Manage transactions with Spring, note constraint import of header file: tx
xmlns:tx="http://www.springframework.org/schema/tx"

http://www.springframework.org/schema/tx
http://www.springframework.org/schema/tx/spring-tx.xsd">
spring-dao.xml
<?xml version="1.0" encoding="UTF-8"?>
<beans xmlns="http://www.springframework.org/schema/beans"
xmlns:xsi="http://www.w3.org/2001/XMLSchema-instance"
xmlns:tx="http://www.springframework.org/schema/tx" xmlns:aop="http://www.springframework.org/schema/aop"
xsi:schemaLocation="http://www.springframework.org/schema/beans
https://www.springframework.org/schema/beans/spring-beans.xsd http://www.springframework.org/schema/aop https://www.springframework.org/schema/aop/spring-aop.xsd
http://www.springframework.org/schema/tx https://www.springframework.org/schema/tx/spring-tx.xsd
">
<!--DataSource:Use spring-jdbc Dependent on supplied data source class substitution Mybatis Original Data Source Class-->
<bean id="dataSource" class="org.springframework.jdbc.datasource.DriverManagerDataSource">
<!--Attribute values of related parameters injected into the class to connect to the database-->
<property name="driverClassName" value="com.mysql.cj.jdbc.Driver"/>
<property name="url" value="jdbc:mysql://localhost:3306/mybatis?serverTimezone=UTC&useUnicode=true&characterEncoding=utf-8&useSSL=true"/>
<property name="username" value="root"/>
<property name="password" value="root"/>
</bean>
<!--sqlSessionFactory-->
<bean id="sqlSessionFactory" class="org.mybatis.spring.SqlSessionFactoryBean">
<!--injection dataSource Attribute Value-->
<property name="dataSource" ref="dataSource"/>
<!--binding Mybatis Configuration files can also be used unbound property Label to replace mybatis Configuration in Configuration File
If bound mybatis Profile,that mybatis Configuration Files and spring The configuration files are connected-->
<!--notes: Labeled below value Fixed form of value: classpath:File path.(If the file is located in the resource directory,Write the file name directly)(And classpath:There must be no spaces between and the file path,Otherwise, errors will occur)-->
<property name="configLocation" value="classpath:mybatis-config.xml"/>
<!--Because of each Mapper.xml Need to be in mybatis Register in Core Profile,The following is equivalent to registering each Mapper.xml-->
<!-- Be careful:classpath:Use the following file path/Split-->
<property name="mapperLocations" value="classpath:com/carson/mapper/*.xml"/>
</bean>
<!--There SqlSessionTemplate:Just before us mybatis Used in sqlSession-->
<bean id="sqlSessionTemplate" class="org.mybatis.spring.SqlSessionTemplate">
<!--Injection can only be done using a parametric constructor sqlSessionFactory,because SqlSessionTemplate Not in set Method-->
<constructor-arg index="0" ref="sqlSessionFactory"/>
</bean>
</beans>
- The corresponding implementation class UserMapperImpl.java needs to be added to the corresponding interface
Add the related methods of adding and deleting Users in the middle of the query User method. This example adds user 9 and deletes user 5!
UserMapperImpl.java
//Now write an additional interface implementation class
public class UserMapperImpl extends SqlSessionDaoSupport implements UserMapper{

    public List<User> getUsers() {
        UserMapper mapper = getSqlSession().getMapper(UserMapper.class);

        //Add test code (add methods to add and remove Users to the query User)
        User user = new User(9, "Increased King", "1212112");
        addUser(user);//Add a user
        delUser(5);//Delete User 5

        return mapper.getUsers();//Return information

    }

    public int addUser(User user) {
        return getSqlSession().getMapper(UserMapper.class).addUser(user);

    }

    public int delUser(int id) {
        return getSqlSession().getMapper(UserMapper.class).delUser(id);
    }
}
- Create a new spring's total configuration file applicationContext.xml in the resources directory
applicationContext.xml
<?xml version="1.0" encoding="UTF-8"?>
<beans xmlns="http://www.springframework.org/schema/beans"
       xmlns:xsi="http://www.w3.org/2001/XMLSchema-instance" xmlns:context="http://www.springframework.org/schema/context"
       xsi:schemaLocation="http://www.springframework.org/schema/beans
       https://www.springframework.org/schema/beans/spring-beans.xsd">

    <!--Import spring-dao.xml-->
    <import resource="spring-dao.xml"/>

    <!--Implementation Class for Register Interface -->
    <bean id="userMapperImpl" class="com.carson.mapper.UserMapperImpl">
        <!--injection sqlSessionFactory-->
        <property name="sqlSessionFactory" ref="sqlSessionFactory"/>
    </bean>
</beans>
- test
public class MyTest {
    public static void main(String[] args) {
        ApplicationContext context = new ClassPathXmlApplicationContext("applicationContext.xml");
        UserMapper userMapper = context.getBean("userMapperImpl", UserMapper.class);

        List<User> users = userMapper.getUsers();
        for(User user:users){
            System.out.println(user);
        }
    }
Result:
Unexpected error because delete statement writes more than one s:

Because the insertion user method is first, although deletion user error, user 9 successfully inserts!
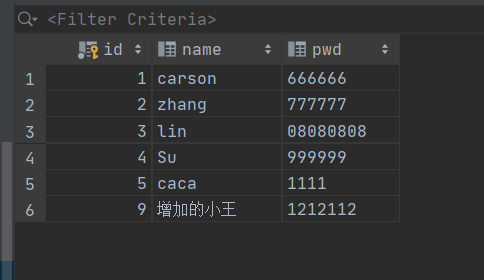
Although the error was reported, user 9 was successfully inserted, which affects the consistency and integrity of the data!
To do this, we need to introduce transaction management to meet the atomic requirements of transactions! Either the execution succeeds or the rollback fails!
Spring gives us transaction management, we just need to configure it!
Example declarative transaction application
Delete the previous 9 users and prepare for testing again.
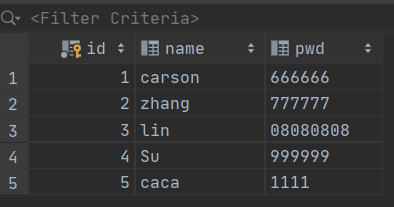
Example steps:
- Entity classes that write tests in the pojo directory.
User.java
public class User {
    private int id;
    private String name;
    private String pwd;

    public User() {
    }

    public User(int id, String name, String pwd) {
        this.id = id;
        this.name = name;
        this.pwd = pwd;
    }

    public int getId() {
        return id;
    }

    public void setId(int id) {
        this.id = id;
    }

    public String getName() {
        return name;
    }

    public void setName(String name) {
        this.name = name;
    }

    public String getPwd() {
        return pwd;
    }

    public void setPwd(String pwd) {
        this.pwd = pwd;
    }

    @Override
    public String toString() {
        return "User{" +
                "id=" + id +
                ", name='" + name + '\'' +
                ", pwd='" + pwd + '\'' +
                '}';
    }
}
- Write interface files in mapper directory
Again, add two new ways to add and remove users!
usermapper.java
public interface UserMapper {
    //query
    public List<User> getUsers();
    //increase
    public int insertUser(User user);
    //Delete (simple data type with @param())
    public int delUser(@Param("id") int id);
}
- Write Mapper.xml for the interface in the mapper directory (one XML file for each interface in mybatis)
mapper file, here we deliberately delete sql statement delete written wrong, easy to test!
UserMapper.xml
<?xml version="1.0" encoding="UTF-8" ?>
<!DOCTYPE mapper
        PUBLIC "-//mybatis.org//DTD Mapper 3.0//EN"
        "http://mybatis.org/dtd/mybatis-3-mapper.dtd">

<mapper namespace="com.carson.mapper.UserMapper">
    <select id="getUsers" resultType="user">
        select * from user;
    </select>

    <!--id Corresponding Method Name-->
    <insert id="addUser" parameterType="user">
        insert into user values(#{id},#{name},#{pwd});
    </insert>

    <!--Here intentionally will delete Statement Writing Error,Add one more s-->
    <delete id="delUser" parameterType="int">
        deletes from user where id=#{id};
    </delete>

</mapper>
- Write the mybatis core configuration file in the resources directory.
mybatis-config.xml
<?xml version="1.0" encoding="UTF-8" ?>
<!DOCTYPE configuration
        PUBLIC "-//mybatis.org//DTD Config 3.0//EN"
        "http://mybatis.org/dtd/mybatis-3-config.dtd">

<!--Because spring Related can be done in the configuration file mybatis Set up,So original mybatis Core Profiles Keep Only Partial Settings-->
	<!--Generally in mybatis The configuration file leaves only two configurations: That is, alias management and setup items-->

<!--configuration Tags are core profiles-->
<configuration>

    <!--1.Alias Management: Setting aliases by scanning packages-->
    <typeAliases>
        <!--name Property corresponds to the location of the package-->
        <package name="com.carson.pojo"/>
    </typeAliases>

    <!--2.settings Labels are right mybatis Related Settings-->
    <!--<settings>
        <setting name="" value=""/>
    </settings>-->

</configuration>
- Increase transaction management configuration in the spring configuration file spring-dao.xml under the resources directory
Manage transactions with Spring, note constraint import of header file: tx
xmlns:tx="http://www.springframework.org/schema/tx"

http://www.springframework.org/schema/tx
http://www.springframework.org/schema/tx/spring-tx.xsd">
spring-dao.xml
More configuration related to transaction management than before.
<?xml version="1.0" encoding="UTF-8"?>
<beans xmlns="http://www.springframework.org/schema/beans"
xmlns:xsi="http://www.w3.org/2001/XMLSchema-instance"
xmlns:tx="http://www.springframework.org/schema/tx" xmlns:aop="http://www.springframework.org/schema/aop"
xsi:schemaLocation="http://www.springframework.org/schema/beans
https://www.springframework.org/schema/beans/spring-beans.xsd http://www.springframework.org/schema/aop https://www.springframework.org/schema/aop/spring-aop.xsd
http://www.springframework.org/schema/tx https://www.springframework.org/schema/tx/spring-tx.xsd
">
<!--DataSource:Use spring-jdbc Dependent on supplied data source class substitution Mybatis Original Data Source Class-->
<bean id="dataSource" class="org.springframework.jdbc.datasource.DriverManagerDataSource">
<!--Attribute values of related parameters injected into the class to connect to the database-->
<property name="driverClassName" value="com.mysql.cj.jdbc.Driver"/>
<property name="url" value="jdbc:mysql://localhost:3306/mybatis?serverTimezone=UTC&useUnicode=true&characterEncoding=utf-8&useSSL=true"/>
<property name="username" value="root"/>
<property name="password" value="root"/>
</bean>
<!--sqlSessionFactory-->
<bean id="sqlSessionFactory" class="org.mybatis.spring.SqlSessionFactoryBean">
<!--injection dataSource Attribute Value-->
<property name="dataSource" ref="dataSource"/>
<!--binding Mybatis Configuration files can also be used unbound property Label to replace mybatis Configuration in Configuration File
If bound mybatis Profile,that mybatis Configuration Files and spring The configuration files are connected-->
<!--notes: Labeled below value Fixed form of value: classpath:File path.(If the file is located in the resource directory,Write the file name directly)(And classpath:There must be no spaces between and the file path,Otherwise, errors will occur)-->
<property name="configLocation" value="classpath:mybatis-config.xml"/>
<!--Because of each Mapper.xml Need to be in mybatis Register in Core Profile,The following is equivalent to registering each Mapper.xml-->
<!-- Be careful:classpath:Use the following file path/Split-->
<property name="mapperLocations" value="classpath:com/carson/mapper/*.xml"/>
</bean>
<!--There SqlSessionTemplate:Just before us mybatis Used in sqlSession-->
<bean id="sqlSessionTemplate" class="org.mybatis.spring.SqlSessionTemplate">
<!--Injection can only be done using a parametric constructor sqlSessionFactory,because SqlSessionTemplate Not in set Method-->
<constructor-arg index="0" ref="sqlSessionFactory"/>
</bean>
<!--Configure declarative transactions-->
<bean id="transactionManager" class="org.springframework.jdbc.datasource.DataSourceTransactionManager">
<!--injection dataSource Data Source Object,Can be injected through a parametric constructor,Or set Method Injection-->
<!--<constructor-arg ref="dataSource"/>-->
<property name="dataSource" ref="dataSource"/>
</bean>
<!--Combination AOP Implement transaction weaving-->
<!--Configure Transaction Notifications-->
<tx:advice id="txAdvice" transaction-manager="transactionManager">
<!--Which methods to configure transactions and configure the propagation characteristics of transactions(Indicates how these methods will use transactions),Normally default REQUIRED,It works in most cases-->
<tx:attributes>
<!--among*For wildcards,Match all methods-->
<tx:method name="query" read-only="true"/>
<tx:method name="*" propagation="REQUIRED"/>
</tx:attributes>
</tx:advice>
<!--AOP To configure:Cut transaction in-->
<aop:config>
<!--1.Set entry point-->
<aop:pointcut id="txPointCut" expression="execution(* com.carson.mapper.*.*(..))"/>
<!--2.To configure Advice(notice)To entry point-->
<aop:advisor advice-ref="txAdvice" pointcut-ref="txPointCut"/>
</aop:config>
</beans>
- The corresponding implementation class UserMapperImpl.java needs to be added to the corresponding interface
Add the related methods of adding and deleting Users in the middle of the query User method, and the example adds user 9 and deletes user 5!
UserMapperImpl.java
//Now write an additional interface implementation class
public class UserMapperImpl extends SqlSessionDaoSupport implements UserMapper{

    public List<User> getUsers() {
        UserMapper mapper = getSqlSession().getMapper(UserMapper.class);

        //Add test code (add methods to add and remove Users to the query User)
        User user = new User(9, "Increased King", "1212112");
        addUser(user);//Add a user
        delUser(5);//Delete User 5

        return mapper.getUsers();//Return information

    }

    public int addUser(User user) {
        return getSqlSession().getMapper(UserMapper.class).addUser(user);

    }

    public int delUser(int id) {
        return getSqlSession().getMapper(UserMapper.class).delUser(id);
    }
}
- Create a new spring's total configuration file applicationContext.xml in the resources directory
applicationContext.xml
<?xml version="1.0" encoding="UTF-8"?>
<beans xmlns="http://www.springframework.org/schema/beans"
       xmlns:xsi="http://www.w3.org/2001/XMLSchema-instance" xmlns:context="http://www.springframework.org/schema/context"
       xsi:schemaLocation="http://www.springframework.org/schema/beans
       https://www.springframework.org/schema/beans/spring-beans.xsd">

    <!--Import spring-dao.xml-->
    <import resource="spring-dao.xml"/>

    <!--Implementation Class for Register Interface -->
    <bean id="userMapperImpl" class="com.carson.mapper.UserMapperImpl">
        <!--injection sqlSessionFactory-->
        <property name="sqlSessionFactory" ref="sqlSessionFactory"/>
    </bean>
</beans>
- test
public class MyTest {
    public static void main(String[] args) {
        ApplicationContext context = new ClassPathXmlApplicationContext("applicationContext.xml");
        UserMapper userMapper = context.getBean("userMapperImpl", UserMapper.class);

        List<User> users = userMapper.getUsers();
        for(User user:users){
            System.out.println(user);
        }
    }
Result:
Unexpected error:

However, we found that due to the addition of transaction management, there was no user 9 added to the data table as before, or it remained the same!
And that's what we want to see when we introduce transaction management through spring!
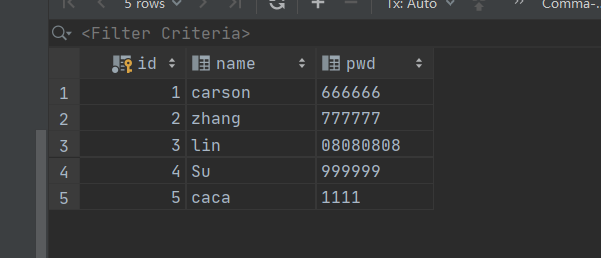
Welcome to the Personal Public Number, reply to "Spring" and get all the complete test code in this article!