1. Preface
Welcome to read Spring Security practical dry goods series,Last article We implemented the JWT tool. In this article, we will discuss how to combine JWT with Spring Security. After the authentication is successful, we will not jump to the specified page but directly return to JWT Token. The * * DEMO of this paper can be obtained by the end of this paper**
2. process
JWT is suitable for front and rear end separation. After successful login, we will not jump to the home page, but will directly return JWT Token pair (JwtTokenPair in DEMO). After login failure, we will return the information related to authentication failure.
3. Implement login success / failure return logic
If you've seen it Spring Security: play with custom login It will be very easy to understand the following.
3.1 AuthenticationSuccessHandler returns JWT Token
The AuthenticationSuccessHandler is used to handle the logic after successful login. We write the implementation and inject it into the Spring IoC container:
     /**
      * The JWT Token pair is returned after the login is processed successfully.
      *
      * @param jwtTokenGenerator the jwt token generator
      * @return the authentication success handler
      */
     @Bean
     public AuthenticationSuccessHandler authenticationSuccessHandler(JwtTokenGenerator jwtTokenGenerator) {
         return (request, response, authentication) -> {
             if (response.isCommitted()) {
                 log.debug("Response has already been committed");
                 return;
             }
             Map<String, Object> map = new HashMap<>(5);
             map.put("time", LocalDateTime.now().format(DateTimeFormatter.ofPattern("yyyy-MM-dd HH:mm:ss")));
             map.put("flag", "success_login");
             User principal = (User) authentication.getPrincipal();

             String username = principal.getUsername();
             Collection<GrantedAuthority> authorities = principal.getAuthorities();
             Set<String> roles = new HashSet<>();
             if (CollectionUtil.isNotEmpty(authorities)) {
                 for (GrantedAuthority authority : authorities) {
                     String roleName = authority.getAuthority();
                     roles.add(roleName);
                 }
             }

             JwtTokenPair jwtTokenPair = jwtTokenGenerator.jwtTokenPair(username, roles, null);

             map.put("access_token", jwtTokenPair.getAccessToken());
             map.put("refresh_token", jwtTokenPair.getRefreshToken());

             ResponseUtil.responseJsonWriter(response, RestBody.okData(map, "Login successfully"));
         };
     }
3.2 AuthenticationFailureHandler returns authentication failure information
AuthenticationFailureHandler processes the logic after authentication failure. The front end performs jump processing logic according to this return. We also implement it and inject it into the Spring IoC container:
    /**
     * The failure login processor processes the logic login failure return information after login failure and jumps based on this.
     *
     * @return the authentication failure handler
     */
    @Bean
    public AuthenticationFailureHandler authenticationFailureHandler() {
        return (request, response, exception) -> {
            if (response.isCommitted()) {
                log.debug("Response has already been committed");
                return;
            }
            Map<String, Object> map = new HashMap<>(2);

            map.put("time", LocalDateTime.now().format(DateTimeFormatter.ofPattern("yyyy-MM-dd HH:mm:ss")));
            map.put("flag", "failure_login");
            ResponseUtil.responseJsonWriter(response, RestBody.build(HttpStatus.UNAUTHORIZED.value(), map, "Authentication failed","-9999"));
        };
    }
4. configuration
Write the two handler beans written above to the login configuration. The related fragments are as follows. For details, see DEMO at the end of the article:
httpSecurity.formLogin().loginProcessingUrl(LOGIN_PROCESSING_URL).successHandler(authenticationSuccessHandler).failureHandler(authenticationFailureHandler)
5. validation
We still pass Spring Security: play with custom login In Chapter 6.4 of this paper, test is used to run. The results are as follows:
5.1 login success results
 {
     "httpStatus": 200,
     "data": {
         "access_token": "eyJhbGciOiJSUzI1NiIsInR5cCI6IkpXVCJ9.eyJzdWIiOiJhbGwiLCJhdWQiOiJGZWxvcmRjbiIsInJvbGVzIjoiW10iLCJpc3MiOiJmZWxvcmQuY24iLCJleHAiOiIyMDE5LTExLTI3IDExOjMxOjMyIiwiaWF0IjoiMjAxOS0xMC0yOCAxMTozMTozMiIsImp0aSI6IjdmYTBlOWFiYjk5OTRjZGRhNGM5NjI4YzExNGM3YTk4In0.PvVsc8w10_0C5UIifJS1S5dEia5PQoVc_6wMfLAZOf574kt-VopHBVEp2zkjC1CNN3ltchy5rx6samaBDQvqWgoeFLXbRgNOa9Qhdf0wMLf-pUqoKRHuhBZV9HsvXSyQCFjZWlIguv4FSPZhbEff6D_8QUXmdWjlF_XEG2BPMr4",
         "refresh_token": "eyJhbGciOiJSUzI1NiIsInR5cCI6IkpXVCJ9.eyJzdWIiOiJhbGwiLCJhdWQiOiJGZWxvcmRjbiIsInJvbGVzIjoiW10iLCJpc3MiOiJmZWxvcmQuY24iLCJleHAiOiIyMDIwLTAxLTI2IDExOjMxOjMyIiwiaWF0IjoiMjAxOS0xMC0yOCAxMTozMTozMiIsImp0aSI6IjdmYTBlOWFiYjk5OTRjZGRhNGM5NjI4YzExNGM3YTk4In0.Caj4AAothdUwZAFl8IjcAZmmXHgTt76z8trVG1sf_WHZucFVcHR8FWjShhITpArsQpmokP6GBTMsCvWDl08fUVZBpOWc1CdPUAIIEdArHCFzO64HXc_DLSyg9v0C-qYfxaTlf0npL5QxpBBr9sJcyzxZF3CnpfZpAxm8WZzXG6o",
         "time": "2019-10-28 11:32:11",
         "flag": "success_login"
     },
     "msg": "Login successfully",
     "identifier": ""
 }
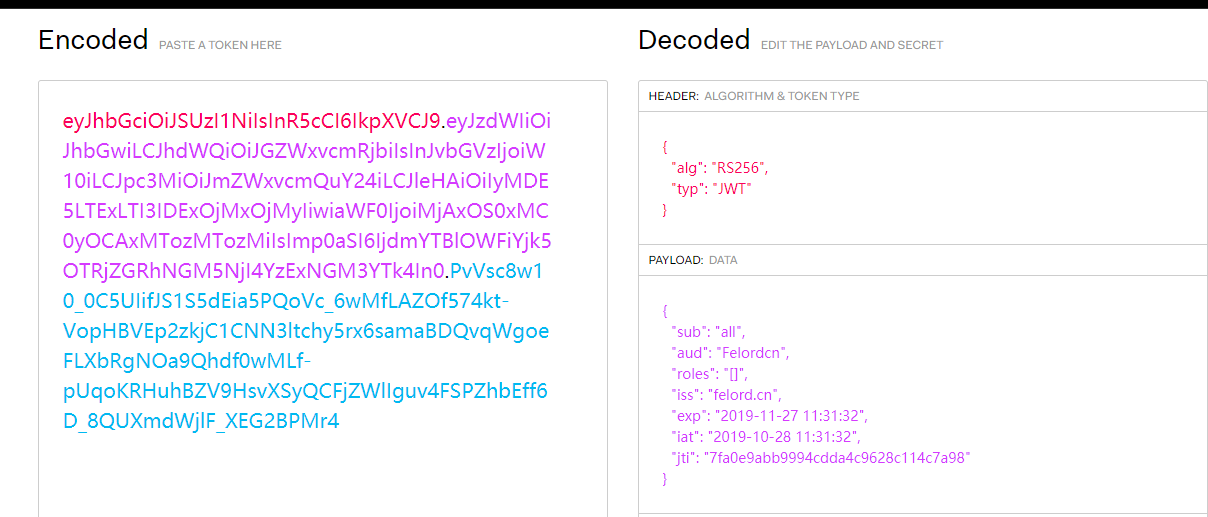
We take access_token and use the decoding function provided by jwt.io on the official website to decode as follows:

5.2 login failure results
 {
     "httpStatus": 401,
     "data": {
         "time": "2019-10-28 12:54:10",
         "flag": "failure_login"
     },
     "msg": "Authentication failed",
     "identifier": "-9999"
 }
6. summary
Today, we associate JWT with Spring Security, and return JWT Token after successful login. This is just the beginning. In the next article, we will introduce how to use JWT Token on the client side and how to verify JWT Token on the server side. Please pay attention.
The DEMO related to the article can be obtained by paying attention to the public number: ferrodcn and replying to ss06.
Pay attention to the public account: ferrodcn for more information