1. Content of this article [submission at the end of the document]
This article mainly introduces the integration of mybatis and spring. For those unfamiliar with mybatis, it is recommended to take a look first MyBatis Master Series
At present, we use more annotation methods, so we mainly introduce annotation methods, and xml methods are not introduced here for the time being.
There are two main ways to integrate spring with mybatis:
1. Method 1: the mapper xml file is placed in the resource directory and is not in the same directory as the Mapper interface
2. Mode 2: mapper xml file and Mapper interface are in the same directory
Another point will be introduced: how to configure multiple databases?
2. Case code
git Address:
https://gitee.com/javacode2018/spring-series

mode1Source code: spring-series\lesson-005-mybatis
mode2Source code: spring-series\lesson-006-mybatis
3. Prepare db script
/*Create database javacode2018*/
DROP DATABASE IF EXISTS `javacode2018`;
CREATE DATABASE `javacode2018`;
USE `javacode2018`;

/*Create table structure*/
DROP TABLE IF EXISTS `t_user`;
CREATE TABLE t_user (
  id BIGINT AUTO_INCREMENT PRIMARY KEY COMMENT 'Primary key, user id,Automatic growth',
  `name` VARCHAR(32) NOT NULL DEFAULT '' COMMENT 'full name'
) COMMENT 'User table';

SELECT * FROM t_user;
Let's insert and query the above table through mybatis.
4. Mode 1
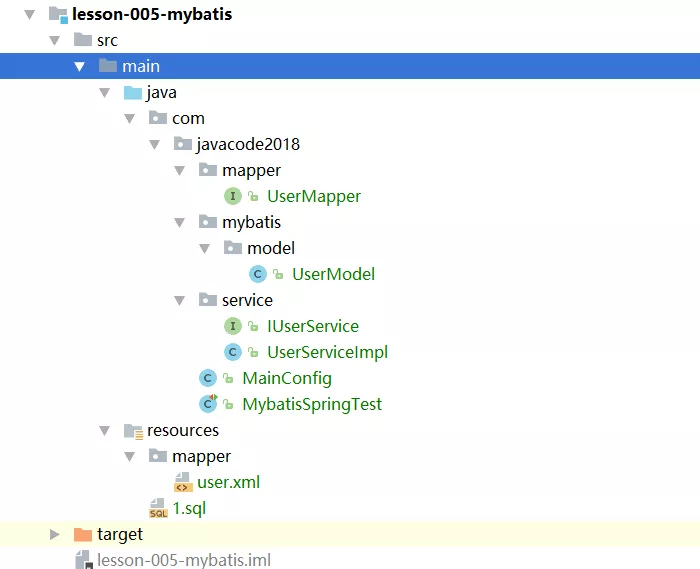
4.1 project structure
In this way, the Mapper interface and the mapper xml file are placed in different locations, and the mapper xml file is placed in the resource/mapper directory, as shown in the following figure
4.2,UserModel
package com.javacode2018.mybatis.model;

import lombok.*;

/**
 * The official account: Java, a former passerby, worked for 10 years before Ali P7 shared Java, algorithm and database technology dry cargo.
 * <a href="http://www.itsoku.com">Personal blog</a>
 */
@Getter
@Setter
@Builder
@NoArgsConstructor
@AllArgsConstructor
@ToString
public class UserModel {
    private Long id;
    private String name;
}
4.3,UserMapper
This is the Mapper interface. You need to add * * @ Mapper annotation * * on the class to mark that this is a Mapper interface
package com.javacode2018.mapper;

import com.javacode2018.mybatis.model.UserModel;
import org.apache.ibatis.annotations.Mapper;

import java.util.List;

/**
 * The official account: Java, a former passerby, worked for 10 years before Ali P7 shared Java, algorithm and database technology dry cargo.
 * <a href="http://www.itsoku.com">Personal blog</a>
 */
@Mapper
public interface UserMapper {
    void insert(UserModel userModel);
    List<UserModel> getList();
}
4.4,UserMapper.xml
Add the UserMapper.xml file in spring series \ lesson-005-mybatis \ SRC \ main \ resources \ mapper. You can name this file at will, not necessarily UserMapper. You can see the project structure diagram above for the specific location
<?xml version="1.0" encoding="UTF-8" ?>
<!DOCTYPE mapper PUBLIC "-//mybatis.org//DTD Mapper 3.0//EN"
        "http://mybatis.org/dtd/mybatis-3-mapper.dtd">
<mapper namespace="com.javacode2018.mapper.UserMapper">

    <insert id="insert" parameterType="com.javacode2018.mybatis.model.UserModel" keyProperty="id" useGeneratedKeys="true">
        <CDATA[ INSERT INTO `t_user` (name) VALUES (#{name})]]>
    </insert>

    <select id="getList" resultType="com.javacode2018.mybatis.model.UserModel">
        <CDATA[
        SELECT id,name FROM t_user
        ]]>
    </select>

</mapper>
4.5,IUserService
package com.javacode2018.service;

import com.javacode2018.mybatis.model.UserModel;

import java.util.List;

/**
 * The official account: Java, a former passerby, worked for 10 years before Ali P7 shared Java, algorithm and database technology dry cargo.
 * <a href="http://www.itsoku.com">Personal blog</a>
 */
public interface IUserService {
    /**
     * Insert user information
     *
     * @param userModel
     * @return
     */
    UserModel insert(UserModel userModel);

    /**
     * Query all user records
     *
     * @return
     */
    List<UserModel> getList();
}
4.6,UserServiceImpl
The IUserService implementation class injects usermapper internally through @ Autowired and accesses the database through usermapper. Usermapper is actually a proxy object created by mybatis.
package com.javacode2018.service;

import com.javacode2018.mapper.UserMapper;
import com.javacode2018.mybatis.model.UserModel;
import org.springframework.beans.factory.annotation.Autowired;
import org.springframework.stereotype.Service;
import org.springframework.transaction.annotation.Propagation;
import org.springframework.transaction.annotation.Transactional;

import java.util.List;

/**
 * The official account: Java, a former passerby, worked for 10 years before Ali P7 shared Java, algorithm and database technology dry cargo.
 * <a href="http://www.itsoku.com">Personal blog</a>
 */
@Service
public class UserServiceImpl implements IUserService {
    @Autowired
    private UserMapper userMapper;

    @Transactional(rollbackFor = Exception.class)
    @Override
    public UserModel insert(UserModel userModel) {
        userMapper.insert(userModel);
        return userModel;
    }

    @Transactional(propagation = Propagation.SUPPORTS, readOnly = true)
    @Override
    public List<UserModel> getList() {
        return userMapper.getList();
    }
}
4.7 spring configuration class MainConfig
package com.javacode2018;

import com.javacode2018.mapper.UserMapper;
import org.apache.ibatis.annotations.Mapper;
import org.mybatis.spring.SqlSessionFactoryBean;
import org.mybatis.spring.annotation.MapperScan;
import org.springframework.beans.factory.annotation.Qualifier;
import org.springframework.context.annotation.Bean;
import org.springframework.context.annotation.ComponentScan;
import org.springframework.context.annotation.Configuration;
import org.springframework.core.io.Resource;
import org.springframework.core.io.support.PathMatchingResourcePatternResolver;
import org.springframework.jdbc.datasource.DataSourceTransactionManager;
import org.springframework.transaction.PlatformTransactionManager;
import org.springframework.transaction.TransactionManager;
import org.springframework.transaction.annotation.EnableTransactionManagement;

import javax.sql.DataSource;
import java.io.IOException;

/**
 * The official account: Java, a former passerby, worked for 10 years before Ali P7 shared Java, algorithm and database technology dry cargo.
 * <a href="http://www.itsoku.com">Personal blog</a>
 */
@EnableTransactionManagement //Turn on transaction support
@ComponentScan
@Configuration
// @ MapperScan annotation is the key. Mapper interfaces marked with @ mapper annotation will be scanned and registered in the spring container
@MapperScan(basePackageClasses = {UserMapper.class}, annotationClass = Mapper.class)
public class MainConfig {
    //Define data source
    @Bean
    public DataSource dataSource() {
        org.apache.tomcat.jdbc.pool.DataSource dataSource = new org.apache.tomcat.jdbc.pool.DataSource();
        dataSource.setDriverClassName("com.mysql.jdbc.Driver");
        dataSource.setUrl("jdbc:mysql://localhost:3306/javacode2018?characterEncoding=UTF-8");
        dataSource.setUsername("root");
        dataSource.setPassword("root123");
        dataSource.setInitialSize(5);
        return dataSource;
    }

    //Define transaction manager
    @Bean
    public TransactionManager transactionManager(DataSource dataSource) {
        return new DataSourceTransactionManager(dataSource);
    }

    //Defines a SqlSessionFactoryBean to create a SqlSessionFactory
    @Bean
    public SqlSessionFactoryBean sqlSessionFactoryBean(DataSource dataSource) throws IOException {
        SqlSessionFactoryBean sqlSessionFactoryBean = new SqlSessionFactoryBean();
        sqlSessionFactoryBean.setDataSource(dataSource);
        //Get all mapper.xml files
        Resource[] resources = new PathMatchingResourcePatternResolver().getResources("classpath*:mapper/**/*.xml");
        sqlSessionFactoryBean.setMapperLocations(resources);
        return sqlSessionFactoryBean;
    }
}
There are 2 key information in this class:
1. @ MapperScan annotation: this annotation is the key. It will scan the Mapper interface class marked with @ Mapper annotation, then generate a proxy object for the Mapper interface and register it in the spring container. This annotation has several properties to note
- value or basePackages: an array of type String, which is used to specify the scanned packages
- Basepackageclass: you can specify a class, and the scanning range is the package in which the class is located and all its sub packages
- sqlSessionFactoryRef: used to specify the bean name of sqlsessionfactory. When multiple libraries need to be operated in our system, each library corresponds to a sqlsessionfactory. At this time, this attribute can be used to specify which sqlsessionfactory needs to be used.
2. Define SqlSessionFactoryBean: as you can see from the name, this is used to generate SqlSessionFactory. Internally, you need to specify the data source and the location of the local mapper xml. We put the mapper xml file in the resource / mapper file. Here, we use the wildcard method to load all xml files in the mapper directory and subdirectory in the classpath
Resource[] resources = new PathMatchingResourcePatternResolver().getResources("classpath*:mapper/**/*.xml");
sqlSessionFactoryBean.setMapperLocations(resources);
4.8 test effect
Let's have a test class
package com.javacode2018;

import com.javacode2018.mybatis.model.UserModel;
import com.javacode2018.service.IUserService;
import org.junit.Test;
import org.springframework.context.annotation.AnnotationConfigApplicationContext;

import java.util.List;

/**
 * The official account: Java, a former passerby, worked for 10 years before Ali P7 shared Java, algorithm and database technology dry cargo.
 * <a href="http://www.itsoku.com">Personal blog</a>
 */
public class MybatisSpringTest {
    @Test
    public void insert() {
        AnnotationConfigApplicationContext context = new AnnotationConfigApplicationContext(MainConfig.class);
        IUserService userService = context.getBean(IUserService.class);
        UserModel userModel = UserModel.builder().name("Zhang San").build();
        userService.insert(userModel);
        System.out.println(userModel);
    }

    @Test
    public void getList() {
        AnnotationConfigApplicationContext context = new AnnotationConfigApplicationContext(MainConfig.class);
        IUserService userService = context.getBean(IUserService.class);
        List<UserModel> userModelList = userService.getList();
        System.out.println(userModelList);
    }
}
The insert method is used to insert data and execute output
UserModel(id=1, name=Zhang San)
The getList method is used to query all data in the table and run the output
[UserModel(id=1, name=Zhang San)]
4.8 summary: review steps
It is mainly divided into four steps
1. Add @ Mapper annotation on Mapper interface
@Mapper
public interface UserMapper
2. Define the mapper xml file. For example, put the user.xml file in the spring series \ less-005-mybatis \ SRC \ main \ resources \ mapper directory
3. Add the @ MapperScan annotation to the spring configuration class to scan the @ Mapper annotated class and register it in the spring container
@MapperScan(basePackageClasses = {UserMapper.class}, annotationClass = Mapper.class)
4. Define SqlSessionFactoryBean
@Bean
public SqlSessionFactoryBean sqlSessionFactoryBean(DataSource dataSource) throws IOException {
    SqlSessionFactoryBean sqlSessionFactoryBean = new SqlSessionFactoryBean();
    //specify data source
    sqlSessionFactoryBean.setDataSource(dataSource);
    //Get all mapper.xml files
    Resource[] resources = new PathMatchingResourcePatternResolver().getResources("classpath*:mapper/**/*.xml");
    //Set the location of the mapper
    sqlSessionFactoryBean.setMapperLocations(resources);
    return sqlSessionFactoryBean;
}
5. Mode 2
5.1 project structure
In this way, put the mapper xml file and mapper interface in the same directory. Next, we will create a new project lesson-006-mybatis with the following structure
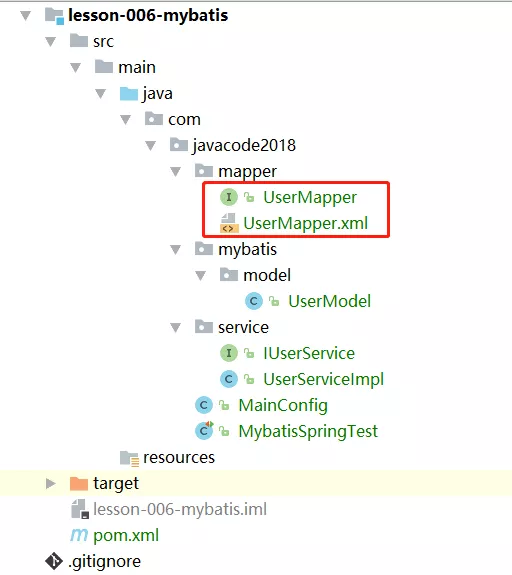
Comparing the two figures, the main difference is: in mode 1, the UserMapper.xml file is placed in the src\main\resources\mapper directory, while in this mode, the UserMapper.xml and the UserMapper interface are placed in the same directory.
5.2. Modify the definition of SqlSessionFactoryBean
The definition of SqlSessionFactoryBean in MainConfig needs to be modified as follows. It is more concise and does not need to specify the location of mapper xml. Here, it should be noted that when mapper xml file and mapper interface are placed in a directory in method 2, the names of the two files must be the same, so that the location of mapper xml does not need to be specified when defining SqlSessionFactoryBean.
@Bean
public SqlSessionFactoryBean sqlSessionFactoryBean(DataSource dataSource) throws IOException {
    SqlSessionFactoryBean sqlSessionFactoryBean = new SqlSessionFactoryBean();
    sqlSessionFactoryBean.setDataSource(dataSource);
    return sqlSessionFactoryBean;
}
5.3. Adjust pom.xml configuration
The following configuration needs to be added to the pom file so that maven will package the xml in src/main/java directory into the directory when packaging. Otherwise, these xml will be lost after packaging. You must pay attention to this.
<build>
    <resources>
        <resource>
            <directory>${project.basedir}/src/main/java</directory>
            <includes>
                <include>**/*.xml</include>
            </includes>
        </resource>
        <resource>
            <directory>${project.basedir}/src/main/resources</directory>
            <includes>
                <include>**/*</include>
            </includes>
        </resource>
    </resources>
</build>
5.4 summary
If you use mode 2, you should pay attention to the following 2 points:
1. Mapper interface and mapper xml must have the same name and be placed in the same directory
2. You need to add the specified configuration in the pom.xml file, otherwise the XML will be lost after packaging
6. Integrate multiple data sources
Sometimes our system needs to use multiple data sources, and each data source corresponds to a SqlSessionFactory. In the @ MapperScan annotation, you can specify the bean name of SqlSessionFactory through sqlSessionTemplateRef.
6.1 development steps of multiple data sources
1. Step 1: specify the bean name of SqlSessionFactory in @ MapperScan
Each db corresponds to a module. Different modules are distinguished by packages. Each module specifies a spring configuration class. The configuration class needs to be configured with three beans: data source, transaction manager and sqlsessionfactory. The following is the spring configuration class of a module. Note the @ MapperScan annotation of the following code, When there are multiple sqlsessionfactories in the system, you need to use the sqlSessionFactoryRef property to specify the bean name of sqlsessionfactory.
Since there are multiple data sources, the bean name of the injected datasource needs to be qualified through @ Qualifier(DATASOURCE_BEAN_NAME) in the code.
package com.javacode2018.mybatis.module1;

import org.apache.ibatis.annotations.Mapper;
import org.mybatis.spring.SqlSessionFactoryBean;
import org.mybatis.spring.annotation.MapperScan;
import org.springframework.beans.factory.annotation.Qualifier;
import org.springframework.context.annotation.Bean;
import org.springframework.context.annotation.ComponentScan;
import org.springframework.context.annotation.Configuration;
import org.springframework.jdbc.datasource.DataSourceTransactionManager;
import org.springframework.transaction.TransactionManager;
import org.springframework.transaction.annotation.EnableTransactionManagement;

import javax.sql.DataSource;
import java.io.IOException;

@Configuration
@MapperScan(annotationClass = Mapper.class, sqlSessionFactoryRef = Module1SpringConfig.SQL_SESSION_FACTORY_BEAN_NAME)
@ComponentScan
@EnableTransactionManagement
public class Module1SpringConfig {
    public final static String DATASOURCE_BEAN_NAME = "dataSourcemodule1";
    public final static String TRANSACTION_MANAGER_BEAN_NAME = "transactionManagermodule1";
    public final static String SQL_SESSION_FACTORY_BEAN_NAME = "sqlSessionFactorymodule1";

    //Define data source
    @Bean
    public DataSource dataSourcemodule1() {
        org.apache.tomcat.jdbc.pool.DataSource dataSource = new org.apache.tomcat.jdbc.pool.DataSource();
        dataSource.setDriverClassName("com.mysql.jdbc.Driver");
        dataSource.setUrl("jdbc:mysql://localhost:3306/module1?characterEncoding=UTF-8");
        dataSource.setUsername("root");
        dataSource.setPassword("root123");
        dataSource.setInitialSize(5);
        return dataSource;
    }

    //Define transaction manager
    @Bean
    public TransactionManager transactionManagermodule1(@Qualifier(DATASOURCE_BEAN_NAME) DataSource dataSource) {
        return new DataSourceTransactionManager(dataSource);
    }

    //Defines a SqlSessionFactoryBean to create a SqlSessionFactory
    @Bean
    public SqlSessionFactoryBean sqlSessionFactorymodule1(@Qualifier(DATASOURCE_BEAN_NAME) DataSource dataSource) throws IOException {
        SqlSessionFactoryBean sqlSessionFactoryBean = new SqlSessionFactoryBean();
        sqlSessionFactoryBean.setDataSource(dataSource);
        return sqlSessionFactoryBean;
    }
}
2. Step 2: specify the transaction manager
Each db corresponds to a datasource. Each datasource needs to specify a Transaction manager. Specify the Transaction manager through the transactionManager attribute of the @ Transaction annotation, as shown below
@Transactional(transactionManager = Module1SpringConfig.TRANSACTION_MANAGER_BEAN_NAME, rollbackFor = Exception.class)
6.2 cases
Now let's experience how to implement multiple db through a case.
1. Case code
spring-series\lesson-007-mybatis
2. Project structure diagram
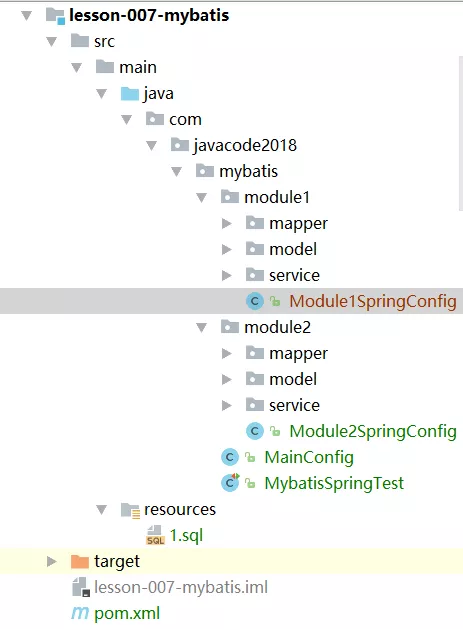
- In the case, we prepared two databases: module1 and module2, and created a T in each database_ User table
- All classes corresponding to the module1 library are placed in the com.javacode2018.mybatis.module1 package
- All classes corresponding to the module2 library are placed in the com.javacode2018.mybatis.module2 package
- Module1SpringConfig is the spring configuration class of module1
- Module2SpringConfig is the spring configuration class of module2
3. How does the project work?
1. Import project into idea
2. Execute sql script
/*Create two libraries: module1 and module2, and create a T in each library_ User table*/
DROP DATABASE IF EXISTS `module1`;
CREATE DATABASE `module1`;

DROP DATABASE IF EXISTS `module2`;
CREATE DATABASE `module2`;

/*Create table structure*/
DROP TABLE IF EXISTS module1.t_user;
CREATE TABLE module1.t_user (
  id BIGINT AUTO_INCREMENT PRIMARY KEY COMMENT 'Primary key, user id,Automatic growth',
  `name` VARCHAR(32) NOT NULL DEFAULT '' COMMENT 'full name'
) COMMENT 'User table';

DROP TABLE IF EXISTS module2.t_user;
CREATE TABLE module2.t_user (
  id BIGINT AUTO_INCREMENT PRIMARY KEY COMMENT 'Primary key, user id,Automatic growth',
  `name` VARCHAR(32) NOT NULL DEFAULT '' COMMENT 'full name'
) COMMENT 'User table';

SELECT * FROM module1.t_user;
SELECT * FROM module2.t_user;
3. Run test cases
com.javacode2018.mybatis.MybatisSpringTest
There are two methods in this use case. You can run them to see the effect of two db.
6.3 summary
Multiple data sources can be integrated in the system. This is not recommended. Usually, a business library corresponds to a module. Modules are isolated from each other and deployed independently to facilitate maintenance and expansion.
7. Principle of Spring integrating MyBatis
Some friends may want to study how to integrate mybatis in spring. They are more interested in this. I won't elaborate here. If you are interested, you can take a look at what I wrote earlier MyBatis Master Series , as well as all articles in the current spring series, the principle of mybatis integrating spring can be started from the @ MapperScan annotation, and you will understand it in seconds!!! Let's leave a room for everyone to study.
Another two words, many fans have always said that I should write the spring boot series. Why should I spend so much time writing the spring series? After writing so much, how much is used?
If you understand the principles of spring thoroughly, spring boot is not a small thing, so it is recommended that you first understand all the articles in the spring series. Even if I haven't written the spring boot, it's easy for you to read the source code yourself. I can't understand it because there are too many deficiencies. You haven't mastered many principles in spring, so watching springboot will be confused. Come on a little. First lay a solid foundation, the foundation is ok, and then learn things quickly. Slow is fast, fine products!!!
8. Summary
This paper introduces two methods of integrating mybatis in spring. The focus of the two methods is in the summary above. They are relatively simple. You are free to choose which method to use.
Source: https://mp.weixin.qq.com/s?__ biz=MzA5MTkxMDQ4MQ==&mid=2648938316&idx=2&sn=ec09a3ab5a76785ed599d6168b3b60fa&scene=21#wechat_ redirect