Preface: Project Environment
This simple demo is based on the spring MVC framework. The deployment environment is tomcat, which is used in the previous section. bootstrap+jquery_file_upload Components. The way to store pictures is to store them in the virtual directory and return them to the virtual directory. It is suggested to match Spring MVC environment before continuing to refer to this blog. There is no good environment to refer to. This blog
Picture Storage
Before giving the code for uploading pictures, first explain the idea of receiving pictures uploaded by the server. There are two ways to save pictures on the server side.
Store pictures in a blob format in a database, only for smaller scenes
Storing pictures in the server's directory and storing image paths and access URL s in the database has the disadvantage of possibly degrading server performance.
Store the picture in any path of the non-server directory, configure the virtual directory in the server, and access the picture in the picture directory through the virtual directory.
Here I will mainly talk about how to realize the third kind of image storage.
In a development environment, you can configure Tomcat virtual directories directly using Intellij. Because Intellij managed Tomcat is actually a Tomcat virtual image, the configuration in Intellij will not affect the configuration in the actual tomcat. So if you deploy projects directly using Intellij during development testing, refer to Configuring Virtual Directories in Intellij. If the developed war package is deployed directly in the server, the virtual directory is configured with reference to tomcat.
Configuring virtual directories in Intellij

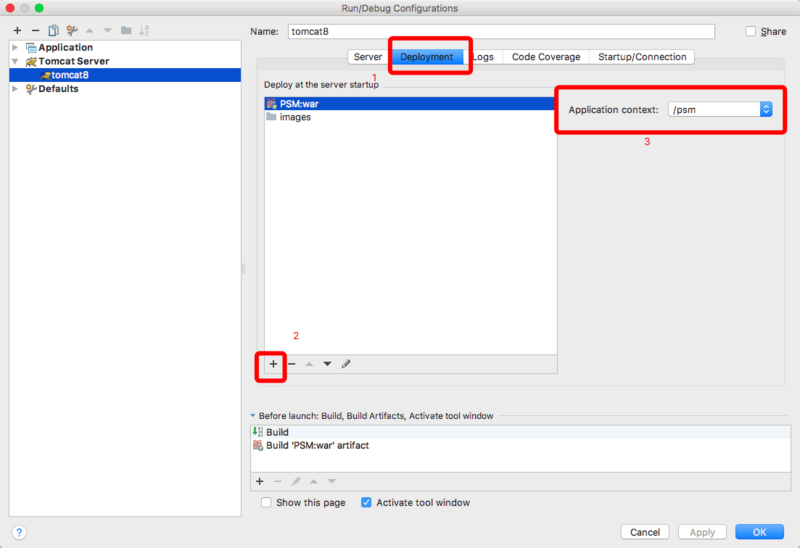
Go to the tomcat configuration management page, click on the deployment tab, then click on the plus sign in the lower left corner to select `external source', and add the real path of the corresponding virtual directory. Finally, the access path of the virtual directory is configured in the Application context.
Configuring virtual directories in Tomcat
There are many ways to configure virtual directories in tomcat. You can refer to these two blogs for more details.
http://www.cnblogs.com/love54...
https://my.oschina.net/liangz...
The way I want to introduce here is to configure a separate virtual directory in Catalina.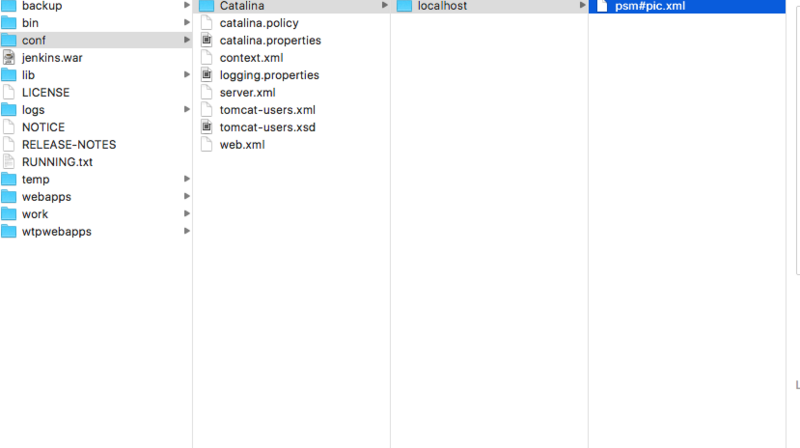

Find the / TOMCAT_HOME/conf/Catalina/localhost folder and create a new xml file under this folder. The file name of the xml file is the corresponding access path name of the virtual directory. If you need a multi-level directory, you can use # to separate it. For example, the corresponding access path of psm PC. xml is / psm/pic. Configure the virtual directory in the xml file with the following syntax
<Context docBase="/users/rale/Documents/images" reloadable="false" ></Context>
reloadale means whether to reload if something changes. After the configuration is completed, the virtual directory can be accessed directly using this path without restarting the server.
Picture upload and reception
In the front end, the bootstrap and juery_file_upload plug-ins are used to upload images. The simple html page is as follows
    <!DOCTYPE html>
    <html>
        ...
        <label for="cover"><img src=""></label>
        <input type="file" id="cover" data-url="/psm/image/upload"/>
        <%--ImageUpload--%>
        <spring:url value="/resources/plugins/jQuery/jQuery-2.1.4.min.js" var="jquery_js"/>
        <script src="${jquery_js}"></script>
        <spring:url value="/resources/plugins/jQueryFileupload/js/vendor/jquery.ui.widget.js" var="jquery_ui_widget_js"/>
        <spring:url value="/resources/plugins/jQueryFileupload/js/jquery.iframe-transport.js" var="jquery_iframe_transport_js"/>
        <spring:url value="/resources/plugins/jQueryFileupload/js/jquery.fileupload.js" var="jquery_fileupload_js"/>
        <script src="${jquery_ui_widget_js}"></script>
        <script src="${jquery_iframe_transport_js}"></script>
        <script src="${jquery_fileupload_js}"></script>

        <!--Use jquery_file_upload Plug-in unit-->
        <script>
            $(function () {
            $('#cover').fileupload({
                dataType: 'json',

                done: function (e, data) {
                    if(data.result != null){
                        console.log(data.result.fileURL)
                        $('label[for="cover"] img').attr('src', data.result.fileURL)
                    }
                },

            });
        });
        </script>
    </html>
controller receives requests to upload files, which you can refer to here This blog
The code of the file stored in java is as follows. This method converts the byte stream of the picture into a file and stores it in the corresponding image path, which is under the virtual directory we configured before.
import java.io.File;
import java.io.FileNotFoundException;
import java.io.FileOutputStream;
import java.io.IOException;
import java.util.Date;

/**
 * Created by rale on 5/29/17.
 * Store pictures locally
 */
public class FileUtil {

    public static void save(byte[] bytes, String fileName, String path) throws IOException {
        createDirectory(path);
        FileOutputStream os = new FileOutputStream(path + fileName);
        os.write(bytes);
        os.close();
    }

    private static boolean isExistPath(String path) {
        File file = new File(path);
        if (file.exists()) {//Judging the existence of file directories
            return true;
        }else{
            return false;
        }
    }
    private static void createDirectory(String path){
        if(!isExistPath(path)){
            File file=new File(path);
            file.mkdirs();
        }
    }
}