SpringMVC
The resume of spring MVC is based on spring. Spring learning reference
Spring learning notes
1, Integration with Web
1. Integration of spring and Web Environment
1.1 ApplicationContext application context acquisition method
The application context object is obtained through the new ClasspathXmlApplicationContext(spring configuration file), but each time a Bean is obtained from the container, the new ClasspathXmlApplicationContext(spring configuration file) must be written. This disadvantage is that the configuration file is loaded multiple times and the application context object is created multiple times.
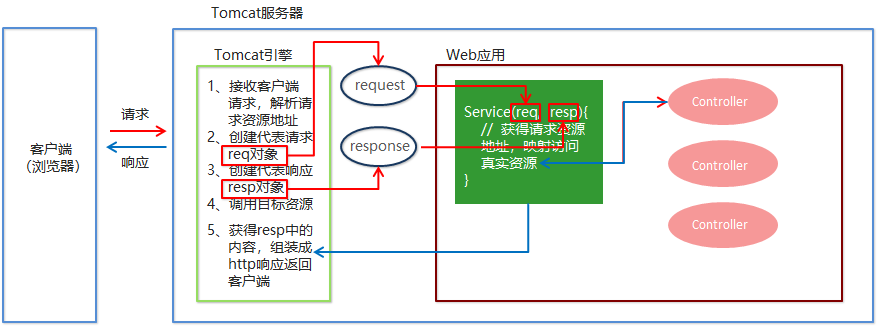
In the Web project, you can use the ServletContextListener to listen to the start of the Web application. When the Web application starts, we can load the Spring configuration file, create the application context object ApplicationContext, and store it in the largest domain servletContext domain, so that the application context ApplicationContext object can be obtained from the domain at any location.
1.2 Spring provides tools for obtaining application context
The above analysis does not need to be implemented manually. Spring provides a listener, ContextLoaderListener, which encapsulates the above functions. The listener internally loads the spring configuration file, creates the application context object, and stores it in the ServletContext domain. It provides a client tool WebApplicationContextUtils for users to obtain the application context object.
So there are only two things we need to do:
① Configure the ContextLoaderListener listener in web.xml (import spring web coordinates)
② Get the application context object ApplicationContext using WebApplicationContextUtils
1.3 coordinates of importing Spring integrated web
<dependency>
    <groupId>org.springframework</groupId>
    <artifactId>spring-web</artifactId>
    <version>${spring.version}</version>
</dependency>
1.4 configuring the ContextLoaderListener listener
<!--Global parameters-->
<context-param>
    <param-name>contextConfigLocation</param-name>
    <param-value>classpath:applicationContext.xml</param-value>
</context-param>
<!--Spring Monitor for-->
<listener>
	<listener-class>
       org.springframework.web.context.ContextLoaderListener
   </listener-class>
 </listener>
1.5 obtaining application context objects through tools
ServletContext servletContext = this.getServletContext();
ApplicationContext applicationContext = WebApplicationContextUtils.getWebApplicationContext(servletContext);
Object obj = applicationContext.getBean("id");
2. Introduction to spring MVC
2.1 spring MVC overview
Spring MVC is a request driven lightweight Web framework based on Java to implement MVC design model. It is a follow-up product of spring framework and has been integrated into Spring Web Flow.
Spring MVC has become one of the most mainstream MVC frameworks, and with the release of spring 3.0, it has comprehensively surpassed struts 2 and become the best MVC framework. Through a set of annotations, it makes a simple Java class a controller for processing requests without implementing any interface. It also supports RESTful programming style requests.
2.2 spring MVC quick start
Requirements: the client initiates the request, the server receives the request, executes logic and jumps the view.
Development steps
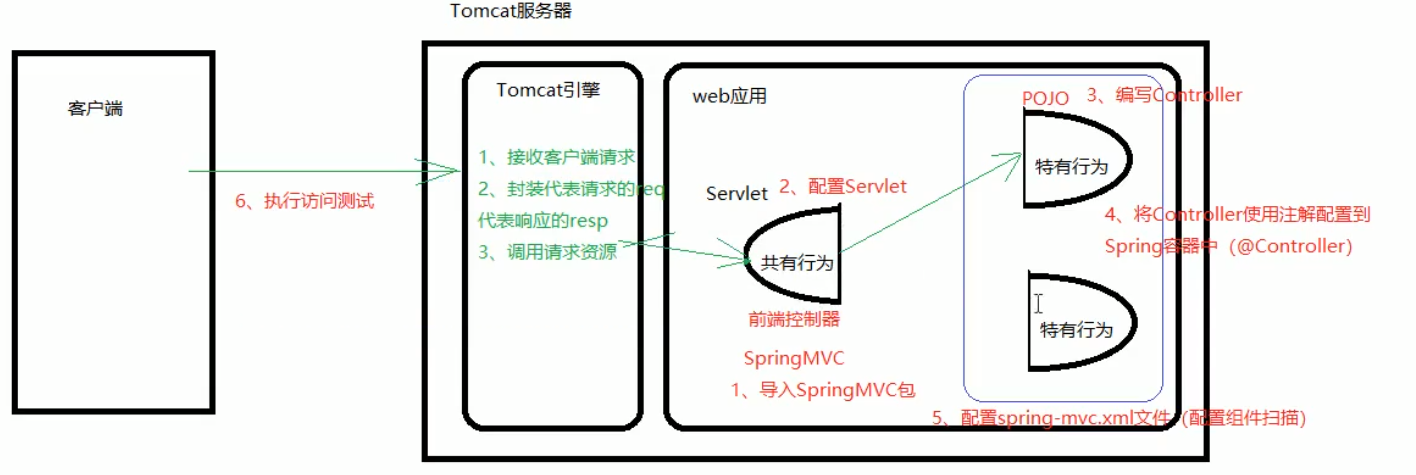
① Import spring MVC related coordinates
② Configuring the spring MVC core controller DispathcerServlet
③ Create Controller class
④ Use the annotation to configure the mapping address of the business method in the Controller class
⑤ Configure spring MVC core file spring-mvc.xml
⑥ Client initiated request test
code implementation
① Import the coordinates of Spring and Spring MVC, and import the coordinates of Servlet and Jsp
<dependency>
    <groupId>org.springframework</groupId>
    <artifactId>spring-web</artifactId>
    <version>${spring.version}</version>
</dependency>
<dependency>
    <groupId>org.springframework</groupId>
    <artifactId>spring-webmvc</artifactId>
    <version>${spring.version}</version>
</dependency>
② Configuring the core controller of spring MVC in web.xml
<servlet>
    <servlet-name>DispatcherServlet</servlet-name>
    <servlet-class>org.springframework.web.servlet.DispatcherServlet</servlet-class>
    <init-param>
        <param-name>contextConfigLocation</param-name>
        <param-value>classpath:spring-mvc.xml</param-value>
    </init-param>
	<load-on-startup>1</load-on-startup>
</servlet>
<servlet-mapping>
    <servlet-name>DispatcherServlet</servlet-name>
    <url-pattern>/</url-pattern>
</servlet-mapping>
③ Create Controller and business method
public class QuickController {
	public String quickMethod(){
		System.out.println("quickMethod running.....");
		return "index";
	}
}
③ Create view page index.jsp
<html>
<body>
    <h2>Hello SpringMVC!</h2>
</body>
</html>
④ Configuration annotation
@Controller
public class QuickController {
	@RequestMapping("/quick")
	public String quickMethod(){
		System.out.println("quickMethod running.....");
			return "index";
	}
}
⑤ Create spring-mvc.xml
<beans xmlns="http://www.springframework.org/schema/beans"
    xmlns:mvc="http://www.springframework.org/schema/mvc"
    xmlns:context="http://www.springframework.org/schema/context"
    xmlns:xsi="http://www.w3.org/2001/XMLSchema-instance"
    xsi:schemaLocation="
      http://www.springframework.org/schema/beans http://www.springframework.org/schema/beans/spring-beans.xsd
      http://www.springframework.org/schema/mvc http://www.springframework.org/schema/mvc/spring-mvc.xsd
      http://www.springframework.org/schema/context http://www.springframework.org/schema/context/spring-context.xsd">

    <!--Configure annotation scanning-->
    <context:component-scan base-package="com.itheima"/>
</beans>
⑥ Access test address
http://localhost:8080/itheima_springmvc1/quick
2.3 spring MVC process diagram
3. Component parsing of spring MVC
3.1 execution process of spring MVC
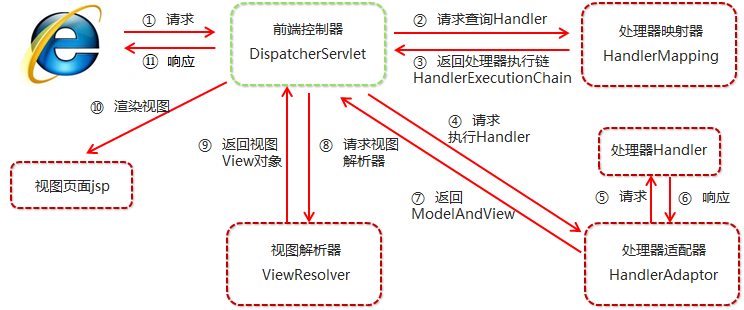
① The user sends a request to the front-end controller DispatcherServlet.
② The dispatcher servlet receives a request to call the handler mapping processor mapper.
③ The processor mapper finds the specific processor (which can be found according to the xml configuration and annotation), generates the processor object and the processor interceptor (if any) and returns it to the dispatcher servlet.
④ Dispatcher servlet calls HandlerAdapter processor adapter.
⑤ The HandlerAdapter invokes a specific processor (Controller, also known as back-end Controller) through adaptation.
⑥ The Controller returns ModelAndView after execution.
⑦ The HandlerAdapter returns the controller execution result ModelAndView to the dispatcher servlet.
⑧ The dispatcher servlet passes the ModelAndView to the viewrestrover view parser.
⑨ The viewrestrover returns the specific View after parsing.
⑩ The dispatcher servlet renders the View according to the View (that is, fills the View with model data). Dispatcher servlet responds to the user.
3.2 spring MVC component parsing
- Front end controller: dispatcher Servlet
When the user's request reaches the front-end controller, it is equivalent to C in MVC mode. Dispatcher servlet is the center of the whole process control. It calls other components to process the user's request. The existence of dispatcher servlet reduces the coupling between components.
- Processor mapper: HandlerMapping
HandlerMapping is responsible for finding the Handler, that is, the processor, according to the user's request. Spring MVC provides different mappers to implement different mapping methods, such as configuration file mode, implementation interface mode, annotation mode, etc.
- Processor adapter: HandlerAdapter
The processor is executed through the HandlerAdapter, which is an application of the adapter mode. More types of processors can be executed through the extension adapter.
- Processor: Handler
It is the specific business controller to be written in our development. The dispatcher servlet forwards the user request to the Handler. The Handler handles specific user requests.
- View Resolver: View Resolver
The View Resolver is responsible for generating the processing results into the View view. The View Resolver first resolves the logical View name into the physical View name, that is, the specific page address, and then generates the View object. Finally, it renders the View and displays the processing results to the user through the page.
- Views: View
Spring MVC framework provides support for many View types, including jstlView, freemarkerView, pdfView, etc. The most common View is jsp. Generally, the model data needs to be displayed to users through pages through page label or page template technology. Programmers need to develop specific pages according to business requirements
3.3 spring MVC annotation parsing
@RequestMapping
Function: used to establish the correspondence between the request URL and the request processing method
Location:
Class, request the first level access directory of the URL. If it is not written here, it is equivalent to the root directory of the application
Method, the second level access directory of the request URL and the first level directory marked with @ ReqquestMapping on the class form an access virtual path
Properties:
value: used to specify the URL of the request. It works the same way as the path attribute
Method: used to specify the method of the request
params: used to specify conditions that restrict request parameters. It supports simple expressions. key and value as like as two peas for the requested parameters must be exactly the same as those configured.
For example:
params = {"accountName"}, indicating that the request parameter must have accountName
params = {"moeny!100"}, indicating that money in the request parameter cannot be 100
1.mvc namespace introduction
Namespace: xmlns:context="http://www.springframework.org/schema/context"
        xmlns:mvc="http://www.springframework.org/schema/mvc"
Constraint address: http://www.springframework.org/schema/context
        http://www.springframework.org/schema/context/spring-context.xsd
        http://www.springframework.org/schema/mvc
        http://www.springframework.org/schema/mvc/spring-mvc.xsd
2. Component scanning
Spring MVC is based on the spring container, so during spring MVC operation, you need to store the controller in the spring container. If you use the @ controller annotation, you need to use < context: component scan base package = "com. Itheima. Controller" / > to scan the components.
- Just scan the controller layer
3.4 XML configuration parsing of spring MVC
Spring MVC has default component configuration. The default components are configured in the DispatcherServlet.properties configuration file. The address of the configuration file is org/springframework/web/servlet/DispatcherServlet.properties. The default view parser is configured in the file, as follows:
org.springframework.web.servlet.ViewResolver=org.springframework.web.servlet.view.InternalResourceViewResolver
By browsing the source code of the parser, you can see the default settings of the parser, as follows:
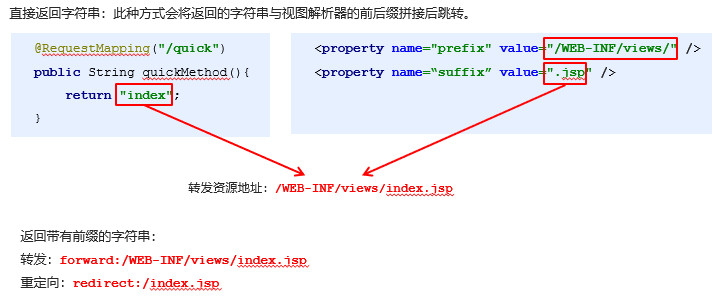
REDIRECT_URL_PREFIX = "redirect:"  --Redirect prefix
FORWARD_URL_PREFIX = "forward:"    --Forwarding prefix (default)
prefix = "";     --View name prefix
suffix = "";     --View name suffix
- view resolver
We can modify the pre suffix of the view by attribute injection
<!--Configure internal resource view parser-->
<bean class="org.springframework.web.servlet.view.InternalResourceViewResolver">
  <property name="prefix" value="/WEB-INF/views/"></property>
  <property name="suffix" value=".jsp"></property>
</bean>
2, Request and response
Data response of spring MVC
01 data response mode
- Page Jump
- Returns a string directly
- Return via ModelAndView object
2) Write back data
- Returns a string directly
- Returns an object or collection
02 page Jump - return string form
03 page Jump - return to ModelAndView form 1
In the Controller, the method returns the ModelAndView object and sets the view name
@RequestMapping(value="/quick2")
public ModelAndView save2(){
    /*
            Model:Model action encapsulates data
            View: View function: display data
         */
    ModelAndView modelAndView = new ModelAndView();
    //Set model data
    modelAndView.addObject("username","itcast");
    //Set view name
    modelAndView.setViewName("success");

    return modelAndView;
}
04 page Jump - return to ModelAndView form 2
You can directly declare ModelAndView on the method parameter in the Controller without creating it in the method. You can also jump to the page by directly using the object in the method to set the view
@RequestMapping(value="/quick3")
public ModelAndView save3(ModelAndView modelAndView){
    modelAndView.addObject("username","itheima");
    modelAndView.setViewName("success");
    return modelAndView;
}
@RequestMapping(value="/quick4")
public String save4(Model model){
    model.addAttribute("username","Erudite Valley");
    return "success";
}
05 page Jump - return to ModelAndView form 3
You can directly use the native httpservertrequest object on the formal parameters of the Controller method, just declare it
@RequestMapping(value="/quick5")
public String save5(HttpServletRequest request){
    request.setAttribute("username","Kuding fish");
    return "success";
}
06 write back data - write back string directly
The response object injected through the spring MVC framework uses response.getWriter().print("hello world") to write back the data. At this time, there is no need to jump the view, and the return value of the business method is void
Return the string to be written back directly, but at this time, you need to inform the spring MVC framework through the @ ResponseBody annotation that the string returned by the method is not a jump, but directly returned in the http response body
@RequestMapping(value="/quick6")
public void save6(HttpServletResponse response) throws IOException {
    response.getWriter().print("hello itcast");
}

@RequestMapping(value="/quick7")
@ResponseBody  //Tell the spring MVC framework to respond directly to data without view jump
public String save7() throws IOException {
    return "hello itheima";
}
07 write back data - directly write back json format string (application)
@RequestMapping(value="/quick8")
@ResponseBody
public String save8() throws IOException {
    return "{\"username\":\"zhangsan\",\"age\":18}";
}
It is troublesome to manually splice json format strings. Complex java objects are often converted into json format strings in development. We can use jackson, the json conversion tool learned in the web stage, to convert json format strings and return character strings
@RequestMapping(value="/quick9")
@ResponseBody
public String save9() throws IOException {
    User user = new User();
    user.setUsername("lisi");
    user.setAge(30);
    //Use the json conversion tool to convert the object into a json format string and return it
    ObjectMapper objectMapper = new ObjectMapper();
    String json = objectMapper.writeValueAsString(user);

    return json;
}
08 write back data - return object or collection
Spring MVC helps us convert and write back json strings to objects or collections, configure message conversion parameters for the processor adapter, and specify that jackson is used to convert objects or collections. Therefore, the following configuration needs to be carried out in spring-mvc.xml:
<bean class="org.springframework.web.servlet.mvc.method.annotation.RequestMappingHandlerAdapter">
    <property name="messageConverters">
        <list>
            <bean class="org.springframework.http.converter.json.MappingJackson2HttpMessageConverter"/>
        </list>
    </property>
</bean>
@RequestMapping(value="/quick10")
@ResponseBody
//Spring MVC is expected to automatically convert users to json formatted strings
public User save10() throws IOException {
    User user = new User();
    user.setUsername("lisi2");
    user.setAge(32);
    return user;
}
09 write back data - return object or set 2
Adding @ ResponseBody to the method can return a string in json format, but this configuration is troublesome and there are many configured codes. Therefore, we can use mvc annotation driven instead of the above configuration
<mvc:annotation-driven/>
Among the components of spring MVC, processor mapper, processor adapter and view parser are called the three components of spring MVC.
Use < MVC: annotation driven / > to automatically load RequestMappingHandlerMapping and
RequestMappingHandlerAdapter (processing adapter), which can be used in the Spring-xml.xml configuration file
< MVC: annotation driven / > replaces the configuration of annotation processors and adapters.
Use < MVC: annotation driven / >
By default, the bottom layer will integrate jackson to convert json format strings of objects or collections
10 summary of key knowledge points
1) Page Jump
Returns a string directly
Return via ModelAndView object
2) Write back data
Returns a string directly
The HttpServletResponse object writes back data directly, the HttpServletRequest object brings back data, the Model object brings back data, or @ ResponseBody writes back string data
Returns an object or collection
@ResponseBody+<mvc:annotation-driven/>
Get request for spring MVC
1 request parameter type
The format of client request parameters is: name = value & name = value
In order to obtain the requested parameters, the server sometimes needs to encapsulate the data. Spring MVC can receive the following types of parameters
- Basic type parameters
- POJO type parameter (simple Java Bean object)
- Array type parameter
- Set type parameter
2 get basic type parameters
The parameter name of the business method in the Controller should be consistent with the name of the request parameter, and the parameter value will be mapped and matched automatically, and the type conversion can be done automatically;
Automatic type conversion refers to the conversion from String to other basic data types
http://localhost:8080/itheima_springmvc1/quick9?username=zhangsan&age=12
@RequestMapping(value="/quick11")
@ResponseBody
public void save11(String username,int age) throws IOException {
    System.out.println(username);
    System.out.println(age);
}
3. Get POJO type parameters
The property name of the POJO parameter of the business method in the Controller is consistent with the name of the request parameter, and the parameter value will be mapped and matched automatically.
@RequestMapping(value="/quick12")
@ResponseBody
public void save12(User user) throws IOException {
    System.out.println(user);
}
4 get array type parameters (not commonly used)
The name of the business method array in the Controller is consistent with the name of the request parameter, and the parameter value will be mapped and matched automatically.
http://localhost:8081/springWeb/con/quick9?args=1&args=2
@RequestMapping(value="/quick13")
@ResponseBody
public void save13(String[] args) throws IOException {
    System.out.println(Arrays.asList(args));
}
5 get set type parameter 1 (not commonly used)
When obtaining set parameters, the set parameters should be wrapped in a POJO.
<form action="${pageContext.request.contextPath}/user/quick14" method="post">
    <%--Indicates that it is the first User Object username age--%>
    <input type="text" name="userList[0].username"><br/>
    <input type="text" name="userList[0].age"><br/>
    <input type="text" name="userList[1].username"><br/>
    <input type="text" name="userList[1].age"><br/>
    <input type="submit" value="Submit">
</form>
package com.itheima.domain;

import java.util.List;
//	VO ValueObject
public class VO {

    private List<User> userList;

    public List<User> getUserList() {
        return userList;
    }

    public void setUserList(List<User> userList) {
        this.userList = userList;
    }

    @Override
    public String toString() {
        return "VO{" +
                "userList=" + userList +
                '}';
    }
}
@RequestMapping(value="/quick14")
    @ResponseBody
    public void save14(VO vo) throws IOException {
        System.out.println(vo);
    }
6 get set type parameter 2
When submitting with ajax, you can specify the content type as json, so using @ RequestBody in the method parameter position can directly receive the collection data without using POJO for packaging
<script src="${pageContext.request.contextPath}/js/jquery-3.3.1.js"></script>
<script>
    var userList = new Array();
    userList.push({username:"zhangsan",age:18});
    userList.push({username:"lisi",age:28});

    $.ajax({
        type:"POST",
        url:"${pageContext.request.contextPath}/user/quick15",
        data:JSON.stringify(userList),
        contentType:"application/json;charset=utf-8"
    });
</script>
@RequestMapping(value="/quick15")
@ResponseBody
public void save15(@RequestBody List<User> userList) throws IOException {
    System.out.println(userList);
}
7 enable static resource access
When static resources need to be loaded, such as jquery files, it is found that they are not loaded into jquery files through the Google developer tool. The reason is that the URL pattern of the DispatcherServlet, the front-end controller of spring MVC, is configured as /, which means that all resources are filtered. We can specify the release of static resources in the following two ways:
• specify the released resources in the spring-mvc.xml configuration file
<mvc:resources mapping="/js/**"location="/js/"/>
• use the < MVC: default servlet handler / > tag
<!--Access to development resources-->
<!--<mvc:resources mapping="/js/**" location="/js/"/>
<mvc:resources mapping="/img/**" location="/img/"/>-->

<mvc:default-servlet-handler/>
8 configure global garbled filter
When post requests, the data will be garbled. We can set a filter to filter the encoding.
<!--Configuring global filtering filter-->
<filter>
    <filter-name>CharacterEncodingFilter</filter-name>
    <filter-class>org.springframework.web.filter.CharacterEncodingFilter</filter-class>
    <init-param>
        <param-name>encoding</param-name>
        <param-value>UTF-8</param-value>
    </init-param>
</filter>
<filter-mapping>
    <filter-name>CharacterEncodingFilter</filter-name>
    <url-pattern>/*</url-pattern>
</filter-mapping>
9 parameter binding annotation @ RequestParam
When the requested parameter name is inconsistent with the business method parameter name of the Controller, the binding displayed through the @ RequestParam annotation is required
@RequestParam
- value: request parameter name
- required: whether the specified request parameters must be included. The default is true. If there is no such parameter during submission, an error will be reported
- defaultValue: when no request parameter is specified, the specified default value is used for assignment
<form action="${pageContext.request.contextPath}/quick16" method="post">
    <input type="text" name="name"><br>
    <input type="submit" value="Submit"><br>
</form>
@RequestMapping(value="/quick16")
@ResponseBody
public void save16(@RequestParam(value="name",required = false,defaultValue = "itcast") String username) throws IOException {
    System.out.println(username);
}
10 acquisition of restful style parameters
Restful is a software architecture style and design style, not a standard, but provides a set of design principles and constraints. It is mainly used for interactive software between client and server. The software designed based on this style can be more concise, more hierarchical, and easier to implement cache mechanism.
Restful style requests use "url + request method" to indicate the purpose of a request. The four verbs in the HTTP protocol indicating the operation method are as follows:
- GET: used to GET resources
- POST: used to create a new resource
- PUT: used to update resources
- DELETE: used to DELETE resources
For example:
/user/1 GET: get the user with id = 1
/user/1 DELETE: delete the user with id = 1
/user/1 PUT: update user with id = 1
/user POST: new user
1 in the above url address / user/1 is the request parameter to be obtained. Placeholders can be used for parameter binding in spring MVC. The address / user/1 can be written as / user/{id}, and the placeholder {id} corresponds to the value of 1. In the business method, we can use the @ PathVariable annotation to match and obtain placeholders.
http://localhost:8080/itheima_springmvc1/quick17/zhangsan
@RequestMapping(value="/quick17/{name}")
@ResponseBody
 public void save17(@PathVariable(value="name") String username) throws IOException {
        System.out.println(username);
 }
11 custom type converter (not commonly used)
Spring MVC provides some common type converters by default, such as converting the string submitted by the client to int for parameter setting.
However, not all data types are provided with converters. If not, custom converters are required. For example, custom converters are required for date type data.
Development steps of custom type converter:
- Define the Converter class and implement the Converter interface
- Declare the converter in the configuration file
- Introducing converters in < annotation driven >
public class DateConverter implements Converter<String, Date> {
    public Date convert(String dateStr) {
        //Returns a date string converted to a date object
        SimpleDateFormat format = new SimpleDateFormat("yyyy-MM-dd");
        Date date = null;
        try {
            date = format.parse(dateStr);
        } catch (ParseException e) {
            e.printStackTrace();
        }
        return date;
    }
}
@RequestMapping(value="/quick18")
@ResponseBody
public void save18(Date date) throws IOException {
    System.out.println(date);
}
2. Declaration converter
<!--    Declaration converter-->
<bean id="conversionService" class="org.springframework.context.support.ConversionServiceFactoryBean">
    <property name="converters">
        <list>
            <bean class="com.example.converter.DateConverter"/>
        </list>
    </property>
</bean>
3. Introduction converter
<mvc:annotation-driven conversion-service="conversionService"/>
12 get Servlet related API s
Spring MVC supports using the original servlet API object as the parameter of the controller method for injection. The common objects are as follows:
- HttpServletRequest
- HttpServletResponse
- HttpSession
@RequestMapping(value="/quick19")
@ResponseBody
public void save19(HttpServletRequest request, HttpServletResponse response, HttpSession session) throws IOException {
    System.out.println(request);
    System.out.println(response);
    System.out.println(session);
}
13 get request header information
Use @ RequestHeader to obtain the request header information, which is equivalent to the request.getHeader(name) learned in the web stage
@The attributes of the RequestHeader annotation are as follows:
value: the name of the request header
required: whether this request header must be carried
@RequestMapping(value="/quick20")
@ResponseBody
public void save20(@RequestHeader(value = "User-Agent",required = false) String user_agent) throws IOException {
    System.out.println(user_agent);
}
Use @ Cookie value to get the value of the specified Cookie
@The properties of the CookieValue annotation are as follows:
value: Specifies the name of the cookie
required: do you have to carry this cookie
@RequestMapping(value="/quick21")
@ResponseBody
public void save21(@CookieValue(value = "JSESSIONID") String jsessionId) throws IOException {
    System.out.println(jsessionId);
}
3, File upload, interceptor and exception handling
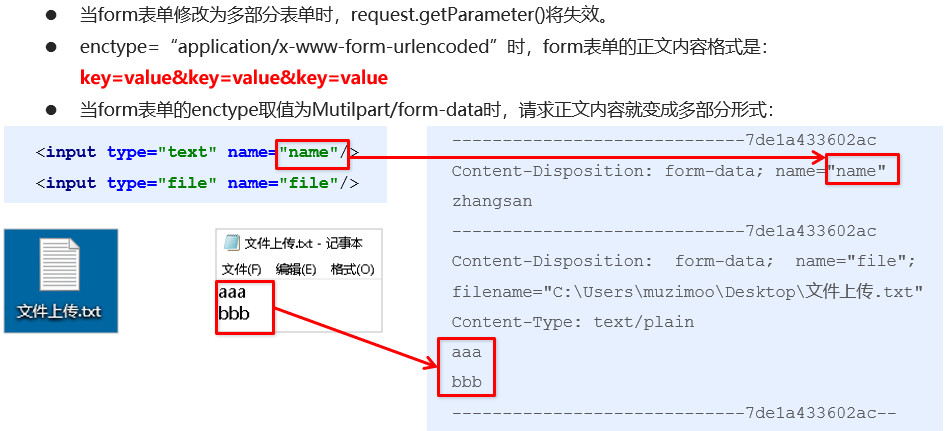
Spring MVC file upload
1 file upload - client form implementation
The file upload client form needs to meet the following requirements:
- Form item type = "file"
- The form is submitted by post
- The enctype attribute of the form is a multi part form, and enctype = "multipart / form data"
<form action="${pageContext.request.contextPath}/user/quick22" method="post" enctype="multipart/form-data">
    name<input type="text" name="username"><br/>
    File 1<input type="file" name="uploadFile"><br/>
    <input type="submit" value="Submit">
</form>
2 file upload - principle of file upload
3 file upload - code implementation of single file upload 1
Add dependency
<dependency>
  <groupId>commons-fileupload</groupId>
  <artifactId>commons-fileupload</artifactId>
  <version>1.3.1</version>
</dependency>
<dependency>
  <groupId>commons-io</groupId>
  <artifactId>commons-io</artifactId>
  <version>2.3</version>
</dependency>
Configure multimedia parser
<!--Profile upload parser-->
<bean id="multipartResolver" class="org.springframework.web.multipart.commons.CommonsMultipartResolver">
    <property name="defaultEncoding" value="UTF-8"/>
    <property name="maxUploadSize" value="500000"/>
</bean>
Background program
@RequestMapping(value="/quick22")
@ResponseBody
public void save22(String username, MultipartFile uploadFile) throws IOException {
    System.out.println(username);
    System.out.println(uploadFile);
}
4 file upload - code implementation of single file upload 2
Complete file upload
@RequestMapping(value="/quick22")
@ResponseBody
public void save22(String username, MultipartFile uploadFile) throws IOException {
    System.out.println(username);
    //Get the name of the uploaded file
    String originalFilename = uploadFile.getOriginalFilename();
    uploadFile.transferTo(new File("C:\\upload\\"+originalFilename));//Transfer uploaded files
}
5 file upload - code implementation of multi file upload
To upload multiple files, you only need to change the page to multiple file upload items and change the method parameter MultipartFile type to MultipartFile []
<form action="${pageContext.request.contextPath}/user/quick23" method="post" enctype="multipart/form-data">
    name<input type="text" name="username"><br/>
    File 1<input type="file" name="uploadFile"><br/>
    Document 2<input type="file" name="uploadFile"><br/>
    <input type="submit" value="Submit">
</form>
@RequestMapping(value="/quick23")
@ResponseBody
public void save23(String username, MultipartFile[] uploadFile) throws IOException {
    System.out.println(username);
    for (MultipartFile multipartFile : uploadFile) {
        String originalFilename = multipartFile.getOriginalFilename();
        multipartFile.transferTo(new File("C:\\upload\\"+originalFilename));
    }
}
Interceptor for spring MVC
01 function of interceptor
The interceptor of Spring MVC is similar to the Filter in Servlet development, which is used to preprocess and post process the processor.
The interceptors are connected into a chain in a certain order, which is called interceptor chain. When accessing the intercepted method or field, the interceptors in the interceptor chain will be called in the order they were previously defined. Interceptor is also the concrete implementation of AOP idea.
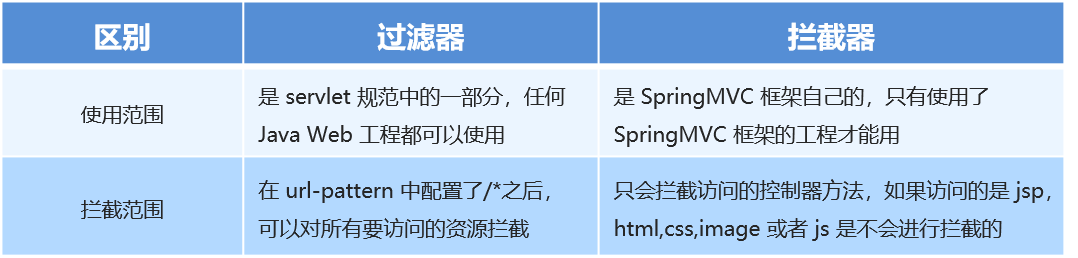
02 difference between interceptor and filter
The difference between interceptor and filter is shown in the figure:
03 quick start
The custom interceptor is very simple. There are only three steps:
① Create an interceptor class to implement the HandlerInterceptor interface
② Configure interceptor
③ Test the interception effect of the interceptor
Write Interceptor:
public class MyInterceptor1 implements HandlerInterceptor {
    //Execute before the target method executes
    public boolean preHandle(HttpServletRequest request, HttpServletResponse response, Object handler) throws ServletException, IOException {
        System.out.println("preHandle.....");
	}

    //Execute after the target method executes and before the view object returns
    public void postHandle(HttpServletRequest request, HttpServletResponse response, Object handler, ModelAndView modelAndView){
		System.out.println("postHandle...");
    }

    //Execute after all processes are executed
    public void afterCompletion(HttpServletRequest request, HttpServletResponse response, Object handler, Exception ex) {
        System.out.println("afterCompletion....");
    }

}
Configuration: configure in the configuration file of spring MVC
<!--Configuring Interceptors -->
<mvc:interceptors>
    <mvc:interceptor>
        <!--Which resources are intercepted-->
        <mvc:mapping path="/**"/>
        <bean class="com.itheima.interceptor.MyInterceptor1"/>
    </mvc:interceptor>
</mvc:interceptors>
Write test program:
Write the controller, send a request to the controller and jump to the page
@Controller
public class TargetController {
    @RequestMapping("/target")
    public ModelAndView show(){
        System.out.println("Target resource execution......");
        ModelAndView modelAndView = new ModelAndView();
        modelAndView.addObject("name","itcast");
        modelAndView.setViewName("index");
        return modelAndView;
    }
}
page
<html>
    <body>
    	<h2>Hello World! ${name}</h2>
    </body>
</html>
04 quick start details
The method in the interceptor is described below

Under what circumstances will the interceptor execute the target resource after preprocessing, under what circumstances will the interceptor not execute the target resource, and what is the execution order of the interceptor when there are multiple interceptors?
Write another interceptor 2,
public class MyInterceptor2 implements HandlerInterceptor {
    //Execute before the target method executes
    public boolean preHandle(HttpServletRequest request, HttpServletResponse response, Object handler) throws ServletException, IOException {
        System.out.println("preHandle22222.....");
        return true;	//Returning true means release, and returning false means no release
    }

    //Execute after the target method executes and before the view object returns
    public void postHandle(HttpServletRequest request, HttpServletResponse response, Object handler, ModelAndView modelAndView){
        System.out.println("postHandle2222...");
    }

    //Execute after all processes are executed
    public void afterCompletion(HttpServletRequest request, HttpServletResponse response, Object handler, Exception ex) {
        System.out.println("afterCompletion2222....");
    }
}
Configure interceptor 2
<!--Configuring Interceptors -->
<mvc:interceptors>
    <mvc:interceptor>
        <!--Which resources are intercepted-->
        <mvc:mapping path="/**"/>
        <bean class="com.itheima.interceptor.MyInterceptor2"/>
    </mvc:interceptor>
    <mvc:interceptor>
        <!--Which resources are intercepted-->
        <mvc:mapping path="/**"/>
        <bean class="com.itheima.interceptor.MyInterceptor1"/>
    </mvc:interceptor>
</mvc:interceptors>
Conclusion:
- When the preHandle method of the interceptor returns true, the target resource will be executed. If false, the target resource will not be executed
- In the case of multiple interceptors, the configuration before is executed first, and the configuration after is executed
- The execution order of methods in the interceptor is: preHandler ------ target resource ----- posthandle ----- aftercompletion
06 user login permission control analysis
Judge whether the user is logged in: judge whether there is a user in the session. If there is no login, log in first. If there is already login, directly release access to the target resource
First write the interceptor as follows:
public class PrivilegeInterceptor implements HandlerInterceptor {
    public boolean preHandle(HttpServletRequest request, HttpServletResponse response, Object handler) throws IOException {
        //Logic: judge whether the user logs in. Essence: judge whether there is a user in the session
        HttpSession session = request.getSession();
        User user = (User) session.getAttribute("user");
        if(user==null){
            //not logged on
            response.sendRedirect(request.getContextPath()+"/login.jsp");
            return false;
        }
        //Release access to target resources
        return true;
    }
}
Enter the user name and password on the login page, click login, and query through the user name and password. If the login is successful, the user information entity will be stored in the session, and then jump to the home page. If the login fails, continue to return to the login page
Write login logic in UserController
@RequestMapping("/login")
public String login(String username,String password,HttpSession session){
    User user = userService.login(username,password);
    if(user!=null){
        //Login succeeded. Store user in session
        session.setAttribute("user",user);
        return "redirect:/index.jsp";
    }
    return "redirect:/login.jsp";
}
At this time, we still can't log in, because we need to let the interceptor release the login request url and add the configuration of resource exclusion
<!--Configure permission interceptor-->
<mvc:interceptors>
    <mvc:interceptor>
        <!--Configure which resources to intercept-->
        <mvc:mapping path="/**"/>
        <!--Which resources are configured to exclude blocking operations-->
        <mvc:exclude-mapping path="/user/login"/>
        <bean class="com.itheima.interceptor.PrivilegeInterceptor"/>
    </mvc:interceptor>
</mvc:interceptors>
Note: if the JdbcTemplate.queryForObject object cannot find the data, it will throw an exception, resulting in the program unable to achieve the expected effect. How to solve this problem?
The business layer handles exceptions from the dao layer. If an exception occurs, the service layer returns null instead of throwing the exception to the controller
Therefore, modify the login business layer code and add exception control
public User login(String username, String password) {
    try {
        User user = userDao.findByUsernameAndPassword(username,password);
        return user;
    }catch (EmptyResultDataAccessException e){
        return null;
    }
}
Spring MVC exception handling mechanism
1. Ideas for exception handling
There are two types of exceptions in the system: expected exception and runtime exception RuntimeException. The former obtains exception information by capturing exceptions, and the latter mainly reduces the occurrence of runtime exceptions by standardizing code development and testing.
Dao, Service and Controller of the system are thrown upward through throws Exception. Finally, the spring MVC front-end Controller sends it to the exception handler for exception handling, as shown in the following figure:

2. Two methods of exception handling
① Use the simple exception handler SimpleMappingExceptionResolver provided by Spring MVC
② Implement the exception handling interface of Spring, HandlerExceptionResolver, and customize its own exception handler
3 simple exception handler SimpleMappingExceptionResolver
Spring MVC has defined this type converter. When using it, you can map and configure the corresponding exceptions and views according to the project situation
<!--Configure simple mapping exception handler-->
<bean class="org.springframework.web.servlet.handler.SimpleMappingExceptionResolver">
    <property name="defaultErrorView" value="error"/>   Default error view
    <property name="exceptionMappings">
        <map>		Exception type		                             Error view
            <entry key="com.itheima.exception.MyException" value="error"/>
            <entry key="java.lang.ClassCastException" value="error"/>
        </map>
    </property>
</bean>
4. Custom exception handling steps
① Create an exception handler class to implement HandlerExceptionResolver
public class MyExceptionResolver implements HandlerExceptionResolver {
	@Override
	public ModelAndView resolveException(HttpServletRequest request,HttpServletResponse response, Object handler, Exception ex) {
        //Code implementation for handling exceptions
        //Create ModelAndView object
        ModelAndView modelAndView = new ModelAndView();
        modelAndView.setViewName("exceptionPage");
        return modelAndView;
    }
}
② Configure exception handler
<bean id="exceptionResolver" class="com.itheima.exception.MyExceptionResolver"/>
③ Write exception page
<%@ page contentType="text/html;charset=UTF-8" language="java" %>
<html>
    <head>
        <title>Title</title>
    </head>
    <body>
        This is a final exception display page
    </body>
</html>
④ Test abnormal jump
@RequestMapping("/quick22")
@ResponseBody
public void quickMethod22() throws IOException, ParseException {
    SimpleDateFormat simpleDateFormat = new SimpleDateFormat("yyyy-MM-dd");
    simpleDateFormat.parse("abcde");
}
5 key points of knowledge
Exception handling method
- Configure simple exception handler SimpleMappingExceptionResolver
- Custom exception handler
- Create an exception handler class to implement HandlerExceptionResolver
- Configure exception handler
- Write exception page
- Test abnormal jump