Spring
1. Introduction
1.1. What is Spring
Spring is a lightweight open source framework for layered Java SE/EE application full stack, with IoC (Inverse Of Control) and AOP (Aspect Oriented Programming) as the kernel.
It provides many enterprise application technologies such as presentation layer SpringMVC, persistence layer spring JDBC template and business layer transaction management. It can also integrate many famous third-party frameworks and class libraries in the world, and gradually become the most used open source framework for Java EE enterprise applications.
In 2002, Rod Jahnson first launched the Spring framework prototype interface21 framework.
On March 24, 2004, the Spring framework was redesigned based on the interface 21 framework and released the official version of 1.0.
Spring concept: make the existing technology more practical. Itself is a hodgepodge, integrating the existing framework technology
Official website: http://spring.io/
Official download address: https://repo.spring.io/libs-release-local/org/springframework/spring/
GitHub : https://github.com/spring-projects
1.2 advantages of Spring
- Convenient decoupling and simplified development
- Declarative transaction support
- Spring is a lightweight framework, non intrusive. (Note: it may not be lightweight now)
- Control inversion IoC, facing section Aop
- Support for things and integrate various excellent frameworks
Spring is a lightweight container (framework) for inversion of control (IoC) and aspect oriented (AOP).
1.3. Spring architecture

The Spring framework is a layered architecture consisting of seven well-defined modules. The Spring module is built on top of the core container, which defines how bean s are created, configured, and managed.
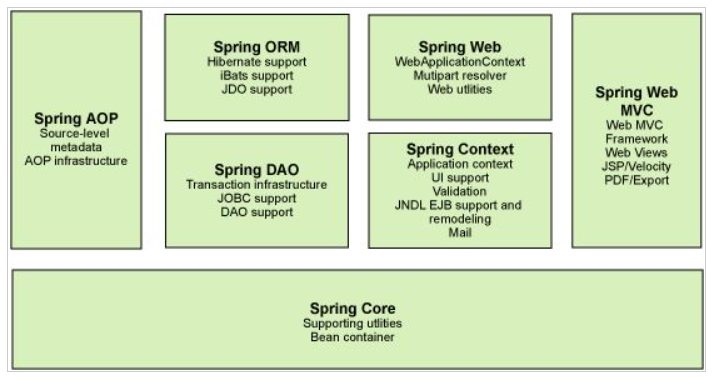
- Spring Core: the core container, which provides the basic functions of the spring framework. The main component of the core container is BeanFactory, which is the implementation of the factory pattern. BeanFactory uses the control inversion IOC pattern to separate the configuration and dependency specifications of the application from the actual application code.
- Spring Context: inherits BeanFactory, provides context information, and extends JNDI, EJB, e-mail, internationalization, checksum scheduling and other functions.
- Spring AOP: the spring AOP module directly integrates aspect oriented programming functions into the spring framework, so it is easy for the spring framework to manage any object that supports AOP. The spring AOP module provides transaction management services for objects in spring based applications. By using spring AOP, declarative transaction management can be integrated into applications without relying on components.
- Spring ORM: the spring framework inserts several ORM frameworks to provide ORM object relationship tools, including JDO, Hibernate and iBatis SQL Map. So these all follow spring's common transaction and DAO exception hierarchy.
- Spring DAO: provides an abstraction layer of JDBC and a declarative transaction management method. And greatly reduces the need to write exception code data (such as opening and closing connections).
- Spring Web: provides basic context information for web development. Existing web frameworks, such as JSF, Tapestry, structures, etc., provide integration.
- Spring MVC: the MVC framework is a fully functional MVC implementation for building Web applications. Through the policy interface, the MVC framework becomes highly configurable. MVC accommodates a large number of view technologies, including JSP, Velocity, Tiles, iText and POI.
1.4. Expansion
Spring Boot and Spring Cloud
- Spring Boot is a set of rapid configuration scaffolds of spring, which can quickly develop a single microservice based on Spring Boot;
- Spring Cloud is implemented based on Spring Boot;
- Spring Boot focuses on a single micro service individual that is fast and easy to integrate. Spring Cloud focuses on the overall service governance framework;
- Spring Boot uses the concept that constraints are better than configuration. Many integration schemes have been selected for you. You can't configure without configuration. A large part of Spring Cloud is implemented based on Spring Boot. Spring Boot can use development projects independently of Spring Cloud, but Spring Cloud is inseparable from Spring Boot and belongs to dependency.
- SpringBoot plays a connecting role in SpringClound. If you want to learn spring cloud, you must learn SpringBoot.
2. What is a container
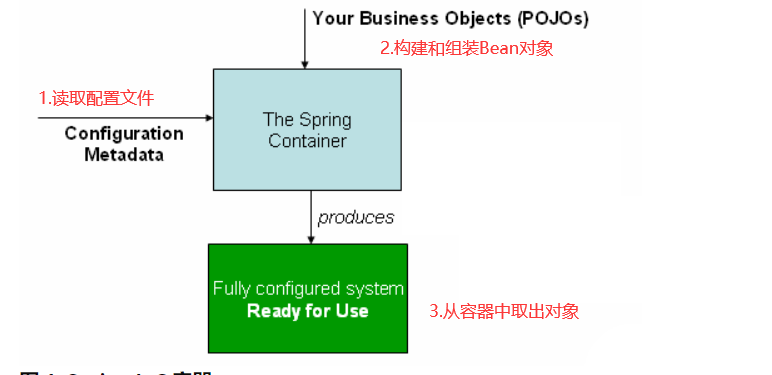
- Conceptually, the container is the core of Spring and is used to manage objects. The container will create objects, connect them together, configure, and manage their entire life cycle from creation to destruction.
- The org.springframework.context.ApplicationContext interface represents the Spring IoC container and is responsible for instantiating, configuring and assembling bean s. The container obtains instructions about which objects to instantiate, configure, and assemble by reading the configuration metadata. Configuration metadata is represented in XML, Java annotations, or Java code. It allows you to express the objects that make up your application and the rich interdependencies between these objects.
- ApplicationContextSpring provides several implementations of this interface. In stand-alone applications, you usually create ClassPathXmlApplicationContext or FileSystemXmlApplicationContext objects.
3. IOC container
**Inversion of control (IoC) is a design idea. DI (dependency injection) is a method to realize IoC. * * some people think that DI is just another way of saying IoC. In programs without IoC, we use object-oriented programming. The creation of objects and the dependencies between objects are completely hard coded. In programs, the creation of objects is controlled by the program itself. After the control is reversed, the creation of objects is transferred to a third party. The control reversal is that the way to obtain dependent objects is reversed.
Inversion of control is a way to produce or obtain specific objects through description (XML or annotation) and through a third party. In Spring, the IoC container implements control inversion, and its implementation method is dependency injection (DI).
3.1. Configuration metadata
- IoC is the core content of the Spring framework. IoC is perfectly implemented in a variety of ways. You can use XML configuration or annotations. The new version of Spring can also implement IoC with zero configuration.
- During initialization, the Spring container reads the configuration file first, creates and organizes objects according to the configuration file or metadata, and stores them in the container. When the program is used, it takes out the required objects from the Ioc container.
Import jar package:
<!-- https://mvnrepository.com/artifact/org.springframework/spring-webmvc -->
<dependency>
    <groupId>org.springframework</groupId>
    <artifactId>spring-webmvc</artifactId>
    <version>5.3.13</version>
</dependency>
applicationContext.xml configuration file:
Generally, spring containers are called (ApplicationContext.xml) configuration files.
<?xml version="1.0" encoding="UTF-8"?>
<beans xmlns="http://www.springframework.org/schema/beans"
    xmlns:xsi="http://www.w3.org/2001/XMLSchema-instance"
    xsi:schemaLocation="http://www.springframework.org/schema/beans
        https://www.springframework.org/schema/beans/spring-beans.xsd">

    <bean id="petStore" class="org.springframework.samples.jpetstore.services.PetStoreServiceImpl">
        <property name="accountDao" ref="accountDao"/>
        <property name="name" value="value"/>
    </bean>

    <bean id="..." class="...">
        <!-- collaborators and configuration for this bean go here -->
    </bean>
    <!-- more bean definitions go here -->
</beans>
3.2. How to use containers
- Implementation class of ApplicationContext
| Implementation class | effect |
|---|---|
| ClassPathXmlApplicationContext | It loads the configuration file from the root path of the class. This is recommended |
| FileSystemXmlApplicationContext | It loads the configuration file from the disk path. The configuration file can be anywhere on the disk |
| AnnotationConfigApplicationContext | When configuring container objects with annotations, you need to use this class to create a spring container. It is used to read annotations |
Instantiate the container to load multiple configuration files
ApplicationContext context = new ClassPathXmlApplicationContext("applicationContext.xml", "daos.xml");
getBean(): get the bean in the container
//GetBean (string name, class < T > requiredtype) gets the instance object
PetStoreService service = context.getBean("petStore", PetStoreService.class);
4. Spring configuration
4.1. Basic configuration of Bean tag
- Spring configuration can have one or more < bean > tags in < beans >.
- The bean definition corresponds to the actual objects that make up the application. Generally, service layer objects, data access objects (DAO), presentation objects (such as Struts operation instances), infrastructure objects (such as hibernate sessionfactories), JMS queues, etc. are defined. In general, fine-grained domain objects are not configured in the container, because creating and loading domain objects is usually the responsibility of the Dao and business logic. However, you can use the integration of Spring and AspectJ to configure objects created outside the control of the IoC container.
- id: used to identify a single bean, variable name.
- If no id is configured, name is the default identifier. If id is configured and name is configured, name is an alias.
- If you do not configure id and name, you can get the object according to applicationContext.getBean(.class).
- Class: attribute defines the type of bean and uses the fully qualified class name, object.
<bean id="fromName" name="toName h2,h3;h4" class="com.kuang.pojo.Hello">
    <property name="name" value="Spring"/>
</bean>
4.2 Bean instantiation
1. Constructor instantiation
- Nonparametric structure
<bean id="exampleBean" class="examples.ExampleBean"/>

<bean name="anotherExample" class="examples.ExampleBeanTwo"/>
2. Factory static method instantiation
3. Factory instance method instantiation
4.3 Bean dependency injection
concept
- Dependency injection (DI)
- Dependency: the creation of a Bean object depends on the container, and the Bean object depends on resources.
- Injection: refers to the resources that the Bean object depends on, which are set and assembled by the container.
1. Constructor injection
- Parametric constructor injection
<!-- The first is set according to the parameter name -->
<bean id="userT" class="com.kuang.pojo.UserT">
    <!-- name Refers to the parameter name -->
    <constructor-arg name="name" value="value"/>
</bean>

<!-- Second basis index Parameter subscript setting -->
<bean id="userT" class="com.kuang.pojo.UserT">
    <!-- index Refers to the construction method , Subscript starts at 0 -->
    <constructor-arg index="0" value="value"/>
</bean>

<!-- The third is set according to the parameter type -->
<bean id="userT" class="com.kuang.pojo.UserT">
    <constructor-arg type="java.lang.String" value="value"/>
</bean>
2. Setter injection
The attribute to be injected must have a set method. The method name of the set method is capitalized by the first letter of the set + attribute. If the attribute is of Boolean type and there is no set method, it is the is method.
Test class:
import java.util.List;
import java.util.Map;
import java.util.Properties;
import java.util.Set;

public class Student {

    private String name;//Basic type
    private Address address;//Entity properties
    private String[] books;//array
    private List<String> hobbys;//list collection
    private Map<String,String> card;//map set
    private Set<String> games;//Set set
    private String wife;//Null, may not have a wife
    private Properties info;//Profile injection

    public void setName(String name) {
        this.name = name;
    }

    public void setAddress(Address address) {
        this.address = address;
    }

    public void setBooks(String[] books) {
        this.books = books;
    }

    public void setHobbys(List<String> hobbys) {
        this.hobbys = hobbys;
    }

    public void setCard(Map<String, String> card) {
        this.card = card;
    }

    public void setGames(Set<String> games) {
        this.games = games;
    }

    public void setWife(String wife) {
        this.wife = wife;
    }

    public void setInfo(Properties info) {
        this.info = info;
    }

    public void show(){
        System.out.println("name="+ name
                           + ",address="+ address.getAddress()
                           + ",books="
                          );
        for (String book:books){
            System.out.print("<<"+book+">>\t");
        }
        System.out.println("\n hobby:"+hobbys);

        System.out.println("card:"+card);

        System.out.println("games:"+games);

        System.out.println("wife:"+wife);

        System.out.println("info:"+info);

    }
}
1. Basic type injection
	<!--
        name:Attribute name
			name You can set multiple aliases,You can use commas,semicolon,Space separated
        ref:It means another bean Defined id Name, reference Spring Objects created in
        value:Set the value of the basic data type for the attribute, and the underlying layer obtains it through reflection set method
	-->
<property name="name" value="pip"/>
2. Bean object injection
<bean id="address" class="com.pip.pojo.Address">
    <property name="address" value="Shaanxi"/>
</bean>
<bean id="student" class="com.pip.pojo.Student">
    <property name="address" ref="address"/>
</bean>
3. Array injection
<property name="books">
    <array>
        <value>Journey to the West</value>
        <value>The Dream of Red Mansion</value>
        <value>Water Margin</value>
    </array>
</property>
4. list collection injection
<property name="hobbys">
    <list>
        <value>listen to the music</value>
        <value>watch movie</value>
        <value>Mountain climbing</value>
    </list>
</property>
5. map set injection
<property name="card">
    <map>
        <entry key="cell-phone number" value="12341234123"/>
        <entry key="id" value="00001"/>
    </map>
</property>
6. Set set injection
<property name="games">
    <set>
        <value>LOL</value>
        <value>BOB</value>
        <value>COC</value>
    </set>
</property>
7. Null injection
<property name="wife">
    <null/>
</property>

<bean class="ExampleBean">
    <property name="email" value=""/>//Here is the empty string
</bean>
8. Properties injection
<property name="info">
    <props>
        <prop key="Student number">20190604</prop>
        <prop key="Gender">male</prop>
        <prop key="full name">Xiao Ming</prop>
    </props>
</property>
3. Other injection
p named and c named injection
1. P namespace injection
First, you need to introduce the P namespace:
xmlns:p="http://www.springframework.org/schema/p"
The essence of P namespace injection is also set method injection, but it is more convenient than the above set method injection, which is mainly reflected in the configuration file, as follows:
<!--P(attribute: properties)Namespace , Property should still be set set method-->
 <bean id="user" class="com.pip.pojo.User" p:name="pip" p:age="18"/>
2. c namespace injection
- Constructor injection requires a parameter structure
A constraint file needs to be added to the header file
xmlns:c="http://www.springframework.org/schema/c"
 <!--C(structure: Constructor)Namespace , Property should still be set set method-->
 <bean id="user" class="com.pip.pojo.User" c:name="pip" c:age="18"/>
4.4. Bean automatic assembly
There are three assembly mechanisms for bean s in Spring:
- Explicit configuration in xml; (use ref to display the assembly)
- Explicit configuration in java;
- Implicit bean discovery mechanism and automatic assembly.
concept
- Automatic assembly is a way to use spring to meet bean dependencies
- spring will find the bean that a bean depends on in the application context.
How Spring's automatic assembly is implemented:
- Component scanning: spring will automatically discover the bean s created in the application context;
- Autowiring: spring automatically satisfies the dependencies between bean s, which is what we call IoC/DI;
1,byName
autowire byName
Spring Find an attribute with the same name as the attribute you want to auto assemble bean(according to id Is the same as the property name). For example, if a bean The definition is set to auto assemble by name and it contains a master Property (that is, it has a setMaster(..)Method), Spring Will find a named bean definition master And use it to set properties.
<!--
	automatic assembly byName There must be corresponding set method
-->
<bean id="address" class="com.pip.pojo.Address"></bean>
<!--User has one address Entity class properties-->
<bean id="user" class="com.pip.pojo.User" autowire="byName">
   <property name="u_name" value="pip"/>
</bean>
2,byType
autowire byType
If there is exactly one attribute type in the container bean,The attribute is automatically assembled. If there are more than one, a fatal exception will be thrown and cannot be byType For this bean Use automatic assembly. If there is no match bean,Then nothing will happen (property is not set).
<!--Here we use cats and dogs as examples-->
<bean id="dog" class="com.pip.pojo.Dog"/>
<bean id="cat" class="com.pip.pojo.Cat"/>
<bean id="cat2" class="com.pip.pojo.Cat"/>

<bean id="user" class="com.pip.pojo.User" autowire="byType">
   <property name="u_name" value="pip"/>
</bean>
Advantages and disadvantages of automatic assembly
advantage:
- Automatic assembly can significantly reduce the need to specify attributes or constructor parameters.
- Automatic assembly can update the configuration as the object develops. For example, if you need to add a dependency to a class, the dependency can be satisfied automatically without modifying the configuration. Therefore, automatic assembly is particularly useful in the development process. When the contemporary code library becomes more stable, it will not deny the option to switch to explicit assembly.
4.5 Bean scope
Scope: refers to the scope of the object. The values are as follows:
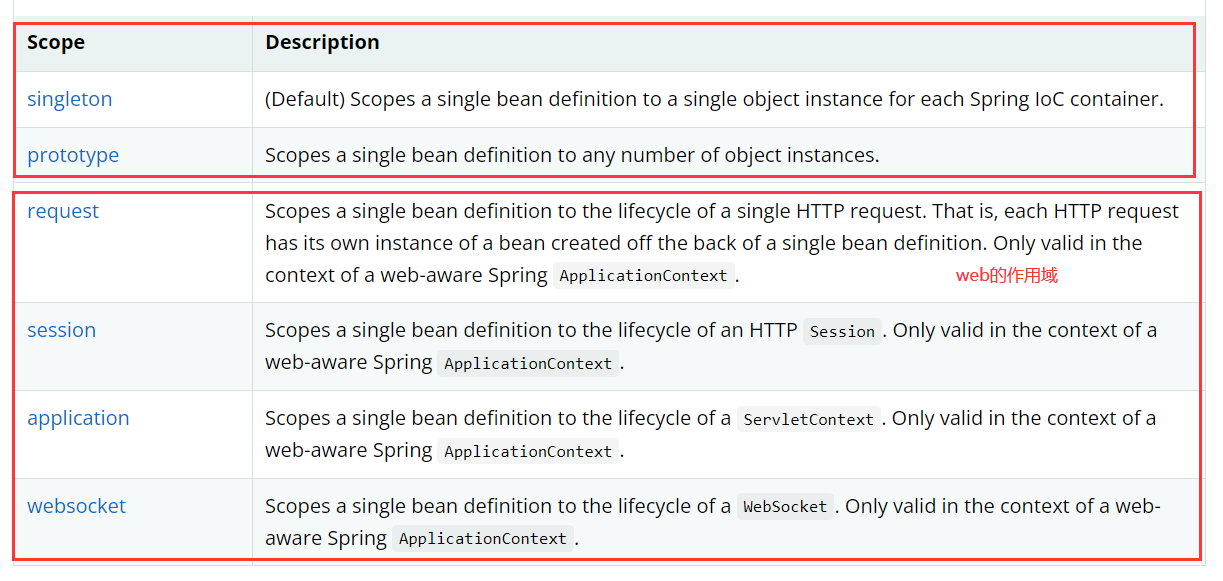
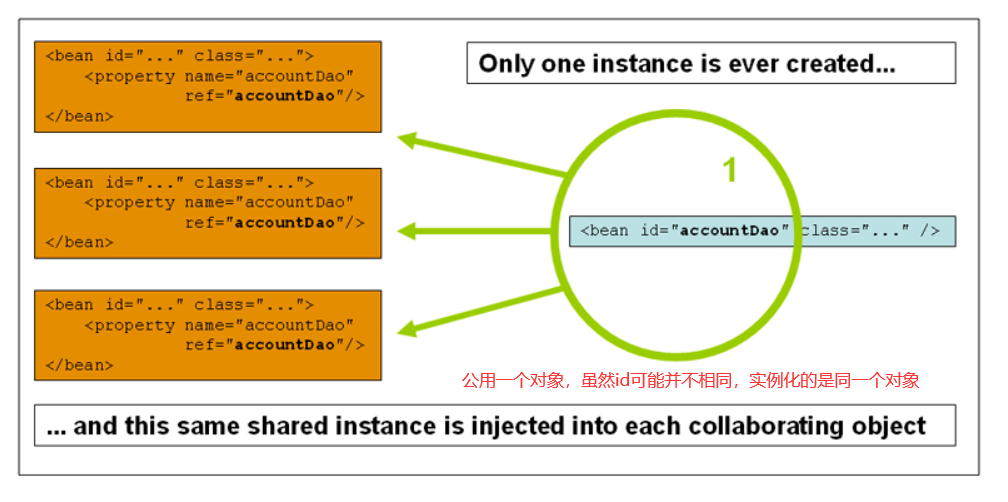
singleton
Singleton scope (singleton mode)
- When a bean definition is defined and its scope is singleton, the Spring IoC container will create an instance of the object defined by the bean definition. The single instance is stored in the cache of such a singleton bean, and all subsequent requests and references to the named bean return the cache object. In vernacular, it means sharing objects in a cache
- Number of instantiations of Bean: 1
- Bean instantiation timing: instantiate the configured bean instance when the Spring core file is loaded
- Bean lifecycle:
- Object creation: when the application loads and creates a container, the object is created
- Object running: the object remains alive as long as the container is
- Object destruction: when the application unloads and destroys the container, the object is destroyed
- Singleton scope is the default scope in Spring. To define a bean as a singleton in XML, as shown in the following example:
<bean id="accountService" class="com.something.DefaultAccountService"/>

<!-- the following is equivalent, though redundant (singleton scope is the default) -->
<bean id="accountService" class="com.something.DefaultAccountService" scope="singleton"/>
Prototype
Prototype scope (prototype pattern)
- The non single prototype scope of bean deployment causes a new bean instance to be created each time a request is made to a particular bean.
- Typically, prototype scopes are used for all stateful beans and singleton scopes are used for stateless beans.
- Number of Bean instantiations: multiple
- Instantiation timing of Bean: instantiate Bean when calling getBean() method
- Object creation: creates a new object instance when using an object
- Object running: as long as the object is in use, it will always be alive
- Object destruction: when an object is not used for a long time, it is recycled by the Java garbage collector
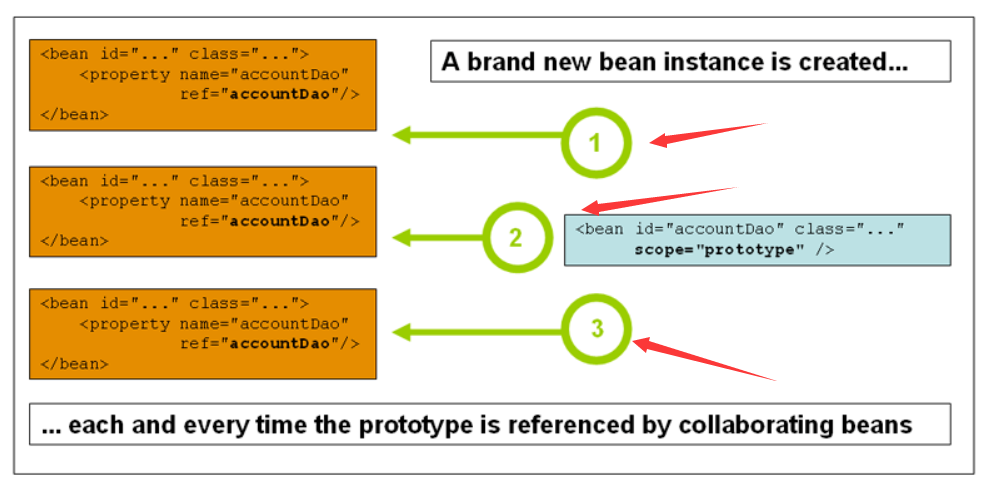
The following example defines a bean as a prototype in XML:
<bean id="accountService" class="com.something.DefaultAccountService" scope="prototype"/>
Request
Consider the following XML configuration for the bean definition:
<bean id="loginAction" class="com.something.LoginAction" scope="request"/>
The Spring container loginaction uses the bean definition for each HTTP request through loginaction to create a new instance of the bean. That is, the scope of the loginaction bean is at the HTTP request level. You can change the internal state of the created instance as needed, because other instances created from the same loginaction bean definition will not see these state changes. They are personal requirements. When the request completes processing, the beans within the request scope will be discarded.
When using annotation driven components or Java configurations, the @ RequestScope annotation can be used to assign components to the request scope. The following example shows how to do this:
@RequestScope
@Component
public class LoginAction {
    // ...
}
Session
Consider the following XML configuration for the bean definition:
<bean id="userPreferences" class="com.something.UserPreferences" scope="session"/>
The Spring container userpreferences creates a new instance Session of a bean by using a bean definition in the life cycle of a single http. In other words, the userpreferences bean is effectively limited to the HTTP Session level. Like request scoped beans, you can change the internal state of the created instance as needed because you know that sessions also use instances created from the same userpreferences bean definition. Other HTTP instances will not see these state changes because they are specific to a single HTTP Session. When the HTTPSession is finally discarded, the bean Session whose scope is the specific HTTP will also be discarded.
When using annotation driven components or Java configuration, you can use the @ SessionScope annotation to assign components to the session scope.
@SessionScope
@Component
public class UserPreferences {
    // ...
}
Application
Consider the following XML configuration for the bean definition:
<bean id="appPreferences" class="com.something.AppPreferences" scope="application"/>
The Spring container apppreferences uses the bean definition once for the entire Web application through apppreferences to create a new instance of the bean. That is, the scope of appPreferencesbean is at the ServletContext level and stored as a regular ServletContext attribute. This is a bit like a Spring singleton bean, but it is different in two important aspects: it is a singleton per ServletContext, not per Spring ApplicationContext (there may be multiple in any given Web application), and it is actually public, so it is visible as a ServletContext attribute
When using annotation driven components or Java configuration, you can use the @ ApplicationScope annotation to assign components to the application scope. The following example shows how to do this:
@ApplicationScope
@Component
public class AppPreferences {
    // ...
}
4.6. Bean alias
Alias the Bean outside the Bean definition
<!--
	name:bean name
	alias:alias
-->
<alias name="fromName" alias="toName"/>
4.7. Importing other configuration files
The cooperation of the team is realized by import ing other container xml files
<import resource="{path}/beans.xml"/>
4.8 context label
Before using the context tag, you need to introduce the context constraint
Enable annotation support:
<context:annotation-config/>
Specify annotation scanning package: support to automatically create bean s for classes under the package and register them in the spring container, including the function of enabling annotation support)
<context:component-scan base-package="Specify the packages to scan"/>
Used to load the configuration in the. properties file:
<context:property-placeholder location="xx.properties"/>
6. Based on original annotation
1. Introduction
concept
Spring is a light code and heavy configuration framework. The configuration is heavy and affects the development efficiency. Therefore, annotation development is a trend. Annotation instead of xml configuration file can simplify the configuration and improve the development efficiency.
Quick description
| annotation | explain |
|---|---|
| @Component | Used on classes to instantiate beans |
| @Controller | Use to instantiate beans on web tier classes |
| @Service | Used on the service layer class to instantiate beans |
| @Repository | Used on dao layer classes to instantiate beans |
| @Autowired | Use on field for type dependent injection |
| @Qualifier | Used in conjunction with @ Autowired for dependency injection by name |
| @Resource | Equivalent to @ Autowired+@Qualifier, injected by name |
| @Value | Inject common attributes |
| @Scope | Label the scope of the Bean |
| @PostConstruct | Use to label the method, which is the initialization method of the Bean |
| @PreDestroy | Use to mark the method as the Bean's destruction method |
2. Annotation usage
2.1 configuration
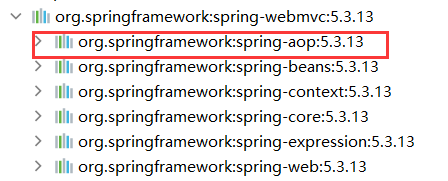
Import dependent jar package: Spring AOP jar package
Introducing context constraints
<?xml version="1.0" encoding="UTF-8"?>
<beans xmlns="http://www.springframework.org/schema/beans"
      xmlns:xsi="http://www.w3.org/2001/XMLSchema-instance"
      xmlns:context="http://www.springframework.org/schema/context"
      xsi:schemaLocation="http://www.springframework.org/schema/beans
       http://www.springframework.org/schema/beans/spring-beans.xsd
       http://www.springframework.org/schema/context
       http://www.springframework.org/schema/context/spring-context.xsd">
</beans>
Configure which packages to scan for annotations:
When developing with annotations, you need to configure component scanning in applicationContext.xml to specify which package and beans under its sub packages need to be scanned in order to identify the classes, fields and methods configured with annotations.
<!--Specify annotation scan package-->
<context:component-scan base-package="Specify the packages to scan"/>
@Component
Using @ component or @ Repository to identify the corresponding class requires Spring to instantiate.
Write classes under the specified package and add annotations
@Component("user")//id can be added or not
// Equivalent to < bean id = "user" class = "currently annotated class" / > in the configuration file
public class User {
   public String name = "pip";
}
@Component three derived annotations
As like as two peas Component, they are just different names.
- @Controller: web layer
- @Service: service layer
- @Repository: dao layer
@Autowired
concept
- @Autowired is automatically assembled according to type and does not support id matching.
- @Autowired can be added to properties or methods
- You can not write the set method, but it is not recommended!
- Using @ component or @ Service to identify UserServiceImpl requires Spring to instantiate it
- Use @ Autowired or @ Autowired+@Qulifier or @ Resource to inject userDao
Configuration * * applicationContext.xml file:**
<?xml version="1.0" encoding="UTF-8"?>
<beans xmlns="http://www.springframework.org/schema/beans"
       xmlns:xsi="http://www.w3.org/2001/XMLSchema-instance"
       xmlns:context="http://www.springframework.org/schema/context"
       xsi:schemaLocation="http://www.springframework.org/schema/beans
                           https://www.springframework.org/schema/beans/spring-beans.xsd
                           http://www.springframework.org/schema/context
                           https://www.springframework.org/schema/context/spring-context.xsd">
    <!--Enable attribute annotation support-->
    <context:annotation-config/>
    <!--Here we use cats and dogs as examples-->
    <bean id="dog" class="com.pip.pojo.Dog"/>
    <bean id="cat" class="com.pip.pojo.Cat"/>
    <bean id="cat2" class="com.pip.pojo.Cat"/>

    <bean id="user" class="com.pip.pojo.User" autowire="byType">
        <property name="u_name" value="pip"/>
    </bean>
</beans>
Bean
//Description: false, the object can be null; true, the object must be saved and cannot be null.
@Autowired(required=false)
private Cat cat;
@Autowired
private Dog dog;
private String u_name;
@Qualifier
- @Qualifier cannot be used alone.
- @Autowired is automatically assembled according to the type. With @ Qualifier, it can be automatically assembled according to byName
@Autowired(required=false)
@Qualifier(value = "cat2")
private Cat cat;
@Autowired
private Dog dog;
private String u_name;
@Resource
- @If the Resource has a specified name attribute, first search the assembly by name according to the attribute;
- Secondly, assemble in the default byName mode;
- If none of the above is successful, it will be assembled automatically by byType.
@Similarities and differences between Autowired and @ Resource:
1. Both @ Autowired and @ Resource can be used to assemble bean s. Can be written on a field or on a setter method.
2. @ Autowired is assembled by type by default (belonging to the spring specification). By default, dependent objects must exist. If null value is allowed, its required property can be set to false, such as @ Autowired(required=false). If we want to use name assembly, it can be used in combination with @ Qualifier annotation
3. @ Resource (belonging to J2EE replication), equivalent to @ Autowired+@Qualifier, is injected according to the name, which can be specified through the name attribute. If the name attribute is not specified, when the annotation is written on the field, the default is to take the field name to search by name. If the annotation is written on the setter method, the default is to take the attribute name for assembly. Assemble by type when no bean matching the name is found. However, it should be noted that once the name attribute is specified, it will only be assembled by name.
They have the same function. They inject objects by annotation, but the execution order is different@ Autowired byType first, @ Resource byName first.
@value
Use annotations to inject basic attributes, which can be added to the set method.
@Component("user")
// Equivalent to < bean id = "user" class = "currently annotated class" / > in the configuration file
public class User {
    @Value("pip")
    // Equivalent to < property name = "name" value = "PIP" / > in the configuration file
    public String name;
}
@scope
-
Use @ Scope to label the Scope of the Bean
-
Singleton: by default, Spring creates this object in singleton mode. Close the factory and all objects will be destroyed.
-
prototype: multi instance mode. Close the factory and all objects will not be destroyed. The internal garbage collection mechanism will recycle
@Controller("user")
@Scope("prototype")
public class User {
   @Value("pip")
   public String name;
}
7. Spring new annotation
1. Introduction
concept
The above annotations can not completely replace the xml configuration file. The configurations that need to be replaced by annotations are as follows
Quick description
| annotation | explain |
|---|---|
| @Configuration | Used to specify that the current class is a Spring configuration class from which annotations will be loaded when creating a container |
| @ComponentScan | Used to specify the packages that Spring will scan when initializing the container. The function is the same as < context: component scan base package = "com. PIP" / > in the xml configuration file of Spring |
| @Bean | On a method, annotations store the return value of the method in the Spring container |
| @PropertySource | Used to load the configuration in the. properties file |
| @Import | Used to import other configuration classes |
2. Annotation usage
@Configuration
Used to specify that the current class is a Spring configuration class from which annotations will be loaded when creating a container
@Configuration
public class SpringConfiguration {
}
@ComponentScan
Used to specify the packages that Spring will scan when initializing the container. The function is the same as that in the xml configuration file of Spring
@ComponentScan("com.pip")//Equivalent to < context: component scan base package = "com. PIP" / >
public class SpringConfiguration {
}
@Import
Used to import other configuration classes
@Configuration
@ComponentScan("com.pip")
@Import({DataSourceConfiguration.class})//Same as < import resource = "{path} / beans. XML" / > function
public class SpringConfiguration {
}
@Bean
Equivalent to the previous < bean > tag used on the method, the annotation stores the return value of the method in the Spring container
@Bean and @ Component can be used separately or at the same time. I think there is no difference
@Configuration
public class AppConfig {

    @Bean("name")//name can be added or not according to demand
    public Bean bean() {
        return new Bean();
    }
}
@PropertySource
Used to load the configuration in the. properties file
8. Agent mode
Here is a brief description of the agent technology of JDK
Static proxy
Static agent analysis
- Abstract object: it is generally implemented using interfaces or abstract classes
- Real objects: represented roles
- Proxy object: proxy real role; After representing a real role, you usually do some ancillary operations. Such as adding logs, etc
- Call object: use the proxy role to perform some operations.
Having learned this, I will not explain it through practical examples, but through code examples
Abstract object:
public interface AbstractSubject {
    void method();
}
Real object:
public class RealSubject implements AbstractSubject{
    @Override
    public void method() {
        System.out.println("In real objects method method");
    }
}
Proxy object:
public class Proxy implements AbstractSubject{
    private RealSubject rs;

    public void setRs(RealSubject rs) {
        this.rs = rs;
    }

    @Override
    public void method() {
        log();
        rs.method();
    }

    /**
    * Added log function
    */
    public static void log(){
        System.out.println(new Date);
    }
}
Call object:
RealSubject rs = new RealSubject();
Proxy proxy = new Proxy();
//Inject real objects into proxy objects
proxy.setRs(rs);
//Call the method of the proxy object
proxy.method();
//result:
//Thu Nov 25 01:18:24 CST 2021
//method methods in real objects
Disadvantages: each proxy object needs us to write, which is very time-consuming and labor-consuming, and can be solved through dynamic proxy.
Dynamic agent
Class based dynamic proxy - cglib, I don't remember it until I learn it
The objects of a dynamic proxy are the same as those of a static proxy
Abstract object:
public interface AbstractSubject {
    void method();
}
Real object:
public class RealSubject implements AbstractSubject{
    @Override
    public void method() {
        System.out.println("In real objects method method");
    }
}
Dynamically generate proxy objects:
Core: InvocationHandler and Proxy
import java.lang.reflect.InvocationHandler;
import java.lang.reflect.Method;
import java.lang.reflect.Proxy;

public class ProxyInvocationHandler implements InvocationHandler {
    private Object object;

    public void setObject(Object object) {
        this.object = object;
    }

    //Generate dynamic proxy object
    //Proxy.newProxyInstance(ClassLoader loader, Class<?>[] interfaces, InvocationHandler h);
    //Loader: defines the class loader for the proxy class
	//Interfaces: list of interfaces to be implemented by the proxy class
	//h: Assign the call handler for the method call
    public Object getProxy(){
        return Proxy.newProxyInstance(this.getClass().getClassLoader(),
                object.getClass().getInterfaces(),this);
    }

     /**
     * When a dynamic proxy object calls an interface method, the method is called automatically
     * @param proxy:The proxy instance that called the method
     * @param method:The method corresponds to an instance calling an interface method on a proxy instance. The declared class of the method object will be the interface declared by the method, which can be the super interface of the proxy interface of the proxy class inheriting the method.
     * @param args:parameter
     * @return
     * @throws Throwable
     */
    @Override
    public Object invoke(Object proxy, Method method, Object[] args) throws Throwable {
        System.out.println("Pre enhancement");
        Object o = method.invoke(object, args);
        System.out.println("Post enhancement");
        return o;
    }
}
Call object:
RealSubject rs = new RealSubject();
ProxyInvocationHandler pih = new ProxyInvocationHandler();
//Add real objects to proxy objects
pih.setObject(rs);
//Methods in dynamic proxy interface
AbstractSubject proxy = (AbstractSubject) pih.getProxy();
//Proxy object call method
proxy.method();
9,AOP
1. What is AOP?
AOP is the abbreviation of Aspect Oriented Programming, which means Aspect Oriented Programming. It is a technology to realize the unified maintenance of program functions through precompiled mode and runtime dynamic agent.
AOP is the continuation of OOP, a hot spot in software development, an important content in Spring framework, and a derivative paradigm of functional programming. AOP can isolate each part of business logic, reduce the coupling between each part of business logic, improve the reusability of program, and improve the efficiency of development.
AOP bottom layer is realized through dynamic agent! During operation, Spring dynamically generates proxy objects through dynamic proxy technology. When the proxy object method is executed, it intervenes to enhance the function, and calls the method of the target object, so as to complete the function enhancement.
1.2 role and advantages of AOP
- Function: during the running of the program, enhance the function of the method without modifying the source code.
- Advantages: reduce repeated code, improve development efficiency, and easy to maintain.
1.3 dynamic agent technology of AOP
Common dynamic agent technology
- JDK agent: dynamic agent technology based on interface
- cglib proxy: dynamic proxy technology based on parent class
2. AOP related terms
- Target: the target object of the proxy
- Proxy: after a class is enhanced by AOP weaving, a resulting proxy class is generated.
- Joinpoint: the so-called connection point refers to those intercepted points. In spring, these points refer to methods, because spring only supports connection points of method types.
- Pointcut: the so-called pointcut refers to the definition of which joinpoints we want to intercept. (enhanced method)
- Advice: the so-called notification means that what needs to be done after intercepting the Joinpoint is notification. (that is, it is a method in the facet class)
- Aspect: a combination of pointcuts and notifications (Introductions). (that is, it is a class)
- Weaving: refers to the process of applying enhancements to the target object to create a new proxy object. spring uses dynamic proxy weaving, while AspectJ uses compile time weaving and class load time weaving. (process of combining pointcut with notification)
3. Configuration details
3.1. Import jar package
- Import weaving jar package
<dependency>
    <groupId>org.aspectj</groupId>
    <artifactId>aspectjweaver</artifactId>
    <version>1.9.7</version>
</dependency>
- Import spring jar package
<dependency>
    <groupId>org.springframework</groupId>
    <artifactId>spring-webmvc</artifactId>
    <version>5.3.13</version>
</dependency>
3.2. Detailed configuration
3.2.1 detailed explanation of xml configuration file
- Import aop constraints

- aop weaving configuration
<aop:config>
	<aop:aspect ref="Cut class>
        <!--notice-->
	</aop:aspect>
</aop:config>
- If multiple pointcut expressions are the same, the pointcut expression can be extracted and notified through pointcut Ref.
<aop:pointcut id="diyPonitcut" expression="execution(* com.pip.Service.UserServiceImpl.*(..))"/>
- Notification types: pre notification, post notification, surround notification, exception throw notification, and final notification
<aop:Notification type method="Method name in facet class" pointcut="Tangent expression"></aop:Notification type>
| name | label | explain |
|---|---|---|
| Before advice | <aop:before> | Used to configure pre notification. Specifies that the enhanced method is executed before the pointcut method |
| Post notification | <aop:after-returning> | Used to configure post notifications. Specifies that the enhanced method is executed after the pointcut method |
| Around Advice | <aop:around> | Used to configure surround notifications. Specifies that the enhanced method is executed before and after the pointcut method |
| Exception throw notification | <aop:throwing> | Used to configure exception throw notifications. Specifies that the enhanced method is executed when an exception occurs |
| Final notice | <aop:after> | Used to configure final notifications. The enhanced mode will be executed regardless of whether there are exceptions |
3.2.2 expression of tangent point
execution([Modifier ] Return value type package name.Class name.Method name(parameter))
- The access modifier can be omitted
- The returned value type, package name, class name and method name can be represented by an asterisk *
- A point between the package name and the class name represents the classes under the current package, and two points... Represent the classes under the current package and its sub packages
- The parameter list can use two points... To represent any number and any type of parameter list
For example:
execution(public void com.pip.aop.Target.method())
execution(void com.pip.aop.Target.*(..))
execution(* com.pip.aop.*.*(..))
execution(* com.pip.aop..*.*(..))
execution(* *..*.*(..))
4. Three ways to implement AOP
4.1. Implementation through Spring API
Through API interface
Write interface class:
public interface UserService {
    void add();
    void delete();
    void uadate();
    void select();
}
Implementation class:
import org.springframework.stereotype.Component;

@Component()
public class UserServiceImpl implements UserService{

    @Override
    public void add() {
        System.out.println("Added a user");
    }

    @Override
    public void delete() {
        System.out.println("A user was deleted");
    }

    @Override
    public void uadate() {
        System.out.println("Modified a user");
    }

    @Override
    public void select() {
        System.out.println("Query user");
    }
}
Write two enhancement classes, one pre enhancement and one post enhancement:
import org.springframework.aop.MethodBeforeAdvice;
import java.lang.reflect.Method;
public class BeforeLog implements MethodBeforeAdvice {
    //Method: the method of the target object to execute
    //objects: parameters of the called method
    //Object: target object
    @Override
    public void before(Method method, Object[] args, Object target) throws Throwable {
        System.out.println(target.getClass().getName() + "of" + method.getName()+ "Method was executed");
    }
}

import org.springframework.aop.AfterReturningAdvice;
import java.lang.reflect.Method;
public class AfterLog implements AfterReturningAdvice {
    //returnValue return value
    //Method called method
    //args parameter of the object of the called method
    //Target the called target object
    @Override
    public void afterReturning(Object returnValue, Method method, Object[] args, Object target) throws Throwable {
        System.out.println("Yes" + target.getClass().getName()
                +"of"+method.getName()+"method,"
                +"Return value:"+returnValue);
    }
}
Write an xml configuration file:
<!--Header file import aop constraint-->
<?xml version="1.0" encoding="UTF-8"?>
<beans xmlns="http://www.springframework.org/schema/beans"
       xmlns:xsi="http://www.w3.org/2001/XMLSchema-instance"
       xmlns:aop="http://www.springframework.org/schema/aop"
       xsi:schemaLocation="http://www.springframework.org/schema/beans
                           http://www.springframework.org/schema/beans/spring-beans.xsd
                           http://www.springframework.org/schema/aop https://www.springframework.org/schema/aop/spring-aop.xsd">

    <!--Configure target class-->
    <bean id="userService" class="com.pip.Service.UserServiceImpl"/>
    <!--Configure facet class-->
    <bean id="beforeLog" class="com.pip.log.BeforeLog"/>
    <!--Configure facet class-->
    <bean id="afterLog" class="com.pip.log.AfterLog"/>
    <aop:config>
        <!--Declare a pointcut execution():Match method to execute-->
        <aop:pointcut id="pointcut" expression="execution(* com.pip.Service.UserServiceImpl.*(..))"/>
        <!--Perform wrap  advice-ref:Execution method pointcut-ref:Reference pointcuts-->
        <aop:advisor advice-ref="beforeLog" pointcut-ref="pointcut"/>
        <aop:advisor advice-ref="afterLog" pointcut-ref="pointcut"/>
    </aop:config>
</beans>
Test:
ApplicationContext applicationContext = new ClassPathXmlApplicationContext("ApplicationContext.xml");
//Through the method in the interface, the dynamic agent principle
UserService userService = applicationContext.getBean("userService", UserService.class);
userService.add();
userService.uadate();
userService.delete();
userService.select();
4.2. User defined class implementation
Realized by section
The interface and implementation class are the same as the first method
Custom cut in class:
public class DiyPointcut {
    public void before(){
        System.out.println("---------Before method execution---------");
    }
    public void after(){
        System.out.println("---------After method execution---------");
    }
}
Write an xml configuration file:
<!--Import AOP constraint-->
<?xml version="1.0" encoding="UTF-8"?>
<beans xmlns="http://www.springframework.org/schema/beans"
       xmlns:xsi="http://www.w3.org/2001/XMLSchema-instance"
       xmlns:aop="http://www.springframework.org/schema/aop"
       xsi:schemaLocation="http://www.springframework.org/schema/beans
                           http://www.springframework.org/schema/beans/spring-beans.xsd
                           http://www.springframework.org/schema/aop https://www.springframework.org/schema/aop/spring-aop.xsd">

    <!--Configure target class-->
    <bean id="userService" class="com.pip.Service.UserServiceImpl"/>
    <!--Configure facet class-->
    <bean id="diy" class="com.pip.log.DiyPointcut"/>
    <aop:config>
        <!--introduce DiyPointcut of bean Is a tangent object-->
        <aop:aspect ref="diy">
            <!--The extracted tangent expression,-->
            <aop:pointcut id="diyPonitcut" expression="execution(* com.pip.Service.UserServiceImpl.*(..))"/>
            <!--
				Notification configuration:
				method="Notification method name
				pointcut="Tangent expression"
				pointcut-ref="Tangent point of reference"
   			-->
            <aop:before method="before" pointcut-ref="diyPonitcut"/>
            <aop:after method="after" pointcut-ref="diyPonitcut"/>
        </aop:aspect>
    </aop:config>
</beans>
Test:
ApplicationContext applicationContext = new ClassPathXmlApplicationContext("ApplicationContext.xml");
UserService userService = applicationContext.getBean("userService", UserService.class);
userService.add();
userService.uadate();
userService.delete();
userService.select();
4.3. Implement with annotation
- Interface class and implementation class are still the first
- Write an @ Aspect enhancement class:
@Aspect
public class AnnotationPointcut {
    //Extract pointcuts
    @Pointcut("execution(* com.pip.Service.UserServiceImpl.*(..))")
    public void myPoint(){}

    @Before("AnnotationPointcut.myPoint()")
    public void before(){
        System.out.println("---------Before method execution---------");
    }

    @After("execution(* com.pip.Service.UserServiceImpl.*(..))")
    public void after(){
        System.out.println("---------After method execution---------");
    }

    @Around("execution(* com.pip.Service.UserServiceImpl.*(..))")
    public void around(ProceedingJoinPoint jp) throws Throwable {
        System.out.println("Surround front");
        System.out.println("autograph:"+jp.getSignature());
        //Execute target method
        Object proceed = jp.proceed();
        System.out.println("After surround");
        System.out.println(proceed);
    }
}
Write an xml configuration file:
<?xml version="1.0" encoding="UTF-8"?>
<beans xmlns="http://www.springframework.org/schema/beans"
       xmlns:xsi="http://www.w3.org/2001/XMLSchema-instance"
       xmlns:aop="http://www.springframework.org/schema/aop"
       xsi:schemaLocation="http://www.springframework.org/schema/beans
       http://www.springframework.org/schema/beans/spring-beans.xsd
       http://www.springframework.org/schema/aop https://www.springframework.org/schema/aop/spring-aop.xsd">
	<!--Register the facet class to the configuration file, using@Component Realize the same principle-->
    <bean id="annotationPointcut" class="com.pip.log.AnnotationPointcut"/>
    <!--open aop Automatic proxy-->
    <aop:aspectj-autoproxy/>
    <!--Register implementation class object-->
    <bean id="userService" class="com.pip.Service.UserServiceImpl"/>
</beans>
Test:
ApplicationContext applicationContext = new ClassPathXmlApplicationContext("ApplicationContext.xml");
UserService userService = applicationContext.getBean(UserService.class);
userService.add();
userService.uadate();
userService.delete();
userService.select();
4.3.1 annotation configuration AOP details
-
Dimension facet classes with * * @ Aspect * *
-
Annotate notification method with @ notification annotation
- Configuration syntax of notification: @ notification annotation ("pointcut expression")
name annotation explain Before advice @Before Used to configure pre notification. Specifies that the enhanced method is executed before the pointcut method Post notification @AfterReturning Used to configure post notification. Specifies that the enhanced method is executed after the pointcut method Around Advice @Around Used to configure wrap notifications. Specifies that enhanced methods are executed before and after pointcut methods Exception throw notification @AfterThrowing Used to configure exception throw notification. Specifies that the enhanced method is executed when an exception occurs Final notice @After Used to configure the final notification. It will be executed whether there are exceptions or not -
Extract tangent expression
@Pointcut("execution(* com.pip.Service.UserServiceImpl.*(..))")
    public void myPoint(){}
@Before("Cut in class name.myPoint()")
    public void before(){}
-
Configure aop auto proxy in configuration file
Proxy target class: the default value is false. Setting it to true means that CGLib dynamic proxy technology is used to weave in enhancements. Even if proxy target class is set to false, if the target class does not declare an interface, spring will automatically use CGLib dynamic proxy.
<aop:aspectj-autoproxy/>
10,MyBatis-Spring
1. Introduction
What is mybatis spring?
MyBatis Spring will help you seamlessly integrate MyBatis code into Spring. It will allow MyBatis to participate in Spring's transaction management, create mapper s and sqlsessions and inject them into bean s, and convert MyBatis exceptions into Spring's DataAccessException. Finally, the application code can be independent of MyBatis, Spring or MyBatis sp ring.
The mybatties config configuration file is no longer required, but some basic configurations of MyBatis can be retained in mybatties config
<?xml version="1.0" encoding="UTF-8" ?>
<!DOCTYPE configuration
        PUBLIC "-//mybatis.org//DTD Config 3.0//EN"
        "http://mybatis.org/dtd/mybatis-3-config.dtd">
<configuration>
    <!--set method-->
    <settings>
        <setting name="" value=""/>
    </settings>
    <!--alias-->
    <typeAliases>
    </typeAliases>
</configuration>
Knowledge base
Before using mybatis spring, you need to import the versions of various jar packages
| MyBatis-Spring | MyBatis | Spring framework | Spring Batch | Java |
|---|---|---|---|---|
| 2.0 | 3.5+ | 5.0+ | 4.0+ | Java 8+ |
| 1.3 | 3.4+ | 3.2.2+ | 2.1+ | Java 6+ |
2. Import dependency
junit test
<dependency>
    <groupId>junit</groupId>
    <artifactId>junit</artifactId>
    <version>4.11</version>
    <scope>test</scope>
</dependency>
Spring related
<dependency>
    <groupId>org.springframework</groupId>
    <artifactId>spring-webmvc</artifactId>
    <version>5.3.13</version>
</dependency>

<dependency>
    <groupId>org.springframework</groupId>
    <artifactId>spring-jdbc</artifactId>
    <version>5.3.13</version>
</dependency>
myBatis
<dependency>
    <groupId>org.mybatis</groupId>
    <artifactId>mybatis</artifactId>
    <version>3.5.7</version>
</dependency>
mySql driver
<dependency>
    <groupId>mysql</groupId>
    <artifactId>mysql-connector-java</artifactId>
    <version>8.0.26</version>
</dependency>
mybatis-spring
<dependency>
    <groupId>org.mybatis</groupId>
    <artifactId>mybatis-spring</artifactId>
    <version>2.0.6</version>
</dependency>
aop woven bag
<dependency>
    <groupId>org.aspectj</groupId>
    <artifactId>aspectjweaver</artifactId>
    <version>1.9.7</version>
</dependency>
3. Configuring data sources in spring
Hand over the data source configuration to Spring container management
- jdbc.properties
jdbc.driver=com.mysql.cj.jdbc.Driver
jdbc.url=jdbc:mysql://localhost:3306 / database name? Useunicode = true & characterencoding = UTF-8 & usessl = false & servertimezone = Asia / Shanghai
jdbc.username=root
jdbc.password=123456
- spring configuration
<!--load properties Files can also be assigned directly in the data source without extraction-->
<context:property-placeholder location="jdbc.properties"/>
<!--
  Configure data sources:
   Use here Spring Self contained data source,Available c3p0,durid Wait
 -->
<bean id="dataSource" class="org.springframework.jdbc.datasource.DriverManagerDataSource">
    <property name="driverClassName" value="${jdbc.driver}"/>
    <property name="url" value="${jdbc.url}"/>
    <property name="username" value="${jdbc.username}"/>
    <property name="password" value="${jdbc.password}"/>
</bean>
4. Configuring the factory in spring
Leave the SqlSessionFactory factory to spring to manage
- SqlSessionFactory needs a DataSource (data source). This can be any DataSource. You only need to configure it as you configure other Spring database connections.
- In the basic MyBatis usage, SqlSessionFactory is created through SqlSessionFactoryBuilder. In MyBatis spring, SqlSessionFactoryBean is used.
- configLocation: it is used to specify the XML configuration file path of MyBatis. It is very useful when the basic configuration of MyBatis needs to be modified. Generally, the basic configuration refers to < Settings > or < typealiases > elements.
- Maperlocations: Associate Mapper.xml configuration file, which is equivalent to < mappers > in mybats configuration
<!-- to configure SqlSessionFactory-->
<bean id="sqlSessionFactory" class="org.mybatis.spring.SqlSessionFactoryBean">
    <!--Associated data source,One SqlSessionFactory Only one data source is required-->
    <property name="dataSource" ref="dataSource"/>
    <!--relation myBatis-->
    <property name="configLocation" value="classpath:mybatis-config.xml"/>
    <property name="mapperLocations" value="classpath:mapper/userMapper.xml"/>
</bean>
userMapper.xml
<?xml version="1.0" encoding="UTF-8" ?>
<!DOCTYPE mapper
        PUBLIC "-//mybatis.org//DTD Config 3.0//EN"
        "http://mybatis.org/dtd/mybatis-3-mapper.dtd">
<mapper namespace="com.pip.mapper.UserMapper">
    <select id="query" resultType="com.pip.bean.User">
        select * from User
    </select>
</mapper>
5. Create SqlSession
Note!!! If your interface implementation class inherits SqlSessionDaoSupport, please skip this step and go directly to method 2 of 6.2!!!
SqlSessionTemplate is the core of mybatis spring. As an implementation of SqlSession, it means that it can be used to seamlessly replace the SqlSession already used in your code. SqlSessionTemplate is thread safe and can be shared by multiple Daos or mappers.
(vernacular means that in MyBatis, SqlSessionFactory can be used to create SqlSession, but it is thread unsafe. In MyBatis spring, SqlSessionTemplate is used instead of SqlSession.)
When calling SQL methods (including the methods in the mapper returned by the getMapper() method) , SqlSessionTemplate will ensure that the SqlSession used is related to the current Spring transaction. In addition, it manages the life cycle of the session, including necessary closing, committing or rolling back operations. In addition, it is also responsible for translating MyBatis exceptions into DataAccessExceptions in Spring.
<bean id="sqlSession" class="org.mybatis.spring.SqlSessionTemplate">
    <!--because SqlSessionTemplate Not in set Method, so use the constructor to inject associations sqlSessionFactory factory-->
    <constructor-arg index="0" ref="sqlSessionFactory" />
</bean>
6. Add Mapper interface implementation class
6.1 method I
Privatize sqlSessionTemplate
//Interface
public interface UserMapper {
    List<Product> query();
}

public class UserMapperImpl implements UserMapper{
    private SqlSessionTemplate sqlSession;

    public void setSqlSessionTemplate(SqlSessionTemplate sqlSessionTemplate) {
        this.sqlSession = sqlSessionTemplate;
    }

    @Override
    public List<User> query() {
        UserMapper mapper = sqlSession.getMapper(UserMapper.class);
        return mapper.query();
    }
}
Register the bean of the interface implementation class in spring
<bean id="userMapper" class="com.pip.mapper.UserMapperImpl">
    <!--The created sqlSession Properties injected into the implementation class-->
    <property name="sqlSession" ref="sqlSession"/>
</bean>
6.2 method II
Interface implementation class to inherit SqlSessionDaoSupport class
The principle of SqlSessionDaoSupport is method 1
SqlSessionDaoSupport has a getSqlSession() method, which can inject SqlSessionFactory directly. Compared with method 1, SqlSessionTemplate does not need to be managed, and the support for transactions is more friendly. You can track the source code and view it.
- Interface implementation class
public class UserMapperImpl2 extends SqlSessionDaoSupport implements UserMapper{
    private SqlSession sqlSession = getSqlSession();
    @Override
    public List<User> query() {
        UserMapper mapper = sqlSession.getMapper(UserMapper.class);
        return mapper.query();
    }
}
- Register the bean of the interface implementation class in spring
<bean id="userMapper" class="com.pip.mapper.UserMapperImpl">
    <!--The created sqlSessionFactory Injected into the implementation class getSqlSession()method-->
    <property name="sqlSessionFactory" ref="sqlSessionFactory"/>
</bean>
11. Spring transaction
1. What is a transaction
Transactions treat a series of actions as an independent unit of work. In short, these actions are either completed or ineffective.
Four principles of business ACID (key points of interview)
- Atomicity: all operations in a transaction are either completed or not completed, and will not end in an intermediate link. If an error occurs during the execution of a transaction, it will be rolled back to the state before the start of the transaction, as if the transaction had never been executed.
- Consistency: the integrity of the database is not destroyed before and after the transaction. This means that the written data must fully comply with all preset rules, including the accuracy and serialization of the data, and the subsequent database can spontaneously complete the predetermined work.
- Isolation: the ability of a database to allow multiple concurrent transactions to read, write and modify the same data at the same time. Isolation can prevent data inconsistency caused by cross execution when multiple transactions are executed concurrently.
- Persistence: once the transaction is completed, no matter what error occurs in the system, the result will not be affected. Typically, the result of a transaction is written to persistent storage
2. Transaction management in Spring
Spring defines an abstraction layer on top of different transaction management APIs, so that developers can use spring's transaction management mechanism without understanding the underlying transaction management API. Spring supports programmatic transaction management and declarative transaction management.
Programming transaction management
- Embed transaction management code into transaction methods to control transaction commit and rollback.
- Disadvantages: additional transaction management code must be included in each transaction operation business logic
Declarative transaction management
- The transaction management code is separated from the business method to realize the transaction management in a declarative way.
- When transaction management is not required, the transaction management service can be removed by modifying the setting file without changing the code and recompiling, which is extremely convenient for maintenance
- Transaction management is regarded as a crosscutting concern and modularized through aop method. Spring supports declarative transaction management through the Spring AOP framework.
3. Implementing transactions through xml
1. Introducing constraints
In the configuration file, introduce the constraint: tx
xmlns:tx="http://www.springframework.org/schema/tx"

http://www.springframework.org/schema/tx
http://www.springframework.org/schema/tx/spring-tx.xsd">
2. Configure transaction manager
- No matter which transaction management strategy (programmatic or declarative) Spring uses, the transaction manager is required.
- Spring's core transaction management abstraction encapsulates a set of technology independent methods
<!--JDBC affair-->
<bean id="transactionManager" class="org.springframework.jdbc.datasource.DataSourceTransactionManager">
    <property name="dataSource" ref="dataSource"/>
</bean>
3. Configure transaction notifications
< TX: advice >: configure transaction notification and bind transaction manager
<tx:method>:
- Name: tangent point method name* Represents all methods
- Isolation: isolation level of transaction
- Propagation: propagation behavior of transactions
| name | effect |
|---|---|
| REQUIRED | The current transaction is supported. If there is no current transaction, a new transaction will be created. The default is this selection |
| NESTED | If a transaction currently exists, it is executed within a nested transaction. If there are currently no transactions, perform an operation similar to REQUIRED |
- Timeout: timeout
- Read only: read only
<tx:advice id="txAdvice" transaction-manager="transactionManager">
    <tx:attributes>
        <tx:method name="*"/>
    </tx:attributes>
</tx:advice>
4. Weaving transaction
<!--Weave in-->
<aop:config>
    <!--breakthrough point-->
    <aop:pointcut id="txPointcut" expression="execution(* com.pip.mapper.*.*(..))"/>
    <aop:advisor advice-ref="txAdvice" pointcut-ref="txPointcut"/>
</aop:config>
The incoming data must fully comply with all preset rules, including the accuracy, seriality of the data and the subsequent database can automatically complete the scheduled work.
- Isolation: the ability of a database to allow multiple concurrent transactions to read, write and modify the same data at the same time. Isolation can prevent data inconsistency caused by cross execution when multiple transactions are executed concurrently.
- Persistence: once the transaction is completed, no matter what error occurs in the system, the result will not be affected. Typically, the result of a transaction is written to persistent storage
2. Transaction management in Spring
Spring defines an abstraction layer on top of different transaction management APIs, so that developers can use spring's transaction management mechanism without understanding the underlying transaction management API. Spring supports programmatic transaction management and declarative transaction management.
Programming transaction management
- Embed transaction management code into transaction methods to control transaction commit and rollback.
- Disadvantages: additional transaction management code must be included in each transaction operation business logic
Declarative transaction management
- The transaction management code is separated from the business method to realize the transaction management in a declarative way.
- When transaction management is not required, the transaction management service can be removed by modifying the setting file without changing the code and recompiling, which is extremely convenient for maintenance
- Transaction management is regarded as a crosscutting concern and modularized through aop method. Spring supports declarative transaction management through the Spring AOP framework.
3. Implementing transactions through xml
1. Introducing constraints
In the configuration file, introduce the constraint: tx
xmlns:tx="http://www.springframework.org/schema/tx"

http://www.springframework.org/schema/tx
http://www.springframework.org/schema/tx/spring-tx.xsd">
2. Configure transaction manager
- No matter which transaction management strategy (programmatic or declarative) Spring uses, the transaction manager is required.
- Spring's core transaction management abstraction encapsulates a set of technology independent methods
<!--JDBC affair-->
<bean id="transactionManager" class="org.springframework.jdbc.datasource.DataSourceTransactionManager">
    <property name="dataSource" ref="dataSource"/>
</bean>
3. Configure transaction notifications
< TX: advice >: configure transaction notification and bind transaction manager
<tx:method>:
- Name: tangent point method name* Represents all methods
- Isolation: isolation level of transaction
- Propagation: propagation behavior of transactions
| name | effect |
|---|---|
| REQUIRED | The current transaction is supported. If there is no current transaction, a new transaction will be created. The default is this selection |
| NESTED | If a transaction currently exists, it is executed within a nested transaction. If there are currently no transactions, perform an operation similar to REQUIRED |
- Timeout: timeout
- Read only: read only
<tx:advice id="txAdvice" transaction-manager="transactionManager">
    <tx:attributes>
        <tx:method name="*"/>
    </tx:attributes>
</tx:advice>
4. Weaving transaction
<!--Weave in-->
<aop:config>
    <!--breakthrough point-->
    <aop:pointcut id="txPointcut" expression="execution(* com.pip.mapper.*.*(..))"/>
    <aop:advisor advice-ref="txAdvice" pointcut-ref="txPointcut"/>
</aop:config>