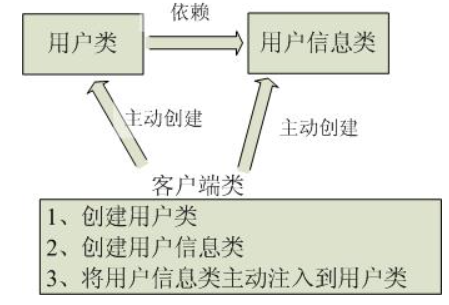
1.IOC control reversal
IOC theoretical derivation
Previous methods
1. First write a UserDao interface
public interface UserDao {
   public void getUser();
}
2. Then write Dao's implementation class
public class UserDaoImpl implements UserDao {
   @Override
   public void getUser() {
       System.out.println("Get user data");
  }
}
3. Then write the UserService interface
public interface UserService {
   public void getUser();
}
4. Finally, write the implementation class of Service
public class UserServiceImpl implements UserService {
   private UserDao userDao = new UserDaoImpl();

   @Override
   public void getUser() {
       userDao.getUser();
  }
}
5. Test it
@Test
public void test(){
   UserService service = new UserServiceImpl();
   service.getUser();
}
If you want to add an implementation class, you need to modify it in UserServiceImpl every time. The coupling is too high
Injection using set method
public class UserServiceImpl implements UserService {
   private UserDao userDao;
// Using set
   public void setUserDao(UserDao userDao) {
       this.userDao = userDao;
  }

   @Override
   public void getUser() {
       userDao.getUser();
  }
}
Test:
@Test
public void test(){
   UserServiceImpl service = new UserServiceImpl();
   service.setUserDao( new UserDaoMySqlImpl() );
   service.getUser();

   //So now we want to use Oracle to implement it
   service.setUserDao( new UserDaoOracleImpl() );
   service.getUser();
}
Inversion of control (IoC) is a design idea, and di (dependency injection) is a method to realize IoC
What is IOC
**Ioc means giving your designed object to the container control, rather than the traditional direct control inside your object** How to understand Ioc well? The key to a good understanding of Ioc is to clarify "who controls who, what controls, and why it is inversion (if there is inversion, there should be forward rotation)
● * * who controls who controls what: * * in traditional Java SE programming, we directly create objects inside objects through new, which means that the program actively creates dependent objects; while IoC has a special container to create these objects, that is, the IoC container controls the creation of objects; who controls who? Of course, the IoC container controls the objects; what? That is the main control External resource acquisition (not only objects, including files, etc.)
● * * why is inversion and what aspects are reversed: * * if there is inversion, there is forward rotation. In traditional applications, we actively control ourselves in the object to directly obtain the dependent object, that is, forward rotation; while inversion is helped by the container to create and inject the dependent object; why is inversion? Because the container helps us find and inject the dependent object, the object only passively accepts the dependency Object, so it is reversed; what aspects are reversed? The acquisition of dependent objects is reversed
Traditional way:
IOC mode:
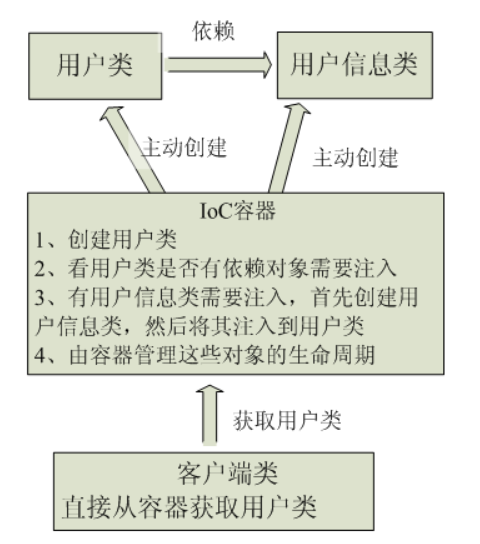
This is the development method advocated by spring. All classes will be registered in the spring container to tell spring what you are and what you need. Then spring will take the initiative to give you what you want and give you to other things that need you when the system runs properly. The creation and destruction of all classes are controlled by spring, that is to say It is spring that controls the life cycle of an object. For a specific object, it used to control other objects, but now all objects are controlled by spring, so this is called control inversion.
What can IOC do
In traditional applications, we actively create dependent objects within classes, which leads to high coupling between classes and is difficult to test; after having the IoC container, we hand over the control of creating and finding dependent objects to the container, and the container injects and combines objects, so there is loose coupling between objects, which is also convenient for testing and function reuse. More importantly It makes the whole architecture of the program very flexible.
The IoC container helps the object find the corresponding dependent object and inject it, rather than the object actively finds it.
IOC and DI
The dependency relationship between components is determined by the container during the run time. To put it vividly, the container dynamically injects a dependency relationship into components. * * the purpose of dependency injection is not to bring more functions to the software system, but to improve the frequency of component reuse and build a flexible and extensible platform for the system. * * through the dependency injection mechanism, we only need to Single configuration, without any code, can specify the resources required by the target and complete its own business logic, without caring where the specific resources come from and who implements them.
The key to understanding DI is: "who relies on who, why does it need to rely on, who injects who, and what injects"
● who depends on whom: of course, the application depends on the IoC container;
● * * why dependency is needed: * * applications need IoC containers to provide external resources required by objects;
● who injects who: it is obvious that the IoC container injects an object of the application, which the application depends on;
● what is injected: it is to inject external resources (including objects, resources and constant data) required by an object
2.HelloSpring
<dependency>
   <groupId>org.springframework</groupId>
   <artifactId>spring-webmvc</artifactId>
   <version>5.1.13.RELEASE</version>
</dependency>
1. Write a Hello entity class
public class Hello { private String name; public String getName() { return name; } public void setName(String name) { this.name = name; } public void show(){ System.out.println("Hello,"+ name ); }}
2. Write our spring file, here we name it beans.xml
<?xml version="1.0" encoding="UTF-8"?><beans xmlns="http://www.springframework.org/schema/beans" xmlns:xsi=" http://www.w3.org/2001/XMLSchema-instance " xsi:schemaLocation=" http://www.springframework.org/schema/beans http://www.springframework.org/schema/beans/spring-beans.xsd "> <! -- beans are java objects created and managed by spring -- > < bean id =" hello "class =" POJO. Hello "> <property name="name" value="Spring"/> </bean></beans>
3. Test
@Testpublic void test(){ //Parse the beans.xml file to generate and manage the corresponding bean object ApplicationContext context = new classpathxmlapplicationcontext ("beans. XML"); / / getBean: the parameter is the ID of the bean in the spring configuration file. Hello hello = (Hello) context.getbean ("hello"); hello. Show();}
3. Dependency injection
1.set injection
The injected attribute must have a set method. The method name of the set method is capitalized by the initial letter of set + attribute. If the attribute is of boolean type and there is no set method, it is is
pojo class:
Address.java
public class Address { private String address; public String getAddress() { return address; } public void setAddress(String address) { this.address = address; } }
Student.java
package pojo; import java.util.List; import java.util.Map; import java.util.Properties; import java.util.Set; public class Student { private String name; private Address address; private String[] books; private List<String> hobbys; private Map<String,String> card; private Set<String> games; private String wife; private Properties info; public void setName(String name) { this.name = name; } public void setAddress(Address address) { this.address = address; } public void setBooks(String[] books) { this.books = books; } public void setHobbys(List<String> hobbys) { this.hobbys = hobbys; } public void setCard(Map<String, String> card) { this.card = card; } public void setGames(Set<String> games) { this.games = games; } public void setWife(String wife) { this.wife = wife; } public void setInfo(Properties info) { this.info = info; } public void show(){ System.out.println("name="+ name + ",address="+ address.getAddress() + ",books=" ); for (String book:books){ System.out.print("<<"+book+">>\t"); } System.out.println("\n hobby:"+hobbys); System.out.println("card:"+card); System.out.println("games:"+games); System.out.println("wife:"+wife); System.out.println("info:"+info); } }
(1) Constant injection
<bean id="student" class="pojo.Student"> <property name="name" value="Xiao Ming"/> </bean>
Test:
@Test public void test01(){ ApplicationContext context = new ClassPathXmlApplicationContext("applicationContext.xml"); Student student = (Student) context.getBean("student"); System.out.println(student.getName()); }
(2) Bean injection
<bean id="addr" class="pojo.Address"> <property name="address" value="Chongqing"/> </bean> <bean id="student" class="pojo.Student"> <property name="name" value="Xiao Ming"/> <!--Injection class usage ref --> <property name="address" ref="addr"/> </bean>
(3) Array injection
<bean id="student" class="pojo.Student"> <property name="name" value="Xiao Ming"/> <property name="address" ref="addr"/> <property name="books"> <array> <value>Journey to the West</value> <value>The Dream of Red Mansion</value> <value>Water Margin</value> </array> </property> </bean>
(4) List injection
<property name="hobbys"> <list> <value>listen to the music</value> <value>watch movie</value> <value>Mountain climbing</value> </list> </property>
(5) Map injection
<property name="card"> <map> <entry key="China Post" value="456456456465456"/> <entry key="build" value="1456682255511"/> </map> </property>
(6) set injection
<property name="games"> <set> <value>LOL</value> <value>BOB</value> <value>COC</value> </set> </property>
(7) Null injection
<property name="wife"><null/></property>
(8) Properties injection
<property name="info"> <props> <prop key="Student number">20190604</prop> <prop key="Gender">male</prop> <prop key="full name">Xiao Ming</prop> </props> </property>
2.P naming and C naming injection
User.java
public class User { private String name; private int age; public void setName(String name) { this.name = name; } public void setAge(int age) { this.age = age; } @Override public String toString() { return "User{" + "name='" + name + '\'' + ", age=" + age + '}'; } }
1. P namespace injection: a constraint file needs to be added to the header file
Import constraints : xmlns:p="http://Www.springframework. Org / schema / P "<! -- P (property: properties) namespace, the property still needs to set the set method -- > < bean id =" user "class =" POJO. User "P: name =" Zhang San "P: age =" 18 "/ >
2. c namespace injection: the constraint file (constructor injection) needs to be added to the header file
Import constraints : xmlns:c="http://Www.springframework. Org / schema / C "<! -- C (construct: Constructor) namespace, the attribute still needs to set the set method -- > < bean id =" user "class =" POJO. User "C: name =" Zhang San "C: age =" 18 "/ >
You need to add a parameter structure in User.java
Test:
@Test public void test02(){ ApplicationContext context = new ClassPathXmlApplicationContext("applicationContext.xml"); User user = (User) context.getBean("user"); System.out.println(user); }
4. Scope of bean
In Spring, the main body of the application and the objects managed by the Spring IoC container are called beans. In short, beans are objects initialized, assembled and managed by the IoC container.
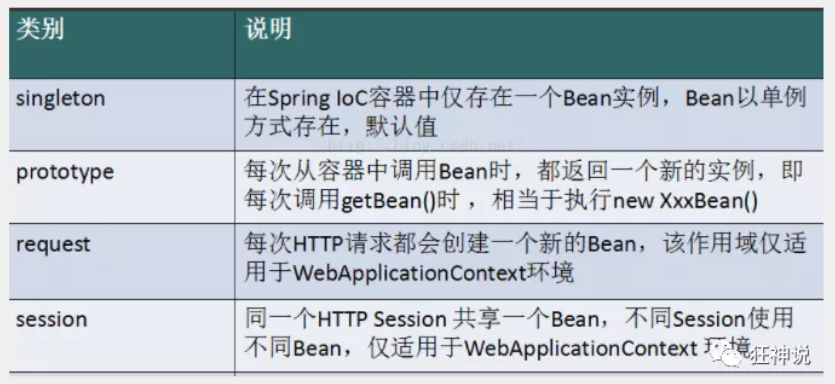
Among the several scopes, the request and session scopes are only used in web-based applications (don't care what web application framework you use), and can only be used in Web-based Spring ApplicationContext environment.
Singleton
When the scope of a bean is singleton, there will only be one shared bean instance in the Spring IoC container, and all requests for a bean will only return the same instance of the bean as long as the id matches the bean definition. Singleton is a singleton type, which automatically creates a bean object when creating a container. It exists whether you use it or not, and the object obtained each time is the same object. Note that the singleton scope is the default scope in Spring. To define a bean as a singleton in XML, you can configure it as follows:
<bean id="ServiceImpl" class="service.ServiceImpl" scope="singleton">
Test:
@Test public void test03(){ ApplicationContext context = new ClassPathXmlApplicationContext("applicationContext.xml"); User user = (User) context.getBean("user"); User user2 = (User) context.getBean("user"); System.out.println(user==user2);
Prototype
When the scope of a bean is prototype, it means that a bean definition corresponds to multiple object instances. A prototype scoped bean will cause a new bean instance to be created each time a request is made to the bean (inject it into another bean, or call the container's getBean() method programmatically). Prototype is a prototype type. It is not instantiated when we create a container. Instead, we create an object when we obtain a bean, and the object we obtain each time is not the same object. As a rule of thumb, you should use the prototype scope for stateful beans and the singleton scope for stateless beans. Define a bean as a prototype in XML, which can be configured as follows:
<bean id="account" class="com.foo.DefaultAccount" scope="prototype"/> perhaps <bean id="account" class="com.foo.DefaultAccount" singleton="false"/>
Request
When the scope of a bean is Request, it means that in an HTTP Request, a bean definition corresponds to an instance; That is, each HTTP Request will have its own bean instance, which is created according to a bean definition. This scope is only valid in the case of web-based Spring ApplicationContext. Consider the following bean definitions:
<bean id="loginAction" class=cn.csdn.LoginAction" scope="request"/>
For each HTTP request, the Spring container will create a new loginaction bean instance according to the loginaction bean definition, and the loginaction bean instance is only valid in the current HTTP request. Therefore, you can safely change the internal state of the created instance according to the needs, while the instances created according to the loginaction bean definition in other requests, You will not see these state changes specific to a request. When the processing of the request ends, the bean instance of the request scope will be destroyed.
Session
When the scope of a bean is Session, it means that in an HTTP Session, a bean definition corresponds to an instance. This scope is only valid in the case of web-based Spring ApplicationContext. Consider the following bean definitions:
<bean id="userPreferences" class="com.foo.UserPreferences" scope="session"/>
For an HTTP Session, the Spring container will create a new userPreferences bean instance according to the userPreferences bean definition, and the userPreferences bean is only valid in the current HTTP Session. Like the request scope, you can safely change the internal state of the created instance as needed. For instances created according to userPreferences in other HTTP sessions, you will not see these state changes specific to an HTTP Session. When the HTTP Session is finally discarded, the beans within the scope of the HTTP Session will also be discarded.
5. Automatic assembly
- Automatic assembly is a way to use spring to meet bean dependencies
- spring will find the bean that a bean depends on in the application context.
There are three assembly mechanisms for bean s in Spring:
- Explicit configuration in xml;
- Explicit configuration in java;
- Implicit bean discovery mechanism and automatic assembly.
Spring's automatic assembly needs to be implemented from two perspectives, or two operations:
- Component scanning: spring will automatically discover the bean s created in the application context;
- Autowiring: spring automatically satisfies the dependencies between bean s, which is what we call IoC/DI;
The combination of component scanning and automatic assembly exerts great power to minimize explicit configuration.
It is recommended to use annotations instead of automatic assembly xml configuration
Test environment construction:
1. Create a new project
2. Create two entity classes, Cat and Dog, with a method called
public class Cat { public void shout() { System.out.println("miao~"); }}
public class Dog { public void shout() { System.out.println("wang~"); }}
3. Create a new User class User
public class User { private Cat cat; private Dog dog; private String people;}
4. Writing Spring configuration files
<?xml version="1.0" encoding="UTF-8"?><beans xmlns="http://www.springframework.org/schema/beans" xmlns:xsi=" http://www.w3.org/2001/XMLSchema-instance " xsi:schemaLocation=" http://www.springframework.org/schema/beans http://www.springframework.org/schema/beans/spring-beans.xsd "> <bean id="dog" class="pojo.Dog"/> <bean id="cat" class="pojo.Cat"/> <bean id="user" class="pojo.User "> < property name =" cat "ref =" cat "/ > < property name =" dog "ref =" dog "/ > < property name =" people "value =" Zhang San "/ > < / bean > < / beans >
5. Testing
public class MyTest { @Test public void testMethodAutowire() { ApplicationContext context = new ClassPathXmlApplicationContext("beans.xml"); User user = (User) context.getBean("user"); user.getCat().shout(); user.getDog().shout(); }}
Auto assemble by name
In the process of manually configuring xml, errors such as missing letters and case often occur, which can not be checked, which reduces the development efficiency.
Using automatic assembly will avoid these errors and simplify the configuration.
Test:
1. Modify the bean configuration and add an attribute autowire = "byName"
<bean id="user" class="pojo.User" autowire="byName"> <property name="people" value="qinjiang"/></bean>
2. Test again and the result is still output successfully!
3. We modify the bean id of cat to catXXX
4. Test again and execute the null pointer java.lang.NullPointerException. Because the wrong set method is found according to the byName rule, the real setCat is not executed and the object is not initialized, so a null pointer error will be reported when calling.
Summary:
When a bean node has an autowire byName attribute.
- All set method names in its class, such as setCat, will be searched to obtain a string with set removed and lowercase, that is, cat.
- Go to the spring container to find whether there is an object with this string name id.
- If any, take out the injection; If not, a null pointer exception is reported
Auto assemble by type
Using autowire byType first needs to ensure that objects of the same type are unique in the spring container. If it is not unique, a non unique exception will be reported. [NoUniqueBeanDefinitionException]
Test:
1. Modify the bean configuration of user: autowire="byType"
2. Test, normal output
3. Register a cat bean object!
<bean id="dog" class="pojo.Dog"/><bean id="cat" class="pojo.Cat"/><bean id="cat2" class="pojo.Cat"/><bean id="user" class="pojo.User" autowire="byType"> <property name="people" value="Zhang San"/></bean>
4. Test, error: NoUniqueBeanDefinitionException
5. Delete cat2 and change the bean name of cat! Test! Because it is assembled by type, no exception will be reported and the final result will not be affected. Even removing the id attribute does not affect the result.
This is automatic assembly by type!
Using annotations
preparation:
1. Introduce the context file header into the spring configuration file
xmlns:context="http://www.springframework.org/schema/context"http://www.springframework.org/schema/contexthttp://www.springframework.org/schema/context/spring-context.xsd
2. Enable attribute annotation support!
<context:annotation-config/>
(1)@Autowired
- @Autowired is automatically transferred by type and does not support id matching.
- You need to import the package of spring AOP!
Test:
1. Remove the set method from the User class and use the @ Autowired annotation
public class User { @Autowired private Cat cat; @Autowired private Dog dog; private String people; public Cat getCat() { return cat; } public Dog getDog() { return dog; } public String getStr() { return str; }}
2. The contents of the configuration file are displayed
<context:annotation-config/><bean id="dog" class="pojo.Dog"/><bean id="cat" class="pojo.Cat"/><bean id="user" class="pojo.User"/>
3. Test, output results successfully!
Note: @ Autowired(required=false) Description: false, the object can be null; true, the object must be saved and cannot be null.
//If the allowed object is null, set required = false, and the default is true@Autowired(required = false)private Cat cat;
(2)@Qualifier
- @Autowired is automatically assembled according to the type. With @ Qualifier, it can be automatically assembled according to byName
- @Qualifier cannot be used alone.
Test steps:
1. Modify the content of the configuration file to ensure that there are objects of type. And the name is not the default name of the class!
<bean id="dog1" class="pojo.Dog"/><bean id="dog2" class="pojo.Dog"/><bean id="cat1" class="pojo.Cat"/><bean id="cat2" class="pojo.Cat"/>
2. No Qualifier test was added and an error was reported directly
[No qualifying bean of type 'pojo.Dog' available: expected single matching bean but found 2: dog1,dog2]
3. Add a Qualifier annotation to the attribute
@Autowired@Qualifier(value = "cat2")private Cat cat;@Autowired@Qualifier(value = "dog2")private Dog dog;
Test, successful output!
(3)@Resource
- @If the Resource has a specified name attribute, first search the assembly by name according to the attribute;
- Secondly, assemble in the default byName mode;
- If none of the above is successful, it will be assembled automatically by byType.
- If they are not successful, an exception is reported.
Entity class:
public class User { //If the allowed object is null, set required = false, and the default is true @ resource (name = "cat2") private cat@ Resource private Dog dog; private String people;}
applicationContext.xml
<bean id="dog" class="pojo.Dog"/><bean id="cat1" class="pojo.Cat"/><bean id="cat2" class="pojo.Cat"/><bean id="user" class="pojo.User"/>
Test result: OK
Summary
@Similarities and differences between Autowired and @ Resource:
1. Both @ Autowired and @ Resource can be used to assemble bean s. Can be written on a field or on a setter method.
2. @ Autowired is assembled by type by default (belonging to the spring specification). By default, dependent objects must exist. If null value is allowed, its required property can be set to false, such as @ Autowired(required=false). If we want to use name assembly, it can be used in combination with @ Qualifier annotation
3. @ Resource (belonging to J2EE complex return), assembled by name by default, and the name can be specified through the name attribute. If the name attribute is not specified, when the annotation is written on the field, the default is to take the field name to search by name. If the annotation is written on the setter method, the default is to take the attribute name for assembly. Assemble by type when no bean matching the name is found. However, it should be noted that once the name attribute is specified, it will only be assembled by name.
They have the same function. They inject objects by annotation, but the execution order is different@ Autowired byType first, @ Resource byName first.
6. Development using annotations
After spring 4, if you want to use annotation form, you must introduce aop package
In the configuration file, a context constraint must also be introduced
<?xml version="1.0" encoding="UTF-8"?><beans xmlns="http://www.springframework.org/schema/beans" xmlns:xsi="http://www.w3.org/2001/XMLSchema-instance" xmlns:context="http://www.springframework.org/schema/context" xsi:schemaLocation="http://www.springframework.org/schema/beans http://www.springframework.org/schema/beans/spring-beans.xsd http://www.springframework.org/schema/context http://www.springframework.org/schema/context/spring-context.xsd"></beans>
Implementation of Bean
We used to use bean tags for bean injection, but in actual development, we usually use annotations!
1. Configure which packages to scan for annotations
<!--Specify annotation scan package--><context:component-scan base-package="pojo"/>
2. Write classes under the specified package and add annotations
@Component("user")// Equivalent to < bean id = "user" class = "currently annotated class" / > public class user {public string name = "Zhang San";}
3. Testing
@Testpublic void test(){ ApplicationContext applicationContext = new ClassPathXmlApplicationContext("beans.xml"); User user = (User) applicationContext.getBean("user"); System.out.println(user.name);}
Attribute injection
Using annotation injection properties
1. You can directly add @ value("value") to the variable name without providing a set method
@Component("user")// Equivalent to < bean id = "user" class = "currently annotated class" / > public class user {@ value ("Qinjiang") / / equivalent to < property name = "name" value = "Qinjiang" / > public string name;}
2. If a set method is provided, @ value("value") is added to the set method;
@Component("user")public class User { public String name; @Value("Qin Jiang") public void setName(String name) { this.name = name; }}
Derived annotation
@Component three derived annotations
For better layering, Spring can use the other three annotations with the same functions. At present, which function is used is the same.
- @Controller: web layer
- @Service: service layer
- @Repository: dao layer
Scope
@scope
- Singleton: by default, Spring creates this object in singleton mode. Close the factory and all objects will be destroyed.
- prototype: multi instance mode. Close the factory and all objects will not be destroyed. The internal garbage collection mechanism will recycle
@Controller("user")@Scope("prototype")public class User { @Value("Qin Jiang") public String name;}
Summary
XML and annotation comparison
- XML can be applied to any scenario, with clear structure and convenient maintenance
- Annotations are not self provided classes and cannot be used. Development is simple and convenient
xml and annotation integrated development: Recommended Best Practices
- xml management Bean
- Annotation complete attribute injection
- In the process of use, there is no need to scan. The scanning is for the annotation on the class
<context:annotation-config/>
effect:
- Make annotation driven registration to make annotations effective
- It is used to activate the annotations on the bean s that have been registered in the spring container, that is, to register with spring
- If you do not scan the package, you need to manually configure the bean
- If it is driven without annotation, the injected value is null!
7. Agency mode
The underlying mechanism of AOP is dynamic agent!
Proxy mode:
- Static proxy
- Dynamic agent
Static proxy
Static agent role analysis
- Abstract role: generally implemented using interfaces or abstract classes
- Real role: the role represented
- Agent role: agent real role; After representing a real role, you usually do some ancillary operations
- Customer: use the agent role to perform some operations
code implementation
Rent. Java is an abstract role
//Abstract role: rent public interface rent {public void rent();}
Host. Java is the real role
//Real role: landlord, the landlord wants to rent a house public class host implements rent {public void rent() {system. Out. Println ("house rental");}}
Proxy. Java is the proxy role
//Proxy role: Intermediary public class proxy implements rent {private host host; public proxy() {} public proxy (host) {this. Host = host;} / / rent public void rent() {seehouse(); host. Rent(); fair();} / / show public void seehouse() {system. Out. Println ("show tenants");} //Collect intermediary fee public void fare() {system. Out. Println ("collect intermediary fee");}}
Client. Java is the client
//Customers, general customers will find agents! Public class client {public static void main (string [] args) {/ / the landlord wants to rent a house Host host = new Host(); / / the agent helps the landlord proxy = new proxy (host); / / go to the agent! proxy.rent();}}
Benefits of static agents:
- Can make our real role more pure. No longer pay attention to some public things
- The public business is completed by the agent, which realizes the division of business,
- When the public business expands, it becomes more centralized and convenient
Disadvantages:
- With more classes and more proxy classes, the workload becomes larger and the development efficiency decreases
We want the benefits of static agent, but we don't want the disadvantages of static agent, so we have dynamic agent!
Static agent re understanding
1. Create an abstract role, such as the user business we usually do, which is abstracted to add, delete, modify and check!
//Abstract role: add, delete, modify and query business public interface userservice {void add(); void delete(); void update(); void query();}
2. We need a real object to complete these operations
//Real object, the person who completes the operation of adding, deleting, modifying and querying public class userserviceimpl implements userservice {public void add() {system.out.println ("added a user");} public void delete() {system.out.println ("deleted a user");} public void update() {system.out.println ("updated a user");} Public void query() {system. Out. Println ("a user was queried");}}
3. The demand is coming. Now we need to add a log function. How to implement it!
- Idea 1: add code on the implementation class [trouble!]
- Idea 2: using an agent to do this, you can realize this function without changing the original business!
4. Set up a proxy class to handle logs! delegable role
//Proxy role, add the log implementation public class userserviceproxy implements userservice {private userserviceimpl userservice; public void setuserservice (userserviceimpl userservice) {this. Userservice = userservice;} public void add() {log ("add"); userservice. Add();} public void delete() {log( "Delete"); userservice. Delete();} public void update() {log ("update"); userservice. Update();} public void query() {log ("query"); userservice. Query();} public void log (string msg) {system.out.println ("executed" + msg + "method");}}
5. Test access class:
public class Client { public static void main(String[] args) { //Real business UserServiceImpl userService = new UserServiceImpl(); / / proxy class userserviceproxy = new userserviceproxy(); / / use proxy class to realize logging function! Proxy.setuserservice (userservice); proxy. Add();}}
Dynamic agent
-
The role of dynamic agent is the same as that of static agent
-
The proxy class of dynamic proxy is dynamically generated. The proxy class of static proxy is written in advance
-
Dynamic agents are divided into two categories: one is interface based dynamic agents, and the other is class based dynamic agents
-
- Dynamic agent based on interface -- JDK dynamic agent
- Class based dynamic proxy – cglib
- Now javasist is used to generate dynamic agents
- We use the native code of JDK to implement it here. The rest are the same
The dynamic proxy of JDK needs to know two classes
Core: InvocationHandler and Proxy
(1) [InvocationHandler: call handler]
Object invoke(Object proxy, method method, Object[] args);//Parameter / / proxy - the proxy instance that calls the method / / method - the method corresponds to the instance that calls the interface method on the proxy instance. The declaration class of the method object will be the interface declared by the method, which can be the super interface of the proxy interface that the proxy class inherits from the method. / / args - the array of objects that pass the parameter value of the proxy instance in the contained method call, or null The port method has no parameters. The parameters of the primitive type are contained in an instance of the appropriate primitive wrapper class, such as java.lang.Integer or java.lang.Boolean.
(2) [Proxy: Proxy]
//Generate proxy class public object getproxy() {return proxy. Newproxyinstance (this. Getclass(). Getclassloader(), rent. Getclass(). Getinterfaces(), this);}
code implementation
Rent. Java is an abstract role
//Abstract role: rent public interface rent {public void rent();}
Host. Java is the real role
//Real role: landlord, the landlord wants to rent a house public class host implements rent {public void rent() {system. Out. Println ("house rental");}}
ProxyInvocationHandler. java is the proxy role
public class ProxyInvocationHandler implements InvocationHandler { private Rent rent; public void setRent(Rent rent) { this.rent = rent; } //Generate a proxy class, focusing on the second parameter, to obtain the abstract role to proxy! Previously, there was a role, but now you can proxy a class of roles public object getproxy() {return proxy. Newproxyinstance (this. Getclass(). Getclassloader(), rent. Getclass(). Getinterfaces(), this);} //Proxy: proxy class method: the method object of the calling handler of the proxy class. / / process the method call on the proxy instance and return the result @ override public object invoke (object proxy, method, object [] args) throws throwable {seehouse(); / / core: the essence is implemented by reflection! Object result = method.invoke (rent, args) ; fail(); return result;} / / public void seehouse() {system. Out. Println ("show tenants");} / / collect intermediary fees public void fail() {system. Out. Println ("collect intermediary fees");}}
Client . java
//Tenant public class client {public static void main (string [] args) {/ / real role Host host = new Host(); / / call handler of proxy instance PIH = new proxyinvocationhandler(); PIH. Setrent (host); / / put real role in! Rent proxy = (Rent)pih.getProxy() ; / / dynamically generate the corresponding proxy class! proxy.rent();}}
Core: a dynamic agent generally represents a certain type of business. A dynamic agent can represent multiple classes, and the agent is the interface!
Summary
It has all the static agents. It also has all the static agents that don't have!
- Can make our real role more pure. No longer pay attention to some public things
- The public business is completed by the agent, which realizes the division of business,
- When the public business expands, it becomes more centralized and convenient
- A dynamic agent, generally acting for a certain kind of business
- A dynamic proxy can proxy multiple classes, and the proxy is the interface
8.AOP
AOP introduction
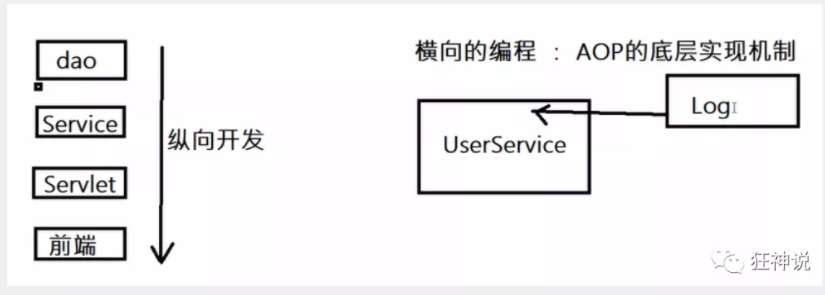
AOP enables us to horizontally extend functions for software without affecting the original functions. How to understand horizontal expansion? In WEB project development, we usually follow the three-tier principle, including control layer - > business layer - > data layer (dao) , then what comes down from this structure is vertical, and its specific layer is what we call horizontal. Our AOP is all methods that can act on a horizontal module.
The Spring IOC container is responsible for generating and managing the AOP proxy in Spring, and its dependencies are also managed by the IOC container. Therefore, the AOP proxy can directly use other bean instances in the container as targets, and this relationship can be provided by the dependency injection of the IOC container. The rules for Spring to create proxy are:
1. By default, the Java dynamic proxy is used to create the AOP proxy, so that the proxy can be created for any interface instance
2. When the class requiring proxy is not a proxy interface, Spring will switch to using CGLIB proxy, or force the use of CGLIB
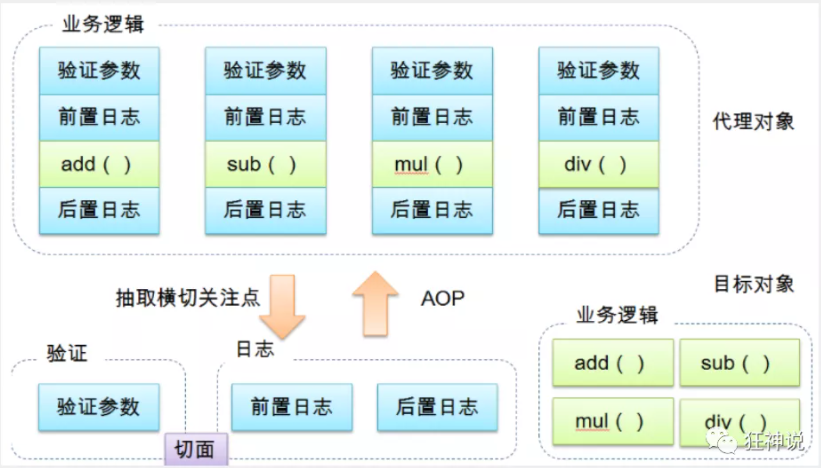
AOP programming is actually a very simple thing. Looking at AOP programming, programmers only need to participate in three parts:
1. Define common business components
2. Define pointcuts. One pointcut may crosscut multiple business components
3. Define enhancement processing, which is the processing action woven for ordinary business components in the AOP framework
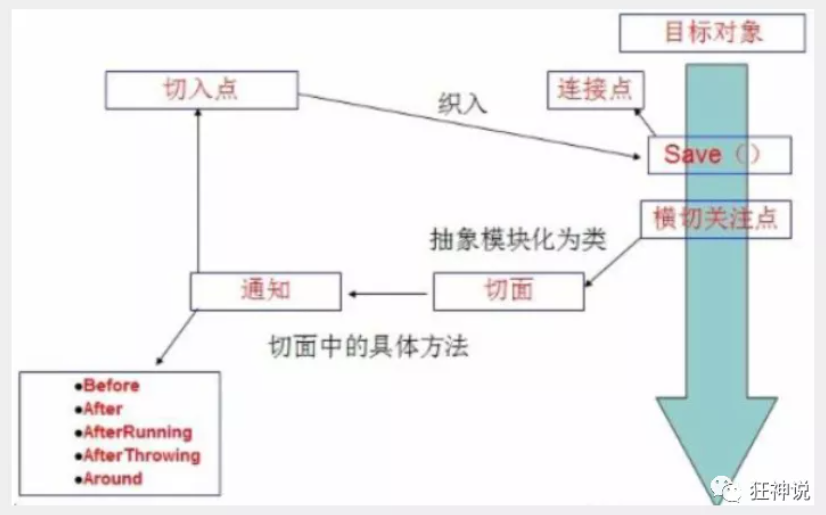
- Facet: interceptor class, which defines pointcuts and notifications
- Pointcut: a specific business point to be intercepted.
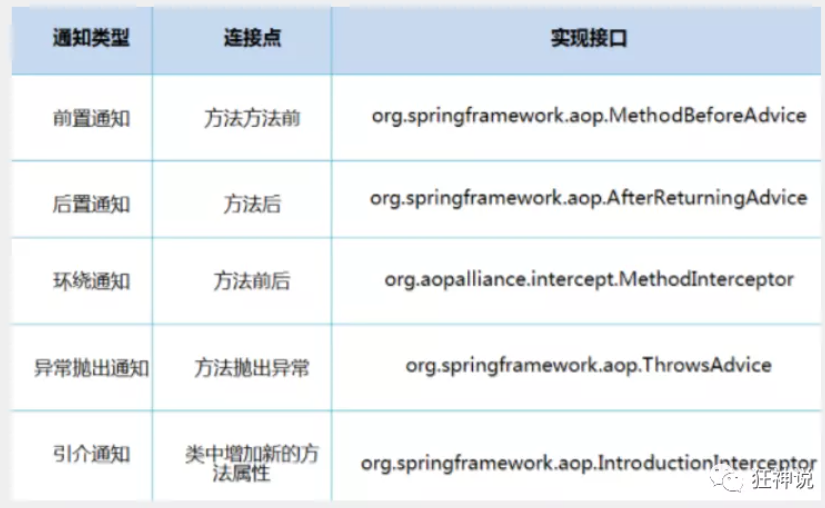
- Notification: the method in the aspect, which declares the execution position of the notification method in the target business layer. The notification types are as follows:
- Pre notification: @ Before is executed Before the target business method is executed
- Post notification: @ After is executed After the target business method is executed
- Return notification: @ AfterReturning is executed after the result returned by the target business method
- Exception notification: @ AfterThrowing after the target business method throws an exception
- Surround notification: @ Around is powerful and can replace the above four notifications. It can also control whether and when the target business method is executed
Therefore, the key to AOP programming is to define the entry point and define the enhancement processing. Once the appropriate entry point and enhancement processing are defined, the AOP framework will automatically generate the AOP proxy, that is, the method of the proxy object = enhancement processing + the method of the proxy object.
AOP (Aspect Oriented Programming) means: Aspect Oriented Programming, which realizes the unified maintenance of program functions through precompiled mode and runtime dynamic agent. AOP is the continuation of OOP, a hot spot in software development, an important content in Spring framework, and a derivative paradigm of functional programming. AOP can isolate each part of business logic, reduce the coupling between each part of business logic, improve the reusability of program, and improve the efficiency of development.
The role of Aop in spring
Provide declarative transactions; Allows you to customize the cut plane
- Crosscutting concerns: methods or functions that span multiple modules of an application. That is, the part that has nothing to do with our business logic, but we need to focus on is crosscutting concerns. Such as log, security, cache, transaction and so on
- ASPECT: a special object whose crosscutting concerns are modularized. That is, it is a class.
- Advice: work that must be completed in all aspects. That is, it is a method in a class.
- Target: the notified object.
- Proxy: an object created after notification is applied to the target object.
- PointCut: the definition of the "place" where the aspect notification is executed.
- Join point: the execution point that matches the pointcut.
That is, Aop adds new functions without changing the original code
Spring implements Aop
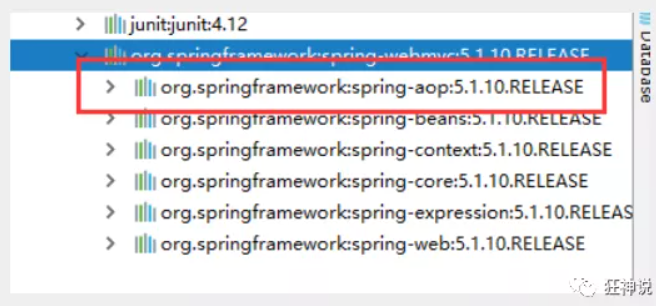
[key] to use AOP weaving, you need to import a dependency package!
<!-- https://mvnrepository.com/artifact/org.aspectj/aspectjweaver --><dependency> <groupId>org.aspectj</groupId> <artifactId>aspectjweaver</artifactId> <version>1.9.4</version></dependency>
(1) Implemented through the spring API
First, write our business interface and implementation class
public interface UserService { public void add(); public void delete(); public void update(); public void search();}
public class UserServiceImpl implements UserService{ @Override public void add() { System.out.println("Add user"); } @Override public void delete() { System.out.println("delete user"); } @Override public void update() { System.out.println("Update user"); } @Override public void search() { System.out.println("Query user"); }}
Then write our enhancement class. We write two, one pre enhancement and one post enhancement
public class Log implements MethodBeforeAdvice { //Method: method of the target Object to be executed / / objects: parameters of the called method / / Object: target Object @ override public void before (method, Object [] objects, Object o) throws throwable {system.out.println (o.getclass(). Getname() + "+ method.getName() +" method executed ");}}
public class AfterLog implements AfterReturningAdvice { //ReturnValue return value / / method called method / / args parameters of the called method object / / target called target object @ override public void afterreturning (object returnValue, method method, object [] args, object target) throws throwable {system.out.println ("executed" + target.getClass().getName() + " +method.getName() + "method," + "return value:" + returnValue);}}
Finally, register in the spring file and implement aop cut in implementation. Pay attention to import constraints
<?xml version="1.0" encoding="UTF-8"?><beans xmlns="http://www.springframework.org/schema/beans" xmlns:xsi=" http://www.w3.org/2001/XMLSchema-instance " xmlns:aop=" http://www.springframework.org/schema/aop " xsi:schemaLocation=" http://www.springframework.org/schema/beans http://www.springframework.org/schema/beans/spring-beans.xsd http://www.springframework.org/schema/aop http://www.springframework.org/schema/aop/spring-aop.xsd "> <! -- register bean -- > < bean id =" userservice "class =" service. Userserviceimpl "/ > < bean id =" log "class =" log. Log "/ > < bean id =" Afterlog "class =" log. Afterlog "/ > <! -- AOP configuration -- > < AOP: config > <! -- pointcut expression: the expression matches the method to be executed -- > < AOP: pointcut id =" pointcut "expression =" execution (* service. Userserviceimpl. * (..) "/ > <! -- execute looping; advice ref execute method. Pointcut ref pointcut -- > < AOP: advisor advice ref =" log " pointcut-ref="pointcut"/> <aop:advisor advice-ref="afterLog" pointcut-ref="pointcut"/> </aop:config></beans>
test
public class MyTest { @Test public void test(){ ApplicationContext context = new ClassPathXmlApplicationContext("beans.xml"); UserService userService = (UserService) context.getBean("userService"); userService.search(); }}
(2) Custom class implementation
The target business class remains the same as userServiceImpl
Step 1: write our own cut in class
public class DiyPointcut { public void before(){ System.out.println("---------Before method execution---------"); } public void after(){ System.out.println("---------After method execution---------"); } }
To configure in spring
<!--The second way is to customize the implementation--><!--register bean--><bean id="diy" class="config.DiyPointcut"/><!--aop Configuration of--><aop:config> <!--The second way: use AOP Label Implementation of--> <aop:aspect ref="diy"> <aop:pointcut id="diyPonitcut" expression="execution(* service.UserServiceImpl.*(..))"/> <aop:before pointcut-ref="diyPonitcut" method="before"/> <aop:after pointcut-ref="diyPonitcut" method="after"/> </aop:aspect></aop:config>
Test:
public class MyTest { @Test public void test(){ ApplicationContext context = new ClassPathXmlApplicationContext("beans.xml"); UserService userService = (UserService) context.getBean("userService"); userService.add(); }}
(3) Implementation using annotations
Step 1: write an enhanced class for annotation implementation
package config;import org.aspectj.lang.ProceedingJoinPoint;import org.aspectj.lang.annotation.After;import org.aspectj.lang.annotation.Around;import org.aspectj.lang.annotation.Aspect;import org.aspectj.lang.annotation.Before;@Aspectpublic class AnnotationPointcut { @Before("execution(* service.UserServiceImpl.*(..))") public void before(){ System.out.println("---------Before method execution---------"); } @After("execution(* service.UserServiceImpl.*(..))") public void after(){ System.out.println("---------After method execution---------"); } @Around("execution(* service.UserServiceImpl.*(..))") public void around(ProceedingJoinPoint jp) throws Throwable { System.out.println("Surround front"); System.out.println("autograph:"+jp.getSignature()); //Execute target method processed object processed = JP. Processed(); System.out.println ("after surround"); System.out.println(proceed); }}
Step 2: register the bean in the Spring configuration file and add the configuration supporting annotation
<!--The third way:Annotation implementation--><bean id="annotationPointcut" class="config.AnnotationPointcut"/><aop:aspectj-autoproxy/>
AOP: AspectJ AutoProxy: description
adopt aop Namespace<aop:aspectj-autoproxy />Declaration is automatically spring Which configurations are in the container@aspectJ Tangential bean Create a proxy and weave in the cut. of course, spring It is still used internally AnnotationAwareAspectJAutoProxyCreator The creation of automatic agent has been carried out, but the details of the specific implementation have been<aop:aspectj-autoproxy />It's hidden<aop:aspectj-autoproxy />There is one proxy-target-class Property, default to false,Indicates use jdk Dynamic proxy weaving enhancement when configured as<aop:aspectj-autoproxy poxy-target-class="true"/>When, it means to use CGLib Dynamic agent technology weaving enhancement. But even if proxy-target-class Set to false,If the target class does not declare an interface, then spring Will be used automatically CGLib Dynamic proxy.
9. Integrate Mybatis
Import jar package
junit
<dependency> <groupId>junit</groupId> <artifactId>junit</artifactId> <version>4.12</version></dependency>
mybatis
<dependency> <groupId>org.mybatis</groupId> <artifactId>mybatis</artifactId> <version>3.5.2</version></dependency>
mysql-connector-java
<dependency> <groupId>mysql</groupId> <artifactId>mysql-connector-java</artifactId> <version>5.1.47</version></dependency>
spring related
<dependency> <groupId>org.springframework</groupId> <artifactId>spring-webmvc</artifactId> <version>5.1.10.RELEASE</version></dependency><dependency> <groupId>org.springframework</groupId> <artifactId>spring-jdbc</artifactId> <version>5.1.10.RELEASE</version></dependency>
aspectJ AOP Weaver
<!-- https://mvnrepository.com/artifact/org.aspectj/aspectjweaver --><dependency> <groupId>org.aspectj</groupId> <artifactId>aspectjweaver</artifactId> <version>1.9.4</version></dependency>
Mybatis spring integration package [key]
<dependency> <groupId>org.mybatis</groupId> <artifactId>mybatis-spring</artifactId> <version>2.0.2</version></dependency>
Configure Maven static resource filtering problem!
<build> <resources> <resource> <directory>src/main/java</directory> <includes> <include>**/*.properties</include> <include>**/*.xml</include> </includes> <filtering>true</filtering> </resource> </resources></build>
To use MyBatis with Spring, you need to define at least two things in the Spring application context: a SqlSessionFactory and at least one data mapper class.
In mybatis Spring, SqlSessionFactory bean can be used to create SqlSessionFactory. To configure this factory bean, you only need to put the following code in the XML configuration file of Spring:
<bean id="sqlSessionFactory" class="org.mybatis.spring.SqlSessionFactoryBean"> <property name="dataSource" ref="dataSource" /></bean>
Note: SqlSessionFactory requires a DataSource. This can be any DataSource. You only need to configure it as you configure other Spring database connections.
In the basic MyBatis usage, SqlSessionFactory is created through SqlSessionFactory builder. In MyBatis spring, SqlSessionFactoryBean is used to create.
In MyBatis, you can use SqlSessionFactory to create sqlsessions. Once you get a session, you can use it to execute mapped statements, commit or rollback connections, and finally close the session when it is no longer needed.
SqlSessionFactory has a unique required property: DataSource for JDBC. This can be any DataSource object, and its configuration method is the same as that of other Spring database connections.
A common attribute is configLocation, which is used to specify the XML configuration file path of MyBatis (mybatis_config.xml). It is very useful when you need to modify the basic configuration of MyBatis. Generally, the basic configuration refers to < Settings > or < typealiases > elements.
It should be noted that this configuration file does not need to be a complete MyBatis configuration. Specifically, any Environment configuration (), data source () and MyBatis's transaction manager () are ignored. SqlSessionFactoryBean will create its own MyBatis Environment configuration and set the value of the custom Environment as required.
SqlSessionTemplate is the core of mybatis spring. As an implementation of SqlSession, this means that it can be used to seamlessly replace the SqlSession already in use in your code.
Templates can participate in Spring's transaction management, and because they are thread safe, they can be used by multiple mapper classes. You should always use SqlSessionTemplate to replace the default DefaultSqlSession implementation of MyBatis. Mixing different classes in the same application may cause data consistency problems
You can use SqlSessionFactory as a parameter of the construction method to create a SqlSessionTemplate object.
<bean id="sqlSession" class="org.mybatis.spring.SqlSessionTemplate"> <constructor-arg index="0" ref="sqlSessionFactory" /></bean>
Now, this bean can be directly injected into your DAO bean. You need to add a SqlSession attribute to your bean, as follows:
public class UserDaoImpl implements UserDao { //Inject sqlSession private SqlSession sqlSession; public void setSqlSession(SqlSession sqlSession) { this.sqlSession = sqlSession;} public User getUser(String userId) { return sqlSession.getMapper...;}}
Inject SqlSessionTemplate as follows:
<bean id="userDao" class="org.mybatis.spring.sample.dao.UserDaoImpl"> <property name="sqlSession" ref="sqlSession" /></bean>
Integration implementation I
1. Introduce Spring configuration file beans.xml
<?xml version="1.0" encoding="UTF-8"?><beans xmlns="http://www.springframework.org/schema/beans" xmlns:xsi="http://www.w3.org/2001/XMLSchema-instance" xsi:schemaLocation="http://www.springframework.org/schema/beans http://www.springframework.org/schema/beans/spring-beans.xsd">
2. Configure the data source to replace the data source of mybaits
<!--Configure data sources: there are many data sources. You can use third-party or Spring of--><bean id="dataSource" class="org.springframework.jdbc.datasource.DriverManagerDataSource"> <property name="driverClassName" value="com.mysql.jdbc.Driver"/> <property name="url" value="jdbc:mysql://localhost:3306/mybatis?useSSL=true&useUnicode=true&characterEncoding=utf8"/> <property name="username" value="root"/> <property name="password" value="123456"/></bean>
3. Configure SqlSessionFactory and associate MyBatis
<!--to configure SqlSessionFactory--><bean id="sqlSessionFactory" class="org.mybatis.spring.SqlSessionFactoryBean"> <property name="dataSource" ref="dataSource"/> <!--relation Mybatis--> <property name="configLocation" value="classpath:mybatis-config.xml"/> <property name="mapperLocations" value="classpath:dao/*.xml"/></bean>
4. Register sqlSessionTemplate and associate sqlSessionFactory
<!--register sqlSessionTemplate , relation sqlSessionFactory--><bean id="sqlSession" class="org.mybatis.spring.SqlSessionTemplate"> <!--Using constructor injection--> <constructor-arg index="0" ref="sqlSessionFactory"/></bean>
5. Add the implementation class of Dao interface; Privatize sqlSessionTemplate
public class UserDaoImpl implements UserMapper { //Sqlsession does not need to be created by ourselves. Spring manages private sqlsessiontemplate sqlsession; public void setSqlSession(SqlSessionTemplate sqlSession) { this.sqlSession = sqlSession; } public List<User> selectUser() { UserMapper mapper = sqlSession.getMapper(UserMapper.class); return mapper.selectUser(); } }
6. Register bean implementation
<bean id="userDao" class="dao.UserDaoImpl"> <property name="sqlSession" ref="sqlSession"/></bean>
7. Testing
@Testpublic void test2(){ApplicationContext context = new ClassPathXmlApplicationContext("beans.xml");UserMapper mapper = (UserMapper) context.getBean("userDao");List<User> user = mapper.selectUser();System.out.println(user);}
The result is output successfully! Now the status of our Mybatis configuration file! Discovery can be integrated by Spring!
<?xml version="1.0" encoding="UTF-8" ?><!DOCTYPE configuration PUBLIC "-//mybatis.org//DTD Config 3.0//EN" "http://mybatis.org/dtd/mybatis-3-config.dtd"><configuration> <typeAliases> <package name="pojo"/> </typeAliases></configuration>
Integration implementation II
dao inherits the Support class, obtains it directly by using getSqlSession(), and then injects it directly into SqlSessionFactory. Compared with method 1, SqlSessionTemplate does not need to be managed, and the Support for transactions is more friendly. You can view the tracking source code
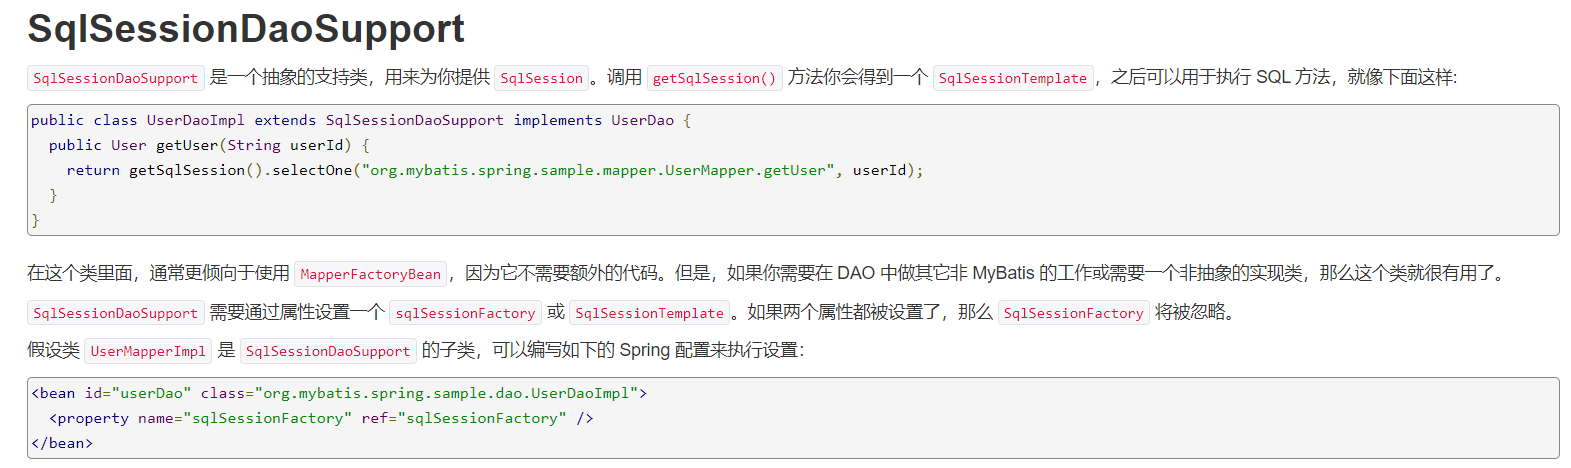
1. Modify the UserDaoImpl we wrote above
public class UserDaoImpl extends SqlSessionDaoSupport implements UserMapper { public List<User> selectUser() { UserMapper mapper = getSqlSession().getMapper(UserMapper.class); return mapper.selectUser(); }}
2. Modify bean configuration
<bean id="userDao" class="dao.UserDaoImpl"> <property name="sqlSessionFactory" ref="sqlSessionFactory" /></bean>
3. Testing
@Testpublic void test2(){ ApplicationContext context = new ClassPathXmlApplicationContext("beans.xml"); UserMapper mapper = (UserMapper) context.getBean("userDao"); List<User> user = mapper.selectUser(); System.out.println(user);}
Declarative transaction
Transaction is to treat a series of actions as an independent unit of work, which are either completed or ineffective.
Transaction four attribute ACID
-
atomicity
-
- A transaction is an atomic operation, which consists of a series of actions. The atomicity of a transaction ensures that the actions either complete or fail to work at all
-
consistency
-
- Once all transaction actions are completed, the transaction is committed. Data and resources are in a consistent state that meets business rules
-
isolation
-
- Multiple transactions may process the same data at the same time, so each transaction should be isolated from other transactions to prevent data corruption
-
Persistence
- Once the transaction is completed, no matter what error occurs in the system, the result will not be affected. Typically, the result of a transaction is written to persistent storage
Code test
In the previous case, we added two methods to the userDao interface, delete and add users;
//Add a user int addUser (user)// Delete user according to id (int id);
mapper file, we deliberately misspelled deletes and tested it
<insert id="addUser" parameterType="com.kuang.pojo.User">insert into user (id,name,pwd) values (#{id},#{name},#{pwd})</insert><delete id="deleteUser" parameterType="int">deletes from user where id = #{id}</delete>
Write the implementation class of the interface. In the implementation class, we operate a wave
public class UserDaoImpl extends SqlSessionDaoSupport implements UserMapper { //Add some operations public list < user > selectuser() {user user = new user (4, "Xiaoming", "123456"); usermapper mapper = getsqlsession(). Getmapper (usermapper. Class); mapper.adduser (user); mapper.deleteuser (4); return mapper. Selectuser();} / / add public int addUser (user) {usermapper mapper = getsqlsession(). Getmapper (usermapper. Class); return mapper. AddUser (user);} / / delete public int deleteuser (int ID) {usermapper mapper mapper = getsqlsession(). Getmapper (usermapper. Class); return mapper. Deleteuser (ID);}}
Test:
@Testpublic void test2(){ ApplicationContext context = new ClassPathXmlApplicationContext("beans.xml"); UserMapper mapper = (UserMapper) context.getBean("userDao"); List<User> user = mapper.selectUser(); System.out.println(user);}
Error reporting: sql exception. delete is written incorrectly
Result: insertion succeeded!
No transaction management; We want them to succeed only when they succeed. If there is a failure, they will all fail. We should need affairs!
Transaction management in Spring
Spring defines an abstraction layer on top of different transaction management APIs, so that developers can use spring's transaction management mechanism without understanding the underlying transaction management API. Spring supports programmatic transaction management and declarative transaction management.
Programming transaction management
- Embed transaction management code into business methods to control transaction commit and rollback
- Disadvantages: additional transaction management code must be included in each transaction operation business logic
Declarative transaction management
- Generally, it works better than programmatic transactions.
- The transaction management code is separated from the business method to realize the transaction management in a declarative way.
- Transaction management is regarded as a crosscutting concern and modularized through aop method. Spring supports declarative transaction management through the Spring AOP framework.
Using Spring to manage transactions, pay attention to the constraint import of header file: tx
xmlns:tx="http://www.springframework.org/schema/tx"http://www.springframework.org/schema/txhttp://www.springframework.org/schema/tx/spring-tx.xsd">
Transaction manager
- No matter which transaction management strategy (programmatic or declarative) Spring uses, the transaction manager is required.
- Spring's core transaction management abstraction encapsulates a set of technology independent methods.
JDBC transaction
<bean id="transactionManager" class="org.springframework.jdbc.datasource.DataSourceTransactionManager"> <property name="dataSource" ref="dataSource" /></bean>
After configuring the transaction manager, we need to configure the notification of transactions
<!--Configure transaction notifications--><tx:advice id="txAdvice" transaction-manager="transactionManager"> <tx:attributes> <!--What methods are configured and what transactions are used,Configure propagation properties of transactions--> <tx:method name="add" propagation="REQUIRED"/> <tx:method name="delete" propagation="REQUIRED"/> <tx:method name="update" propagation="REQUIRED"/> <tx:method name="search*" propagation="REQUIRED"/> <tx:method name="get" read-only="true"/> <tx:method name="*" propagation="REQUIRED"/> </tx:attributes></tx:advice>
spring transaction propagation feature:
Transaction propagation behavior is how transactions propagate among multiple transaction methods when they call each other. spring supports seven transaction propagation behaviors:
- propagation_ Requisited: if there is no transaction at present, create a new transaction. If there is already a transaction, join it. This is the most common choice.
- propagation_supports: supports the current transaction. If there is no current transaction, it will be executed in a non transaction method.
- propagation_mandatory: use the current transaction. If there is no current transaction, an exception will be thrown.
- propagation_required_new: create a new transaction. If there is a current transaction, suspend the current transaction.
- propagation_not_supported: perform operations in a non transactional manner. If there is a transaction, suspend the current transaction.
- propagation_never: execute the operation in a non transactional manner. If the current transaction exists, an exception will be thrown.
- propagation_nested: if a transaction currently exists, it is executed within a nested transaction. If there is no transaction at present, the and propagation are executed_ Required similar operations
The default transaction propagation behavior of Spring is PROPAGATION_REQUIRED, which is suitable for most situations.
Assuming that ServiveX#methodX() works in a transaction environment (that is, they are enhanced by Spring transactions), assuming that there is the following call chain in the program: service1 #method1 () - > service2 #method2 () - > service3 #method3 (), then the three methods of the three service classes work in the same transaction through the transaction propagation mechanism of Spring.
For example, the methods we just mentioned are called, so they will be placed in a group of transactions!
Configure AOP
Import aop header file!
<!--to configure aop Weaving transaction--><aop:config> <aop:pointcut id="txPointcut" expression="execution(* com.kuang.dao.*.*(..))"/> <aop:advisor advice-ref="txAdvice" pointcut-ref="txPointcut"/></aop:config>