1. Introduction to Spring Boot
When I first came into contact with Spring, I felt that it was a very difficult framework to access because of its complex configuration files, the xml file that I disliked most, and the readability of such files was very poor. So for a long time, my Spring learning was out of stagnation.
But that changed after I came into contact with Spring Boot. Spring officials may also find the complicated configuration a very elegant thing, including package scanning but not touching the soul.
Another problem with Spring is the conflict of dependencies, which is even more painful for a half-baked programmer like me.
Fortunately, all the pain was ended by Spring Boot.
Spring Boot has three features:
- Automatic configuration
- Start dependence
- Actuator's Monitoring of Running State
Every feature is so beautiful.
What is the real job of a developer? It is to write business code and realize business functions, so if you spend a lot of time on Spring's configuration and dependency conflict resolution, it is a waste of a lot of time.
The emergence of Spring Boot can be said to be a liberation of productivity.
Less gossip, look at a need.
Now I want to write a tool to connect to the database, add, delete, change and check. I'm afraid many programmers will recall the JDBC template code of ugly when they first learned Java. I am a DBA, because the company has arranged to write a lot of JDBC code, deeply felt that this code is a waste of time, and later came into contact with the JPA framework, feeling very good. Next, Spring Boot is used to realize the function of adding, deleting and modifying a database.
2. Spring Boot Actual JPA
I will use H2 database. This embedded database is most suitable for home learning. It is very small and supports the most basic database operation. As long as it does not involve too deep content, it feels like MySQL. How to start an H2 Server on the local machine is not described here.
First, open IDEA and follow the following order:
New Project - > Spring Initializr - > Fill in the group, artifact - > hook the web - > Click next.
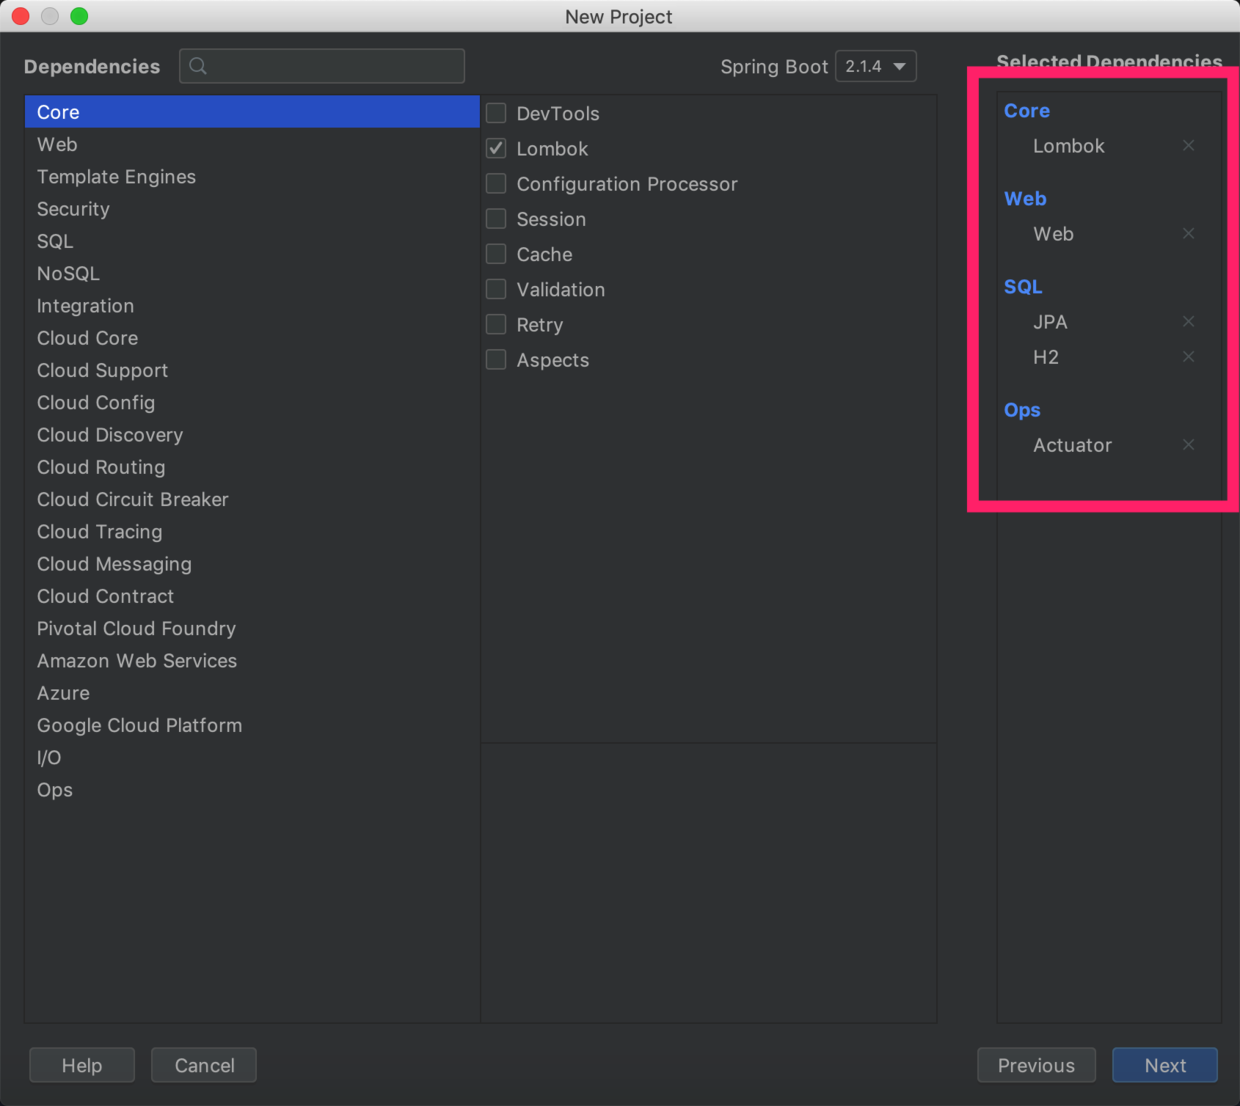
The above illustration is the required component of my choice.
Since it's JPA, let's first define an Entity. My table is called Demo, so Entity is called Demo:
package com.example.springwithjdbc.entity;


import lombok.Data;

import javax.persistence.Entity;
import javax.persistence.GeneratedValue;
import javax.persistence.Id;

@Entity
@Data
public class Demo {
    @Id
    @GeneratedValue
    private int id;

    private String uname;
}
Annotations:
- @ Entity: This class is an Entity.
- @ Data: This is the function provided by lombok. With this annotation, getter s and setter s are not needed, nor toString methods are written, and they are automatically generated.
- @ Id: This is the primary key.
- @ GeneratedValue: Represents self-increasing
Next, the classic DAO layer emerges:
package com.example.springwithjdbc.dao;

import com.example.springwithjdbc.entity.Demo;
import org.springframework.data.jpa.repository.JpaRepository;

public interface DemoDao extends JpaRepository<Demo, Integer> { }
The DAO layer only defines an interface without any implementation. In fact, it does not need any specific implementation. Pay attention to the inherited Jpa Repository, which helps us do a lot of work that needs our original manual coding.
Next comes the classic Service layer, which is the business layer.
package com.example.springwithjdbc.service;

import com.example.springwithjdbc.entity.Demo;

import java.util.List;

public interface IDemoService {
    Demo add(Demo demo);

    Demo findById(int id);

    List<Demo> findAll();
}
The above code is the interface of service, and then we write the concrete implementation:
package com.example.springwithjdbc.service;

import com.example.springwithjdbc.dao.DemoDao;
import com.example.springwithjdbc.entity.Demo;
import org.springframework.beans.factory.annotation.Autowired;
import org.springframework.stereotype.Service;

import java.util.List;

@Service
public class DemoService implements IDemoService {
    @Autowired
    private DemoDao demoDao;

    @Override
    public Demo add(Demo demo) {
        return demoDao.save(demo);
    }

    @Override
    public Demo findById(int id) {
        return demoDao.findById(id).get();
    }

    @Override
    public List<Demo> findAll() {
        return demoDao.findAll();
    }
}
Annotations:
@ Service: Represents a service;
@ Autowired: Inject DemoDao.
Next, we need a Controller to implement the REST interface:
package com.example.springwithjdbc.controller;

import com.example.springwithjdbc.entity.Demo;
import com.example.springwithjdbc.service.IDemoService;
import org.springframework.beans.factory.annotation.Autowired;
import org.springframework.web.bind.annotation.GetMapping;
import org.springframework.web.bind.annotation.PostMapping;
import org.springframework.web.bind.annotation.RequestMapping;
import org.springframework.web.bind.annotation.RequestParam;
import org.springframework.web.bind.annotation.RestController;

import java.util.List;

@RestController
@RequestMapping("/")
public class DemoRestController {
    @Autowired
    IDemoService demoService;

    @PostMapping("/save")
    public String save(@RequestParam(name = "name")String name) {
        Demo demo = new Demo();
        demo.setUname(name);
        return demoService.add(demo).toString();
    }

    @GetMapping("/find")
    public String findById(@RequestParam(name = "id")int id) {
        return demoService.findById(id).toString();
    }

    @GetMapping("/list")
    public String findAll() {
        List<Demo> demoList = demoService.findAll();
        return demoList.toString();
    }
}
Finally, configure application.yml to configure the data source:
spring:
  datasource:
    url: jdbc:h2:tcp://localhost/~/code/h2/bin/demo
    username: admin
    password: admin
  jpa:
    show-sql: true
Start this project, then you can use browser or postman to test, this is my test with postman, first send a POST request, write a data:

Now let's query this data:

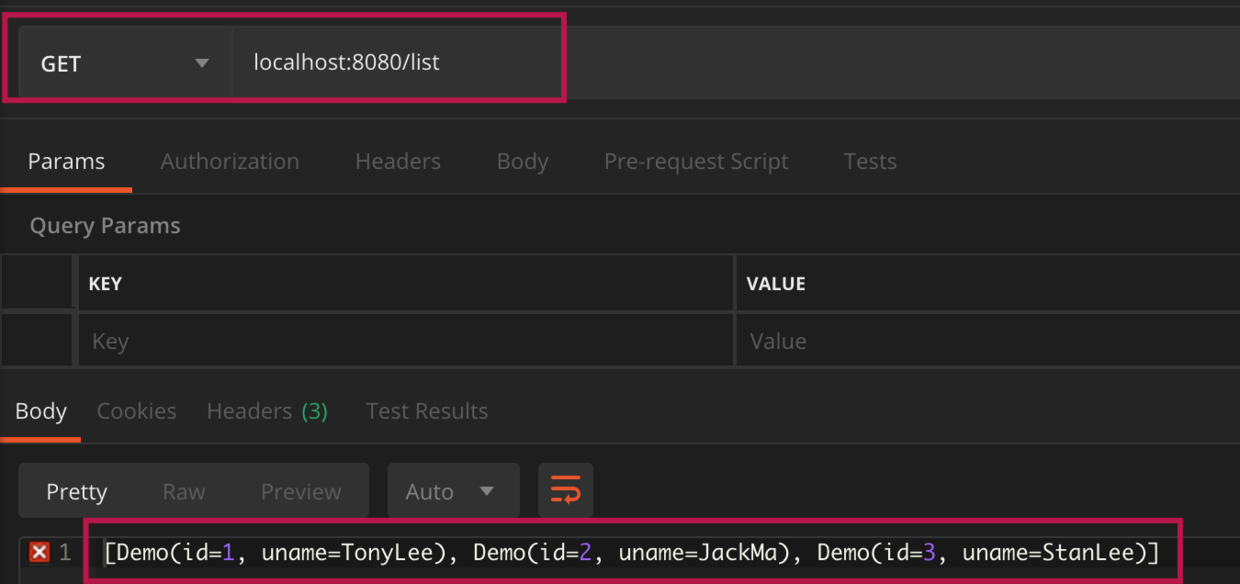
After writing more data, call the list interface:
So far, we have successfully written a JPA code based on Spring Boot, which implements simple new and query functions. I don't know where the JDBC code is simpler than I wrote before, and it's more elegant, and there's no more complicated and difficult xml configuration.
Spring even made a website dedicated to generating engineering skeletons.
3. summary
Recently, I have been learning micro services. Spring Cloud is indispensable for learning micro services, and Spring Boot is indispensable for Spring Cloud. So it's necessary to first understand Spring Boot.
This is the first article of my notes, hoping to help others like me in learning micro services, Spring Cloud and Spring Book.