Spring boot2. X Quick Start Guide (1)
preparation
- IDE: IntelliJ IDEA 2020.3
- Java environment jdk1.8
Quickly create spring boot project on the official website
Now let's get to the point:
Get into https://start.spring.io/ Build an initial project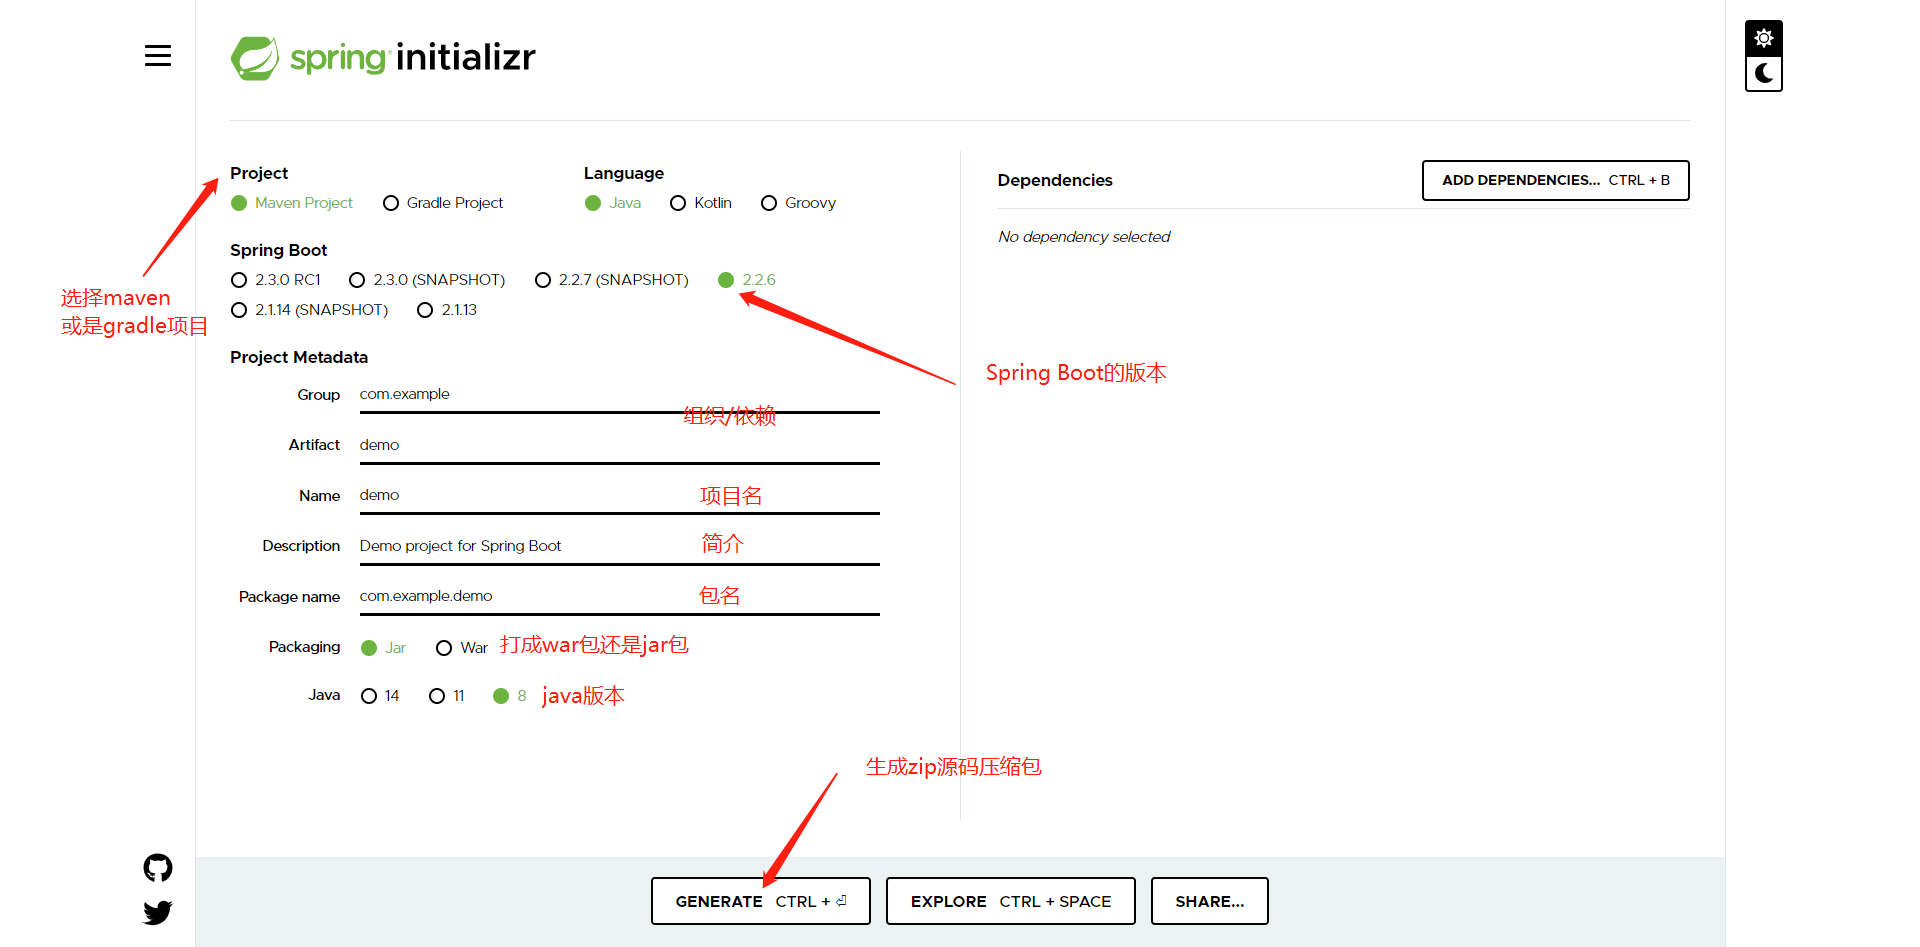
Here you will download a zip project package
Using Maven to import the Spring Boot project
Remember to copy the path of the demo folder after decompressing demo.zip
The development tool used here is IntelliJ IDEA
Here is the import process:
In the IDEA, click file - > Open - > paste the just demo folder path - > find pom.xml and double-click
->Open as peoject - > wait for Maven to finish loading. Can't see the figure below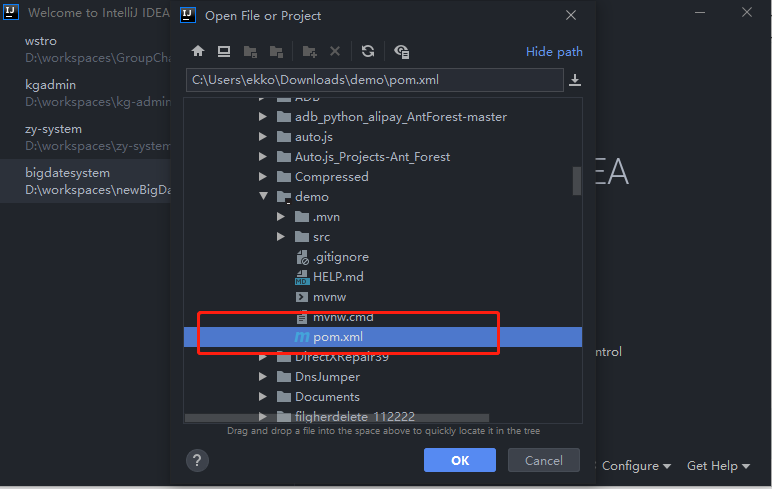
The following direct fix appears. Ignore it if it doesn't appear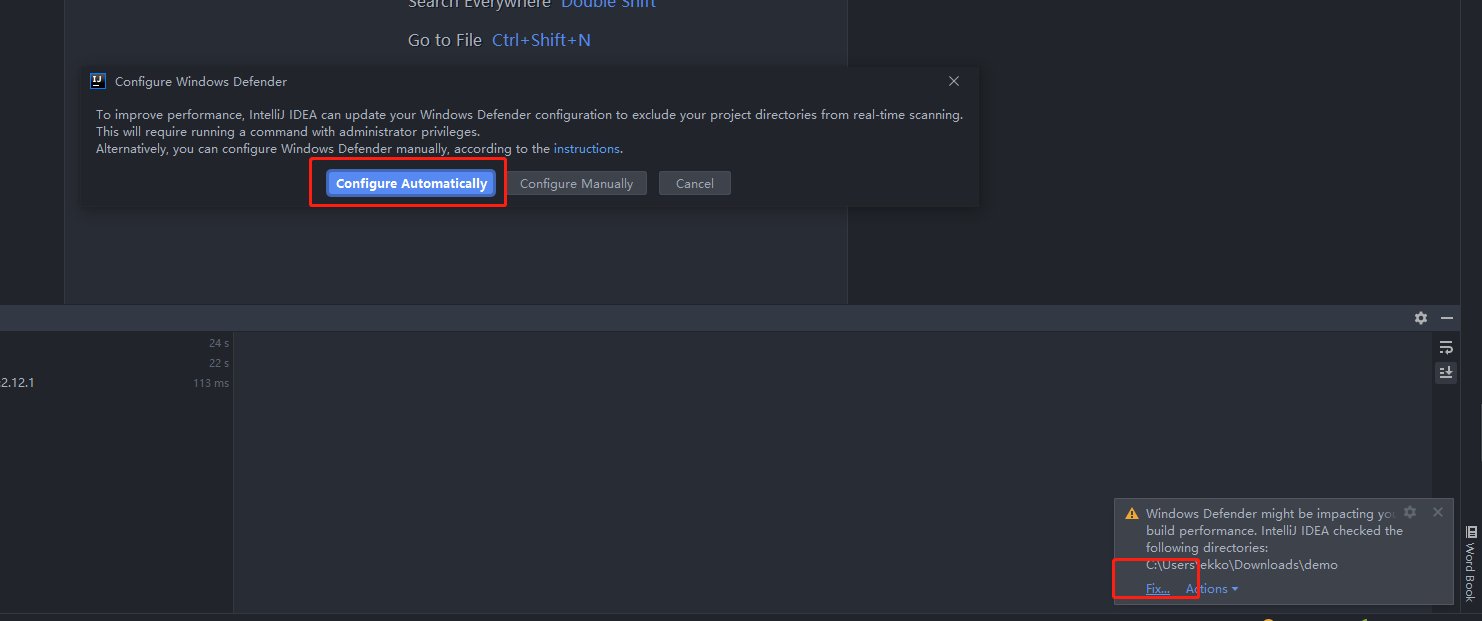
Maven switching domestic source
You'll find that he's very slow to download
Or you can surf the Internet scientifically
Next, turn it off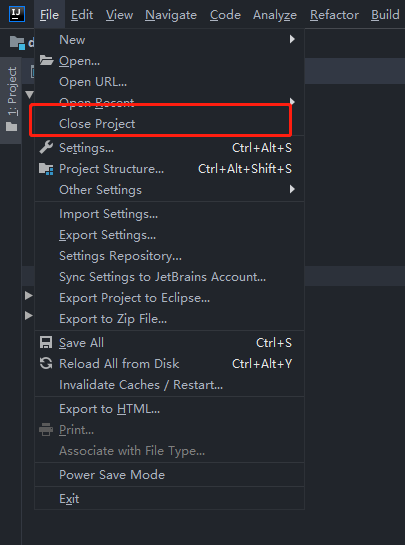
Then reopen
Add at the bottom of pom.xml file
<repositories>
        <!--Alibaba cloud main warehouse, agent maven central and jcenter Warehouse-->
        <repository>
            <id>aliyun</id>
            <name>aliyun</name>
            <url>https://maven.aliyun.com/repository/public</url>
            <releases>
                <enabled>true</enabled>
            </releases>
            <snapshots>
                <enabled>false</enabled>
            </snapshots>
        </repository>
        <!--Alicloud agent Spring Official warehouse-->
        <repository>
            <id>spring-milestones</id>
            <name>Spring Milestones</name>
            <url>https://maven.aliyun.com/repository/spring</url>
            <releases>
                <enabled>true</enabled>
            </releases>
            <snapshots>
                <enabled>false</enabled>
            </snapshots>
        </repository>
    </repositories>
    <pluginRepositories>
        <!--Alicloud agent Spring Plug in warehouse-->
        <pluginRepository>
            <id>spring-plugin</id>
            <name>spring-plugin</name>
            <url>https://maven.aliyun.com/repository/spring-plugin</url>
            <releases>
                <enabled>true</enabled>
            </releases>
            <snapshots>
                <enabled>false</enabled>
            </snapshots>
        </pluginRepository>
    </pluginRepositories>
Take off, wait for download to complete
SpringBoot project launch
Preparation before startup
Move the DemoApplication startup class to the outermost layer of the package according to the figure below
The startup class is equivalent to the person in charge of the management project. If you throw it at the same level as the control layer, there must be an error. No
The purpose is to open a web application and add it under < dependencies > in pom.xml
        <dependency>
            <groupId>org.springframework.boot</groupId>
            <artifactId>spring-boot-starter-web</artifactId>
        </dependency>
Modify BootDemoApplication.java
package com.example.demo;

import org.springframework.boot.SpringApplication;
import org.springframework.boot.autoconfigure.SpringBootApplication;
import org.springframework.web.bind.annotation.GetMapping;
import org.springframework.web.bind.annotation.RestController;

/*
 *
 * description : The @ RestController here is equivalent to @ ResponseBody+@Controller
 * Using @ RestController is equivalent to adding @ ResponseBody annotation to each method
 * @author: Robot
 * @date 0:03 2020/5/8
 **/
@RestController
@SpringBootApplication
public class BootDemoApplication {

    public static void main(String[] args) {
        SpringApplication.run(BootDemoApplication.class, args);
    }

    /**
     * Here, @ GetMapping is equivalent to @ RequestMapping(value = "/hello", method = RequestMethod.GET)
     **/
    @GetMapping("hello")
    public String test(){
        return "i love java";
    }
}
The project structure is as follows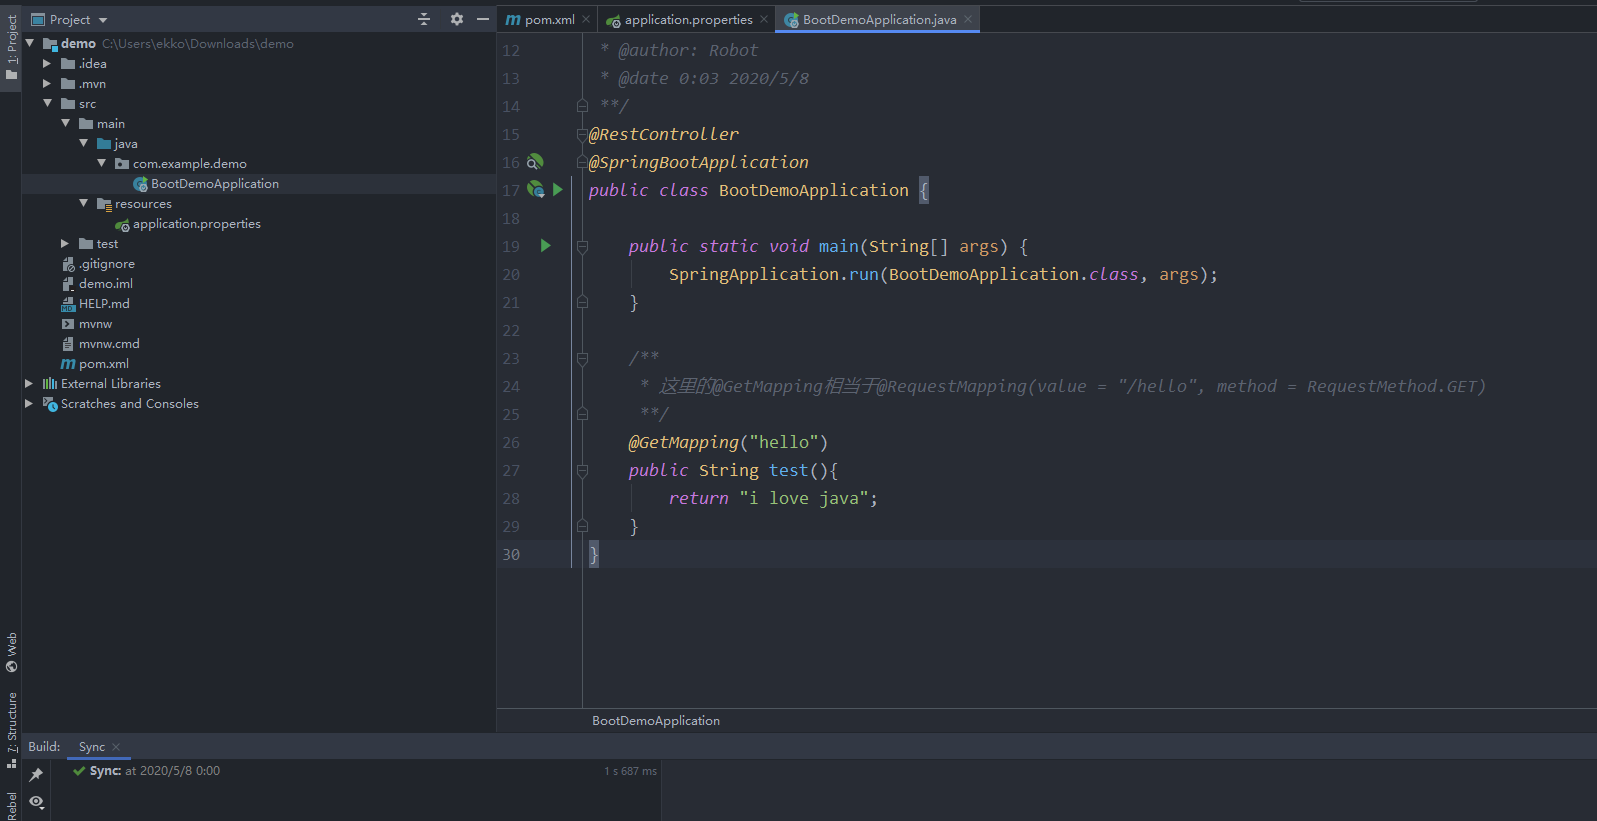
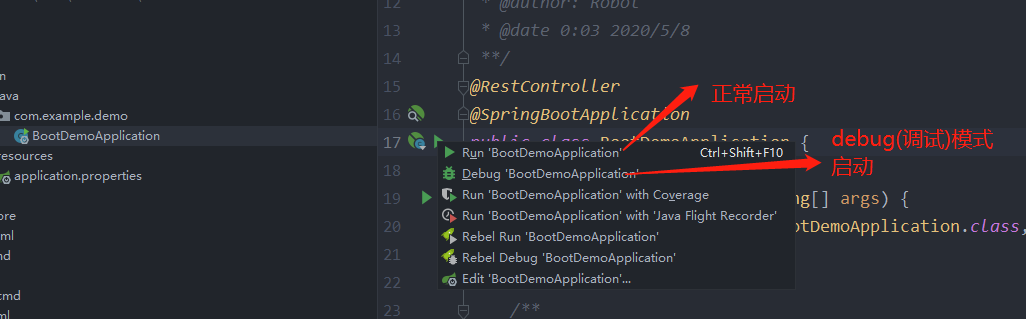
It is recommended to start the debugging mode. In the future, we will do the project as well
Access after startup success http://localhost:8080/hello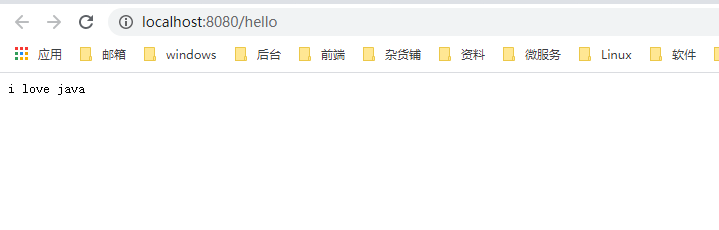
The success of the above figure indicates that the project can be accessed, and you have successfully made the first step towards Spring
Configure application.yml
What is yml?
YML file format is a file format written by YAML (YAML airport markup language). YAML is an intuitive data serialization format that can be recognized by computers, and it is easy for human to read, interact with script language easily, and can be imported by different programming language programs supporting YAML library, such as C / C + +, ruby, python, Java, Perl, C + +, PHP, etc.
I don't understand. I don't understand either
It's the configuration file equivalent to xml and properties. It's more intuitive. Let's go to the code
The following properties
spring.resources.locations= classpath:/templates
After changing to yml format
spring:
  resources:
    static-locations: classpath:/templates
yml should note that the colon (:) should be followed by a space, and the second level and the first level should be separated by a Tab
application.yml
server:
  port: 8080
# If you are connected to a database, you need to have a database that can be used. Otherwise, an error is reported
spring:
  datasource:
    type: com.alibaba.druid.pool.DruidDataSource
    driver-class-name: com.mysql.jdbc.Driver
    url: jdbc:mysql://127.0.0.1:3306/dovis?characterEncoding=utf-8
    username: root
    password: root