After the front and back ends are separated, it is essential to maintain the interface documents.
An ideal state is that after the design is completed, the interface documents will be sent to the front-end and back-end, and each of them will develop according to the established rules. After the development is completed and connected, they can go online. Of course, this is a very ideal state, but it is rarely encountered in the actual development. The interface is always changing, and it needs to be maintained if there is any change. All the small partners who have done it know how big it is! Fortunately, there are some tools that can reduce our workload. Swagger 2 is one of them. As for other software with similar functions but for a fee, I won't introduce it too much here. This article mainly talks with you about how to integrate Swagger2 in Spring Boot.
Engineering creation
Of course, the first step is to create a Spring Boot project and add web dependency. After the creation is successful, add two related dependencies of Swagger2. The complete dependency is as follows:
<dependency>
    <groupId>io.springfox</groupId>
    <artifactId>springfox-swagger2</artifactId>
    <version>2.9.2</version>
</dependency>
<dependency>
    <groupId>io.springfox</groupId>
    <artifactId>springfox-swagger-ui</artifactId>
    <version>2.9.2</version>
</dependency>
<dependency>
    <groupId>org.springframework.boot</groupId>
    <artifactId>spring-boot-starter-web</artifactId>
</dependency>
Swagger2 configuration
The configuration of Swagger2 is also relatively easy. After the project is successfully created, the developer only needs to provide a dock Bean, as follows:
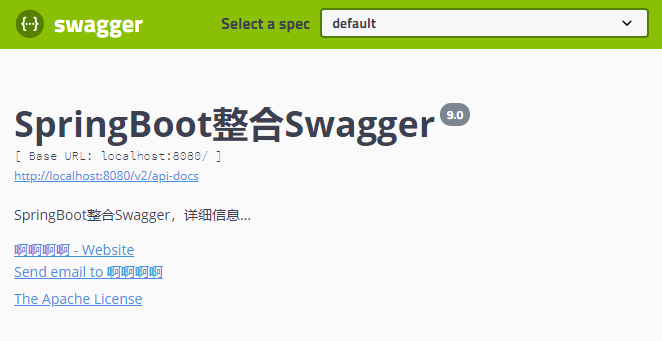
@Configuration
@EnableSwagger2
public class SwaggerConfig {
    @Bean
    public Docket createRestApi() {
        return new Docket(DocumentationType.SWAGGER_2)
                .pathMapping("/")
                .select()
                .apis(RequestHandlerSelectors.basePackage("org.javaboy.controller"))
                .paths(PathSelectors.any())
                .build().apiInfo(new ApiInfoBuilder()
                        .title("SpringBoot integration Swagger")
                        .description("SpringBoot integration Swagger,detailed information......")
                        .version("9.0")
                        .contact(new Contact("Ah ah ah","blog.csdn.net","aaa@gmail.com"))
                        .license("The Apache License")
                        .licenseUrl("http://www.javaboy.org")
                        .build());
    }
}
A configuration class is provided here. First, enable Swagger2 through @ enableswager2 annotation, and then configure a dock Bean. In this Bean, configure the mapping path and the location of the interface to be scanned. In apiInfo, mainly configure the information of Swagger2 document website, such as the title of the website, the description of the website, the information of the contact person, the protocol used, etc.
In this way, Swagger2 is very convenient even if the configuration is successful.
At this time, start the project, input http://localhost:8080/swagger-ui.html, and you can see the following page, indicating that the configuration has been successful:
Create interface
The next step is to create an interface. There are not many comments related to Swagger2, which are easy to understand. Let me give you examples:
@RestController
@Api(tags = "User management related interface")
@RequestMapping("/user")
public class UserController {
    @PostMapping("/")
    @ApiOperation("Add user's interface")
    @ApiImplicitParams({
            @ApiImplicitParam(name = "username", value = "User name", defaultValue = "Li Si"),
            @ApiImplicitParam(name = "address", value = "User address", defaultValue = "Shenzhen", required = true)
    })
    public RespBean addUser(String username, @RequestParam(required = true) String address) {
        return new RespBean();
    }
    @GetMapping("/")
    @ApiOperation("according to id Query user's interface")
    @ApiImplicitParam(name = "id", value = "user id", defaultValue = "99", required = true)
    public User getUserById(@PathVariable Integer id) {
        User user = new User();
        user.setId(id);
        return user;
    }
    @PutMapping("/{id}")
    @ApiOperation("according to id Update user's interface")
    public User updateUserById(@RequestBody User user) {
        return user;
    }
}
There are several API s involved here. Let me explain to you:
- @Api annotations can be used to mark the functions of the current Controller.
- @The ApiOperation annotation is used to mark the function of a method.
- @ApiImplicitParam annotation is used to describe a parameter. It can be used to configure the Chinese meaning of the parameter or set the default value of the parameter, so that manual input can be avoided during interface test.
- If there are multiple parameters, you need to use multiple @ ApiImplicitParam annotations to describe them. Multiple @ ApiImplicitParam annotations need to be placed in one @ ApiImplicitParams annotation.
- It should be noted that although parameters can be specified in @ ApiImplicitParam annotation are required, they cannot replace @ RequestParam(required = true). The former is only required in Swagger2 framework, and the limitation is useless if Swagger2 is discarded. Therefore, if developers need to specify a parameter, the @ RequestParam(required = true) annotation cannot. Ellipsis.
- If the parameter is an object (such as the update interface above), the description of the parameter can also be placed in the entity class. For example, the following code:
@ApiModel
public class User {
    @ApiModelProperty(value = "user id")
    private Integer id;
    @ApiModelProperty(value = "User name")
    private String username;
    @ApiModelProperty(value = "User address")
    private String address;
    //getter/setter
}
OK, after the above configuration, next, refresh the page just opened, and you can see the following effect:
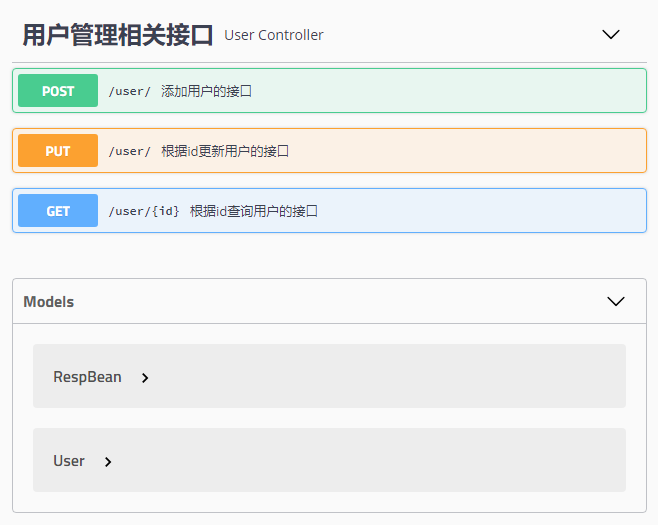
You can see that all interfaces are listed here, including the interface request method, interface address and interface name. Click to open an interface, and you can see the following information:
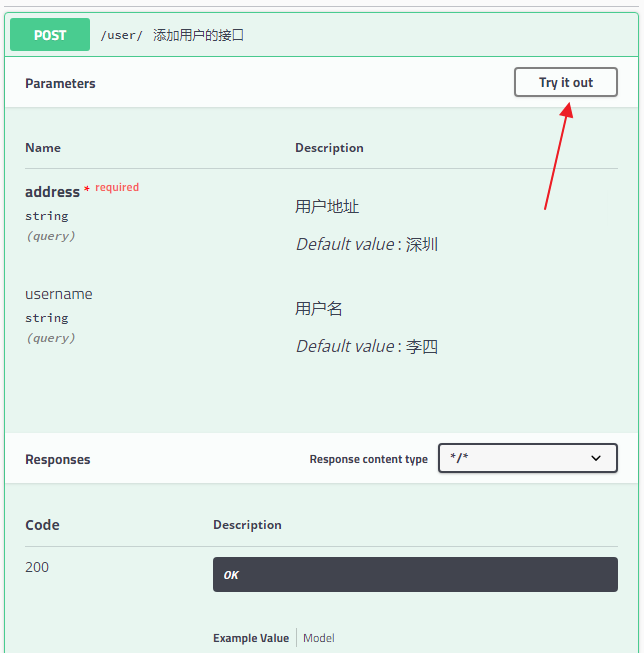
It can be seen that the interface parameters, parameter requirements, parameter default values and so on are all displayed. query under parameter type indicates that parameters are passed in the form of key/value. Click Try it out in the upper right corner to test the interface:
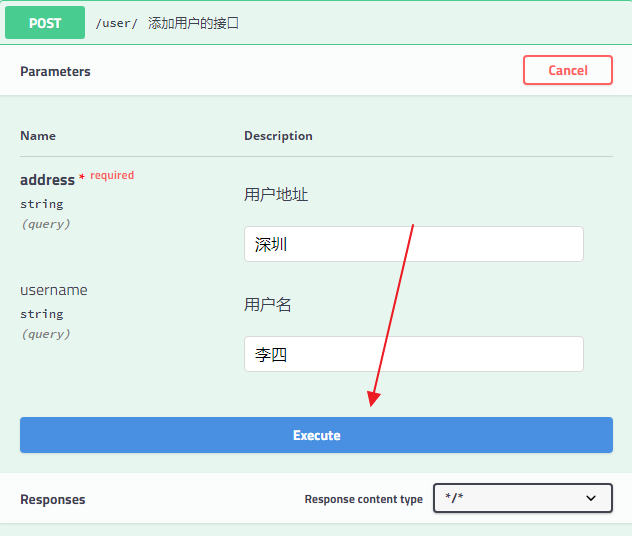
Click the Execute button to send the request for testing. The test results are shown in the Response below.
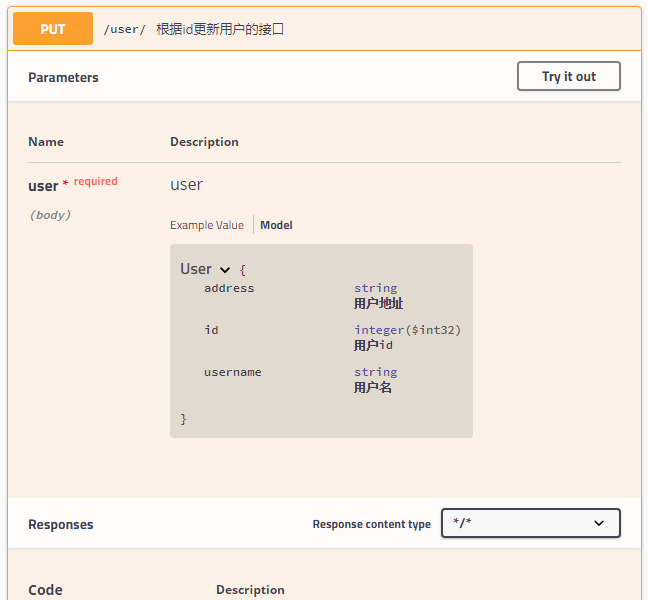
Please note that the query under the parameter type indicates that the parameter is passed in the form of key/value. The value here may also be body, and body indicates that the parameter is passed in the form of request body. For example, the update interface above is as follows:
Of course, another possibility is that the parameter here is path, which means that the parameter is passed in the path. For example, query the user's interface according to the id:

Of course, in addition to these, there are also some comments on response values, which are relatively simple, and small partners can explore by themselves.
Configuration in Security
If Spring Security is integrated in our Spring Boot project, the Swagger2 document may be blocked without additional configuration. At this time, you only need to rewrite the configure method in the configuration class of Spring Security, and add the following filtering:
@Override
public void configure(WebSecurity web) throws Exception {
    web.ignoring()
            .antMatchers("/swagger-ui.html")
            .antMatchers("/v2/**")
            .antMatchers("/swagger-resources/**");
}
After that, the Swagger2 file can be accessed without authentication. I don't know if my friends understand it. If you have any questions, please leave a message for discussion.
Pay attention to the public number [Jiangnan rain], focus on Spring Boot+ micro service and front end separation and other full stack technology, regular video tutorial sharing, focus on back to Java, receive Pine's carefully prepared Java dry goods for you!