Why SpringBoot
Because currently developing WEB applications, Spring Boot is the fastest and most popular way to start Spring projects. No matter what kind of application we want to build, it can let us start and run as soon as possible. There is basically no need to configure anything in the early stage, and the built-in application server allows us to build a production level application two or three times. For Java programmers, it can only be described in two words, that is happiness!
Relationship between SpringBoot and Spring
Perhaps because SpringBoot is so amazing, there are many comments on the Internet, which may have caused some misunderstandings to many small partners. Let me list a few here to see if you have won?
1. SpringBoot is not an application server;
The reason for this misunderstanding is that SpringBoot can package Web applications into executable jar files, which can run without deploying to our traditional Java application server. This is because SpringBoot has a built-in Servlet container (Tomcat, Jetty, etc.), so this function is not provided by SpringBoot itself, but by the embedded Servlet container.
2. SpringBoot does not implement enterprise Java specifications such as JPA or JMS (Java Message Service).
It's just that beans supporting these features are automatically configured, such as Hibernate, which are existing technologies before and are not newly implemented by SpringBoot;
SpringBoot is Spring. It does the Spring Bean configuration that we would do without it.
It takes advantage of the conditional configuration feature of spring 4 and the delivery dependencies provided by Maven and Gradle.
Compared with Spring, Spring Boot mainly includes the following four core functions:
- Automatic configuration;
- Start dependency: Tell Spring Boot what functions it needs, and it can introduce the required libraries.
- Command line interface: This allows us to complete a complete application without building a project and only writing code;
- Actuator: application monitoring and monitoring;
After understanding that Spring Boot is actually a shortcut for developing Spring applications, let's feel the wind and see how convenient it is.
Create a SpringBoot application
First of all, the Spring Boot version I use in this article is 2.5.2. It is required that your locally installed JDK is at least 1.8 or higher. The minimum requirement for Spring Boot versions above 2. X is JDK 1.8. The official recommended versions are jdk8 and jdk11, because these two versions are currently maintained for a long time. Build the packaging tool Gradle 4+ or Maven 3.2 +, and the last is the strongest IDE in the universe, IntellJ IDEA.
Now that we are getting started, let's take the responsive programming supported by spring 5 as an example to let you feel how to develop responsive projects using Spring Boot.
1. Open https://start.spring.io/ , select the language, construction tools and dependencies, and click as shown in the figure below;
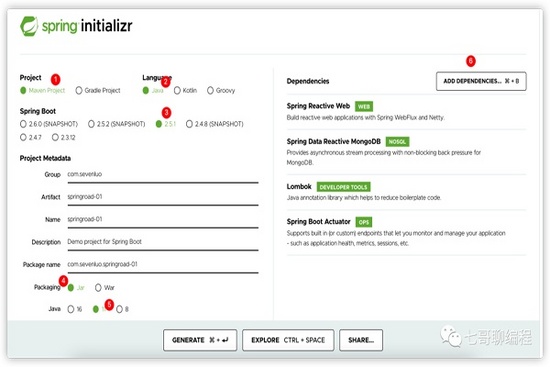
2. Click Generate to download;
3. Unzip the downloaded compressed package, enter the project root directory, and then use IDEA to open pom.xml;
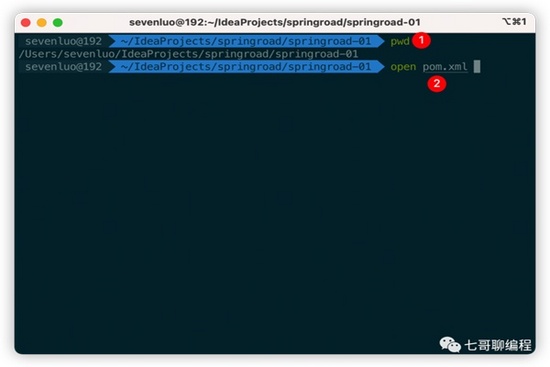
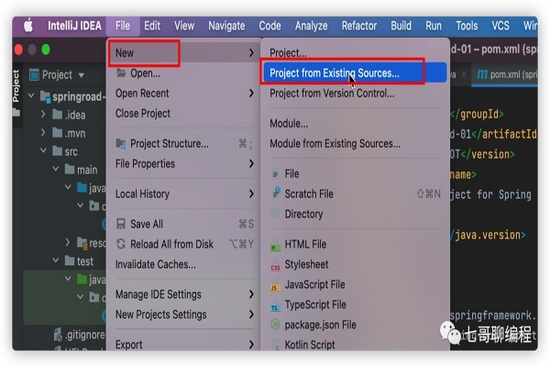
It should be noted that in the above step, you need to set the default open application of pom.xml to IDEA, or you can select File -- > New -- > project from existing sources... And then select pom.xml. The effect is the same, as shown in the following figure.
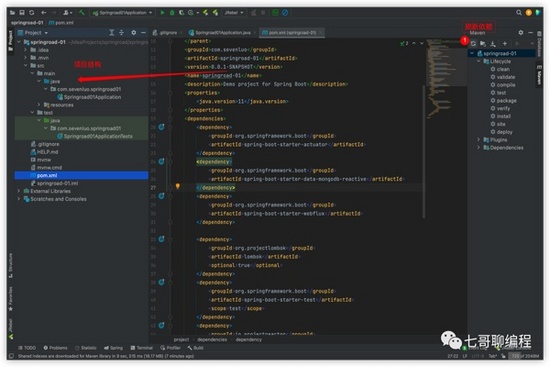
4. After opening, refresh Maven dependency (it will be a little slow for the first time, wait patiently), and we can get the project structure shown in the figure below;
Access database
Spring Boot seamlessly integrates relational database and NOSQL database. Spring Boot also provides responsive database access support.
What do we need to do if we want to use Spring Boot to access the database? Hold on. You might be shocked.
Let's show you the test code I wrote for responsive programming database access. In order not to rely on any environment and let you feel it quickly and intuitively, I use the memory database h2.
- Put the following code into your Spring Boot exclusive startup class.
@SpringBootApplication
public class Springroad01Application {
    public static void main(String[] args) {
        SpringApplication.run(Springroad01Application.class, args);
    }
}
// Test the database access, and the run method will be executed after the container is started
@Component
class DataWriter implements ApplicationRunner {
    private Logger log = LoggerFactory.getLogger(DataWriter.class);
    private DatabaseClient client;
    private UsersDao usersDao;
    public DataWriter(DatabaseClient client, UsersDao usersDao) {
        this.client = client;
        this.usersDao = usersDao;
    }
    @Override
    public void run(ApplicationArguments args) {
        List<String> statements = Arrays.asList(
                "DROP TABLE IF EXISTS USERS;",
                 "CREATE TABLE IF NOT EXISTS USERS ( id SERIAL PRIMARY KEY, name VARCHAR(100) NOT NULL);");
        statements.forEach(sql -> client.sql(sql).fetch().rowsUpdated()
                .doOnSuccess(count -> log.info("Schema created, rows updated: {}", count))
                .doOnError(error -> log.error("got error : {}",error.getMessage(),error))
                .subscribe()
        );
        Flux.just("sevenluo","tonyzhu","jameschen").flatMap(name -> usersDao.save(new Users(null,name))).subscribe(user -> log.info("User saved: {}",user));
     }
}
// The DAO interface does not need to be annotated. It inherits the ReactiveCrudRepository and will automatically generate instances
interface UsersDao extends ReactiveCrudRepository<Users, String> {
}
@Data
@AllArgsConstructor
@NoArgsConstructor
class Users {
    @Id
    private Integer id;
    private String name;
}
- Execute the main method and enter the result;

That's it. It's over. There's no configuration. You can access the database by directly writing a few lines of code.
REST interface development
You should also be concerned about how Spring Boot develops a REST style WEB interface? Don't panic, let's directly use Spring supported responsive programming to build a REST application service. But for WEB access users, we can't see that we use non blocking responsive programming to moisten things silently.
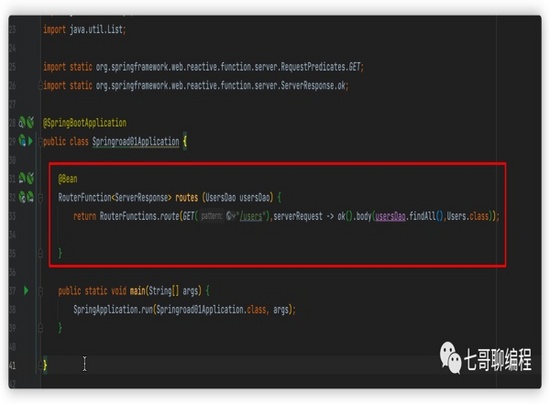
- Put the following code into the startup class to develop a responsive REST interface.
- Test it, open the command line and curl it (it's not that you have to pretend not to use a browser to access it. The boss of the company said that programmers should use more shell environment, um! Start with small things);
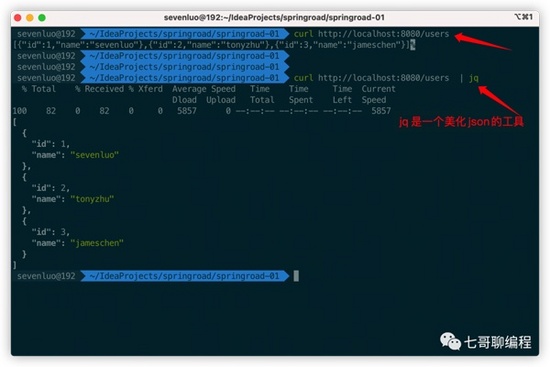
Warm tips: install jq on the mac, and directly use brew install jq to automatically install it for you.
Well, there's nothing to do after handcraft. Spring Boot will always be God!
Monitoring and management applications
After our application goes online, it must be monitored. Otherwise, one day God will die and be in great trouble. This Spring Boot comes with a module tool that can monitor and manage Spring applications for us: Spring Boot actuator.
It has everything you should have, such as health checks, audits, statistics and HTTP tracking. It is worth mentioning that the spring boot actuator is also very open and supports integration with other external monitoring systems. It adds that it does not have some cool capabilities such as good-looking dashboard, chart, analysis and alarm.
How do you play?
Confirm that your application has added corresponding module dependencies;
If you use maven, look at the following dependencies in your pom.xml:
<dependencies>
 <dependency>
  <groupId>org.springframework.boot</groupId>
  <artifactId>spring-boot-starter-actuator</artifactId>
 </dependency>
</dependencies>
If you use gradle, the corresponding build.gradle file has the following dependencies:
dependencies {
    compile("org.springframework.boot:spring-boot-starter-actuator")
}
The actor exposes HTTP requests through the endpoint to monitor and manage applications;
After the application starts,
http://localhost:8080/actuator All endpoint s exposed through HTTP are shown.
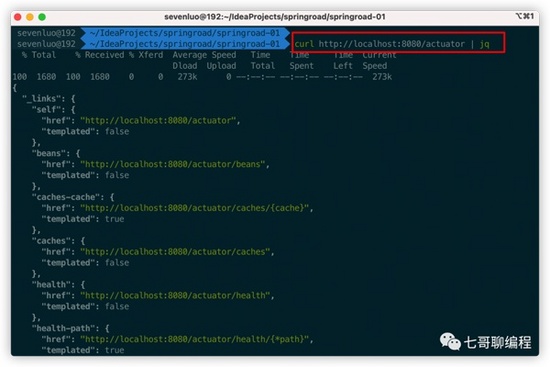
Because it's too long, I'm only listing some endpoint s here. You must try it yourself.
For example, the / health endpoint provides basic information about application health.
/The metrics endpoint shows several very useful metrics, such as JVM memory usage, system CPU usage, open files, and so on.
/loggers endpoint shows the application's logs and allows you to change the log level at runtime.
There are many more. Go down and play by yourself. You can do it.

Friendly tips, if you
http://localhost:8080/actuator There are few open endpoints displayed, because the endpoint of the actor can be opened and closed explicitly. See!
By default, many endpoint s are closed. You only need to add the following configuration in the application.properties configuration file.
management.endpoint.health.show-details=always //Display detailed health information
management.endpoints.web.exposure.include=*  //Rough all open, anyway, play by yourself, capricious
We won't talk more about the role of each of these endpoint s here. If you are interested, you can leave me a message. I'll see if there is a tutorial to introduce it in detail according to your needs.
Of course, in addition to the application health information displayed by default above, we can also customize a health indicator;
We can choose to implement the HealthIndicator interface to achieve our goals;
@SpringBootApplication
public class Springroad01Application {
  // Just add this Bean
    @Bean
    HealthIndicator healthIndicator() {
        return () -> Health.up().withDetail("app", "i am so good").
                withDetail("error","Are you kidding? I can't be wrong!").build();
    }
    @Bean
    RouterFunction<ServerResponse> routes (UsersDao usersDao) {
        return RouterFunctions.route(GET("/users"),serverRequest -> ok().body(usersDao.findAll(),Users.class));
    }
    public static void main(String[] args) {
        SpringApplication.run(Springroad01Application.class, args);
    }
}
Once you add our customized health indicators above and restart the application, you will see that the health endpoint will show the added information:

safety control
For the support of application security, Spring Security cannot be bypassed.
It can easily complete the authentication and authorization functions of applications, and also provides support for responsive programming.
Next, let's show you how to quickly bring a condom to your application.
- Add spring security dependency package;
<dependency>
 <groupId>org.springframework.boot</groupId>
 <artifactId>spring-boot-starter-security</artifactId>
</dependency>
- Configure a user in the memory and set the user name and password;
@Bean
// The USER name and password configured in memory are admin/admin and the USER role is USER
MapReactiveUserDetailsService users() {
    return new MapReactiveUserDetailsService(User.withUsername("admin").password(PasswordEncoderFactories.createDelegatingPasswordEncoder().encode("admin")).roles("USER").build());
 }
- verification
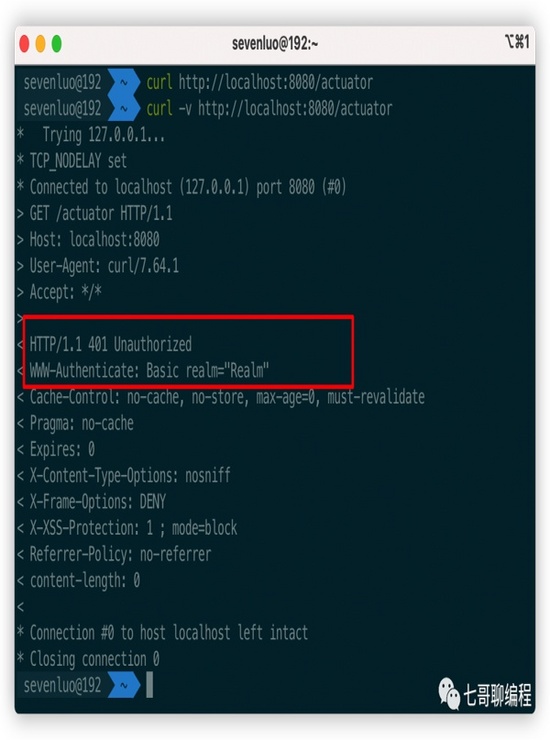
Direct access, prompt 401 error, this error code should be clear in your heart. Yes, it means no authority.
Add the user name and password and let's try again:
curl -vu admin:admin http://localhost:8080/actuator/health | jq

With the user name and password, the expected results will be returned. Is it in a good mood in an instant.
Above, we just introduced the spring security package, and then added two or three lines of code without writing any interceptor verification logic. Our application has the security verification function, which is too sister ing.
See you in the Jianghu
In this chapter, we have completed the introduction to the development of spring boot.
It took 10 minutes to complete the development including application creation, database access, REST interface development, monitoring and management, and security control.
The chapter does not explain the specific technical details, such as the use of responsive programming in the Demo, the detailed explanation of Spring Boot Actuator endpoint, etc.
Just to let the friends know the power and convenience of Spring Boot and feel the friendliness of Spring to our programmers.
If you think the article is helpful to you, you can like it, comment on it, forward it and support it ~ thank you!