1, Developing web applications
Spring Boot Web development is very simple, including common json output, filters, property, log, etc
2, json interface development
In the past, when using spring to develop projects, what needs to be done when you need to provide json interfaces?
1. Add related jar packages such as jackjson
2. Configure spring controller scan package
3. Add @ ResponseBody to the docking method
We often have 406 errors due to configuration errors, and configuration errors due to inadequate understanding of scanning package (SSM framework encountered, which took several days to solve!) Wait a minute. How to do springboot? Just add @ RestController to the class. All the methods in the default class will return in json format
@RestController
public class HelloController {
    @RequestMapping("/getUser")
    public User getUser() {
    	User user=new User();
    	user.setUserName("Su Xiao");
    	user.setPassWord("xxxx");
        return user;
    }
}
If you need to use page development, just use @Controller Annotation is enough. The following will be explained in combination with the template.
3, Custom filter
We often use filters in projects to call logs, exclude characters with XXS threats, perform authorization validation, and so on.
springboot automatically adds OrderedCharacterEncodingFilter and HiddenHttpMethodFilter, and we can customize the filter.
Two steps
(1) Implement filter interface and filter method
(2) Add @ Configuration annotation to add custom filter to the filter chain
@Configuration
public class WebConfiguration {
    @Bean
    public RemoteIpFilter remoteIpFilter() {
        return new RemoteIpFilter();
    }

    @Bean
    public FilterRegistrationBean testFilterRegistration() {

        FilterRegistrationBean registration = new FilterRegistrationBean();
        registration.setFilter(new MyFilter());
        registration.addUrlPatterns("/*");
        registration.addInitParameter("paramName", "paramValue");
        registration.setName("MyFilter");
        registration.setOrder(1);
        return registration;
    }

    public class MyFilter implements Filter {
		@Override
		public void destroy() {
			// TODO Auto-generated method stub
		}

		@Override
		public void doFilter(ServletRequest srequest, ServletResponse sresponse, FilterChain filterChain)
				throws IOException, ServletException {
			// TODO Auto-generated method stub
			HttpServletRequest request = (HttpServletRequest) srequest;
			System.out.println("this is MyFilter,url :"+request.getRequestURI());
			filterChain.doFilter(srequest, sresponse);
		}

		@Override
		public void init(FilterConfig arg0) throws ServletException {
			// TODO Auto-generated method stub
		}
    }
}
4, Custom property
In the process of Web development, I often need to customize some configuration files, how to use them?
1. Configuration in application.properties
server.port=8081
#spring.profiles.active=dev

# idea\uFF0Cproperties\u914D\u7F6E\u6587\u4EF6utf-8
# \uFFFD\uFFFD\uFFFD\uFFFDperson\uFFFD\uFFFD\u05B5
person.last-name=\u5F20\u4E09${random.uuid}
person.age=${random.int}
person.birth=2017/12/15
person.boss=false
person.maps.k1=v1
person.maps.k2=14
person.lists=a,b,c
person.dog.name=${person.hello:hello}_dog
person.dog.age=15
2. Custom configuration class
@Component
public class NeoProperties {
	@Value("${person.last-name}")
	private String last-name;//Last name is the same as last name here
	@Value("${person.age}")
	private int age;
    ...
	//Omit getter settet method

}
3. log configuration
Configure the address and output level of the output
logging.path=/user/local/log
logging.level.com.favorites=DEBUG
logging.level.org.springframework.web=INFO
logging.level.org.hibernate=ERROR
Path is the log address of the local machine. After logging.level, you can configure the log level of different resources according to the package path
5, Database operations
Here we focus on the use of MySQL and spring data jpa. jpa uses hibernate to generate all kinds of automatic sql. If it's just a simple addition, deletion, modification and query, it doesn't need to write. Spring has been encapsulated internally.
Here's how to use it in springboot
1. Add related jar package
<dependency>
    <groupId>org.springframework.boot</groupId>
    <artifactId>spring-boot-starter-data-jpa</artifactId>
</dependency>
 <dependency>
    <groupId>mysql</groupId>
    <artifactId>mysql-connector-java</artifactId>
</dependency>
2. Add profile
spring.datasource.url=jdbc:mysql://localhost:3306/test
spring.datasource.username=root
spring.datasource.password=root
spring.datasource.driver-class-name=com.mysql.jdbc.Driver

spring.jpa.properties.hibernate.hbm2ddl.auto=update
spring.jpa.properties.hibernate.dialect=org.hibernate.dialect.MySQL5InnoDBDialect
spring.jpa.show-sql= true
In fact, the hibernate.hbm2ddl.auto parameter is mainly used for automatic creation.
Verify that the database table structure has four values:
- create: every time hibernate is loaded, the last generated table will be deleted, and then the new table will be generated again according to your model class, even if there is no change twice. This is an important reason for the loss of database table data.
- Create drop: each time hibernate is loaded, a table is generated according to the model class, but once sessionFactory is closed, the table is automatically deleted.
- update: the most commonly used attribute. When hibernate is loaded for the first time, the target structure will be established automatically according to the model class. When hibernate is loaded later, the table structure will be updated automatically according to the model class. Even if the table structure changes, the row in the table still exists and the previous row will not be deleted. It should be noted that when deployed to the server, the table structure will not be established immediately, but will not be established until the application runs for the first time.
- validate: each time hibernate is loaded, the validation creates the database table structure, only compares with the table practices in the database, does not create a new table, but inserts new values.
dialect specifies that InnoDBD is the storage engine that generates the table name
Show SQL whether to print out the automatically generated SQL, which is convenient to check when debugging
3. Add entity class and dao
@Entity
public class User implements Serializable {

	private static final long serialVersionUID = 1L;
	@Id
	@GeneratedValue
	private Long id;
	@Column(nullable = false, unique = true)
	private String userName;
	@Column(nullable = false)
	private String passWord;
	@Column(nullable = false, unique = true)
	private String email;
	@Column(nullable = true, unique = true)
	private String nickName;
	@Column(nullable = false)
	private String regTime;

	//Omit getter settet method and construction method

}
As long as dao inherits the JpaRepository class, it almost doesn't need to write methods. There is also a special urine function, which is to automatically generate SQL according to the method name. For example, findByUserName will automatically generate a query method with userName as the parameter. For example, findAlll will automatically query all the data in the table, such as automatic paging and so on. .
The fields in Entity that should not be columns must be added @Transient Annotation, no annotation will also be mapped into columns
public interface UserRepository extends JpaRepository<User, Long> {
    User findByUserName(String userName);
    User findByUserNameOrEmail(String username, String email);
}
4, test
@RunWith(SpringJUnit4ClassRunner.class)
@SpringApplicationConfiguration(Application.class)
public class UserRepositoryTests {

	@Autowired
	private UserRepository userRepository;

	@Test
	public void test() throws Exception {
		Date date = new Date();
		DateFormat dateFormat = DateFormat.getDateTimeInstance(DateFormat.LONG, DateFormat.LONG);
		String formattedDate = dateFormat.format(date);

		userRepository.save(new User("aa1", "aa@126.com", "aa", "aa123456",formattedDate));
		userRepository.save(new User("bb2", "bb@126.com", "bb", "bb123456",formattedDate));
		userRepository.save(new User("cc3", "cc@126.com", "cc", "cc123456",formattedDate));

		Assert.assertEquals(9, userRepository.findAll().size());
		Assert.assertEquals("bb", userRepository.findByUserNameOrEmail("bb", "cc@126.com").getNickName());
		userRepository.delete(userRepository.findByUserName("aa1"));
	}

}
6, Tymeleaf template
Spring Boot recommends using Thymeleaf instead of Jsp.
1. Introduction to Thymeleaf
Thymeleaf is a template engine for rendering XML/XHTML/HTML5 content. Similar to JSP. It can be easily integrated with the spring MVC framework as a template engine for web applications. Compared with other template engines, the biggest feature of thymeleaf is that it can open and display the template page directly in the browser without launching the whole web application.
Thymeleaf uses natural template technology, which means that the template syntax of thymeleaf will not damage the structure of the document, and the template is still a valid XML document. Templates can also be used as working prototypes, and thymeleaf replaces static values at run time.
URL plays a very important role in Web application template. It should be noted that the handling of URL by thymeleaf is handled by syntax @ {...}. Thymeleaf supports absolute path URL:
<a th:href="@{http://www.thymeleaf.org}">Thymeleaf</a>
Conditional evaluation
<a th:href="@{/login}" th:unless=${session.user != null}>Login</a>
for cycle
<tr th:each="prod : ${prods}">
      <td th:text="${prod.name}">Onions</td>
      <td th:text="${prod.price}">2.41</td>
      <td th:text="${prod.inStock}? #{true} : #{false}">yes</td>
</tr>
2. Page as prototype
In the traditional Java Web development process, the front-end engineer and the back-end engineer need to install a complete development environment, and then modify templates and static resource files in various Java ides, start / restart / reload the application server, refresh the page to see the final results.
But in fact, the front-end engineer should pay more attention to the page, which is difficult to do with JSP, because JSP must be rendered in the application server before it can see the effect in the browser, and Thymeleaf never solves this problem. Template rendering through attributes will not introduce any new tags that cannot be recognized by the browser, such as JSP, which will not be internal to Tag Write an expression. The whole page is directly opened as an HTML file with a browser, and almost the final effect can be seen, which greatly liberates the productivity of front-end engineers. Their final delivery is pure HTML/CSS/JavaScript files.
7, Gradle build tool
spring project suggests using Maven/Gradle to build projects. Compared with maven, gradle is simpler and more suitable for large and complex projects. Gradle has absorbed the characteristics of Maven and ant, but Maven is still the mainstream in the java world. Let's see.
A project configured with Gradle:
buildscript {
    repositories {
        maven { url "http://repo.spring.io/libs-snapshot" }
        mavenLocal()
    }
    dependencies {
        classpath("org.springframework.boot:spring-boot-gradle-plugin:1.3.6.RELEASE")
    }
}

apply plugin: 'java'  //Adding a Java plug-in indicates that this is a java project
apply plugin: 'spring-boot' //Add spring boot support
apply plugin: 'war'  //Add War plug-in to export War package
apply plugin: 'eclipse' //Add Eclipse Plug-in, add Eclipse IDE support, Intellij Idea is "idea"

war {
    baseName = 'favorites'
    version =  '0.1.0'
}

sourceCompatibility = 1.7  //Minimum compatible version JDK1.7
targetCompatibility = 1.7  //Target compatible version JDK1.7

repositories {     //  Maven warehouse
    mavenLocal()        //Use local warehouse
    mavenCentral()      //Use central warehouse
    maven { url "http://Repo. Spring. IO / LIBS snapshot "} / / use remote warehouse
}

dependencies {   // Various dependent jar packages
    compile("org.springframework.boot:spring-boot-starter-web:1.3.6.RELEASE")
    compile("org.springframework.boot:spring-boot-starter-thymeleaf:1.3.6.RELEASE")
    compile("org.springframework.boot:spring-boot-starter-data-jpa:1.3.6.RELEASE")
    compile group: 'mysql', name: 'mysql-connector-java', version: '5.1.6'
    compile group: 'org.apache.commons', name: 'commons-lang3', version: '3.4'
    compile("org.springframework.boot:spring-boot-devtools:1.3.6.RELEASE")
    compile("org.springframework.boot:spring-boot-starter-test:1.3.6.RELEASE")
    compile 'org.webjars.bower:bootstrap:3.3.6'
	compile 'org.webjars.bower:jquery:2.2.4'
    compile("org.webjars:vue:1.0.24")
	compile 'org.webjars.bower:vue-resource:0.7.0'

}

bootRun {
    addResources = true
}
8, WebJars
WebJars is a very magical thing, which can let you use various front-end frameworks and components in the form of jar packages.
1. What is WebJars
WebJars is to package client resources into jar package files for unified dependency management of resources. The jar package of WebJars is deployed on the maven central repository.
2. Why use
When we develop java web projects, we will use Maven, Gradle and other construction tools to realize the version dependency management of jar packages and the automatic management of projects. However, for front-end resource packages such as JavaScript and css, we can only copy them to webapp, so we can't manage the dependency of these resources. Then WebJars will provide these front-end resources to us We can do dependency management.
3. How to use
(1) Add dependency
<dependency>
    <groupId>org.webjars</groupId>
    <artifactId>vue</artifactId>
    <version>2.5.16</version>
</dependency>
(2) Page introduction
<link th:href="@{/webjars/bootstrap/3.3.6/dist/css/bootstrap.css}" rel="stylesheet"></link>
Nine, CRUD
CRUD of springboot has been completed
Post the key code and share it
1. Let's take a look at the project architecture
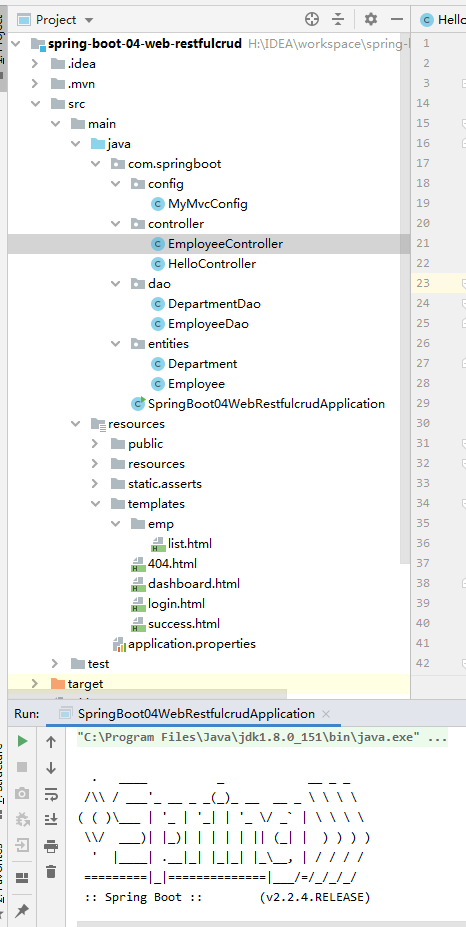
2. Extend the function of spring MVC
package com.atguigu.springboot.config;

import com.atguigu.springboot.component.LoginHandlerInterceptor;
import com.atguigu.springboot.component.MyLocaleResolver;
import org.springframework.boot.context.embedded.ConfigurableEmbeddedServletContainer;
import org.springframework.boot.context.embedded.EmbeddedServletContainerCustomizer;
import org.springframework.context.annotation.Bean;
import org.springframework.context.annotation.Configuration;
import org.springframework.web.servlet.LocaleResolver;
import org.springframework.web.servlet.config.annotation.EnableWebMvc;
import org.springframework.web.servlet.config.annotation.InterceptorRegistry;
import org.springframework.web.servlet.config.annotation.ViewControllerRegistry;
import org.springframework.web.servlet.config.annotation.WebMvcConfigurerAdapter;

//Use WebMvcConfigurerAdapter to extend the function of spring MVC
//@Enable webmvc do not take over spring MVC
@Configuration
public class MyMvcConfig extends WebMvcConfigurerAdapter {
    @Override
    public void addViewControllers(ViewControllerRegistry registry) {
       // super.addViewControllers(registry);
        //Browser sends / atguigu request to success
        registry.addViewController("/atguigu").setViewName("success");
    }

    //All WebMvcConfigurerAdapter components work together
    @Bean //Register component in container
    public WebMvcConfigurerAdapter webMvcConfigurerAdapter(){
        WebMvcConfigurerAdapter adapter = new WebMvcConfigurerAdapter() {
            @Override
            public void addViewControllers(ViewControllerRegistry registry) {
                registry.addViewController("/").setViewName("login");
                registry.addViewController("/index.html").setViewName("login");
                registry.addViewController("/main.html").setViewName("dashboard");
            }

            //Register interceptor
            @Override
            public void addInterceptors(InterceptorRegistry registry) {
                //super.addInterceptors(registry);
                //Static resources; *. CSS, *. JS
                //Spring boot has done a good job of static resource mapping
//                registry.addInterceptor(new LoginHandlerInterceptor()).addPathPatterns("/**")
//                        .excludePathPatterns("/index.html","/","/user/login");
            }
        };
        return adapter;
    }

    @Bean
    public LocaleResolver localeResolver(){

        return new MyLocaleResolver();
    }

}
3,controller
package com.atguigu.springboot.controller;

import com.atguigu.springboot.dao.DepartmentDao;
import com.atguigu.springboot.dao.EmployeeDao;
import com.atguigu.springboot.entities.Department;
import com.atguigu.springboot.entities.Employee;
import org.springframework.beans.factory.annotation.Autowired;
import org.springframework.stereotype.Controller;
import org.springframework.ui.Model;
import org.springframework.web.bind.annotation.*;

import java.util.Collection;

@Controller
public class EmployeeController {
    @Autowired
    EmployeeDao employeeDao;

    @Autowired
    DepartmentDao departmentDao;

    //Query all employees return to list page
    @GetMapping("/emps")
    public String  list(Model model){
        Collection<Employee> employees = employeeDao.getAll();

        //Put in request domain
        model.addAttribute("emps",employees);
        // thymeleaf will spell by default
        // classpath:/templates/xxxx.html
        return "emp/list";
    }

    //Go to employee add page
    @GetMapping("/emp")
    public String toAddPage(Model model){
        //Go to the add page, find out all departments and display them on the page
        Collection<Department> departments = departmentDao.getDepartments();
        model.addAttribute("depts",departments);
        return "emp/add";
    }

    //Employee addition
    //Spring MVC automatically binds the request parameter to the property of the input parameter object one by one; it requires that the name of the request parameter is the same as the property name of the javaBean input parameter object
    @PostMapping("/emp")
    public String addEmp(Employee employee){
        //Go to employee list page

        System.out.println("Saved employee information:"+employee);
        //Employee retention
        employeeDao.save(employee);
        // redirect: indicates redirection to an address / represents the current project path
        // Forward: forward to an address
        return "redirect:/emps";
    }

    //Go to the modification page, find out the current employee, and echo on the page
    @GetMapping("/emp/{id}")
    public String toEditPage(@PathVariable("id") Integer id,Model model){
        Employee employee = employeeDao.get(id);
        model.addAttribute("emp",employee);

        //Page to display a list of all departments
        Collection<Department> departments = departmentDao.getDepartments();
        model.addAttribute("depts",departments);
        //Go back to the modify page (add is a modify add two in one page);
        return "emp/add";
    }

    //Employee modification; employee id needs to be submitted;
    @PutMapping("/emp")
    public String updateEmployee(Employee employee){
        System.out.println("Modified employee data:"+employee);
        employeeDao.save(employee);
        return "redirect:/emps";
    }

    //Staff deletion
    @DeleteMapping("/emp/{id}")
    public String deleteEmployee(@PathVariable("id") Integer id){
        employeeDao.delete(id);
        return "redirect:/emps";
    }

}
4, Front page
Take list.html as an example, and use the tymeleaf template engine of springboot
(1) Introduction
xmlns:th="http://www.thymeleaf.org"
(2) Key introduction of js and css
script type="text/javascript" src="asserts/js/jquery-3.2.1.slim.min.js" th:src="@{/webjars/jquery/3.3.1/jquery.js}"></script>
<script type="text/javascript" src="asserts/js/popper.min.js" th:src="@{/webjars/popper.js/1.11.1/dist/popper.js}"></script>
<script type="text/javascript" src="asserts/js/bootstrap.min.js" th:src="@{/webjars/bootstrap/4.0.0/js/bootstrap.js}"></script>

<!-- Icons -->
<script type="text/javascript" src="asserts/js/feather.min.js" th:src="@{/asserts/js/feather.min.js}"></script>
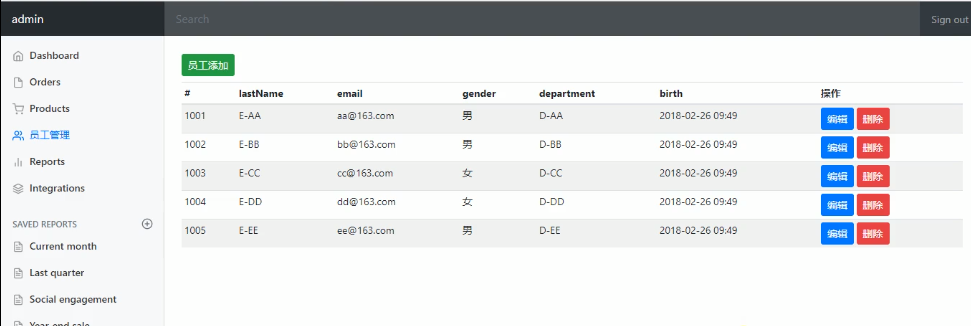
(3) Form form submission
<div class="container-fluid">
  <div class="row">
	<!--Bring in sidebar-->
	<div th:replace="commons/bar::#sidebar(activeUri='emps')"></div>

	<main role="main" class="col-md-9 ml-sm-auto col-lg-10 pt-3 px-4">
		<h2><a class="btn btn-sm btn-success" href="emp" th:href="@{/emp}">Employee addition</a></h2>
		<div class="table-responsive">
		  <table class="table table-striped table-sm">
			<thead>
				<tr>
					<th>#</th>
					<th>lastName</th>
					<th>email</th>
					<th>gender</th>
					<th>department</th>
					<th>birth</th>
					<th>operation</th>
				</tr>
			</thead>
			<tbody>
				<tr th:each="emp:${emps}">
					<td th:text="${emp.id}"></td>
					<td>[[${emp.lastName}]]</td>
					<td th:text="${emp.email}"></td>
					<td th:text="${emp.gender}==0?'female':'male'"></td>
					<td th:text="${emp.department.departmentName}"></td>
					<td th:text="${#dates.format(emp.birth, 'yyyy-MM-dd HH:mm')}"></td>
					<td>
					  <a class="btn btn-sm btn-primary" th:href="@{/emp/}+${emp.id}">edit</a>
					  <button th:attr="del_uri=@{/emp/}+${emp.id}" class="btn btn-sm btn-danger deleteBtn">delete</button>
					</td>
				</tr>
			</tbody>
		  </table>
		</div>
	</main>
	<form id="deleteEmpForm"  method="post">
		<input type="hidden" name="_method" value="delete"/>
	</form>
  </div>
</div>
(4) jQuery implementation
<script>
    $(".deleteBtn").click(function(){
	//Delete current employee's
	$("#deleteEmpForm").attr("action",$(this).attr("del_uri")).submit();
		return false;
    });
</script>
5. Achieving results