Development Environment: IntelliJ IDEA 2019.2.2
Spring Boot Version: 2.1.8
Create a new SpringBoot project named demo.
1. Default Profile
Spring Boot reads the configuration file with the name application.properties(yml).
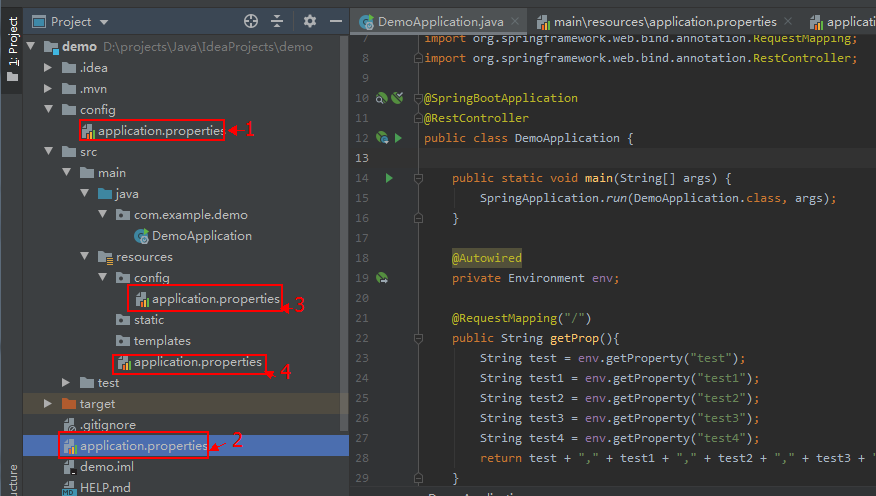
If there are multiple files with the same name, by default, they are read in the following order:
(1) The config directory of the project root directory
(2) Project Root Directory
(3) The config directory under the project classpath
(4) Project classpath root directory
If the same configuration item appears in more than one configuration file, the value read later will not overwrite the previous one.
Test:
Establish application.properties in each of the four locations of the project, as follows:
(1)config/application.properties
test = config/application.properties
test1 = test1
(2)application.properties
test = application.properties
test2 = test2
(3)src/main/resources/config/application.properties
test = src/main/resources/config/application.properties
test3 = test3
(4)src/main/resources/application.properties
test = src/main/resources/application.properties
test4 = test4
Modify the default generated boot class DemoApplication.cs code:
package com.example.demo;

import org.springframework.beans.factory.annotation.Autowired;
import org.springframework.boot.SpringApplication;
import org.springframework.boot.autoconfigure.SpringBootApplication;
import org.springframework.core.env.Environment;
import org.springframework.web.bind.annotation.RequestMapping;
import org.springframework.web.bind.annotation.RestController;

@SpringBootApplication
@RestController
public class DemoApplication {

    public static void main(String[] args) {
        SpringApplication.run(DemoApplication.class, args);
    }

    @Autowired
    private Environment env;

    @RequestMapping("/")
    public String getProp(){
        String test = env.getProperty("test");
        String test1 = env.getProperty("test1");
        String test2 = env.getProperty("test2");
        String test3 = env.getProperty("test3");
        String test4 = env.getProperty("test4");
        return test + "," + test1 + "," + test2 + "," + test3 + "," + test4;
    }
}
Access http://localhost:8080/
Output: config/application.properties,test1,test2,test3,test4
2. Specify Configuration Files
Reads the specified configuration file without using the default application.properties.
Test:
(1)src/main/resources/application.properties content:
test1 = application.properties
(2) Create a new directory config, a new configuration file myConfig.properties, in the src/main/resources of the project:
test2= myConfig.properties

Modify the default generated boot class DemoApplication.cs code:
package com.example.demo;

import org.springframework.beans.factory.annotation.Autowired;
import org.springframework.boot.SpringApplication;
import org.springframework.boot.autoconfigure.SpringBootApplication;
import org.springframework.boot.builder.SpringApplicationBuilder;
import org.springframework.core.env.Environment;
import org.springframework.web.bind.annotation.RequestMapping;
import org.springframework.web.bind.annotation.RestController;

@SpringBootApplication
@RestController
public class DemoApplication {

    public static void main(String[] args) {
        //SpringApplication.run(DemoApplication.class, args);
        new SpringApplicationBuilder(DemoApplication.class).properties(
                "spring.config.location=classpath:/config/myConfig.properties"
        ).run(args);
    }

    @Autowired
    private Environment env;

    @RequestMapping("/")
    public String getProp(){
        String test1 = env.getProperty("test1");
        String test2 = env.getProperty("test2");
        return test1 + "," + test2;
    }
}
Access http://localhost:8080/
Output: null,myConfig.properties
You can see that application.properties is unreadable and the configuration file myConfig.properties was successfully read.
You can also use spring.config.name to specify the name of the configuration file, such as myConfig in the following code, and Spring Boot will look for myConfig.properties(yml) under classpath.
    public static void main(String[] args) {
        //SpringApplication.run(DemoApplication.class, args);
        /*new SpringApplicationBuilder(DemoApplication.class).properties(
                "spring.config.location=classpath:/config/myConfig.properties"
        ).run(args);*/
        new SpringApplicationBuilder(DemoApplication.class).properties(
                "spring.config.name=myConfig").run(args);
    }
3. Use profile to specify configuration
Profiles can be used to activate different configurations based on specific environments.
The contents of src/main/resources/application.yml are as follows:
spring:
  profiles: mysql
jdbc:
  driver:
    com.mysql.jdbc.Driver
---
spring:
  profiles: oracle
jdbc:
  driver:
    oracle.jdbc.driver.OracleDriver
Modify the default generated boot class DemoApplication.cs code:
package com.example.demo;

import org.springframework.beans.factory.annotation.Autowired;
import org.springframework.boot.SpringApplication;
import org.springframework.boot.autoconfigure.SpringBootApplication;
import org.springframework.boot.builder.SpringApplicationBuilder;
import org.springframework.core.env.Environment;
import org.springframework.web.bind.annotation.RequestMapping;
import org.springframework.web.bind.annotation.RestController;

import java.util.Scanner;

@SpringBootApplication
@RestController
public class DemoApplication {

    public static void main(String[] args) {
        //SpringApplication.run(DemoApplication.class, args);

        Scanner scan = new Scanner(System.in);
        String profile = scan.nextLine();
        new SpringApplicationBuilder(DemoApplication.class).properties(
                "spring.config.location=classpath:/application.yml"
        ).profiles(profile).run(args);
    }

    @Autowired
    private Environment env;

    @RequestMapping("/")
    public String getProp(){
        String res = env.getProperty("jdbc.driver");
        return res;
    }
}
After clicking the Run button in IDEA, type oracle after typing in the console.
Access http://localhost:8080/Output:oracle.jdbc.driver.OracleDriver
Re-Run, type mysql after typing in the console.
Access http://localhost:8080/output:com.mysql.jdbc.Driver
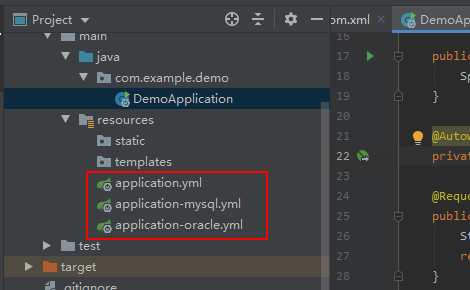
You can also create the following three files by setting profiles with different profile names.
(1)src/main/resources/application.yml content:
spring:
  profiles:
    active: oracle
(2) Contents of src/main/resources/application-mysql.yml:
jdbc:
  driver:
    com.mysql.jdbc.Driver
(3) Contents of src/main/resources/application-oracle.yml:
jdbc:
  driver:
    oracle.jdbc.driver.OracleDriver
Modify the default generated boot class DemoApplication.cs code:
package com.example.demo;

import org.springframework.beans.factory.annotation.Autowired;
import org.springframework.boot.SpringApplication;
import org.springframework.boot.autoconfigure.SpringBootApplication;
import org.springframework.boot.builder.SpringApplicationBuilder;
import org.springframework.core.env.Environment;
import org.springframework.web.bind.annotation.RequestMapping;
import org.springframework.web.bind.annotation.RestController;

import java.util.Scanner;

@SpringBootApplication
@RestController
public class DemoApplication {

    public static void main(String[] args) {
        SpringApplication.run(DemoApplication.class, args);
    }

    @Autowired
    private Environment env;

    @RequestMapping("/")
    public String getProp(){
        String res = env.getProperty("jdbc.driver");
        return res;
    }
}
Access http://localhost:8080/Output:oracle.jdbc.driver.OracleDriver