I've learned Spring Boot these days, and I want to record it for review in the future. Spring Boot greatly simplifies the complexity of XML configuration in the past. A Web project can be built with a few simple lines of configuration, which greatly saves development time.
Environmental preparation
- Eclipse
- JDK 1.7
- Maven
- MySql
The simplest Web application
First, create a new Maven project. The following is the configuration of pom.xml
<parent>
        <groupId>org.springframework.boot</groupId>
        <artifactId>spring-boot-starter-parent</artifactId>
        <version>1.4.1.RELEASE</version>
    </parent>
    <dependencies>
        <!-- Spring Boot -->
        <dependency>
            <groupId>org.springframework.boot</groupId>
            <artifactId>spring-boot-starter-web</artifactId>
        </dependency>
        <dependency>
            <groupId>org.springframework.boot</groupId>
            <artifactId>spring-boot-starter-test</artifactId>
            <scope>test</scope>
        </dependency>

        <!-- MyBatis -->
        <dependency>
            <groupId>org.mybatis.spring.boot</groupId>
            <artifactId>mybatis-spring-boot-starter</artifactId>
            <version>1.1.1</version>
        </dependency>

        <!--Start built-in at startup tomcat -->
        <dependency>
            <groupId>org.springframework.boot</groupId>
            <artifactId>spring-boot-starter-tomcat</artifactId>
        </dependency>

        <!--Yes Jsp Support -->
        <dependency>
            <groupId>org.apache.tomcat.embed</groupId>
            <artifactId>tomcat-embed-jasper</artifactId>
        </dependency>

        <!-- Support jstl -->
        <dependency>
            <groupId>javax.servlet</groupId>
            <artifactId>jstl</artifactId>
            <version>1.2</version>
        </dependency>

        <!-- MySql drive -->
        <dependency>
            <groupId>mysql</groupId>
            <artifactId>mysql-connector-java</artifactId>
            <version>5.1.21</version>
        </dependency>

</dependencies>- 1
- 2
- 3
- 4
- 5
- 6
- 7
- 8
- 9
- 10
- 11
- 12
- 13
- 14
- 15
- 16
- 17
- 18
- 19
- 20
- 21
- 22
- 23
- 24
- 25
- 26
- 27
- 28
- 29
- 30
- 31
- 32
- 33
- 34
- 35
- 36
- 37
- 38
- 39
- 40
- 41
- 42
- 43
- 44
- 45
- 46
- 47
- 48
- 49
- 50
- 51
Then create a new Application.java
//This annotation represents the SpringBoot startup class
@SpringBootApplication
public class Application {

    private static Logger logger = Logger.getLogger(Application.class);

    public static void main(String[] args) {
        logger.info("=================Start success=================");
        SpringApplication.run(Application.class, args);
        logger.info("=================Startup success=================");
    }

}- 1
- 2
- 3
- 4
- 5
- 6
- 7
- 8
- 9
- 10
- 11
- 12
- 13
Then write a Controller class
@Controller
public class IndexController {

    private static Logger logger = Logger.getLogger(IndexController.class);

    @RequestMapping("/")
    @ResponseBody
    public String index() {
        logger.info("Get into index Method");
        return "Hello Spring Boot !";
    }
}- 1
- 2
- 3
- 4
- 5
- 6
- 7
- 8
- 9
- 10
- 11
- 12
Because Tomcat is built in Spring Boot, we can start the Spring Boot project from the main method of Application.java.
At this time, our first Spring Boot project is launched successfully, and input http://localhost:8080/ You can access the Index method in the Controller.
Now we start to integrate MyBatis, because Maven dependency has been introduced, so here we start to integrate directly
In the resources directory, create a new config folder and a new application.properties configuration file
#Set Tomcat port, default 8080
server.port=8080
#Set project ContextPath
server.context-path=/
#Set Tomcat encoding
server.tomcat.uri-encoding=UTF-8
#Set view parser path
spring.mvc.view.prefix=/WEB-INF/views/
#Set view parser suffix
spring.mvc.view.suffix=.jsp

#Database configuration
spring.datasource.url=jdbc:mysql://localhost:3306/dd?useUnicode=true&characterEncoding=utf-8&zeroDateTimeBehavior=convertToNull&allowMultiQueries=true
spring.datasource.username=root
spring.datasource.password=root
spring.datasource.driver-class-name=com.mysql.jdbc.Driver

#Configure. xml file path
mybatis.mapper-locations=classpath:/com/dd/wx/mapper/*.xml
#Configure model path
mybatis.type-aliases-package=com.dd.wx.model
- 1
- 2
- 3
- 4
- 5
- 6
- 7
- 8
- 9
- 10
- 11
- 12
- 13
- 14
- 15
- 16
- 17
- 18
- 19
- 20
- 21
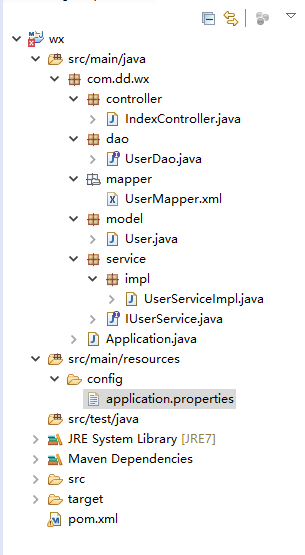
Attached with the engineering structure, the code structure is the same as the general spring MVC engineering structure
Add annotation to Application.java method
//This annotation indicates the package of the dynamic scan DAO interface
@MapperScan("com.dd.wx.dao")
//This annotation represents the SpringBoot startup class
@SpringBootApplication
public class Application {

    private static Logger logger = Logger.getLogger(Application.class);

    public static void main(String[] args) {
        logger.info("=================Start success=================");
        SpringApplication.run(Application.class, args);
        logger.info("=================Startup success=================");
    }

}- 1
- 2
- 3
- 4
- 5
- 6
- 7
- 8
- 9
- 10
- 11
- 12
- 13
- 14
- 15
Write test code
@Autowired
    private IUserService userService;

    @RequestMapping("/getItem")
    public String getItem(HttpServletRequest request) {

        String id = request.getParameter("id");
        logger.info("Get into getItem Method,id:"+id);

        User user = userService.getUser(id);
        request.setAttribute("user", user);

        return "/item";
}- 1
- 2
- 3
- 4
- 5
- 6
- 7
- 8
- 9
- 10
- 11
- 12
- 13
- 14
Create a new item.jsp under WEB-INF/views /
<%@ page language="java" contentType="text/html; charset=UTF-8"
    pageEncoding="UTF-8"%>
<!DOCTYPE html PUBLIC "-//W3C//DTD HTML 4.01 Transitional//EN" "http://www.w3.org/TR/html4/loose.dtd">
<html>
    <head>
        <meta http-equiv="Content-Type" content="text/html; charset=UTF-8">
        <title>details</title>
    </head>
    <body>
        //Get success: ${user.name}
    </body>
</html>- 1
- 2
- 3
- 4
- 5
- 6
- 7
- 8
- 9
- 10
- 11
- 12
Start the project. Visit http://localhost:8080/getItem?id=1
Database data
At this time, the project of Spring Boot + MyBatis is set up.