1, Introduction to RabbitMQ
RabbitMQ is a kind of message middleware, which is the basic software for sending and receiving messages in the distributed system. There are many of these software, including ActiveMQ (from Apache Company) and rocketmq (from Alibaba company, which has now been transferred to apache)
The working process of message middleware can be represented by the producer consumer model. That is, the producer continuously sends information to the message queue, and the consumer consumes information from the message queue. The specific process is as follows:
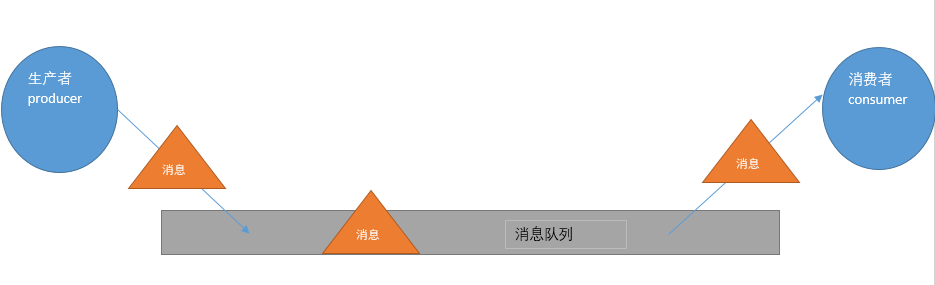
As can be seen from the above figure, producer, message queue and consumer are the three most important concepts for message queue. Producer sends message to message queue, consumer listens for the specified message queue, and receives the message from message queue when message is received by message queue, Message queuing is often used to transfer information between distributed systems
For RabbitMQ, in addition to these three basic modules, a module is added, i.e. exchange. It creates an isolation between the producer and the message queue. The producer sends the message to the switch, and the switch forwards the corresponding message to the corresponding message queue according to the scheduling policy. Then the workflow of RabitMQ is as follows:
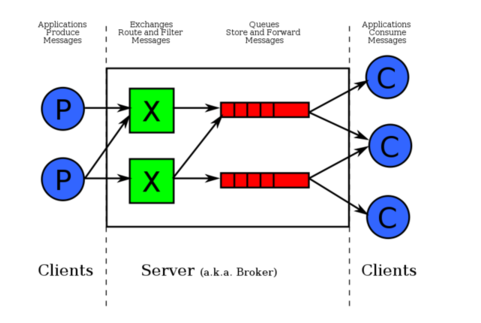
The main function of the switch is to receive the corresponding messages and bind them to the specified queue. There are four types of switches, namely direct, topic, headers and fanout
Direct is the default switch mode of RabbitMQ and also the simplest mode. When creating a message queue, specify a BindingKey. When the sender sends a message, specify the corresponding Key. When the Key is consistent with the BindingKey of the message queue, the message will be sent to the message queue
topic forwarding information is mainly based on wildcards. The binding between queue and switch is mainly based on a pattern (wildcard + string). When sending messages, only when the specified Key matches the pattern, the messages will be sent to the message queue
headers are also matched according to a rule. When a message queue is bound to a switch, a set of key value pair rules will be specified. When a message is sent, a set of key value pair rules will also be specified. When two sets of key value pair rules match, the message will be sent to the matching message queue
Fanout is a form of routing broadcast, which will send messages to all queues bound to it. Even if the key is set, it will be ignored
2, Spring boot integrates RabbitMQ(Direct mode)
It's very simple for spring boot to integrate RabbitMQ! I feel that spring boot has greatly simplified the time of setting up the environment for development.. in this way, our programmers can spend more time on business. Let's start setting up the environment:
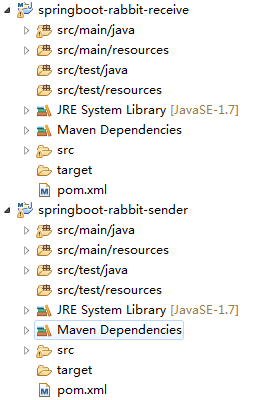
First, two maven projects are created to simulate the process of communication between two applications in the distributed application system, one sender and one receiver
Next, configure pom.xml Note that springboot is used for AMQP (Advanced message queuing protocol, that is, the design of Message Oriented Middleware)
<parent>
        <groupId>org.springframework.boot</groupId>
        <artifactId>spring-boot-starter-parent</artifactId>
        <version>1.4.0.RELEASE</version>
    </parent>
    <properties>
        <java.version>1.7</java.version>
        <project.build.sourceEncoding>UTF-8</project.build.sourceEncoding>
    </properties>
    <dependencies>
        <dependency>
            <groupId>org.springframework.boot</groupId>
            <artifactId>spring-boot-starter</artifactId>
        </dependency>
        <dependency>
            <groupId>org.springframework.boot</groupId>
            <artifactId>spring-boot-devtools</artifactId>
            <optional>true</optional>
            <scope>true</scope>
        </dependency>
        <dependency>
            <groupId>org.springframework.boot</groupId>
            <artifactId>spring-boot-starter-test</artifactId>
            <scope>test</scope>
        </dependency>
        <dependency>
            <groupId>org.springframework.boot</groupId>
            <artifactId>spring-boot-starter-actuator</artifactId>
        </dependency>
        <!-- add to springboot Yes amqp Support for -->
        <dependency>
            <groupId>org.springframework.boot</groupId>
            <artifactId>spring-boot-starter-amqp</artifactId>
        </dependency>
        <dependency>
            <groupId>org.springframework.boot</groupId>
            <artifactId>spring-boot-starter-tomcat</artifactId>
            <scope>provided</scope>
        </dependency>
        <dependency>
            <groupId>org.apache.tomcat.embed</groupId>
            <artifactId>tomcat-embed-jasper</artifactId>
            <scope>provided</scope>
        </dependency>
    </dependencies>
Next, we write the code related to the sender. First of all, there is no doubt to write the startup class:
@SpringBootApplication
public class App{
    public static void main(String[] args) {
        SpringApplication.run(App.class, args);
    }
}
Then in application.properties To edit the configuration information related to RabbitMQ, you can see what the configuration information represents according to the key. The port here is 5672, not 15672... 15672 is the management port!
spring.application.name=spirng-boot-rabbitmq-sender
spring.rabbitmq.host=127.0.0.1
spring.rabbitmq.port=5672
spring.rabbitmq.username=guest
spring.rabbitmq.password=guest
Then, configure the Queue (message Queue). Note that since the Direct mode is adopted, you need to specify a key when configuring the Queue to bind it to the switch
@Configuration
public class SenderConf {
     @Bean
     public Queue queue() {
          return new Queue("queue");
     }
}
Then you can send messages. In SpringBoot, we use AmqpTemplate to send messages. The code is as follows:
@Component
public class HelloSender {
    @Autowired
    private AmqpTemplate template;

    public void send() {
    template.convertAndSend("queue","hello,rabbit~");
    }
}
Write test class! Then our sender code is finished~
@SpringBootTest(classes=App.class)
@RunWith(SpringJUnit4ClassRunner.class)
public class TestRabbitMQ {

    @Autowired
    private HelloSender helloSender;

    @Test
    public void testRabbit() {
        helloSender.send();
    }
}
Then we write the pom file of the receiver, application.properties (modified spring.application.name ), queue configuration class and App startup class are the same! Omitted here. The main reason is that we need to configure listeners to listen to the message queues bound to, and receive messages when there are messages in the message queues. The code is as follows:
@Component
public class HelloReceive {

    @RabbitListener(queues="queue")    //Listener listens for the specified Queue
    public void processC(String str) {
        System.out.println("Receive:"+str);
    }

}
Next, you can test. First, start the application at the receiving end, then run the unit test at the sending end. The application at the receiving end prints out the received message, and the test is successful!
For the first mock exam, Direct mode is equivalent to one to one mode. After sending a message, the message will be forwarded to a bound message queue and then received by a receiver.
In fact, RabbitMQ can also support sending objects: of course, because serialization and deserialization are involved, the object needs to implement the serializable interface. HelloSender makes the following rewrites:
public void send() {

        User user=new User();    //Implement Serializable interface
        user.setUsername("hlhdidi");
        user.setPassword("123");
        template.convertAndSend("queue",user);

}
HelloReceiver rewrites as follows:
@RabbitListener(queues="queue")    //Listener listens for the specified Queue
    public void process1(User user) {    //User as parameter
        System.out.println("Receive1:"+user);
    }
3, Spring boot integrates RabbitMQ(Topic forwarding mode)
First, let's look at the sender. We need to configure the Queue, then configure the exchange, and then bind the Queue to the switch according to the corresponding rules:
@Configuration
public class SenderConf {

        @Bean(name="message")
        public Queue queueMessage() {
            return new Queue("topic.message");
        }

        @Bean(name="messages")
        public Queue queueMessages() {
            return new Queue("topic.messages");
        }

        @Bean
        public TopicExchange exchange() {
            return new TopicExchange("exchange");
        }

        @Bean
        Binding bindingExchangeMessage(@Qualifier("message") Queue queueMessage, TopicExchange exchange) {
            return BindingBuilder.bind(queueMessage).to(exchange).with("topic.message");
        }

        @Bean
        Binding bindingExchangeMessages(@Qualifier("messages") Queue queueMessages, TopicExchange exchange) {
            return BindingBuilder.bind(queueMessages).to(exchange).with("topic.#");//*Denotes one word, Chen denotes zero or more words
        }
}
On the receiving end, we configure two listeners to listen to different queues:
@RabbitListener(queues="topic.message")    //Listener listens for the specified Queue
    public void process1(String str) {
        System.out.println("message:"+str);
    }
    @RabbitListener(queues="topic.messages")    //Listener listens for the specified Queue
    public void process2(String str) {
        System.out.println("messages:"+str);
    }
OK, then we can test it. First, we will send the following:

The first parameter of the method is the switch name, the second parameter is the key sent, and the third parameter is the content. RabbitMQ will look for a queue that matches this rule according to the second parameter. If there is one, send the message to it. If there is more than one, send the message to the matching queue (each queue has a message!). Obviously, in our test, Parameter 2 matches two queues, so messages will be sent to both queues, and listeners listening to both queues will receive messages! If parameter 2 is changed to topic.messages What? Obviously, only one queue will be matched, so the listener corresponding to process2 method receives the message!
4, Spring boot integrates RabbitMQ(Fanout Exchange form)
As mentioned earlier, Fanout Exchange form is also called broadcast form. Therefore, the messages we send to the router will make every Queue bound to the router receive messages. Even if the Key or rule (i.e. the parameter 2 of convertAndSend method in the above) is specified, it will also be ignored. Then, code directly and the configuration of the sender is as follows:
@Configuration
public class SenderConf {

        @Bean(name="Amessage")
        public Queue AMessage() {
            return new Queue("fanout.A");
        }


        @Bean(name="Bmessage")
        public Queue BMessage() {
            return new Queue("fanout.B");
        }

        @Bean(name="Cmessage")
        public Queue CMessage() {
            return new Queue("fanout.C");
        }

        @Bean
        FanoutExchange fanoutExchange() {
            return new FanoutExchange("fanoutExchange");//Configure broadcast router
        }

        @Bean
        Binding bindingExchangeA(@Qualifier("Amessage") Queue AMessage,FanoutExchange fanoutExchange) {
            return BindingBuilder.bind(AMessage).to(fanoutExchange);
        }

        @Bean
        Binding bindingExchangeB(@Qualifier("Bmessage") Queue BMessage, FanoutExchange fanoutExchange) {
            return BindingBuilder.bind(BMessage).to(fanoutExchange);
        }

        @Bean
        Binding bindingExchangeC(@Qualifier("Cmessage") Queue CMessage, FanoutExchange fanoutExchange) {
            return BindingBuilder.bind(CMessage).to(fanoutExchange);
        }

}
The sender uses the following code to send:

The receiver listener is configured as follows:
@Component
public class HelloReceive {
    @RabbitListener(queues="fanout.A")
    public void processA(String str1) {
        System.out.println("ReceiveA:"+str1);
    }
    @RabbitListener(queues="fanout.B")
    public void processB(String str) {
        System.out.println("ReceiveB:"+str);
    }
    @RabbitListener(queues="fanout.C")
    public void processC(String str) {
        System.out.println("ReceiveC:"+str);
    }


}
Run the test code and find that all three listeners have received the data. The test is successful!