1 Preface
In the current mode of front-end and back-end separated development, the front-end invokes the API provided by the back-end to realize data display or related data operations, so as to ensure timely update and complete REST API documents, which will greatly improve the work efficiency of both sides and reduce unnecessary communication costs. The swagger 2 used in this paper is a popular API document tool that can generate beautiful API documents with a small amount of annotations. In the generated online documents, it provides the ability of direct debugging similar to POSTMAN, not only static documents. Next, we will use this tool to combine with the Spring Boot project, and finally generate the REST API documents involved in our last article.
This article basically covers the configuration that Swagger2 may use in the production environment. Take a look at it slowly. It's enough to read this article.
2 Introduction to swagger2
Swagger is a widely used tool for implementing OpenAPI documents. The swagger toolset includes open source tools, free tools and commercial tools, which can be used at different stages of the API life cycle.
Swagger editor (open source): with swagger editor, you can edit the OpenAPI specification in YAML documents within the browser and support real-time preview of documents. You can refer to the official Demo https://editor.swagger.io/
Swagger UI (open source): make the documents generated by swagger more beautiful, and support API interaction. After generating the documents, you can browse them directly in the browser, and you can implement commands like curl or postman to access our API and return relevant data.
Swagger CodeGen (open source): it is a code generator that can generate server-side and client-side engineering codes in different languages through Swagger API definitions.
Swagger core (open source): for example and server integration to generate Swagger API specifications, you can easily access REST API, and combine Swagger UI to make the generated documents more beautiful.
Swagger parser (open source): Java development, parsing the independent library defined by OpenAPI
Swagger inspector (free): API online testing tool, verifying API and generating OpenAPI definition function from existing API https://goo.gl/fZYHWz
Swaggerhub (free and commercial): API design and documentation for teams using OpenAPI.
3 start using
3.1 build Restful WEB Service
Reference resources "Spring Boot starts from scratch 5" RESTful Web Service construction with all aspects " . After construction, there are the following rest APIs:
#GET all user information GET http://localhost:8080/api/v1/users ා, add a new user, pass the POST parameter through the body http://localhost:8080/api/v1/users ා, update a user information PUT http://localhost:8080/api/v1/users/{id}, DELETE the specified user DELETE http://localhost:8080/api/v1/users/{id}3.2 integrate Swagger2
After building a RESTful WEB service, next we integrate Swagger and automatically generate interface documents for the REST API in the previous section.
3.2.1 pom.xml add dependency
To integrate Swagger2, you need to add a dependency source in pom.xml:
<dependencies>
	<dependency>
	    <groupid>io.springfox</groupid>
	    <artifactid>springfox-swagger2</artifactid>
	    <!-- As of November 7, 2019, the latest version is 2.9.2 -->
	    <!-- https://mvnrepository.com/artifact/io.springfox/springfox-swagger2 -->
	    <version>2.9.2</version>
	</dependency></dependencies>
3.2.2 Swagger configuration and initialization
springfox has a special object Docket, which can flexibly configure various properties of Swagger. First, we simply create a Swagger configuration class, Swagger2Config.java:
@Configuration@EnableSwagger2
public class Swagger2Config {
    @Bean("UsersApis")
    public Docket usersApis() {        return new Docket(DocumentationType.SWAGGER_2)                .select()                .apis(RequestHandlerSelectors.any())                .paths(PathSelectors.any())                .build();
    }
}
The @ Configuration annotation here is used to define the Configuration class. The annotated class contains one or more methods annotated by @ Bean. These methods will be scanned by the annotationconfiguapplicationcontext class, and used to build the Bean definition and initialize the object. @ComponentScan will automatically get all Spring Components, including the @ Configuration class. In addition, the "user management module" API generation Configuration here is very simple, generating documents for APIs on all paths.
3.2.3 start service and verify
When the configuration class of Swagger2 is completed, start the WEB service, through the http://localhost:8080/v2/api-docs You can access the generated document content, but the browser returns JSON content, which is basically difficult to give reference to developers who need to use related API s. This is the time to use the Swagger2 UI.
3.3 integrate Swagger2 UI
Add dependency in pom.xml, restart the WEB service, and visit again http://localhost:8080/swagger-ui.html At this time, you will see the WEB document.
<dependency>
    <groupid>io.springfox</groupid>
    <artifactid>springfox-swagger-ui</artifactid>
    <version>2.9.2</version></dependency>
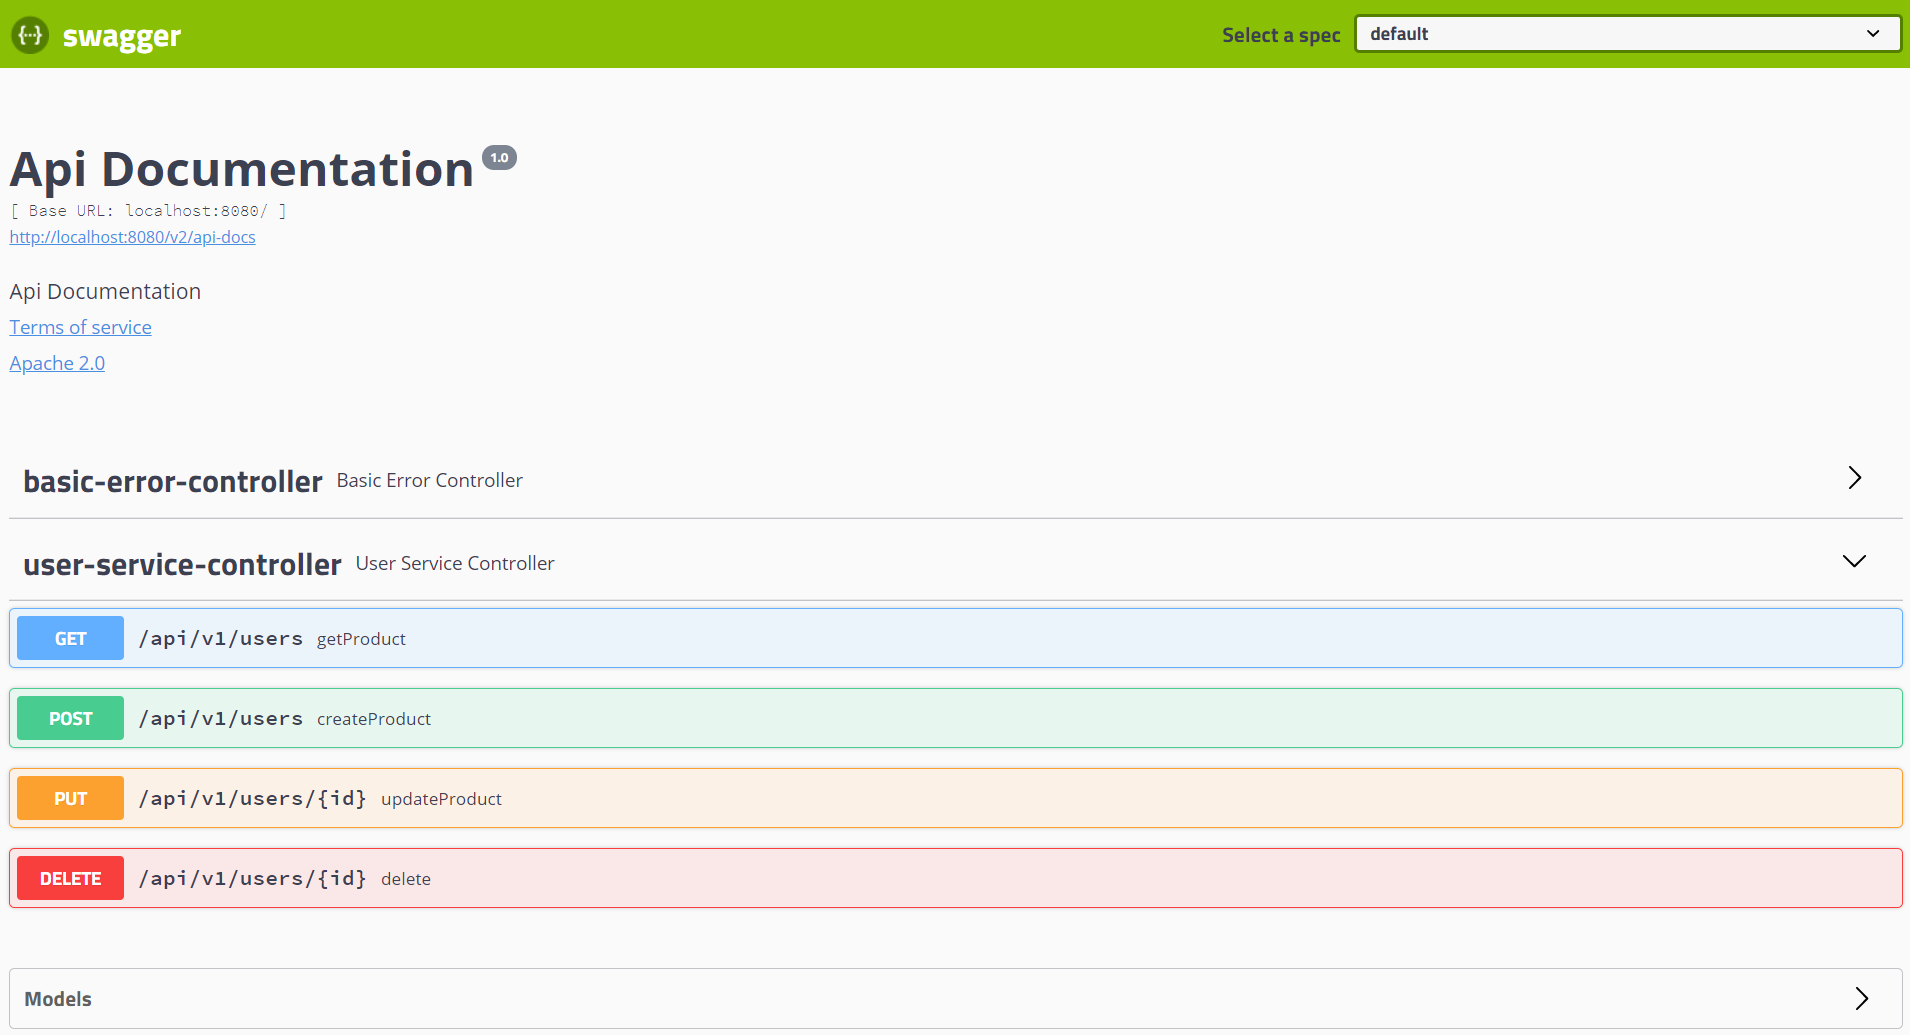
From the page of Swagger UI, we can see that there is a piece of irrelevant content, or how can we clearly express the content related to the project? The following sections explain in detail the various configurations of Swagger, which can be applied to the actual production environment.
4 Swagger2 deep configuration
4.1 deep configuration objectives
First of all, it is necessary to display friendly information and classify the API documents that we finally generate to the developers of the production environment. Next, we achieve the following goals:
-
Various information description of the document
document title
Document description
Document version number
Logo
Document owner
Document license information
Document terms of service
-
API grouping
Group description
API descriptions
Additional parts (non API)
Customized document page style
In order to better show the API grouping function, a group of rest APIs are added here (only one copy of User related code is needed at the code level, and all User keywords are changed to products, including case):
#GET all product information GET http://localhost:8080/api/v1/products add a new product, pass the POST parameter through the body http://localhost:8080/api/v1/products update a product information PUT http://localhost:8080/api/v1/products/{id} DELETE the specified product DELETE http://localhost:8080/api/v1/products/{id}4.2 document information configuration
@Configuration@EnableSwagger2public class Swagger2Config {    @Bean("UsersApis")    public Docket usersApis() {        return new Docket(DocumentationType.SWAGGER_2)        		//'select() returns the ApiSelectorBuilder object, not the dock object
                .select()
                .apis(RequestHandlerSelectors.any())
                .paths(PathSelectors.any())
                //'build() returns the dock object
                .build()                //Host URL when testing API
                .host("https://xiaobaiai.net")
                //API prefix
                .pathProvider(new RelativePathProvider(null) {                    @Override
                    public String getApplicationBasePath() {                        return "/prefix";
                    }
                })
                .apiInfo(apiInfo());
    }
    public ApiInfo apiInfo() {    	//Contact information of API principal
    	final Contact contact = new Contact(    			"Ethan", "https://xiaobaiai.net "," YCM ﹣ hy @ 163. Com ");; return new ApiInfoBuilder(); API document title
            .title("X System platform interface document")            //API document description
            .description("user/Product related API, More, please pay attention to the public number.: Xiao Bai AI Or wechat applet: Xiaobai AI Blog")            //Service terms URL
            .termsOfServiceUrl("https://github.com/yicm ") (API document version)
            .version("1.0")            //Contact information of API principal
            .contact(contact)            //API's license Url
            .licenseUrl("http://license.coscl.org.cn/MulanPSL")
            .license("MulanPSL")
            .build();
    }
}
API infobuilder can be compiled by adding document information to configure various information of API documents, including title, description, terms of service, version, owner, license, etc. Finally, add the information configuration object to the Docket to take effect.
4.3 API grouping configuration and API fine configuration
4.3.1 API Group display
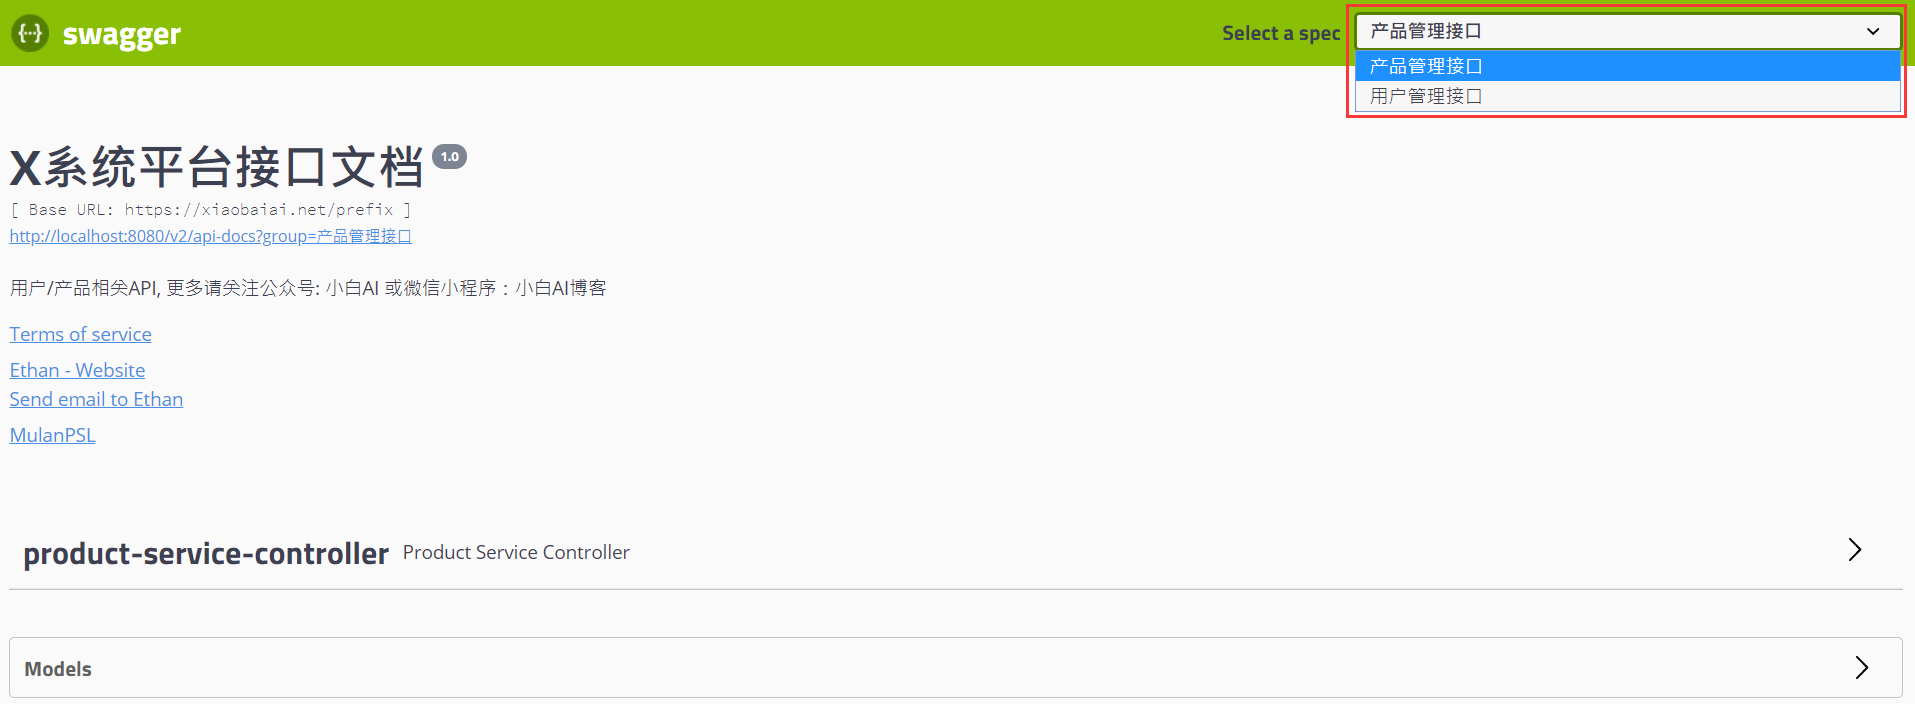
In the above document information configuration, there is no API grouping by default, that is, all APIs are displayed on a page without isolation. If we need to group, we need to assign beans to different API groups. At present, the example can be divided into user API groups and product API groups, and then API filtering is performed through apis() and paths().
In order not to display the API under a package or under a URL path, Docket provides two methods, apis() and paths(), to help us filter the interface at different levels (in the above example, we do not do any filtering for these two settings by default, and scan all APIs):
apis(): in this way, you can specify the package name to allow Swagger2 to scan only under some packages
paths(): this can be filtered by filtering the API URL
In addition to any, ant, none, predictors in apis and paths also support regex regular expressions.
Such as:
PathSelectors.regex("/api/v2/users.*")The following is the example code of grouping. To realize grouping, simply configure the group name in the Docket:
@Configuration@EnableSwagger2public class Swagger2Config {    @Bean
    public Docket usersApis() {        return new Docket(DocumentationType.SWAGGER_2)
        		.groupName("User management interface")        		//'select() returns the ApiSelectorBuilder object, not the dock object
                .select()

                .apis(RequestHandlerSelectors.basePackage("com.xiaobaiai.user"))
                .paths(Predicates.or(                        //Two * * can match all URL s below
                        //One *, only one level URL segment can be matched
                        PathSelectors.ant("/api/v1/users/**"),
                        PathSelectors.ant("/api/v1/users/*")))
                //'build() returns the dock object
                .build()                //Host URL when testing API
                .host("https://xiaobaiai.net")
                //API prefix. The basic address of all APIs is host+prefix: https://xiaobaiai.net/prefix
                .pathProvider(new RelativePathProvider(null) {                    @Override
                    public String getApplicationBasePath() {                        return "/prefix";
                    }
                })
                .apiInfo(apiInfo());
    }
    @Bean
    public Docket productsApis() {        return new Docket(DocumentationType.SWAGGER_2)
        		.groupName("Product management interface")        		//'select() returns the ApiSelectorBuilder object, not the dock object
                .select()

                .apis(RequestHandlerSelectors.basePackage("com.xiaobaiai.product"))
                .paths(Predicates.or(                        //Two * * can match all URL s below
                        //One *, only one level URL segment can be matched
                        PathSelectors.ant("/api/v1/products/**"),
                        PathSelectors.ant("/api/v1/products/*")))
                //'build() returns the dock object
                .build()                //Host URL when testing API
                .host("https://xiaobaiai.net")
                //API prefix
                .pathProvider(new RelativePathProvider(null) {                    @Override
                    public String getApplicationBasePath() {                        return "/prefix";
                    }
                })
                .apiInfo(apiInfo());
    }
    public ApiInfo apiInfo() {    	//Contact information of API principal
    	final Contact contact = new Contact(    			"Ethan", "https://xiaobaiai.net "," YCM ﹣ hy @ 163. Com ");; return new ApiInfoBuilder(); API document title
            .title("X System platform interface document")            //API document description
            .description("user/Product related API, More, please pay attention to the public number.: Xiao Bai AI Or wechat applet: Xiaobai AI Blog")            //Service terms URL
            .termsOfServiceUrl("https://github.com/yicm ") (API document version)
            .version("1.0")            //Contact information of API principal
            .contact(contact)            //API's license Url
            .licenseUrl("http://license.coscl.org.cn/MulanPSL")
            .license("MulanPSL")
            .build();
    }
}
After the group configuration is completed, restart and open the browser to see the effect:
4.3.2 API fine configuration
Although we can control the display and grouping of APIs above, for APIs in more detail, such as the group description information, how to control the parameter description and return value description of each API. These are realized by annotation. Next, we will talk about common annotations and their functions:
@Api: add this annotation to the controller class to add description class information to the controller:
The relevant settable parameters are:
value: the "path" used as the API declaration of the hosting resource, which can be said to be the alias of the API URL
tags: if this value is set, the value will be overwritten
Description: obsolete, description of api resources
protocols: protocol types such as: http, https, ws, wss
hidden: set to true to hide the operations under this resource( After testing, it seems that it can't work. The alternative is @ ApiIgnore)
Products: such as "application/json, application/xml"
Consumers: such as "application/json, application/xml"
authorizations: configuration during advanced feature authentication
Example:
//Swagger configuration class @ Configuration@EnableSwagger2public class Swagger2Config {@ Bean
    public Docket productsApis() {        return new Docket(DocumentationType.SWAGGER_2)
        		.groupName("Product management interface")
                .select()
                .apis(RequestHandlerSelectors.basePackage("com.xiaobaiai.product"))
                .paths(Predicates.or(
                        PathSelectors.ant("/api/v1/products/**"),
                        PathSelectors.ant("/api/v1/products/*")))
                .build()
                .host("https://xiaobaiai.net")
                .pathProvider(new RelativePathProvider(null) {                    @Override
                    public String getApplicationBasePath() {                        return "/prefix";
                    }
                })
                .apiInfo(apiInfo())
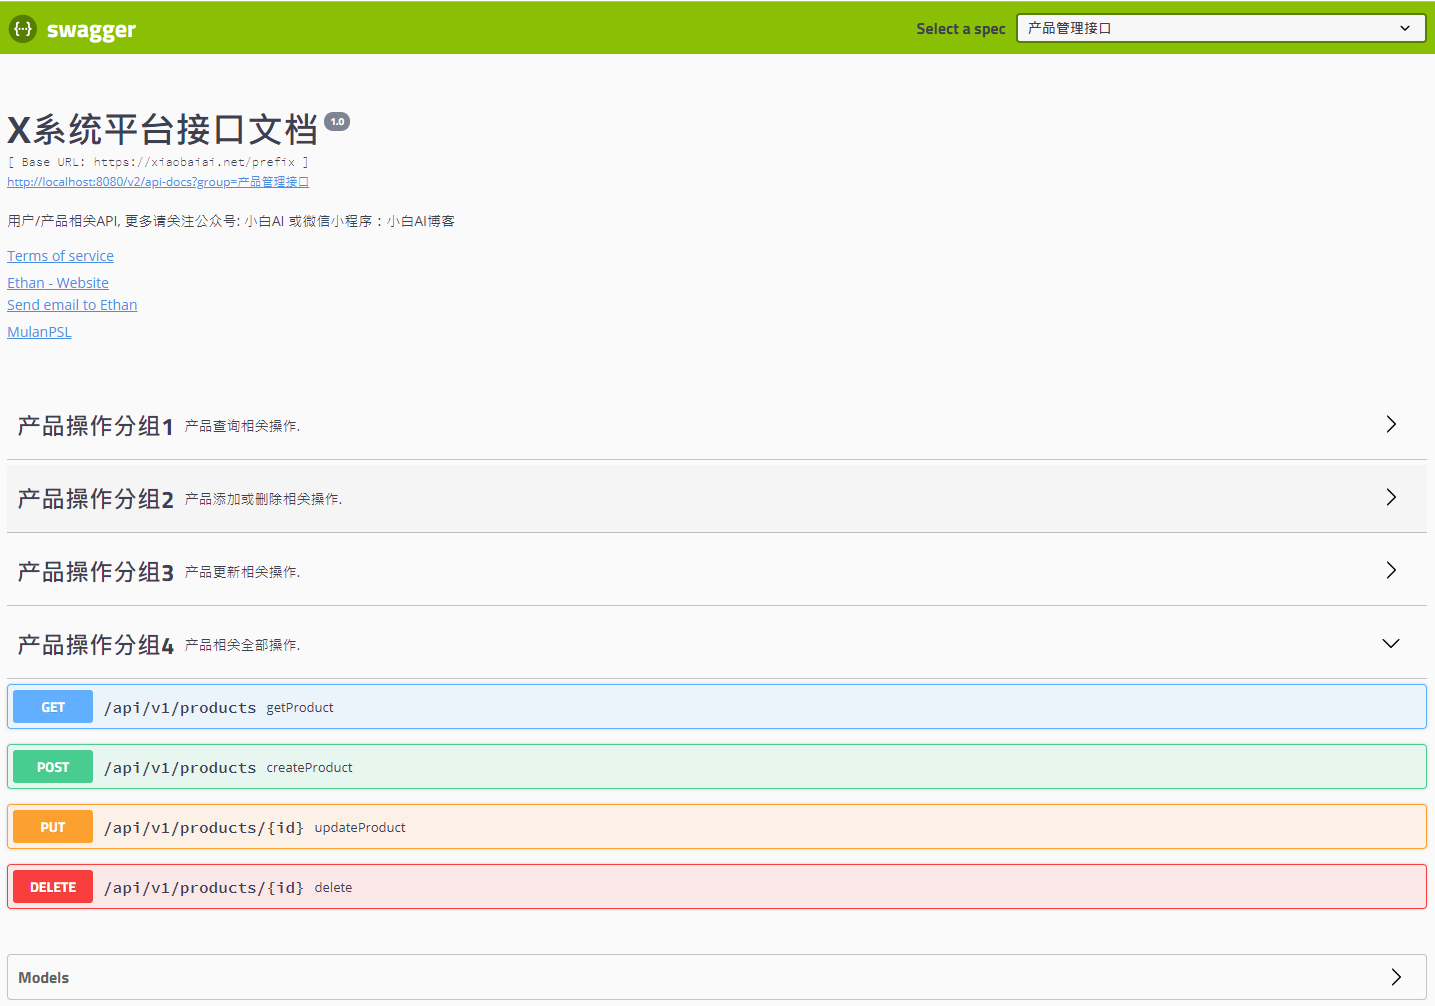
                .tags(new Tag("Product operation group 1", "Product query related operations."),                        new Tag("Product operation group 2", "Add or delete products."),                        new Tag("Product operation group 3", "Product update related operations."),                        new Tag("Product operation group 4", "All operations related to the product."));
    }
}
//Controller class @ RestController@RequestMapping("/api/v1")@Api(tags = {"product interface document list"}) public class ProductServiceController {...}The effect is as follows:
@ApiIgnore: if it is applied to the REST API controller method, the API will not be displayed:
@ApiIgnore@RequestMapping(value = "/users/{id}", method = RequestMethod.DELETE)public ResponseEntity<object> delete(@PathVariable("id") String id) { ... }@ApiOperation annotation is used to describe the controller method. The related parameter settings are described as follows:
value: the name of the interface
Notes: interface notes
Response: the return type of the interface, for example: response = String.class
hidden: configure to true to hide in document
Example:
@ApiOperation(value = "Get all products", notes = "Every call consumes 100 traffic M", response = String.class)@GetMapping(value = "/products")public ResponseEntity<object> getProduct() { return new ResponseEntity<>(productService.getProducts(), HttpStatus.OK);
}The final effect is:

@The ApiImplicitParam and @ ApiImplicitParam annotations are used to describe the parameters passed in by the controller method. By default, Swagger generates parameter descriptions based on the incoming parameters in API methods, but the parameter descriptions are variable names by default, because these two annotations are not necessary. The related parameter settings are as follows:
Name: parameter name. Please make sure it is consistent with the parameter name of the actual method, otherwise it will not take effect.
Value: parameter value
defaultValue: parameter default value
Required: required or not
allowMultiple: allow duplicates or not
dataType: data type, such as object,string,array,int, etc
-
paramType: parameter passing type
Header: put it in the request header. Get request parameters: @ requestheader (receive comments in code)
query: used for parameter splicing of get requests. Get request parameters: @ requestparam (receive comments in code)
path: used for restful interface, obtaining request parameters: @ pathvariable (receiving comments in code)
Body: put it in the request body. Get request parameters: @ requestbody (receive comments in code)
form: not commonly used
examples: examples
Example:
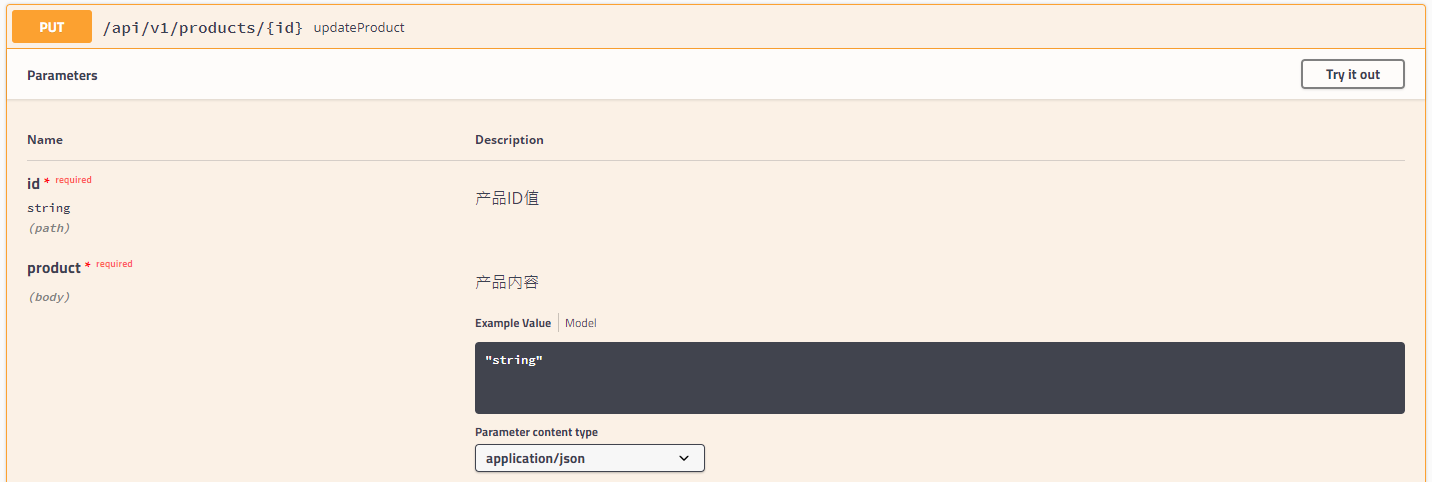
//If there is only one parameter, only @ ApiImplicitParam can be used @ ApiImplicitParam ({@ ApiImplicitParam(name="id",? Value = "product ID value",? required =? true), @ ApiImplicitParam(name="product",? Value = "product content",? required =? true)
})@RequestMapping(value = "/products/{id}", method = RequestMethod.PUT)public ResponseEntity<object> updateProduct(@PathVariable("id") String id, @RequestBody Product product) {
productService.updateProduct(id, product); return new ResponseEntity<>("Product is updated successsfully", HttpStatus.OK);
}
How about the evaluation of Jiaozuo Guoyitang gastrointestinal hospital: http://jz.lieju.com/xuankeyiyuan/37174965.htm
@ApiParam: the function is the same as apiimplicit param. This annotation is commonly used for single parameter description, and it can only be used with JAX-RS 1.x/2.x Annotations are used in combination. The parameter settings are described as follows:
Name: parameter name
Value: parameter value
Required: required or not
defaultValue: default
Type: parameter type
hidden: whether this parameter
@ApiResponses, @ ApiResponse: used to describe the return value of the controller method. The parameter settings are as follows:
Code: status code of HTTP
message: return status description
Response: state response. The default response class is Void
Example:
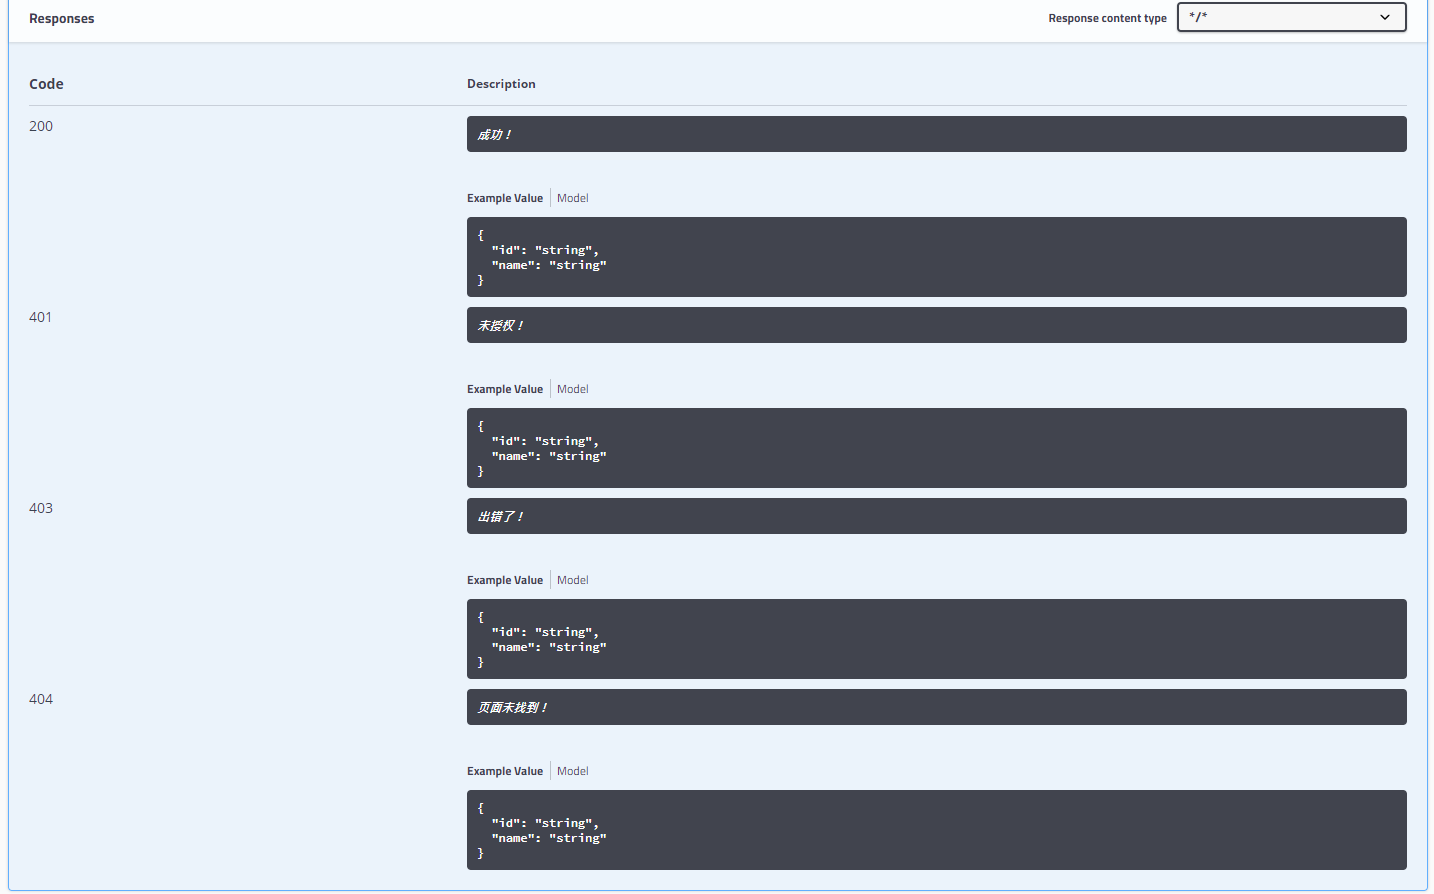
@ApiOperation(value = "Get all products", notes = "Every call consumes 100 traffic M",response =Product.class, responseContainer="List")@ApiResponses({ @ApiResponse(code = 200, message = "Success!", response=Product.class), @ApiResponse(code = 401, message = "Unauthorized!", response=Product.class), @ApiResponse(code = 404, message = "Page not found!", response=Product.class), @ApiResponse(code = 403, message = "Wrong!", response=Product.class)
})@GetMapping(value = "/products")public ResponseEntity<object> getProduct() { return new ResponseEntity<>(productService.getProducts(), HttpStatus.OK);
}The effect is as follows:
@Deprecated: for controller methods, it indicates that the method is out of date. It is recommended that developers adopt new methods.
@ApiModel: used on JavaBean classes to illustrate the purpose of JavaBeans, such as the Product.java class we defined. Common parameter settings are as follows:
value: entity class alias, default to class name
Description: description
Parent: parent class, default to Void.class
subTypes: default is {}
reference: dependency, default is' '
Example:
@ApiModel(value="Product",description="Description of product definition")public class Product { ... }@ApiModelProperty: also used on the properties of JavaBean class to describe related properties. Similar to @ ApiImplicitParam described on the method. The setting parameters are:
Name: attribute name, which should be consistent with the JavaBean
Value: attribute value
notes: description
dataType: data type
Required: required or not
readOnly: read only or not, default is false
reference: dependency, default is' '
allowEmptyValue: allow null value or not
allowableValues: allowed values, default is' '
4.4 API historical version management
There are several ways to manage different API versions:
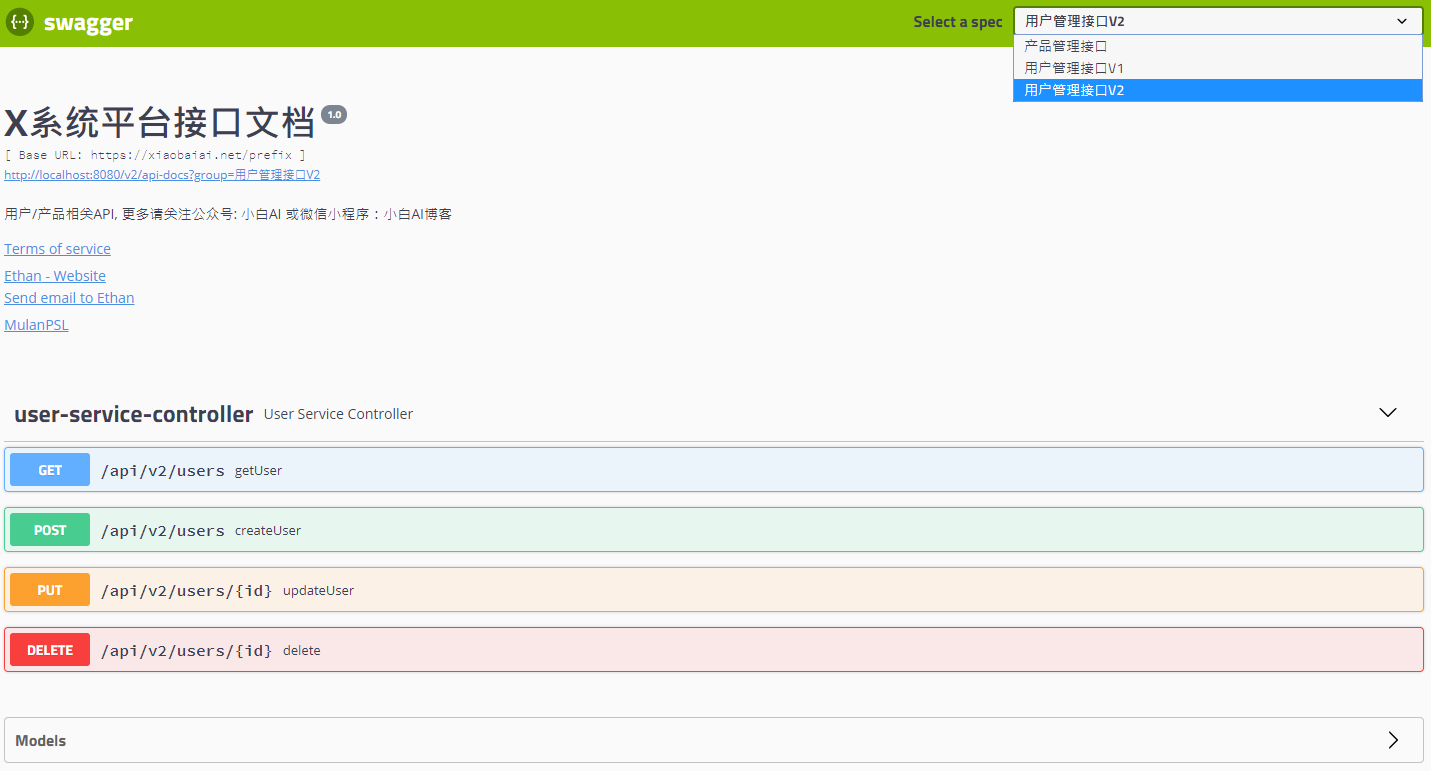
By means of URL, the version number is included in the URL, such as / api/v1/users. In this way, we can filter out different versions in the Docket. Combining with grouping, we can realize API management of different versions.
By querying the parameter, take the version number as a specific parameter, such as / api/users?version=1
By customizing the HTTP header – define a new header that contains the version number in the request
Through content negotiation: the version number and the accepted content type are included in the "Accept" header, such as curl -H "Accept: application/vnd.piomin.v1+json" http://localhost:8080/api/users
Here we show an example of the first way:
Add a new user API Docket in Swagger2Config.java:
@Configuration@EnableSwagger2public class Swagger2Config {    @Bean("UsersApis_V1")    public Docket usersApisV1() {        return new Docket(DocumentationType.SWAGGER_2)
        		.groupName("User management interface V1")
                .select()
                .apis(RequestHandlerSelectors.basePackage("com.xiaobaiai.user"))
                .paths(Predicates.or(                        //Filter version v1
                        PathSelectors.ant("/api/v1/users/**"),
                        PathSelectors.ant("/api/v1/users/*")))
                .build()
                .host("https://xiaobaiai.net")
                .pathProvider(new RelativePathProvider(null) {                    @Override
                    public String getApplicationBasePath() {                        return "/prefix";
                    }
                })
                .apiInfo(apiInfo());
    }
    @Bean("UsersApis_V21")    public Docket usersApisV2() {        return new Docket(DocumentationType.SWAGGER_2)
        		.groupName("User management interface V2")
                .select()
                .apis(RequestHandlerSelectors.basePackage("com.xiaobaiai.user"))
                .paths(Predicates.or(                        //Filter version v1
                        PathSelectors.ant("/api/v2/users/**"),
                        PathSelectors.ant("/api/v2/users/*")))
                .build()
                .host("https://xiaobaiai.net")
                .pathProvider(new RelativePathProvider(null) {                    @Override
                    public String getApplicationBasePath() {                        return "/prefix";
                    }
                })
                .apiInfo(apiInfo());
    }
    @Bean
    public Docket productsApis() {        return new Docket(DocumentationType.SWAGGER_2)
        	.....
    }
    public ApiInfo apiInfo() {    	final Contact contact = new Contact(    			"Ethan", "https://xiaobaiai.net", "ycm_hy@163.com");        return new ApiInfoBuilder()
            .title("X System platform interface document")
            .description("user/Product related API, More, please pay attention to the public number.: Xiao Bai AI Or wechat applet: Xiaobai AI Blog")
            .termsOfServiceUrl("https://github.com/yicm")
            .version("1.0")
            .contact(contact)
            .licenseUrl("http://license.coscl.org.cn/MulanPSL")
            .license("MulanPSL")
            .build();
    }
}
Then the controller adds a new version of API method:
@RestController@RequestMapping("/api")public class UserServiceController { @Autowired
UserService userService;
@DeleteMapping({"/v1/users/{id}", "/v2/users/{id}"}) public ResponseEntity<object> delete(@PathVariable("id") String id) {
userService.deleteUser(id); return new ResponseEntity<>("User is deleted successsfully", HttpStatus.OK);
} @PutMapping({"/v1/users/{id}", "/v2/users/{id}"}) public ResponseEntity<object> updateUser(@PathVariable("id") String id, @RequestBody User user) {
userService.updateUser(id, user); return new ResponseEntity<>("User is updated successsfully", HttpStatus.OK);
} @PostMapping({"/v1/users", "/v2/users"}) public ResponseEntity<object> createUser(@RequestBody User user) {
userService.createUser(user); return new ResponseEntity<>("User is created successfully", HttpStatus.CREATED);
} @GetMapping({"/v1/users"}) @Deprecated
public ResponseEntity<object> getUser() { return new ResponseEntity<>(userService.getUsers(), HttpStatus.OK);
}
@GetMapping(value = "/v2/users") public ResponseEntity<object> getUser(@RequestParam String id) { return new ResponseEntity<>(userService.getUsers(), HttpStatus.OK);
}
}Final effect:
Other methods are similar, such as distinguishing versions in the Header, which will not be expanded here. http://m.qd8.com.cn/yiyao/xinxi21_3710012.html
4.5 other configurations
4.5.1 configure global Token for each API to realize one-time authorization
When our REST API joins the authorization mechanism, we need to have access to the API to operate the API. But we want to debug the API in the Swagger UI. How to solve the problem of one-time authorization for each API and access to all APIs? Increase the convenience of use, do not have to authorize every API every time. However, this configuration is required only when the API authorization mechanism has been used in WEB services. It will not be expanded here for the moment, and the Spring Security + Swagger2 UI configuration will be discussed separately later.
4.5.2 change language in online document page
It should not: https://github.com/swagger-api/swagger-ui#known-issues
translations is not implemented.
5 Summary
This article starts with the introduction of Swagger2, describes how to integrate and configure Swagger2 in Spring Boot, and generates online API documents in the generation environment, including how to group API, group information description, API information description, API method parameter description, if the API version is managed, and finally extends the content, including how to configure global Token for each API. The content is very complete. It should be enough to refer to this article. Continue!