>Author: Xiao Xian > >Source code warehouse: https://github.com/zhshuixian/learn-spring-boot-2
For the Web system, it is necessary to control the access rights of pages and API interfaces. For example, it is necessary to block the access rights of non system users and control the access rights of different pages or interfaces. In Java development, the common security frameworks are Spring Security and Apache Shiro.
Spring Security is the security framework of spring ecosystem, which is based on Spring AOP and Servlet filter implementation. It is the recommended security framework for Spring Boot. It provides a comprehensive security solution that handles authentication and authorization at both the Web request and method call levels.
Spring Security mainly includes the following two parts:
- Login Authentication
- Authorization
In this section, we will integrate Spring Security with Spring Boot to realize user registration, login and access control of role permissions.
MySQL is used for database and MyBatis is used for data persistence layer framework.
Spring Security uses Session by default, so it does not use the RESTful API and uses MVC mode. Thymeleaf as a template engine for Web pages
1) Dependency introduction and project configuration
Create a new project 05 spring security. Note that the Spring Boot version should be 2.1.X
1.1) dependency introduction
Spring Security provides a Starter (initiator) for Spring Boot, which enables Spring Boot to achieve almost 0 configuration development by integrating Security.
thymeleaf-extras-springsecurity5 is an extension of thymeleaf to control the display of web elements on Web pages.
Gradle project dependency
    implementation 'org.springframework.boot:spring-boot-starter-security'
    implementation 'org.springframework.boot:spring-boot-starter-thymeleaf'
    implementation 'org.mybatis.spring.boot:mybatis-spring-boot-starter:2.1.1'
    implementation 'org.springframework.boot:spring-boot-starter-web'
    runtimeOnly 'mysql:mysql-connector-java'
    testImplementation 'org.springframework.boot:spring-boot-starter-test'
    testImplementation 'org.springframework.security:spring-security-test'
    // https://mvnrepository.com/artifact/org.thymeleaf.extras/thymeleaf-extras-springsecurity5
    compile group: 'org.thymeleaf.extras', name: 'thymeleaf-extras-springsecurity5', version: '3.0.4.RELEASE'
See the lowest part of the article for Maven project dependency
1.2) project configuration
Configure MySQL database and MyBatis hump naming conversion, application.properties
# Database URL, user name, password, JDBC Driver to change the database only need to change these information
# MySQL 8 needs to specify serverTimezone to connect successfully
spring.datasource.url=jdbc:mysql://localhost:3306/spring?useUnicode=true&characterEncoding=utf8&serverTimezone=UTC
spring.datasource.password=xiaoxian
spring.datasource.username=root
spring.datasource.driver-class-name=com.mysql.cj.jdbc.Driver
# MyBatis hump naming conversion
mybatis.configuration.map-underscore-to-camel-case=true
Add @ MapperScan
@MapperScan("org.xian.security.mapper")
public class SecurityApplication {}
2) Start using Spring Security
The project uses a three-tier model similar to MVC
<img src="https://gitee.com/ylooq/image-repository/raw/master/image2020/20200325231259.png" alt="image-20200325231257474" style="zoom: 45%;">
View presentation layer: the Web page rendered by Thymeleaf. Controller controller: the main logical part of the application. Model layer: write the corresponding MyBatis Mapper interface to realize the interaction with MySQL database.
2.1) data table structure and Mapper entity class
Create the following user table sys user
| field | type | Remarks |
|---|---|---|
| user_id | bigint | Self increasing primary key |
| username | varchar(18) | User name, non empty and unique |
| password | varchar(60) | Password, non empty |
| user_role | varchar(8) | User role (USER / ADMIN) |
Here, the user role has USER / ADMIN. It is not considered that a user may have multiple roles.
SQL
use spring;
create table sys_user
(
    user_id   bigint auto_increment,
    username  varchar(18)  not null unique,
    password  varchar(60) not null,
    user_role varchar(8)   not null,
    constraint sys_user_pk
        primary key (user_id)
);
Mapper entity class: create a new package with the name of entity. Create a new SysUser class under entity:
public class SysUser implements Serializable {
    private static final long serialVersionUID = 4522943071576672084L;
    private Long userId;
    private String username;
    private String password;
    private String userRole;
    // Omit getter setter constructor
}
2.2) Mapper interface
// How to use annotations here
public interface SysUserMapper {
    /** Insert a record into SYS user
     * @param sysUser User information
     */
    @Insert("Insert Into sys_user(username, password,user_role) Values(#{username}, #{password},#{userRole})")
    @Options(useGeneratedKeys = true, keyProperty = "userId")
    void insert(SysUser sysUser);

    /** Query user information according to user Username
     * @param username User name
     * @return User information
     */
    @Select("Select user_id,username, password,user_role From sys_user Where username=#{username}")
    SysUser selectByUsername(String username);
}
2.3) Spring Security configuration
With Spring Security, you only need to implement the UserDetailsService interface and inherit the websecurity configureradapter.
New security package, new MyUserDetailsServiceImpl, SpringSecurityConfig class
Implement UserDetailsService
@Service public class MyUserDetailsServiceImpl implements UserDetailsService { @Resource private SysUserMapper sysUserMapper; @Override public UserDetails loadUserByUsername(String username) throws UsernameNotFoundException { SysUser sysUser = sysUserMapper.selectByUsername(username); if (null == sysUser) { throw new UsernameNotFoundException(username); } List<simplegrantedauthority> authorities = new ArrayList<>(); authorities.add(new SimpleGrantedAuthority("ROLE_" + sysUser.getUserRole())); return new User(sysUser.getUsername(), sysUser.getPassword(), authorities); } }
Code resolution:
loadUserByUsername: pass in user name, user password and user role to Spring Security by overriding the loadUserByUsername method of the UserDetailsService interface.
List < simple grant authority >: authors.add can add multiple user roles. For a system where a user has multiple roles, multiple user role information can be stored by adding user role table and user role mapping table.
"ROLE" + sysuser. Getuserrole(): Spring Security ROLE name starts with "ROLE" by default.
The user password is not verified when querying the user information, because the password verification part is completed through Spring Security.
SpringSecurityConfig class
@Configuration
@EnableWebSecurity
@EnableGlobalMethodSecurity(prePostEnabled = true)
public class SpringSecurityConfig extends WebSecurityConfigurerAdapter {
    @Resource
    private MyUserDetailsServiceImpl userDetailsService;

    @Override
    public void configure(WebSecurity web) {
        // Ignore the front-end static resources, such as css js
        web.ignoring().antMatchers("/css/**");
        web.ignoring().antMatchers("/js/**");
    }

    @Override
    protected void configure(AuthenticationManagerBuilder auth) throws Exception {
        // Set the password encryption mode, and verify the password here
        auth.userDetailsService(userDetailsService).passwordEncoder(passwordEncoder());
    }

    @Bean
    public PasswordEncoder passwordEncoder() {
        // Using BCryptPasswordEncoder
        return new BCryptPasswordEncoder();
    }

    @Override
    protected void configure(HttpSecurity http) throws Exception {
        // Allow unauthorized access to '/ login', '/ Register' / register save '
        // Access to other addresses requires authentication
        http.authorizeRequests()
                .antMatchers("/login", "/register", "/register-save", "/error").permitAll()
                .anyRequest().authenticated()
                .and()
                .formLogin()
                // User name and user password parameter name
                .passwordParameter("password")
                .usernameParameter("username")
                // Specify login page
                .loginPage("/login")
                // Login error jump to / login error
                .failureUrl("/login-error")
                .permitAll()
                .and()
                // Set the URL of logout and jump page after successful logout
                .logout()
                .logoutUrl("/logout")
                .logoutSuccessUrl("/login");
    }
}
Code resolution:
BCryptPasswordEncoder: the stored password is encrypted by BCrypt strong hash method. For Web systems, passwords are rarely stored in clear text. The BCryptPasswordEncoder class provided by Spring Security implements the function of password encryption. BCrypt strong hash method results in different encryption results each time.
2.3) realize user registration function
In resources/templates /, create a new register.html
    <meta charset="UTF-8">
    <title>register</title>


<p>Registration page</p>
<p th:if="${error}" class="error">Registration error</p>
<form th:action="@{/register-save}" method="post">
    <label for="username">User name:</label>:
    <input type="text" id="username" name="username" autofocus> <br>
    <label for="password">Password:</label>:
    <input type="password" id="password" name="password"> <br>
    <label for="userRole">User roles</label>:
    <select name="userRole" id="userRole">
        <option value="ADMIN">Administrators</option>
        <option value="USER">Ordinary users</option>
    </select>
    <br>
    <input type="submit" value="register"><br>
    <a href="index.html" th:href="@{/}">Back to home page</a> <br>
    <a href="login.html" th:href="@{/login}">Sign in</a>
</form>
Code resolution:
Th: the label at the beginning indicates that it is rendered by Thymeleaf. th:if indicates judgment, th:action URL submission path, more Thymeleaf functions can be found on the official website https://www.thymeleaf.org/
Create a new controller package, and create a new RegisterController class below it:
@Controller
public class RegisterController {
    @Resource
    private SysUserMapper sysUserMapper;

    @RequestMapping("/register")
    public String register() {
        return "register";
    }

    @RequestMapping("/register-error")
    public String registerError(Model model) {
        // The role of Model is to feed data to Web pages
        // model adds a parameter error. If the parameter is true, the following line of HTML code will be displayed
        // < p th: if = "${error}" class = "error" > registration error</p>
        model.addAttribute("error", true);
        return "register";
    }

    @RequestMapping("/register-save")
    public String registerSave(@ModelAttribute SysUser sysUser,
                               Model model) {
        // Judge that username password cannot be empty
        if (sysUser.getUsername() == null || sysUser.getPassword() == null || sysUser.getUserRole() == null) {
            model.addAttribute("error", true);
            return "register";
        }
        try {
            // Password encrypted storage
            BCryptPasswordEncoder bCryptPasswordEncoder = new BCryptPasswordEncoder();
            String password = bCryptPasswordEncoder.encode(sysUser.getPassword());
            sysUser.setPassword(password);
            // Write to database
            sysUserMapper.insert(sysUser);
            //  Redirect to login page
            return "redirect:/login";
        } catch (Exception e) {
            // Registration error
            model.addAttribute("error", true);
            return "register";
        }
    }
}
Code resolution:
@The Controller annotation indicates that an HTML page is returned. return "register" means to return register.html; return "redirect:/xxx" to a page.
@ModelAttribute SysUser sysUser: similar to @ RequestBody, read data from the form and assign it to SysUser.
Run the project and access it through the browser http://localhost:8080/register , enter the user name and password, select the user role, and click Register.
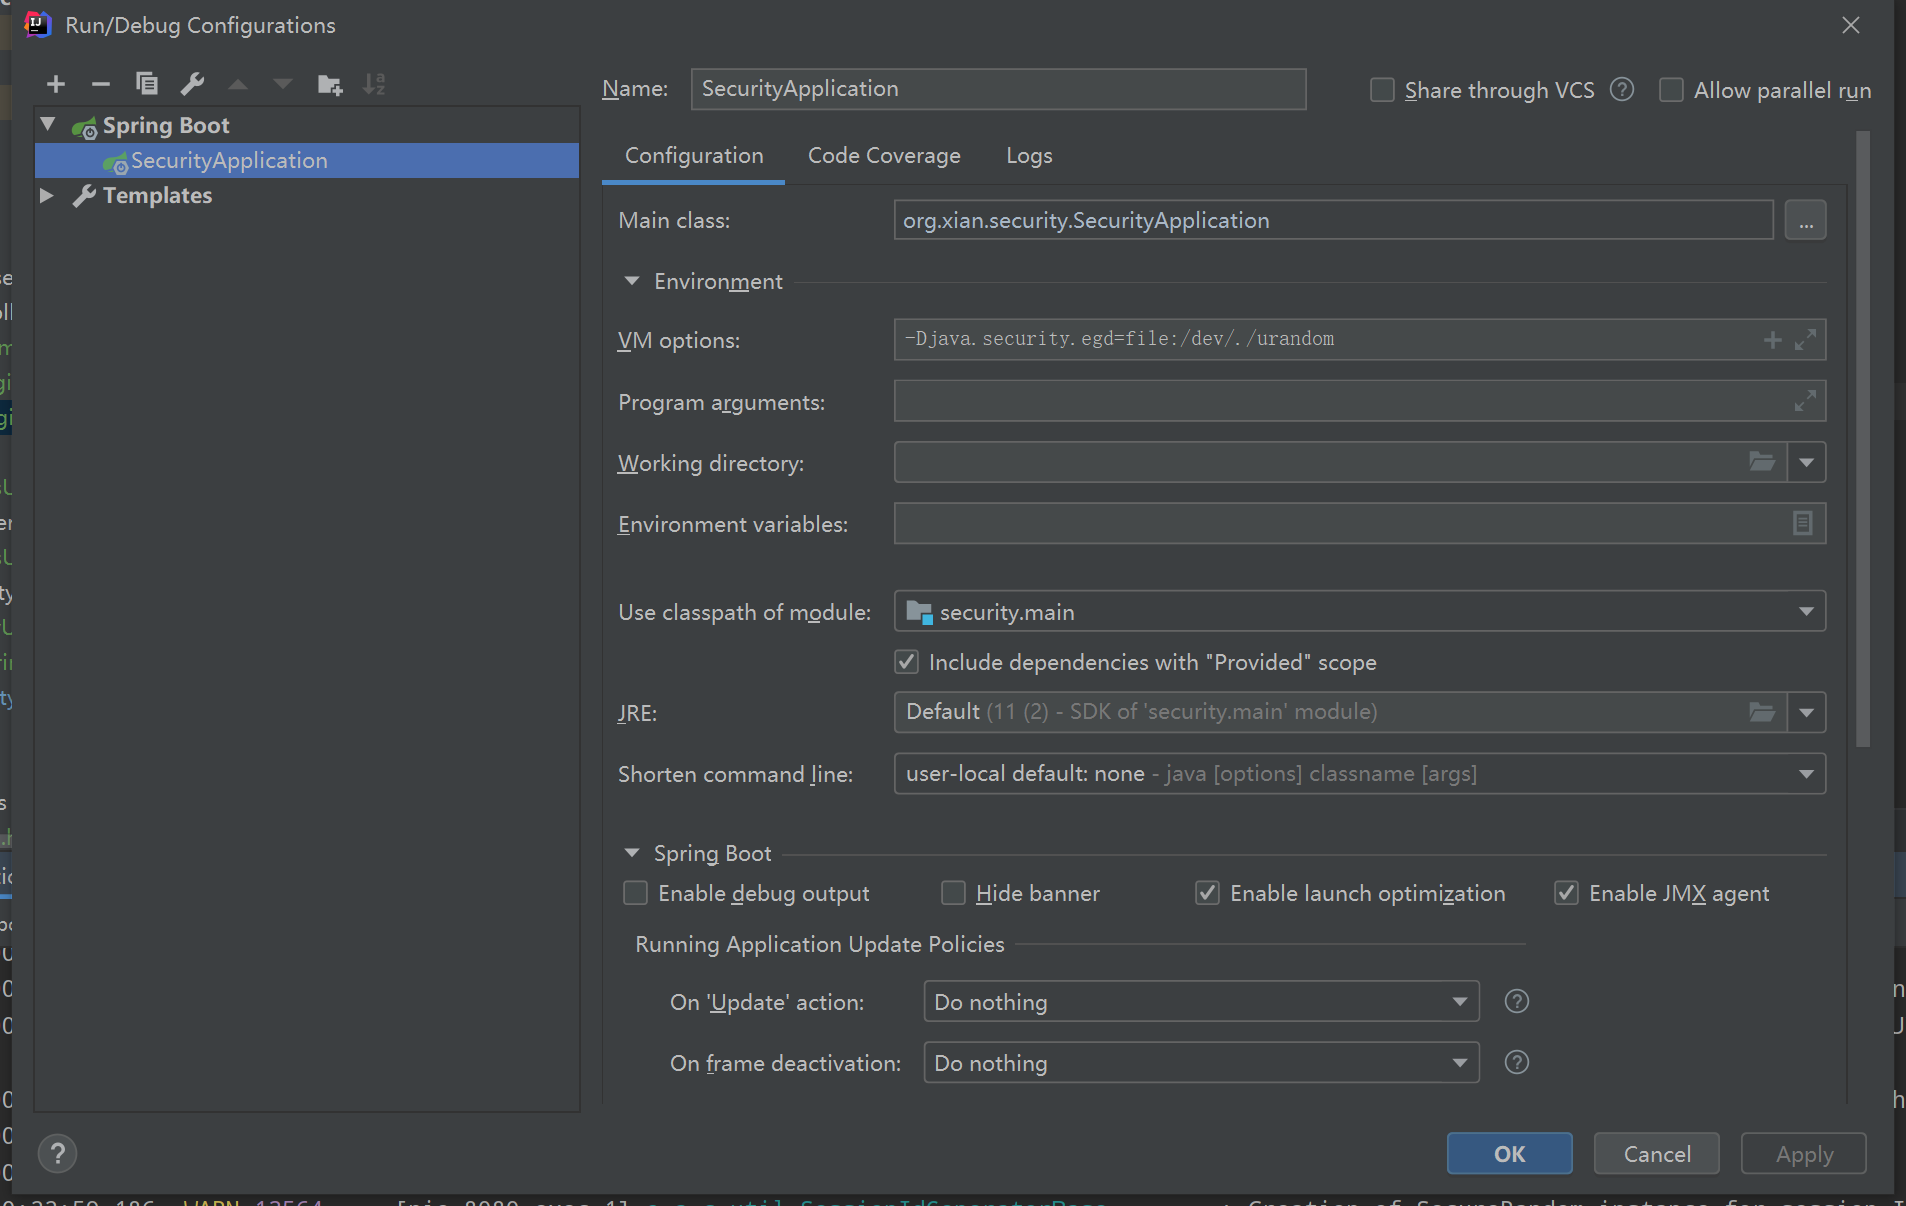
>Remember to add the JVM running parameter - Djava.security.egd=file:/dev/./urandom, which seems to be a security random number bug.
>
> 
2.4) realize user login function
Create new login.html and index.html (in Section 2.6).
    <meta charset="UTF-8">
    <title>Sign in</title>


<p>Sign in</p>
<p th:if="${error}" class="error">Wrong user name or password</p>
<form th:action="@{/login}" method="post">
    <label for="username">User name</label>:
    <input type="text" id="username" name="username" autofocus> <br>
    <label for="password">User password</label>:
    <input type="password" id="password" name="password"> <br>
    <input type="submit" value="Sign in">
</form>
Create a new LoginController class under the controller package:
@Controller
public class LoginController {

    @RequestMapping("/login")
    public String login() {
        return "login";
    }

    @RequestMapping("/login-error")
    public String loginError(Model model) {
        // Login error
        model.addAttribute("error", true);
        return "login";
    }
}
Because we have specified the roles of / login and / login error, the specific implementation of login and login failure is implemented by Spring Security.
Run the project and access it through the browser http://localhost:8080/login , enter the user name and password, select the user role, and click login.
2.5) user role permission control
The user role permission control can be annotated on @ RequestMapping with @ PreAuthorize annotation, which means that this URL needs some role permission to access; the other way is to realize that some elements of the page need to specify role permission to access through Thymeleaf.
Here we first introduce the first way @ PreAuthorize annotation:
Create a new admin controller in the controller package. The corresponding admin.html can view the warehouse source code:
@Controller
public class AdminController {
    // Role admin role is required to access / Admin
    // That's why MyUserDetailsServiceImpl needs "role" + sysuser. Getuserrole()
    @PreAuthorize("hasRole('ADMIN')")
    @RequestMapping("/admin")
    public String admin() {
        return "admin";
    }
}
Rerun the project, log in with USER and ADMIN in different roles, and access http://localhost:8080/admin. View the results of different role permissions.
2.6) tymeleaf role control
For the same page, some elements may be visible to ADMIN and some to USER. These are implemented through the Thymeleaf extras spring security extension of Thymeleaf.
Modify the index.html page:
    <meta charset="UTF-8">
    <title>homepage</title>


<h1>Login successfully</h1>
<div sec:authorize="isAuthenticated()">
    Users can see
</div>
<br>
<div sec:authorize="hasRole('ROLE_ADMIN')">
    Administrator can see <br>
    <a href="admin.html" th:href="@{/admin}">Management page</a>
</div>
<br>
<div sec:authorize="hasRole('ROLE_USER')">
    Users can see
</div>
<br>
<br>
<form th:action="@{/logout}" method="post">
    <input type="submit" value="Logout">
</form>
appendix
Maven project dependency
<dependencies>
  <dependency>
    <groupid>org.springframework.boot</groupid>
    <artifactid>spring-boot-starter-security</artifactid>
  </dependency>
  <dependency>
    <groupid>org.springframework.boot</groupid>
    <artifactid>spring-boot-starter-thymeleaf</artifactid>
  </dependency>
  <dependency>
    <groupid>org.springframework.boot</groupid>
    <artifactid>spring-boot-starter-web</artifactid>
  </dependency>
  <dependency>
    <groupid>org.mybatis.spring.boot</groupid>
    <artifactid>mybatis-spring-boot-starter</artifactid>
    <version>2.1.2</version>
  </dependency>
  <dependency>
    <groupid>mysql</groupid>
    <artifactid>mysql-connector-java</artifactid>
    <scope>runtime</scope>
  </dependency>
  <dependency>
    <groupid>org.springframework.boot</groupid>
    <artifactid>spring-boot-starter-test</artifactid>
    <scope>test</scope>
  </dependency>
  <dependency>
    <groupid>org.springframework.security</groupid>
    <artifactid>spring-security-test</artifactid>
    <scope>test</scope>
  </dependency>
  <!-- https://mvnrepository.com/artifact/org.thymeleaf.extras/thymeleaf-extras-springsecurity5 -->
  <dependency>
    <groupid>org.thymeleaf.extras</groupid>
    <artifactid>thymeleaf-extras-springsecurity5</artifactid>
    <version>3.0.4.RELEASE</version>
  </dependency>
</dependencies>
This section mainly implements the Spring Boot integration of Spring Security to achieve user registration, login and role control. In the next section, we will integrate Spring Boot with JJWT to realize the RESTful API interface for Token authentication and authorization. </simplegrantedauthority></simplegrantedauthority>