Although it's slowly separating development in the popular front and back end, according to song Ge, there are still some companies that are developing front and back end indiscriminately. In the development of front and back end indiscriminately, we will need back-end page templates (in fact, even if the front and back end are separated, we will also need to use page templates in some scenarios, such as email sending templates).
<!--more-->
Early Spring Boot Velocity is also supported as a page template in. Now, velocity is not supported in Spring Boot. Page templates mainly support Thymeleaf and Freemarker. Of course, as the most basic page template in Java, Jsp is also supported by Spring Boot, but it's troublesome to use.
Song is going to introduce these three page template technologies in three articles.
Today, let's take a look at the integration of Thymeleaf in Spring Boot!
About Thymeleaf
Thymeleaf is a new generation of Java template engine, which is similar to the traditional Java template engine such as Velocity and FreeMarker. However, unlike the traditional Java template engine, thymeleaf supports HTML prototypes.
It not only allows the front-end engineer to directly open the viewing style in the browser, but also allows the back-end engineer to view the display effect in combination with real data. At the same time, spring boot provides an automatic configuration solution for Thymeleaf, so it is very convenient to use Thymeleaf in spring boot.
In fact, in addition to displaying the basic HTML and rendering the page, Thymeleaf can also be rendered as an HTML fragment. For example, when we do email, we can use Thymeleaf as the email template.
In addition, since the suffix of tymeleaf template is. html, it can be opened directly by the browser, so it is very convenient to preview.
integration
- Create project
It is very easy to integrate Thymeleaf in Spring Boot. You only need to add Thymeleaf when creating a project:

After creation, pom.xml depends on the following:
<dependency>
    <groupid>org.springframework.boot</groupid>
    <artifactid>spring-boot-starter-thymeleaf</artifactid>
</dependency>
<dependency>
    <groupid>org.springframework.boot</groupid>
    <artifactid>spring-boot-starter-web</artifactid>
</dependency>
Of course, Thymeleaf can not only be used in Spring Boot, but also in other places. Spring Boot provides a complete set of automatic configuration schemes for Thymeleaf. The properties of this set of configuration classes are in org.springframework.boot.autoconfigure.thymeleaf.ThymeleafProperties. Some source codes are as follows:
@ConfigurationProperties(prefix = "spring.thymeleaf")
public class ThymeleafProperties {
        private static final Charset DEFAULT_ENCODING = StandardCharsets.UTF_8;
        public static final String DEFAULT_PREFIX = "classpath:/templates/";
        public static final String DEFAULT_SUFFIX = ".html";
        private boolean checkTemplate = true;
        private boolean checkTemplateLocation = true;
        private String prefix = DEFAULT_PREFIX;
        private String suffix = DEFAULT_SUFFIX;
        private String mode = "HTML";
        private Charset encoding = DEFAULT_ENCODING;
        private boolean cache = true;
        //...
}
- First, the @ ConfigurationProperties annotation is used to bind the configuration of application.properties prefixed with spring.thymeleaf to the properties in this class.
- The first three static variables define the default encoding format, the prefix and suffix of the view parser, etc.
- From the first three lines of configuration, you can see that the default location of the Thymeleaf template is in the resources/templates directory, and the default suffix is html.
- These configurations, if not provided by the developers themselves, will be used by default. If they are provided by themselves, the relevant configurations will start with spring.thymeleaf in application.properties.
As we just mentioned, the automatic configuration class provided by Spring Boot for Thymeleaf is org.springframework.boot.autoconfigure.Thymeleaf.thymeleafaautoconfiguration. Some source codes are as follows:
@Configuration
@EnableConfigurationProperties(ThymeleafProperties.class)
@ConditionalOnClass({ TemplateMode.class, SpringTemplateEngine.class })
@AutoConfigureAfter({ WebMvcAutoConfiguration.class, WebFluxAutoConfiguration.class })
public class ThymeleafAutoConfiguration {
}
As you can see, in this automatic configuration class, first import ThymeleafProperties, and then the @ ConditionalOnClass annotation indicates that when the TemplateMode and SpringTemplateEngine classes exist in the current system, the current automatic configuration class will take effect, that is, as long as the project introduces the Thymeleaf related dependency, the configuration will take effect.
These default configurations can be used without any changes. If developers have special needs, you can configure the properties starting with spring.thymeleaf in application.properties.
- Create Controller
Next, we can create the Controller. In fact, after introducing the Thymeleaf dependency, we can do nothing to configure it. The new IndexController is as follows:
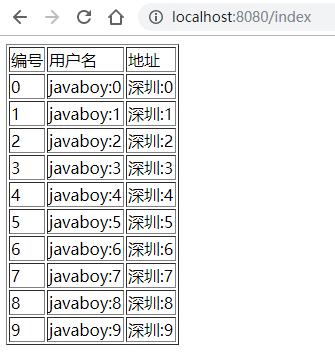
@Controller public class IndexController { @GetMapping("/index") public String index(Model model) { List<user> users = new ArrayList<>(); for (int i = 0; i < 10; i++) { User u = new User(); u.setId((long) i); u.setName("javaboy:" + i); u.setAddress("Shenzhen:" + i); users.add(u); } model.addAttribute("users", users); return "index"; } } public class User { private Long id; private String name; private String address; //Omit getter/setter }
Return the logical view name + data in the IndexController. The logical view name is index, which means that we need to provide a template file named index.html in the resources/templates directory.
- Create Thymeleaf
    <meta charset="UTF-8">
    <title>Title</title>


<table border="1">
    <tbody><tr>
        <td>number</td>
        <td>User name</td>
        <td>address</td>
    </tr>
    <tr th:each="user : ${users}">
        <td th:text="${user.id}"></td>
        <td th:text="${user.name}"></td>
        <td th:text="${user.address}"></td>
    </tr>
</tbody></table>
In Thymeleaf, a set is traversed by th:each instruction, and data display is realized by th:text instruction.
Note that the thymeleaf namespace is introduced at the top of index.html.
After the configuration is completed, you can start the project. By visiting the / index interface, you can see the data in the collection:
In addition, Thymeleaf supports getting the variables in the Model directly in js. For example, in IndexController, there is a variable username:
@Controller
public class IndexController {
    @GetMapping("/index")
    public String index(Model model) {
        model.addAttribute("username", "Li Si");
        return "index";
    }
}
In the page template, you can get this variable directly in js:
<script th:inline="javascript">
    var username = [[${username}]];
    console.log(username)
</script>
This feature is one of the features of tymeleaf.
Manual rendering
What we said earlier is to return a tymeleaf template. We can also manually render the tymeleaf template, which is generally useful when sending mail. For example, I create a new mail template in the resources/templates directory, as follows:
    <meta charset="UTF-8">
    <title>Title</title>


<p>hello Welcome <span th:text="${username}"></span>join XXX Group, your employment information is as follows:</p>
<table border="1">
    <tbody><tr>
        <td>position</td>
        <td th:text="${position}"></td>
    </tr>
    <tr>
        <td>salary</td>
        <td th:text="${salary}"></td>
    </tr>
</tbody></table>
<img src="https://oscimg.oschina.net/oscnet/javaboy.jpg" alt="">
In this HTML template, there are several variables. We need to render this HTML template into a String string, and then send the String through email. How to render it manually?
@Autowired
TemplateEngine templateEngine;
@Test
public void test1() throws MessagingException {
    Context context = new Context();
    context.setVariable("username", "javaboy");
    context.setVariable("position", "Java Engineer");
    context.setVariable("salary", 99999);
    String mail = templateEngine.process("mail", context);
    //Omit email
}
- When rendering, we need to first inject a TemplateEngine object, which is configured in the automatic configuration class of Thymeleaf (that is, when we introduce the dependency of Thymeleaf, this instance will be available).
- Then construct a Context object to store variables.
- Call the process method to render. The return value of the method is the rendered HTML string. Then we send the string.
This is the key points for Spring Boot to integrate Thymeleaf. For more usage of Thymeleaf as a page template, please refer to the documentation of Thymeleaf: https://www.thymeleaf.org.
summary
This article mainly introduces some problems in the integration of Spring Boot and Thymeleaf, which is relatively simple. You can read the official documents of Thymeleaf to learn more about the use of Thymeleaf. I have uploaded this case to GitHub: https://github.com/lenve/javaboy-code-samples
About this article, if you have any questions, please leave a message for discussion. </user>