Automatic configuration of data sources
To access the data source, we need to import the JDBC scenario first
        <dependency>
            <groupId>org.springframework.boot</groupId>
            <artifactId>spring-boot-starter-data-jdbc</artifactId>
        </dependency>
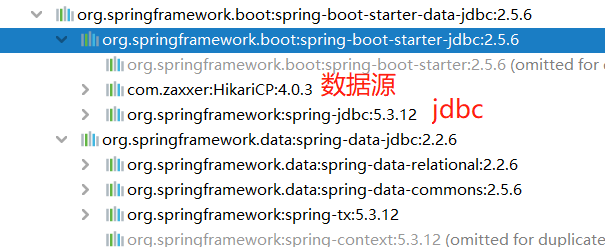
We found that he did not automatically help us introduce the database driver, because the system does not know whether we need to use MySQL or oracle or other databases. We need to import the dependency manually. Note that the version of MySQL driver must be consistent with the large version of MySQL installed on the computer
        <dependency>
            <groupId>mysql</groupId>
            <artifactId>mysql-connector-java</artifactId>
            <!--SpringBoot2.5.6 Corresponding to mysql8.0.27,If the versions are inconsistent, you can modify them in the following ways-->
            <!--<version>xx.xx.xx</version>-->
        </dependency>
In the past, when configuring MySQL, we all need to set its properties. In the SpringBoot framework, we need to see where the automatically set path is
@Configuration(
    proxyBeanMethods = false
)
@ConditionalOnClass({DataSource.class, EmbeddedDatabaseType.class})
@ConditionalOnMissingBean(
    //The annotations here are for distributed development, but they are not available now
    type = {"io.r2dbc.spi.ConnectionFactory"}
)
//DataSourceProperties specify where to modify the configuration
@EnableConfigurationProperties({DataSourceProperties.class})
@Import({DataSourcePoolMetadataProvidersConfiguration.class, InitializationSpecificCredentialsDataSourceInitializationConfiguration.class, SharedCredentialsDataSourceInitializationConfiguration.class})
public class DataSourceAutoConfiguration {
@ConfigurationProperties(
    prefix = "spring.datasource"
)
public class DataSourceProperties implements BeanClassLoaderAware, InitializingBean {
Therefore, we can make the following settings in the application.yaml file
spring:
  datasource:
    url: jdbc:mysql://localhost:3306/mybatis
    username: root
    password: Hkx123
    driver-class-name: com.mysql.cj.jdbc.Driver
test
@Slf4j
@SpringBootTest
class Boot03WebApplicationTests {
    @Autowired
    JdbcTemplate jdbcTemplate;
    @Test
    void contextLoads() {
        Long aLong = jdbcTemplate.queryForObject("select count(*) from employee", Long.class);
        log.info("The number of fields in the database is{}", aLong);
    }

}
Using Druid database connection pool
The database connection pool configured by SpringBoot for us is Hikari, and we can manually modify it to druid database connection pool
- custom
- Find starter
You can check the related documents of Druid connection pool on Github link
Introducing Druid in custom mode
Import Druid dependency
        <dependency>
            <groupId>com.alibaba</groupId>
            <artifactId>druid</artifactId>
            <version>1.2.8</version>
        </dependency>
In spring MVC, we create a bean in the xml configuration file and set its properties
 <bean id="dataSource" class="com.alibaba.druid.pool.DruidDataSource" init-method="init" destroy-method="close">
     <property name="url" value="${jdbc_url}" />
     <property name="username" value="${jdbc_user}" />
     <property name="password" value="${jdbc_password}" />
 </bean>
In SpringBoot, we create beans by using configuration classes
@Configuration
public class DataSourceConfig {
    @ConfigurationProperties("spring.datasource")
    @Bean
    public DruidDataSource dataSource(){
        DruidDataSource druidDataSource = new DruidDataSource();
        //We can automatically configure the following configurations by binding @ ConfigurationProperties("spring.datasource") configuration file properties
//        druidDataSource.setUrl();
//        druidDataSource.setUsername();
//        druidDataSource.setPassword();
        return druidDataSource;
    }

}
test
@Slf4j
@SpringBootTest
class Boot03WebApplicationTests {
    @Autowired
    DataSource dataSource;
    @Test
    void contextLoads()
        log.info("The data source type is{}", dataSource.getClass()); //The data source type is class com.alibaba.druid.pool.DruidDataSource
    }

}
Using Druid's monitoring function
Let's take a look at what Druid's official document says. It uses the Spring configuration method to configure a Servlet

In spring boot, we only need to create a Servlet registrar to register in it
    //Use Druid built-in monitoring page
    @Bean
    public ServletRegistrationBean statViewServlet(){
        ServletRegistrationBean<StatViewServlet> registrationBean = new ServletRegistrationBean<>(new StatViewServlet());
        //Set access path
        registrationBean.addUrlMappings("/druid/*");
        HashMap<String, String> map = new HashMap<>();
        map.put("loginUsername","admin");
        map.put("loginPassword","admin");
        //Set the account and password for accessing the monitoring page
        registrationBean.setInitParameters(map);
        return registrationBean;
    }
The following is the monitoring page, but the function is not perfect

Turn on SQL monitoring and firewall function
When creating a datasource, you can set both
    @ConfigurationProperties("spring.datasource")
    @Bean
    public DruidDataSource dataSource() throws SQLException {
        DruidDataSource druidDataSource = new DruidDataSource();
        //Open sql monitoring (stat) and firewall (wall)
        druidDataSource.setFilters("stat,wall");
        return druidDataSource;
    }
Turn on Web Monitoring
Before using unknown functions, Xiao Huang suggested that you first look at the official documents

It is said here that a Filter component should be configured. In Xiaohuang's previous article, the configuration of the three components was introduced Three native components are used in SpringBoot
    //Open Druid's web monitoring statistics function
    @Bean
    public FilterRegistrationBean statFilter(){
        FilterRegistrationBean<WebStatFilter> webStatFilterFilterRegistrationBean = new FilterRegistrationBean<>(new WebStatFilter());
        webStatFilterFilterRegistrationBean.setUrlPatterns(Arrays.asList("/*"));
        HashMap<String, String> map = new HashMap<>();
        map.put("exclusions","*.js,*.gif,*.jpg,*.png,*.css,*.ico,/druid/*");
        webStatFilterFilterRegistrationBean.setInitParameters(map);
        return webStatFilterFilterRegistrationBean;
    }
Introducing starter
It is very convenient to introduce the Druid spring boot starter dependency, which helps us configure the default settings
<!-- https://mvnrepository.com/artifact/com.alibaba/druid-spring-boot-starter -->
<dependency>
    <groupId>com.alibaba</groupId>
    <artifactId>druid-spring-boot-starter</artifactId>
    <version>1.2.8</version>
</dependency>
Let's take a look at the dependent structure. Xiao Huang summarizes the following. When using strater, we all start with the structure. When customizing, we refer to the official documents and learn to open some relevant information. After introducing starter, we only need to modify the configuration item. Then we find the configuration item in the relative configuration

spring:
  datasource:
    url: jdbc:mysql://localhost:3306/mybatis
    username: root
    password: Hkx123
    driver-class-name: com.mysql.cj.jdbc.Driver
    druid:
      stat-view-servlet:
        # Enable druid monitoring function (false by default)
        enabled: true
        # Set permissions for monitoring pages
        login-username: admin
        login-password: admin
      # Set and enable sql monitoring and firewall monitoring
      filters: 'stat,wall'
      # Set web monitoring on
      web-stat-filter:
        enabled: true
        url-pattern: /*
        exclusions: '*.js,*.gif,*.jpg,*.png,*.css,*.ico,/druid/*'
Integrate MyBatis operations
To use MyBatis in SpringBoot, you need to import related dependencies
        <dependency>
            <groupId>org.mybatis.spring.boot</groupId>
            <artifactId>mybatis-spring-boot-starter</artifactId>
            <version>2.2.0</version>
        </dependency>
Let's first review the integration of MyBatis in Spring
- Create mybatis global profile
- sqlSessionFactory (spring boot configured)
- sqlSession (automatically configured)
- Mapper: as long as the operation Mybatis interface is marked with @ mapper, it will be automatically recognized
MyBatis autoconfiguration class
@Configuration
@ConditionalOnClass({SqlSessionFactory.class, SqlSessionFactoryBean.class})
@ConditionalOnSingleCandidate(DataSource.class)
@EnableConfigurationProperties({MybatisProperties.class})
@AutoConfigureAfter({DataSourceAutoConfiguration.class, MybatisLanguageDriverAutoConfiguration.class})
public class MybatisAutoConfiguration implements InitializingBean {

//Mybatis configuration item, starting with mybatis
@ConfigurationProperties(
    prefix = "mybatis"
)
public class MybatisProperties {
application.yaml file
In the application.yaml file, configure the mybatis global configuration file and mapper file path
mybatis:
  # Global profile address
  config-location: classpath:mybatis/mybatis-config.xml
  mapper-locations: classpath:mybatis/mapper/*.xml
You can also use the following configuration instead of the global configuration file
mybatis:
  # Global profile address
#  config-location: classpath:mybatis/mybatis-config.xml
  # Replace with the following
  configuration:
    # Open hump naming
    map-underscore-to-camel-case: true
The specific use process is no different from that of Spring integration
Configuration mode
The configuration mode is to use the corresponding interface of the mapper file
<mapper namespace="com.yellowstar.boot02web.mapper.UserMapper">
    <!--User getUserById();-->
    <select id="getUserById" resultType="com.yellowstar.boot02web.bean.User">
        select * from t_user where id = #{id}
    </select>
</mapper>
@Mapper
public interface UserMapper {
    User getUserById(Integer id);
}
Annotation mode
The annotation mode can be developed completely without the xml configuration file. However, Xiao Huang recommends that concise sql statements can be developed with this mode. The complex is to uninstall the mapper file, which is relatively clear and easy to understand
@Mapper
public interface UserMapper {
    @Select("select * from t_user where id = #{id}")
    //@Options() can set the attribute of select
    User getUserById(Integer id);
}
We can also use @ MapperScan annotation on the main program to scan Mapper files, so there is no need to add @ Mapper annotation to each Mapper file, but Xiao Huang still recommends adding @ Mapper annotation to each Mapper file
@MapperScan("com.yellostar.boot02web.mapper")
@SpringBootApplication
public class Boot02WebApplication {
Integrate MyBatisPlus and implement simple CRUD
MyBatisPlus greatly simplifies the development process. Most sql statements can be used directly
Before using MyBatisPlus, you must import related dependencies, which include mybatis and jdbc dependencies, so you do not need to import dependencies repeatedly
        <dependency>
            <groupId>com.baomidou</groupId>
            <artifactId>mybatis-plus-boot-starter</artifactId>
            <version>3.4.1</version>
        </dependency>
Auto configuration
-
The MybatisPlusAutoConfiguration configuration class is bound to the MybatisPlusProperties configuration item. Mybatis plus: xxx is the customization of mybatis plus
-
SqlSessionFactory is automatically configured. The bottom layer is the default data source in the container
-
Maperlocations is automatically configured. There are default values. classpath*:/mapper/**/*.xml; All XML in any path under all mapper folders under the classpath of any package are sql mapping files. It is recommended to put the sql mapping file under mapper in the future
-
SqlSessionTemplate is also automatically configured in the container
-
@The interface marked by mapper will also be automatically scanned; It is recommended to directly scan @ MapperScan("com.atguigu.admin.mapper") in batches
To use mybatisplus for simple CRUD operations
query
Introduce all data in the query table, write a mapper interface and inherit BaseMapper. If you don't need to add sql statements, you can't add methods. All methods have been implemented in BaseMapper
public interface EmpMapper extends BaseMapper<Employee> {
}
service interface, just inherit IService
public interface EmpService extends IService<Employee> {
}
The service implementation class needs to inherit ServiceImpl and implement EmpService
@Service
public class EmpServiceImpl extends ServiceImpl<EmpMapper, Employee> implements EmpService {
}
Next we can call directly in controller, and mybatisplus comes with a paging plugin. After the use of Xiao Huang, it is found that the number of display pages is not very supportive. It is recommended to use pagehelper paging plugin.
    @Autowired
    EmpServiceImpl empService;

    @GetMapping("/dynamic_table")
    public String dynamic_table(@RequestParam(value = "pn",defaultValue = "1") Integer pn, Model model){
        PageHelper.startPage(pn,10);
        List<Employee> list = empService.list();
        PageInfo<Employee> info = new PageInfo<>(list,5);

        model.addAttribute("pageInfo",info);
        return "table/dynamic_table";
    }
Consolidate pageHelper
Import dependency
        <dependency>
            <groupId>com.github.pagehelper</groupId>
            <artifactId>pagehelper-spring-boot-starter</artifactId>
            <version>1.4.0</version>
        </dependency>
Set the database language in the configuration file. All configurations about pagehelper can be set with the prefix pagehelper
pagehelper:
  helper-dialect: mysql