Mysql installation
Download and install
- Download and install MySQL's official Yum Repository
wget -i -c http://dev.mysql.com/get/mysql57-community-release-el7-10.noarch.rpm
- Yum installation source
yum -y install mysql57-community-release-el7-10.noarch.rpm
- Install Mysql
yum -y install mysql-community-server
- Set Mysql to power on
systemctl enable mysqld.service
5 start Mysql
service mysqld start
Mysql settings
- You need to view the default password before accessing Mysql
grep "password" /var/log/mysqld.log
- Login Mysql
mysql -u root -p
Then enter the password you just found. The password is invisible and hidden.
- Modify password policy
> show VARIABLES like "%password%"
+---------------------------------------+---------+
| Variable_name                         | Value   |
|---------------------------------------+---------|
| default_password_lifetime             | 0       |
| disconnect_on_expired_password        | ON      |
| log_builtin_as_identified_by_password | OFF     |
| mysql_native_password_proxy_users     | OFF     |
| old_passwords                         | 0       |
| report_password                       |         |
| sha256_password_proxy_users           | OFF     |
| validate_password_dictionary_file     |         |
| validate_password_length              | 8       |
| validate_password_mixed_case_count    | 1       |
| validate_password_number_count        | 1       |
| validate_password_policy              | MEDIUM  |
| validate_password_special_char_count  | 1       |
+---------------------------------------+---------+
Several main parameters are introduced:
| parameter | Explain |
|---|---|
| validate_password_number_count | Parameter is the number of digits at least in the password, which takes effect when the password policy is MEDIUM or above. |
| validate_password_special_char_count | Parameter is the number of special characters such as non English numbers in the password. It takes effect when the password policy is MEDIUM or above. |
| validate_password_mixed_case_count | Parameter is the number of upper and lower case characters in Chinese and English of the password. It takes effect when the password policy is MEDIUM or above. |
| validate_password_length | The parameter is the length of the password, which is generated by the following formula. |
# Change password length
set global validate_password_length=0;

# Change number of numbers
set global validate_password_number_count=0;

# Change the number of upper and lower case letters
set global validate_password_mixed_case_count=0;

# Change the number of special characters
set global validate_password_special_char_count=0;
- Change Password
ALTER USER 'root'@'localhost' IDENTIFIED BY 'Your New Pssword';
- Turn on remote access
grant all privileges on *.* to 'root'@'You IP or ALL %' identified by 'Your Password' with grant option;
# Refresh authority
flush privileges;
- Configure default characters
In my.cnf (/ etc/my.cnf) or my.ini file
Insert the following statement in my.cnf configuration
[client]
default-character-set=utf8
Be sure to insert these two sentences before [mysqld], otherwise the following error will appear
mysql: [ERROR] unknown variable 'datadir=/var/lib/mysql'
The main reason is that the configuration information of [client] is placed in the middle of the configuration information of [mysqld], resulting in the configuration of other [mysqld] under [client].
Insert the following two lines after socket
character-set-server=utf8
collation-server=utf8_general_ci
- Transaction isolation (optional: Conference installation needs to be set)
Four kinds of transaction isolation of Mysql
In my.cnf or my.ini file
After the above, you can restart the Mysql service.transaction_isolation = READ-COMMITTED
service mysqld restart
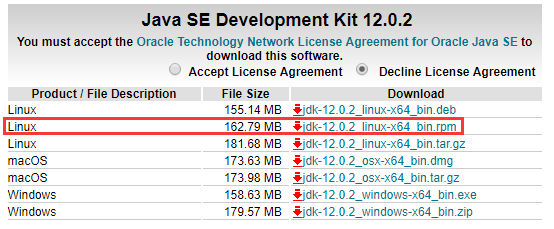
Using rpm to install JDK
download
First pass Official website Download the red file marked as follows
transmission
Pass the downloaded file FileZilla Software upload to server
install
Using the rpm command to install
rpm -ivh jdk-8u152-linux-x64.rpm
Nginx download and installation
Add yum source
rpm -ivh http://nginx.org/packages/centos/7/noarch/RPMS/nginx-release-centos-7-0.el7.ngx.noarch.rpm
After installing the yum source, you can use the following command to view it
yum repolist
install
yum install nginx
Configuration service
Set startup
systemctl enable nginx
Startup service
service nginx start
Install NodeJS
Install nodejs from yum
Update various versions of yum source of nodejs
- Nodejs v10.x installation command
$ curl --silent --location https://rpm.nodesource.com/setup_10.x | bash -
- Nodejs v8.x installation command
$ curl --silent --location https://rpm.nodesource.com/setup_8.x | bash -
Other versions as shown above
Direct installation
yum install nodejs -y
Install via compression pack
First, you need to go to the official website to download the corresponding installation package
Select all images > Alibaba cloud image
Find node-v12.10.0-linux-x64.tar.gz, which looks like the file name. The specific version number will change
wget https://npm.taobao.org/mirrors/node/v12.10.0/node-v12.10.0-linux-x64.tar.gz
Extract to the specified directory after downloading
tar xf node-v12.10.0-linux-x64.tar.gz -C /usr/local/
Rename folder
cd /usr/local/
mv node-v12.10.0-linux-x64/ nodejs
Set global command
ln -s /usr/local/nodejs/bin/node /usr/local/bin

ln -s /usr/local/nodejs/bin/npm /usr/local/bin
Then you can use it happily
Jenkins installation
Official installation
Official link RPM installation
Before the formal installation, you need to install the java environment
Installation source
sudo wget -O /etc/yum.repos.d/jenkins.repo https://pkg.jenkins.io/redhat/jenkins.repo
Import key
sudo rpm --import https://pkg.jenkins.io/redhat/jenkins.io.key
Install jenkins
yum install jenkins
Modify port
vim /etc/sysconfig/jenkins
Find Jenkins? Port = "8080" and change it to Jenkins? Port = "the port you need"
If you need to run the root shell in an automated build, you also need to modify the above file
JENKINS_USER="root"
Restart service
systemctl restart jenkins.service
After starting the access, prompt to obtain the password from / var/lib/jenkins/secrets/initialAdminPassword
Other operations after login
When using http to access, plug-ins will fail when installed, so you need to enter the following link first
HOST/pluginManager/advanced
Modify the lowest upgrade site
http://updates.jenkins.io/update-center.json
//Tsinghua source: https://mirrors.tuna.tsinghua.edu.cn/jenkins/updates/current/update-center.json
Then install the plug-in and add an administrator to use it
Docker image installation
Directly look at Official website installation You need basic knowledge of Docker operation.
Git install new
Download editing tools
yum -y groupinstall "Development Tools"
Download dependency package
yum -y install zlib-devel perl-ExtUtils-MakeMaker asciidoc xmlto openssl-devel
Delete git
When installing dependency, Git is installed automatically. You need to uninstall the old version of GIT. The command is:
yum remove git
Download git's latest version of source code
Go to GitHub to download the release directly
Of course, it may be slow to download the release version of github in China, so you can recommend downloading it on the official website
Download official website
git official website Click Downloads to enter the download page
Click Linux/Unix to download git of Linux version
Pull to the bottom, click download a tarball Transfer to git compression package and press it on the page, select the version you need to download
Decompress git package
tar -zxvf git-2.30.0.tar.gz
Enter git directory and configure the installation path
cd git-2.13.3
./configure --prefix=/usr/local/git
install
make && make install
Configure global path
export PATH="/usr/local/git/bin:$PATH"
source /etc/profile
View git version
git --version
Configure soft connections
In some systems or software, the default git address may be used, so the above configuration may not be able to access the GIT command, so you need to add a soft connection to the place you need
ln -s /usr/local/git/bin/git /usr/bin/git
The front is where you install it, and the back is where you need a soft connection.
As for whether to add - s or not, you can see here Linux Ln command
Author: SpiritLing
Copyright notice: except for the special notice, all articles in this blog adopt BY-NC-SA 4.0 License agreement. Reprint please indicate the source!
Blog Garden CSDN GitHub
Book: http protocol learning: address Custom address
docker learning: address Custom address