1. Overview of LVM
The full name of LVM, Logical Volume Manager, is a flexible management mechanism for disk partitions provided by Linux.To understand LVM, you first need to start with a problem that Linux users often encounter, which is, "How should I properly evaluate the size of different partitions to appropriately allocate hard disk space?"Normally, the size of the space cannot be changed after a logical partition has been partitioned. At this time, if the file that needs to be stored is too large, a single logical partition cannot be stored, but the file cannot be stored across multiple partitions, because of the limitations of the upper file system, so that a single file cannot be stored on different disks at the same time.When there is insufficient space for a partition, symbolic links or tools to resize the partition are usually the only temporary solutions. However, none of these temporary measures are effective solutions. The mechanism of LVM can solve this problem well, allowing users to resize the partitions without stopping the computer.
2. Steps to create LV
- Create Physical Volumes
- Create Volume Group
- Create Logical Volumes
2.1 Physical Volume
2.1.1 View physical volumes
View physical volumes using the pvs command
[root@localhost ~]# pvs
The results are as follows:
PV         VG   Fmt     Attr    PSize   PFree
/dev/sda centos lvm2     a--    <7.00g    0
2.1.2 New Disk Partitions
-
New Disk
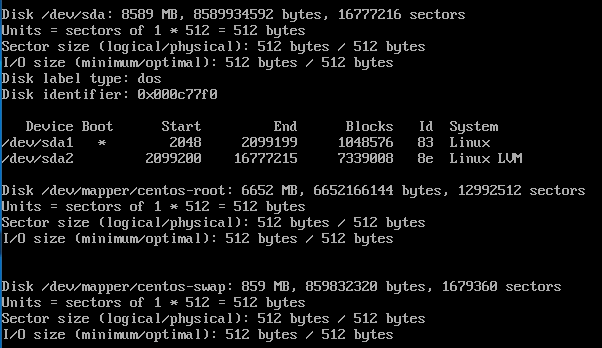
To create a new physical volume, we first add a new disk and mount it to the file system.First use the fdisk command to see all disks in the current system:
[root@localhost ~]# fdisk -l
The results are as follows:
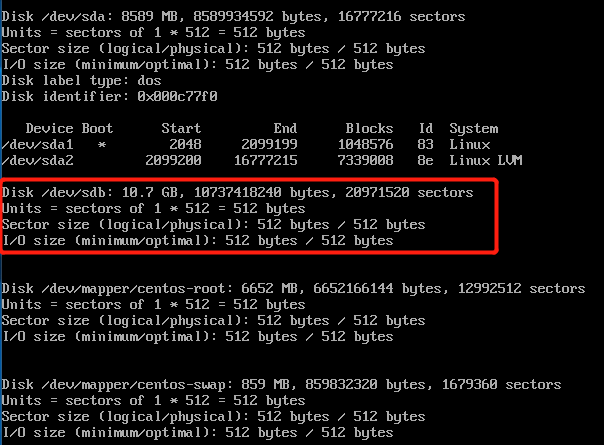
Next, we add a new disk and use the fdisk command. As shown below, we can see that there is one more disk / dev/sdb, which is exactly what we added:
-
Create partitions for new disks
Use fdisk/dev/sdb to create partitions on it:

Select the p primary partition here:
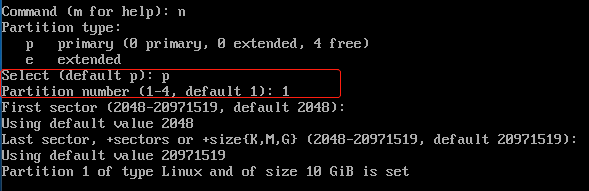
Finally, you need to choose w to save the settings, otherwise it will not take effect:
Command (m for help): w
Calling ioctl() to re-read partition table
Symcing disks
Now that the partition has been created, you can see that the / dev/sdb1 partition already exists by using the fdisk -l command again
Device Boot    Start    End        Blocks     Id    System
/dev/sdb1      2048   20971519    10484736    83    Linux
-
format partition
The next step is to format the partition using the mkfs command.The following command formats/dev/sdb1 into ext4 format
[root@localhost ~]# mkfs -t ext4 /dev/sdb1
-
Mount New Partition
By looking at the partition distribution with the df-h command, we can see that the partition has not been mounted yet.
[root@localhost ~]# df -h
Filesystem                 Size    Used    Avail    Use%    Mounted on
/dev/mapper/centos-root    6.2G    1007M   5.3G     16%     /
/devtmps                   908M    0       908M     0%      /dev
tmpfs                      920M    0       920M     0%      /dev/shm
tmpfs                      920M    8.6M    911M     1%      /run
tmpfs                      920M    0       920M     0%      /sys/fs/cgroup
/ddev/sda1                1014M    146M    869M     15%     /boot
tmpfs                      184M    0       184M     0%      /run/user/0
Next we will mount the new partition/dev/sdb1 onto/data:
[root@localhost ~]# mkdir /data
[root@localhost ~]# mount /dev/sdb1 /data
Now execute the df-h command again to see the partition distribution, and you can see that/dev/sdb1 is mounted on/data:
Filesystem                 Size    Used    Avail    Use%    Mounted on
/dev/mapper/centos-root    6.2G    1007M   5.3G     16%     /
/devtmps                   908M    0       908M     0%      /dev
tmpfs                      920M    0       920M     0%      /dev/shm
tmpfs                      920M    8.6M    911M     1%      /run
tmpfs                      920M    0       920M     0%      /sys/fs/cgroup
/ddev/sda1                1014M    146M    869M     15%     /boot
tmpfs                      184M    0       184M     0%      /run/user/0
/dev/sdb1                  9.8G    37M     9.2G     1%      /data
In addition, you can modify the / etc/fstab file to add the following to the last line to make the system mount automatically every time it starts
/dev/sdb1 /data ext4 defaults 0 0
2.1.3 Creating physical volumes
Use the pvcreate command to create a physical volume:
[root@localhost ~]# pvcreate /dev/sdb1
Note that if /dev/sdb1 is already mounted on the file system, umount is required before pvcreate:
[root@localhost ~]# umount /dev/sdb1
Use pvs command to view physical volumes after creation
PV         VG   Fmt     Attr    PSize   PFree
/dev/sda centos lvm2     a--    <7.00g    0
/dev/sdb centos lvm2     ---     <10.00g  <10.00g
You can see from the results the newly created physical volume/dev/sbd
2.2 Volume Group
2.2.1 View Volume Groups
Use vgs to view volume groups
[root@localhost ~]# vgs
The results are as follows:
VG        #PV   #LV     #SN    Attr   VSize    VFree
centos     1     2       0    wz--n-  <7.00g     0
2.2.2 Adding physical volumes to volume groups
Adding physical volumes to volume groups
Vgextend <volume group name> <physical volume name>
For example, add a physical volume/dev/sdb1 to the centos volume group:
[root@localhost ~]# vgextend centos /dev/sdb1
The results are as follows:
VG        #PV   #LV     #SN    Attr   VSize    VFree
centos     2     2       0    wz--n-  16.99g  <10.00g
2.3 Logical Volume
2.3.1 View Logical Volume
View logical volumes using the lvs command
[root@localhost ~]# lvs
The results are as follows:
LV    VG    Attr        LSize   Pool  Origin  Data%  Meta%  Move  Log  Cpy%Sync  Convert
root centos -wi-ao----   <6.20g
2.3.2 Creating Logical Volumes
3. Snapshot backup using LVM
4. Other useful commands
4.1 Create Volume Groups
Vgcreate <Volume Group Name> <Free Partition Name Joining the Volume Group>