In the communication scenario, the common mode is that the client sends the request to the server, and the server responds again. Another communication mode is that the server actively pushes messages to the client. There are usually two scenarios for this communication.
Scenario 1
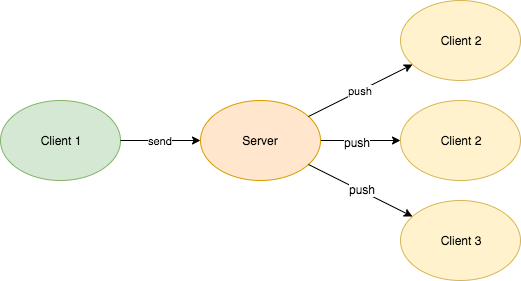
A client sends instructions to the server and triggers the server to push messages to other clients, such as IM.
Scenario 2
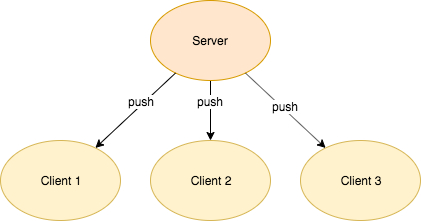
The server actively pushes messages to the connected client based on a certain business scenario, such as APP message Push.
This paper takes scenario 1 as an example to demonstrate how to implement Push message distribution through smart socket. First, we need to define three roles:
- SendClient: message sender. The client will send messages to the server, and then push them to other clients.
- ReceiverClient: the message receiver who accepts the messages pushed from the server.
- PushServer: the Push server receives the messages sent by SendClient and forwards them to other clients ReceiverClient.
Step 1: define the agreement
The first step of communication programming is to define communication protocol. For demonstration purposes, we use the protocol format of length+data, that is, we use an int value of four bytes to represent the message header, and the size of the int value represents the length of the message body. SendClient and PushServer, PushServer and ReceiverClient all use this protocol to communicate.
public class StringProtocol implements Protocol<String> {

    @Override
    public String decode(ByteBuffer readBuffer, AioSession<String> session) {
        int remaining = readBuffer.remaining();
        if (remaining < Integer.BYTES) {
            return null;
        }
        readBuffer.mark();
        int length = readBuffer.getInt();
        if (length > readBuffer.remaining()) {
            readBuffer.reset();
            return null;
        }
        byte[] b = new byte[length];
        readBuffer.get(b);
        readBuffer.mark();
        return new String(b);
    }
}
Step 2: Push server processor
The processor of PushServer needs the following capabilities:
- Maintain all client connections. After the client establishes a connection with the server, the AioSession is stored in the sessionMap. When the connection is disconnected, it is removed from the Map.
- Accept the message sent by SendClient and Push it to other clients.
/*******************************************************************************
 * Copyright (c) 2017-2020, org.smartboot. All rights reserved.
 * project name: smart-socket
 * file name: PushServerProcessorMessage.java
 * Date: 2020-04-25
 * Author: sandao (zhengjunweimail@163.com)
 *
 ******************************************************************************/

package org.smartboot.socket.push;

import org.slf4j.Logger;
import org.slf4j.LoggerFactory;
import org.smartboot.socket.MessageProcessor;
import org.smartboot.socket.StateMachineEnum;
import org.smartboot.socket.transport.AioSession;
import org.smartboot.socket.transport.WriteBuffer;

import java.util.Map;
import java.util.concurrent.ConcurrentHashMap;

/**
 * @author Three knives
 * @version V1.0 , 2020/4/25
 */
public class PushServerProcessorMessage implements MessageProcessor<String> {
    private static final Logger LOGGER = LoggerFactory.getLogger(PushServerProcessorMessage.class);
    private Map<String, AioSession<String>> sessionMap = new ConcurrentHashMap<>();

    @Override
    public void process(AioSession<String> session, String msg) {
        LOGGER.info("Received SendClient Messages sent:{}", msg);
        byte[] bytes = msg.getBytes();
        sessionMap.values().forEach(onlineSession -> {
            if (session == onlineSession) {
                return;
            }
            WriteBuffer writeBuffer = onlineSession.writeBuffer();
            try {
                LOGGER.info("Send out Push to ReceiverClient:{}", onlineSession.getSessionID());
                writeBuffer.writeInt(bytes.length);
                writeBuffer.write(bytes);
                writeBuffer.flush();
            } catch (Exception e) {
                LOGGER.error("Push Message exception", e);
            }
        });
    }

    @Override
    public void stateEvent(AioSession<String> session, StateMachineEnum stateMachineEnum, Throwable throwable) {
        switch (stateMachineEnum) {
            case NEW_SESSION:
                LOGGER.info("And clients:{} Establish a connection", session.getSessionID());
                sessionMap.put(session.getSessionID(), session);
                break;
            case SESSION_CLOSED:
                LOGGER.info("Disconnect client: {}", session.getSessionID());
                sessionMap.remove(session.getSessionID());
                break;
            default:
        }
    }
}
Step 3: ReceiverClient processor
This article simplifies the processing logic of the message receiver, only printing a line of log for observation. In practical application, some business logic needs to be executed according to the received messages.
public class PushClientProcessorMessage implements MessageProcessor<String> {
    private static final Logger LOGGER = LoggerFactory.getLogger(PushClientProcessorMessage.class);

    @Override
    public void process(AioSession<String> session, String msg) {
        LOGGER.info("ReceiverClient:{} Received Push news:{}", session.getSessionID(), msg);
    }

    @Override
    public void stateEvent(AioSession<String> session, StateMachineEnum stateMachineEnum, Throwable throwable) {

    }
}
Step 4: start the service
Start server: PushServer
public class PushServer {
    public static void main(String[] args) throws IOException {
        AioQuickServer<String> server = new AioQuickServer<>(8080, new StringProtocol(), new PushServerProcessorMessage());
        server.start();
    }
}
Start recipient: ReceiverClient
public class ReceiverClient {
    public static void main(String[] args) throws IOException, ExecutionException, InterruptedException {
        AsynchronousChannelGroup channelGroup = AsynchronousChannelGroup.withFixedThreadPool(Runtime.getRuntime().availableProcessors(), new ThreadFactory() {
            @Override
            public Thread newThread(Runnable r) {
                return new Thread(r);
            }
        });
        StringProtocol protocol = new StringProtocol();
        PushClientProcessorMessage clientProcessorMessage = new PushClientProcessorMessage();
        AioQuickClient<String>[] clients = new AioQuickClient[4];
        for (int i = 0; i < clients.length; i++) {
            clients[i] = new AioQuickClient<>("localhost", 8080, protocol, clientProcessorMessage);
            clients[i].start(channelGroup);
        }
    }
}
Start sender: SenderClient
public class SenderClient {
    public static void main(String[] args) throws IOException, ExecutionException, InterruptedException {
        StringProtocol protocol = new StringProtocol();
        PushClientProcessorMessage clientProcessorMessage = new PushClientProcessorMessage();
        AioQuickClient<String> clients = new AioQuickClient("localhost", 8080, protocol, clientProcessorMessage);
        AioSession<String> session = clients.start();
        byte[] msg = "HelloWorld".getBytes();
        while (true) {
            WriteBuffer writeBuffer = session.writeBuffer();
            writeBuffer.writeInt(msg.length);
            writeBuffer.write(msg);
            writeBuffer.flush();
            Thread.sleep(1000);
        }
    }
}
Step 5: observe the console
SenderClient sends one HelloWorld message per second to the PushServer. Observe the PushServer console to see that after the server receives the message, it can be forwarded to the ReceiverClient.
 Then observe the receiver client console, and the message pushed from the server will be printed.

Last
Through a simple example, this paper demonstrates the implementation principle of Push service. In the actual scenario, there are also many reliability issues to consider, and interested readers can study them on their own.
The example code involved in this article can be obtained from smart-socket Download in warehouse