
Preface
It has been more than a month since I came into contact with the vue framework. A little demo I have done before is mainly familiar with the vue family bucket technology. The interface layout imitates the cat's eye and the data uses the background interface provided by the bean flap developer. The whole process from scaffolding to the final project packaging online is a complete development process, involving more knowledge points, but also more fragmentary, through this project to my own knowledge system to do a comb and summary.
The project has been uploaded to github, you are welcome to download and exchange.
Front-end project address: https://github.com/Hanxueqing...
Background Data Address: https://github.com/Hanxueqing...
Online Project Manual: https://hanxueqing.github.io/...
Project Technology Stack
- Vue.js family bucket: vue-cli, vue-router, vue-resource (new version has been replaced by axios), vuex
- Language: ES6
- UI: Mint-UI, Vant components
- Background interface: express, MongoDB. Refer to my previous article on how to make a data interface: "Not Writing API Data Interface Front Siege Lion Is Not a Good Programming Ape".
- Packing online: Aliyun server. Refer to my previous article on how to apply for and configure the Aliyun server and package the project online: "From 0 to 1: The whole process of Aliyun server deployment web project".
Project operation
# Cloning to local
git clone git@github.com:Hanxueqing/Douban-Movie.git

# Installation dependency
npm install

# Open local server localhost:8080
yarn serve

# Publishing environment
yarn build
Project Development
1. Installation of vue-cli3 scaffolding
Now the use of front-end engineering development projects is the mainstream trend, that is to say, we need to use some tools to build the Vue development environment, in general we use webpack to build, here we directly use the official vue-based scaffolding tool: vue-cli.
(1) Global installation of webpack
cnpm install webpack -g
(2) Global installation of yarn
cnpm install yarn -g
(3) Global installation of vue-cli
cnpm install -g @vue/cli

OR

yarn global add @vue/cli
(4) View installation results
My computer has been installed, and I execute the order in turn:
node -v
yarn -v
vue -V (Note that this is capitalized“ V")
Note: Require node.js version 8 or 8+
Successful installation is indicated by the corresponding version number

2. Build a project with vue-cli
(1) Create projects
vue create douban (project name)
(Note that the name here should not have capital letters. If there is an error, Sorry, name can not longer contain capital letters)

Teacher Ruan Yifeng's Blog Why do file names need lowercase You can refer to it.
The first vue-model is the settings I saved, which I didn't have when I first create d it. Default is the default setting, which will install babel and eslink modules for you. We choose the third Manual select features to configure manually.

The input space is to select the current option, and the input a is to be selected.
(bold is the configuration item to be selected)
When Babel installs this module, it can recognize ES6's grammar, otherwise it can only recognize ES5's grammar.
TypeScript is a superset of JavaScript that supports the ECMAScript 6 standard.
Progressive Web App (PWA) Support progressively enhanced front-end web page technology, PWA, is a specialized subject, can do offline storage function, mobile phone can also access this page when the network is disconnected, we do not need to install it at present.
Router routing
Vuex Global State Management
CSS Pre-processors CSS Preprocessing Language
Linter / Formatter Formatting Tool to Help us Write Code Better
Unit Testing Unit Testing
E2E Testing
Select these four items and enter Enter
The next few configurations are:
- Whether to use history mode to configure routing, enter n, return
- Since we have just chosen the CSS preprocessing language, we have chosen the stable version of Sass/SCSS (with node-sass).
- Where do you need to store these configuration files, we choose in package.json
- Finally, do you want to save these configurations as a default file to be applied in the future? After saving, you don't need to configure these options manually. You can use them directly later. I saved them before. Here I choose n first.

After returning to the bus, it will be downloaded. The speed depends on your current network speed.

When the installation is successful, we will be prompted to run yarn serve r to start listening under the folder of douban.

(2) Loading compiled files
Copy the Vue.config.js compiled file to the douban folder
3. sorting out src folders
(1)router
Create a new router folder, drag the router.js file in, rename it index.js, delete the contents of routes.

(2)views
Two. vue files under views folder are deleted, logo diagrams under assets folder are deleted, and HelloWorld components under components folder are deleted.
(3)App.vue
App.vue file style is deleted, div content with id name app is deleted.

(4) New pages in views
Create home page, book, video, broadcast, group and my page in turn under the views folder. Create index.vue file under the folder. File with Vue as suffix name contains template, script and style. Web pack loads with vue-loader when parsing. Vue file.
(5) configuring routing in router
Under the router folder, we create the JS routing files of the home page, books, videos, broadcasts, groups and my pages in turn. Each route is configured with a name name, so that we can find this routing component by named routing in the future. Finally, we introduce it into index.js.
(6) Introducing <router-view>into App.vue
(7) Writing style files
New stylesheets folder
Web packages do not process underlined files in the process of packaging to avoid duplicate packaging
Create: _base.scss basic style in turn
_ commons.scss Universal Style
_ Mixed styles of mixins.scss
_ reset.scss Reset Style
Finally, it is introduced in turn under the main.scss folder.
@import "_base.scss";
@import "_mixins.scss";
@import "_reset.scss";
@import "_commons.scss";
Introduce style as a module in main.js
//Introduce main.scss file
import "./stylesheets/main.scss"
4. Tabbar components
(1) slot slot: named slot, anonymous slot
First, we introduce the normal status icon and the selected status icon in turn, write the style, give the normal status icon named normalImg, and the selected status icon named activeImg. Here we use slot slot slot slot. Write slot label in the child component and assign name value as a named slot, then you can pass in the content to be inserted in the parent component.
Subcomponents:
<span><slot name = "normalImg"></slot></span>
<span><slot name = "activeImg"></slot></span>
Parent component:
<TabItem>
            <img slot = "normalImg" src = "../../assets/ic_tab_home_normal.png" alt = "">
            <img slot = "activeImg" src = "../../assets/ic_tab_home_active.png" alt = "">
</TabItem>
(2) v-if/v-else instruction: control display and hiding
The first step is to switch the click icon from normal style to selected style. We need to set a flag attribute to control the display of normalImg and activeImg. Here we use v-if and v-else instructions.
<span v-if = "!flag"><slot name = "normalImg"></slot></span>
<span v-else><slot name = "activeImg"></slot></span>
(3) Two ways of passing values from parent component to child component: event binding and custom event
In the parent component, a unique txt, mark, select attribute value and changeSelected method are passed to the child component. The parent component passes the selected value to the sel through the attribute binding method:
Parent component:
<TabItem txt = "My" mark = "mine" :sel = "selected" :changeSelected = "changeSelected">
Subcomponents receive:
props:["txt","mark","sel","changeSelected"]
In the child component, by binding click event change, the parent component changes the selected value and passes it to the child component. The return value is determined by matching the mark value, thus controlling the current icon status.
Subcomponent binding click event trigger change method:
<div class = "tabitem" @click = "change">
Subcomponent change method:
change(){
            //Let the parent component change the sel value
            this.changeSelected(this.mark);
        }
The parent component changes the sel value:
changeSelected(val){
            this.selected = val;
        }
The parent component can also use custom events to pass the method to the child component. Instead of receiving them through props, the child component can use this.$emit directly in the method. The first parameter is the event name bound to the parent itself, and the second parameter is the parameter passed to the parent, which is triggered in the child component by this method. Method of parent component.
Parent component:
<TabItem txt = "group" mark = "group" :sel = "selected" @changeSelected = "changeSelected">
Subcomponents:
change(){
            //Custom Event Communication Method
            this.$emit("changeSelected",this.mark)
        }
(4) computed computing attributes
The sub-component judges and returns the falg value. Because it needs to depend on the external value to change, we write the flag in the computational attribute computer:
computed:{
        flag(){
            if(this.mark === this.sel){
                return true
            }
            return false
        }
    }
(5) Programmed navigation
Through programmable navigation in sub-components, different routes are matched according to different mark attributes to realize clicking icons to jump to corresponding pages.
change(){
            //Custom Event Communication Method
            this.$emit("changeSelected",this.mark)
            //Programming Navigation
            this.$router.push("/" + this.mark)
        }
Since we wrote Tabbar in App.vue before, it was created only once, and it will appear on all pages, but some of our pages do not need Tabbar, so we can not write it in the global, which pages need to be introduced on which page, at this time we will find that although we can achieve click-and-jump pages, but The bottom icon can't achieve click discoloration, because every jump Tabbar goes through a process from creation to destruction, so we can't assign it a fixed value in data at this time.
Original code:
data(){
        return{
            selected:"home"
        }
    }
Because we set the name attribute for each route when we configure the route, we can get its name value in $route when we print this. We assign the name value to data and pass it directly to the subcomponent for judgment, so we don't need to pass the method any more.

Determine which element in the parent component is selected by this.$route.name.
Parent component:
data(){
        return{
            selected:this.$route.name,
        }
    }
Writing all the introduced sub-component data in template is obviously cumbersome and bulky. At this time, we can write the data in the data object, and then use the v-for loop instruction to load it on the page in turn:
In data, create an array of footers and place the object data in the array:
footers:[
                {id:1,txt:"home page",mark:"home",normalImg:"../../assets/ic_tab_home_normal.png",activeImg:"../../assets/ic_tab_home_active.png"},
                {id:2,txt:"douban",mark:"audio",normalImg:"../../assets/ic_tab_audio_normal.png",activeImg:"../../assets/ic_tab_audio_active.png"},
                {id:3,txt:"Radio broadcast",mark:"broadcast",normalImg:"../../assets/ic_tab_broadcast_normal.png",activeImg:"../../assets/ic_tab_broadcast_active.png"},
                {id:4,txt:"group",mark:"group",normalImg:"../../assets/ic_tab_group_normal.png",activeImg:"../../assets/ic_tab_group_active.png"},
                {id:5,txt:"My",mark:"mine",normalImg:"../../assets/ic_tab_mine_normal.png",activeImg:"../../assets/ic_tab_mine_active.png"}
            ]
(6) v-for instruction
Loop through footers in TabItem tags:
<TabItem
            v-for="foot in footers"
            :key = "foot.id"
            :txt = "foot.txt"
            :sel = "selected"
            :mark = "foot.mark"
        >
            <img slot = "normalImg" :src = "foot.normalImg" alt = "">
            <img slot = "activeImg" :src = "foot.activeImg" alt = "">
        </TabItem>
But when you refresh the page, you will find that the icons can't be loaded, because the webpack doesn't recognize our relative path during the packaging process, and it will output the quotation marks as they are.

We need to use the require load path to introduce pictures as a module
{id:1,txt:"home page",mark:"home",normalImg:require("../../assets/ic_tab_home_normal.png"),activeImg:require("../../assets/ic_tab_home_active.png")}
And webpack will convert the image we introduced into base64-bit format, which is equivalent to putting a paragraph of text in the web page, so that when we visit it again, we don't need to send requests remotely.

After conversion, it will become larger, but it will not be much larger than before. Network request time will be reduced. Time will become 0ms to speed up access efficiency and improve user experience. This is mainly for small pictures, less than 20 kb.

Pages 5 and 404
(1) redirect: route redirect
When we visit a path that does not exist, we redirect the page to notfound, that is, when the user enters a path that does not exist in the routing table, they will all jump to 404 pages.
Create a new Notfound folder in views, write 404 pages in index.vue, and configure routing in router.
Write in index.js:
 routes: [
    {path:"/",redirect:"/home"},
    home,audio,broadcast,group,mine,
    {path:"/notfound",component:()=>import("@/views/Notfound")},
    {path:"*",redirect:"/notfound"},
  ]
The asterisk represents any path. When configuring {path:"*",redirect:"/notfound"} it should be placed at the end, otherwise all paths will jump to 404 pages, and the routing will look up the pages in order from top to bottom.
(2) router-link: routing label
Add a click to return to the home page
<router-link to = "/"> click on me to return to home page </router-link>.
6. Write header headers
(1) rem: Responsive Layout
Here we use rem to calculate the size and realize the responsive layout of the mobile terminal.
First, we create a new module folder and write rem.js, mainly iPhone 6.
document.documentElement.style.fontSize = document.documentElement.clientWidth / 3.75 + "px"
window.onresize = function(){
    document.documentElement.style.fontSize = document.documentElement.clientWidth / 3.75 + "px"
}
Introduce rem.js file in main.js
//Introduce rem.js file
import "./modules/rem.js"
(2) font-awsome: Font Icon Library
Download the css file package on font-awsome, put it in the public folder, and introduce the style in index.html.

Using font-awsome:
<i :class = "['fa','fa-' + home]"></i>
Now we want to change the header information dynamically when the routing changes. First we change the content to this form:
In template:
<div class = "left">
            <i :class = "['fa','fa-' + icon]"></i>
            <span>{{title}}</span>
        </div>
In data:
data(){
        return{
            icon:"home",
            title:"Douban Home Page",
        }
    },
At this time, we need to use the routing guard. We can do some business logic when we switch routes. First, we need to introduce global routing into the page:
import router from "@/router"
Write router.beforeEach, the global pre-routing guard, and use the switch statement to match:
created(){
        router.beforeEach((to,from,next)=>{
            switch(to.name){
                case "home":
                    this.title = "Douban Home Page"
                    this.icon = "home"
                    break;
                case "audio":
                    this.title = "Douban Video and Sound"
                    this.icon = "audio-description"
                    break;
                case "broadcast":
                    this.title = "Bean Flap Broadcasting"
                    this.icon = "caret-square-o-left"
                    break;
                case "group":
                    this.title = "Douban group"
                    this.icon = "group"
                    break;
                case "mine":
                    this.title = "Bean flaps for me"
                    this.icon = "cog"
                    break;
                default:
                    break;

            }
            next();
        })
    }
Since we write the Header component in the global App, it will be displayed on every page, but we hope that it will only be displayed when matching the specified routing. At this time, we need to set an isShow parameter value to control its display and hiding.
In data:
data(){
        return{
            icon:"home",
            title:"Douban Home Page",
            isShow:true
        }
    }
In switch: the isShow values matched to the case are all true, default is in addition to the above several cases, assigning isShow a value of false
switch(to.name){
                case "home":
                    this.title = "Douban Home Page"
                    this.icon = "home"
                    this.isShow = true
                    break;
                case "audio":
                    this.title = "Douban Video and Sound"
                    this.icon = "audio-description"
                    this.isShow = true
                    break;
                case "broadcast":
                    this.title = "Bean Flap Broadcasting"
                    this.icon = "caret-square-o-left"
                    this.isShow = true
                    break;
                case "group":
                    this.title = "Douban group"
                    this.icon = "group"
                    this.isShow = true
                    break;
                case "mine":
                    this.title = "Bean flaps for me"
                    this.icon = "cog"
                    this.isShow = true
                    break;
                default:
                    this.isShow = false
                    break;

            }
Then add v-if to div and assign isShow value
<div class = "app-header" v-if = "isShow">
So there are two ways to display and hide components:
(1) Reference wherever needed, such as Tabbar.
(2) switch cooperates with routing guards to make judgments, and uses v-if display whenever necessary, such as Header.
7. Banner Rotation Map
(1) swiper: Rotary Map Component
First install and download two modules swiper and axios:
cnpm i swiper -S perhaps yarn add swiper -S

cnpm i axios -S
It's better not to mix it up. You've been installing cnpm since you started using cnpm.
Successful installation display

Introducing swiper style into main.js
//Introduce swiper.min.css style file
import 'swiper/dist/css/swiper.min.css'
Create a new Banner folder in component, write index.vue file, and introduce swiper:
import Swiper from "swiper"
Write swiper content and render banners pictures on the page in a circular fashion
<div class = "swiper-container">
        <div class = "swiper-wrapper">
            <div
                class = 'swiper-slide'
                v-for = "banner in banners"
                :key = "banner.id"
            >
                <img width = "100%" :src = "getImages(banner.images.small)" alt = "">
            </div>
        </div>
        <div class = "swiper-pagination"></div>
Since we use the bean api, we will encounter the problem of picture 403. For the specific solution, please refer to this article:
https://blog.csdn.net/jsyxiao...
The article provides us with a way to solve this problem. Here we introduce it.
methods:{
        // Solving 403 Picture Caching Problem
        getImages( _url ){
            if( _url !== undefined ){
                let _u = _url.substring( 7 );
                return 'https://images.weserv.nl/?url=' + _u;
            }
        }
    },
Since we will use this function later, we write it in module and export it:
export default (_url) => {
    if (_url !== undefined) {
        let _u = _url.substring(7);
        return 'https://images.weserv.nl/?url=' + _u;
    }
    return true
}
Later only need to introduce:
import getImages from "@/modules/getImg"
Register this method in methods:
 methods:{
        getImages
    }
Write the name of the function directly when you use it. Pass in the src of the picture as a parameter.
<img width = "100%" :src = "getImages(movie.images.small)" alt = "">
Next we'll instantiate Swiper
new Swiper(".home-banner",{
                    loop:true,
                    pagination:{
                        el:".swiper-pagination"
                    }
                })
The reason is that there is no swiper-slide data in this place. After we send an ajax request, he will generate six swiperslide s dynamically. The banners data changes immediately. It will generate a new virtual Dom and compare it with the last virtual DOM structure. It takes time to generate a new real dom, but we instantiate it immediately, so the instantiation is long over when the real DOM rendering is complete.
The solution is that we have to wait until the new real dom rendering is completed due to data changes to avoid this problem.
(2) this.$nextTick function
So we need to write the process of instantiation in the callback function of this.$nextTick, in which the operation is to wait until the real dom rendered by the new virtual dom in the page caused by the data update is really rendered. In short, it is to wait until the page is rendered completely before proceeding. Line instantiation operation.
this.$nextTick(()=>{//In this function, because the data changes cause the page to generate a new real dom, all rendering is completed.
                new Swiper(".home-banner",{
                    loop:true,
                    pagination:{
                        el:".swiper-pagination"
                    }
                })
            })
Operation effect of banner rotation chart:

(3) axios: Send ajax asynchronous request data
Axios is a promise-based HTTP library that can be used in browsers and node.js.
Its main functions are:
- Creating XMLHttpRequests from Browsers
- Create http requests from node.js
- Support for Promise API
- Intercept requests and responses
- Transform request and response data
- Cancel the request
- Automatic conversion of JSON data
- Client Support Defense XSRF
Because there are many places where data requests are needed, each time it is troublesome to introduce axios, which can be directly bound to the prototype of the vue prototype attribute, and then accessed through this.$http:
//Introducing axios
import axios from "axios"
Vue.prototype.$http = axios;
(4) Cross-domain solution: reverse proxy
Since we are now accessing pictures of remote ports locally, cross-domain problems arise. Here we solve cross-domain problems by reverse proxying, configuring proxies in the Vue.config.js configuration file.
proxy: {//Reverse Proxy Solves Cross-Domain Problems
            "/api":{
                target:"http://47.96.0.211:9000 ", // Target Domain Name
                changeOrigin:true,//Does the domain name change?
                pathRewrite:{//What to begin with
                    "^/api":""
                }
            }
        }, // Setting up agents
At the end of the visit, the / api will be automatically cleared and the following paths will be spliced into the target domain name:
this.$http.get("/api/db/in_theaters",{
Once the configuration file changes, we need to restart the listener manually!
(5) loading pictures
When you first enter the page, there is no data loaded in, it will show an empty piece. Here you can add a loading graph to indicate that the user data is loading, hide when the data loaded in, and enhance the user experience.
The loading image is placed in the assests folder and can be used elsewhere, so we introduce it in the common style:
.loading{
    background:url(../assets/index.svg) no-repeat center;
    background-size:10%;
    height:2.4rem
}
Since we set the initial value of banner to null in data, the display and hiding of tags can be determined according to the value of banner and the v-if/v-else instruction.
<div class = "loading" v-if = "!banners"></div>
        <div class = "swiper-wrapper" v-else>
Introducing Banner Components on the Home Page
<Banner></Banner>
Loading diagram operation effect:

8. Home page list
(1) filter: filter
We need to write MovieBox components on the home page, which are nested with MovieItem components, request data in MovieBox, and pass it to MovieItem in the form of attributes.
data(){
        return{
            movies:null
        }
    },
    created(){
        this.$http.get("/api/db/in_theaters",{
            params:{
                limit:6
            }
        }).then(res=>{
            this.movies = res.data.object_list
        })
    }
MovieItem receives movies objects:
props:{
        movie:Object
    }
Insert data into the page:
<div class = "movieitem">
        <div class = "main_block">
            <div class = "img-box">
                <img width = "100%" :src = "getImages(movie.images.small)" alt = "">
            </div>
            <div class = "info">
                <div class = "info-left">
                    <div class = "title line-ellipsis">{{movie.title}}</div>
                    <div class = "detail">
                        <div class = "count line-height">Playback volume<span class = "sc">{{movie.collect_count | filterData}}</span></div>
                        <div class = "actor line-height line-ellipsis">
                            <span class = "a_title">director:</span>
                            <span class = "a_star line-ellipsis">{{movie.directors[0].name}}</span>
                        </div>
                        <div class = "rating line-height">Score:{{movie.rating.average}}</div>
                    </div>
                </div>

                <div class = "info-right">
                    <div class = "btn">
                        <span>Ticket purchase</span>
                    </div>
                </div>
            </div>
        </div>
    </div>
Loop rendering to the page in MovieBox:
<div class = "moviebox">
        <div class="loading" v-if="!movies"></div>
        <MovieItem
            v-else
            v-for = "movie in movies"
            :key = "movie.id"
            :movie = "movie"
        ></MovieItem>
    </div>
When we request data from the back end, sometimes it does not meet our actual needs. For example, the playback volume returns a large number, which is not convenient for reading and viewing. At this time, we need to set up a filter filter to process the data into the format we want. Here we set up a filter Data method. If the received data is more than 10,000, we divide the current number by 10,000, reserve a decimal number by. toFixed (), and then stitch up a "million" to display on the page. The filter must have a return value, and after processing, we will return the data data.
filters:{
        filterData(data){
            // console.log(typeof data) //num numeric type
            if(data > 10000){
                data = data /10000;
                data = data.toFixed(1)
                data += "ten thousand"
            }
            return data;
        }
    }
Use "|" in components:
<div class = "count line-height">Playback volume<span class = "sc">{{movie.collect_count | filterData}}</span></div>
(2) mint-ui: UI Library
Install mint-ui:
cnpm i mint-ui -S
Successful installation shows:

Official website provides two ways of introducing mint-ui components. The first way is to introduce mint-ui components completely, and the second way is to introduce mint-ui components on demand.

A plug-in needs to be installed when using the second way:
npm install babel-plugin-component -D

Then add the following to the babel.config.js file:
"plugins": [["component",
    {
      "libraryName": "mint-ui",
      "style": true
    }
  ]]
Insert a small BUG here. If you encounter the following problems when installing the babel module, please refer to this article to solve them.
https://segmentfault.com/a/11... The reason is that after the upgrade of babel, we abandoned the previous naming method and started the project normally by modifying the dependency and babel.config.js configuration file. There are many solutions to this pit. After trying, we found that only this article can solve the problem perfectly.

(3) Lazyload: Lazy Load Component
Implementing Lazy Loading Function
Firstly, the lazy loading module in Mint-UI is introduced.
//Introducing mint-ui related modules
import {Lazyload} from "mint-ui"
Vue.use(InfiniteScroll);
Replace the src attribute of the image with the v-lazy instruction
<img width = "100%" v-lazy = "getImages(movie.images.small)" alt = "">
In this way, the page can achieve lazy loading effect when rendering pictures, only when users need to load pictures when they slide down.

Unloaded images, real SRC attributes are temporarily stored in data-src

(4) InfiniteScroll: Unlimited Loading
mint-ui also provides a plug-in that implements pull-up loading, called InfiniteScorll, or is it referenced in main.js
//Introducing mint-ui related modules
import { Lazyload, InfiniteScroll } from "mint-ui"
Vue.use(Lazyload);
Vue.use(InfiniteScroll);
Adding v-infinite-scroll instructions to the outermost div tag in the MovieBox module can use infinite scroll.
<div class = "moviebox"
        v-infinite-scroll="loadMore"
        infinite-scroll-disabled="loading"
        infinite-scroll-distance="10"
    >

v-infinite-scroll: Method triggered when the scroll distance is less than the threshold, default value is false
infinite-scroll-disabled: If true, infinite scroll will not be triggered
infinite-scroll-distance: scroll distance threshold (pixels) for triggering loading methods
infinite-scroll-immediate-check: If true, the instruction is bound to the element and immediately checks whether the loading method needs to be executed. It is very useful when content may not support the container in the initial state. The default value is true, and changing to false does not execute the loadMore method
We write the loadMore method in methods to achieve infinite scrolling
methods:{
        loadMore(){
            console.log("loadmore")
            }
        },
    }
As long as the infinite scroll opens, the loadMore method will be executed by default once when the page is created, so we encapsulate the code previously written in create into a getMovies method written in methods and triggered in loadMore.
methods:{
        loadMore(){
            console.log("loadMore")
            this.getMovies();
        },
        getMovies(){
            this.$http.get("/api/db/in_theaters",{
            params:{
                limit:6
            }
            }).then(res=>{
                this.movies = res.data.object_list
            })
        }
    }
When infinite-scroll-disabled value is false, infinite scroll will start. We assign load to infinite scroll-disabled, so we need to define loading in data and assign false, so that it triggers infinite scroll by default.
data(){
        return{
            movies:null,
            loading:false,//Default triggers infinite scroll
        }
    }
When we continue to slide down, we need to request the parameters of the second page, so we need to use the page attribute. When we request data, we need to implement dynamic loading. So we need to configure limit and page separately.
data(){
        return{
            movies:null,
            loading:false,//Default triggers infinite scroll
            limit:6,
            page:1,
        }
    }
Using deconstruction assignment to params, page++ is executed in the. then function
getMovies(){
            // Deconstruction
            let{page,limit} = this;
            this.$http.get("/api/db/in_theaters",{
            params:{
                limit,
                page
            }
            }).then(res=>{
                this.movies = res.data.object_list
                this.page++
            })
        }
At this time, we found that the data we requested after the first page covered the previous data. The effect we want to achieve is to accumulate on the basis of the first page, so we need to initialize movies into an empty array.
movies:[],
The concat method of arrays is used to splice arrays on the original basis, and a new array is returned and assigned to movies.
//Stitching arrays on the original basis and returning new arrays
                this.movies = this.movies.concat(res.data.object_list)
At this point, we can achieve the effect of downloading new content, but there is another problem. From the result of data request, the same loadMore method is triggered many times.

We only need to request it once, so we need to shut down loadMore temporarily when we request data.
this.loading = true;
Open it again in the. then function when the data comes back
this.loading = false;
This will not trigger the infinite scroll method frequently, but now even if there is no data, it will send data requests, so we need to set a parameter to monitor whether there is more data, prompt users when there is no data, and prevent subsequent operations.
hasMore:true //Is there more data? By default, there is more data
Write a judgment statement in the. then function. If it is greater than the total number of pages multiplied by limit, then assign hasMore a false value. At the same time, return false prevents subsequent operations. This step needs to be placed in front of page+.
if(this.limit * this.page >= res.data.total){ //Judge if there is more data
                        this.hasMovies = false //Assign hasMovies to false when no more data is available, return false, and do not execute the following page++.
                        return false
                    }
this.page++
Write a judgment statement in loadMore. If hasMore is false, close the infinite scroll and stop the getMovies method. No more ajax requests are sent, and the loadMore method is not triggered frequently.
loadMore(){
            if(!this.hasMore){
                this.loading = true //Turn off infinite scrolling without more data and return false without performing the next operation
                return false
            }
            this.getMovies();
        }

(5) Toast: pop-up box component
In order to give users a good use experience, we need to give users a hint when the data is loaded. At this time, we need to use the Toast pop-up box component. First, we load the module in MovieBox, because Toast can not be used as a global variable, and can only be introduced in real time.
import {Toast} from "mint-ui"
duration is the number of milliseconds that persist. If you want it to be displayed all the time, you only need to assign a value of - 1. Executing the Toast method returns a Toast instance, each of which has a close method for manually closing Toast.

Before requesting data, place a Toast to indicate that user data is loading
let instance = Toast({
                message: 'Loading in progress...',
                duration: -1,
                iconClass:"fa fa-cog fa-spin"
            })
After loading, the close method is called in the. then function to close the pop-up box.
instance.close();
Because I made a mistake using toast style in mint-ui, I used Vant instead. Vant is a lightweight and reliable mobile-side Vue component library. Its parameter settings are similar to mint-ui. It is defined by vant.Toast:
const toast1 = vant.Toast.loading({
                message: 'Loading in progress',
                duration: 0,
            })
When duration is 0, it does not automatically close. Assign it to a constant and close it by the. clear () method.
toast1.clear();

toast Bullet Window Effect:

9. Tab Switching
(1) watch monitoring data changes
We need to add a tab to the home page that is being and will be shown, and define an array of navs in the data by dynamically loading the data.
data(){
      return{
        type:"in_theaters",
        navs:[
          {id:1,title:"It's hot",type:"in_theaters"},
          {id:2,title:"Upcoming release",type:"coming_soon"},
        ],
      }
    }
Cycling through the array in span, rendering data on the page, adding the calss name of "active" and the method of clicking on the event, changing the type value when the mouse clicks on the option, and judging whether the type is equal to nav.type, adding the active selection style when the type is equal, to achieve the effect that the clicked option becomes the selected state. Fruit.
<div class = "navbar"">
          <span
            v-for = "nav in navs"
            :key = "nav.id"
            :class  = "{'active':type === nav.type}"
            @click = "type = nav.type"
          >{{nav.title}}</span>
        </div>
Since we used the address / api/db/in_theaters to request data in MovieBox, we can only request data that is being hot-mapped now. We need to pass the type value to MovieBox.
<MovieBox :type = "type"></MovieBox>
MovieBox Receiver
props:["type"],
Then change intheaters to this.type to realize dynamic switching request interface
this.$http.get("/api/db/" + this.type,{
In order to display different data when clicking switch, we need to let MovieBox do follow-up operation according to the change of type value. At this time, we need to use watch to monitor the change of type value. When type value changes, we need to do some business logic processing to empty the original movies array and page from the first page. At first, hasMore assigns true, and then triggers the getMovies method again to request more data.
watch:{
        type(){
            this.movies = [];
            this.page = 1;
            this.hasMore = true;
            this.getMovies();
        }
    }
Tab switching effect:

10. Fixed Options Bar
(1) created hook function
When the page scrolls down to a certain height, we need to fix the option bar. To achieve this effect, we first define a data isfixed in the data, with an initial value of false.
isfixed:false,
When scrolling to a certain height, the value is true, while dynamically binding class to the option bar and page content, adding a fixed positioning style
<div class = "tab" :class = "{fixedTop:isfixed}">
<div :class = "{fixedBox:isfixed}">
We listen for scroll events in the create function to get the scroll height of the page. To avoid triggering the event repeatedly, we trigger the event when the scroll height is greater than 50 and the isfixed value is false.
 created(){//Initialize some life cycle related events
      window.addEventListener("scroll",e=>{
        //Get the scroll height
let sTop = document.documentElement.scrollTop || document.body.scrollTop;
        if(sTop >= 50 && !this.isfixed){
          this.isfixed = true;
        }else if(sTop < 50 && this.isfixed){
          this.isfixed = false;
        }
    })
Now you can scroll a certain distance, the option bar fixed effect, but we will find that other pages scroll also trigger this effect, so we will write this function in methods, redefine a method listenScroll():
methods:{
      listenScroll(e){
        //Get the scroll height
        let sTop = document.documentElement.scrollTop || document.body.scrollTop;
        if(sTop >= 330 && !this.isfixed){
          this.isfixed = true;
        }else if(sTop < 300 && this.isfixed){
          this.isfixed = false;
        }
      }
    }
Add this method to create:
created(){//Initialize some life cycle related events
      window.addEventListener("scroll",this.listenScroll)
    },
(2) beforeDestory hook function
Then destroy this method when leaving the current page:
beforeDestory(){//Component replacement, equivalent to executing a destruction operation when a component is destroyed
      window.removeEventListener("scroll",this.listenScroll)
    },
So it doesn't interfere with the business logic of other pages.
11. Record Caching
(1) keep-alive: cache tags
When we switch between components, we want to keep the browsing status of the home page and not let it be rendered repeatedly. At this time, we need to use the keep-alive tag, wrap the cached content, and select the name-matching component through the include attribute.
<keep-alive include = "home">
      <router-view></router-view>
</keep-alive>
At this point, our home component will be cached, so his create function will only be executed once, it will not be destroyed, and the beforeDestory method will not be executed, so our previous methods need to be written in the active and de activated life cycle hook functions.
(2) activated and deactived life cycle functions
Actated and de activated are triggered only in nested components within the < keep-alive > tree.
activated(){
      window.addEventListener("scroll",this.listenScroll)
    },
    deactivated(){
      window.removeEventListener("scroll",this.listenScroll)
    }
At this time, we will find a problem, when we leave this component, he will complete the data request at one time, so we need to assign this.loading value to true in deactived method, turn off infinite scrolling, and open it again in active.
activated(){
      window.addEventListener("scroll",this.listenScroll)
      this.loading = false;//Open infinite scroll
    },
    deactivated(){
      window.removeEventListener("scroll",this.listenScroll)
      this.loading = true;//Turn off infinite scroll
    }
At the same time, when entering from other components, this.isfixed needs to be reassigned to false, otherwise it will always be fixed.
deactivated(){
      window.removeEventListener("scroll",this.listenScroll)
      this.isfixed = false;
      this.loading = true;//Turn off infinite scroll
    }
(3) beforeRouteLeave hook function
We get the scroll height in beforeRouteLeave through document.documentElement.scrollTop
beforeRouteLeave(to,from,next){
      this.homeTop = document.documentElement.scrollTop;
      next();
    }
(4) scrollTo method
Add window.scrollTo method to activate to record scrollbar position
activated(){
      window.addEventListener("scroll",this.listenScroll)
      window.scrollTo(0,this.homeTop)
    }
Or you can jump record scrollbar position by assigning document.documentElement.scrollTop to this.homeTop
document.documentElement.scrollTop = this.homeTop
keep-alive tag caching effect:

12. Return to the top
(1) Custom directives
We need to add a component to the home page that returns to the top, and define an isShow parameter in data with v-if instructions to control the display and hiding of the return top button, which does not appear at the beginning by default.
data(){
        return {
            isShow:false
        }
    }
Because we added keep-alive in the parent component, we can also use activated and deactivated methods in the child component, or listenScroll methods in the methods, specifying that they should be displayed when scrolling to 200px.
methods:{
        listenScroll(){
            let sTop = document.documentElement.scrollTop || document.body.scrollTop
            //Avoid repetitive triggering
            if(sTop >= 200 && !this.isShow){
                this.isShow = true;
            }else if(sTop < 200 && this.isShow){
                this.isShow = false;
            }
        },
    }
Add and remove operations in two hook functions.
activated(){
        window.addEventListener("scroll",this.listenScroll)
    },
    deactivated(){
        window.removeEventListener("scroll",this.listenScroll)
    }
We need to implement the click button to return to the top of the operation, we need to bind the click event to the button.
<div class="back-top-box" v-if = "isShow" @click = "backTop">
At the same time, write backTop method in methods
backTop(){
            window.scrollTo(0,0)
        }
But if the page can also double-click the option bar to return to the top, it is more troublesome to repeat the binding event, then we can write this method as a custom instruction, and then we need to add instructions on the label of this function.
That is to encapsulate custom instructions in modules and get the time type by binding.arg. The default is click:
//v-backtop allows you to return to the top
import Vue from "vue"
Vue.directive("backtop",{
    bind(el,binding,vnode){
        let eventType = binding.arg || "click";
        el.addEventListener(eventType,e=>{
            window.scrollTo(0,0)
        })
    }
})
Register in main.js
//Introducing directive
import "./modules/directive"
Add custom instructions to the button to click back to the top
<div class="back-top-box" v-if = "isShow" v-backtop>
Add custom instructions to the selection bar to double-click back to the top
<div class = "tab" :class = "{fixedTop:isfixed}" v-backtop:dblclick>
Return to the top run effect:

13. Film Details Page
(1) Dynamic routing
Create a MovieDetail page to configure dynamic routing via: id
export default {
    name:"moviedetail",
    path:"/moviedetail/:id",
    component:()=>import("@/views/Movie/MovieDetail")
}
Introduce and register in index.
import moviedetail from "./moviedetail"
Add router-link in MovieItem to dynamically transfer the parameter movie.id.
<router-link
        :to = "{name:'moviedetail',params:{id:movie.id}}"
        tag = "div"
        class = "main_block">
Assign the retrieved res.data to movie
getMovie(){
            this.$http.get("/api/db/movie_detail/" + this.$route.params.id).then(res => {
                this.movie = res.data
            })
        }
After rendering the data we need dynamically to the page, we add a Header component in Mint-UI, assigning the title to movie.title, adding the return button, and introducing the Header component in main.js.
import { Lazyload, InfiniteScroll, Header, Button } from "mint-ui"
Vue.component("mt-header", Header);
Vue.component("mt-button", Button);
Inserting the mt-header tag into the page can now achieve the effect of clicking and jumping to the corresponding movie details page.
<mt-header fixed :title="movie.title">
                <router-link to="/" slot="left">
                    <mt-button icon="back">Return</mt-button>
                </router-link>
                <mt-button icon="more" slot="right"></mt-button>
            </mt-header>
Details page operation effect:

14. Shopping cart effect
(1) vuex official state management tool
vue provides a global state management tool, which mainly deals with state sharing among multiple components in a project
Vuex is an official state management tool of vue. What is state? We have a concept in front-end development: data-driven, any display in the page is different, there should be a data control, and this data is also called state, state.
In vue. Data transmission and communication between components are very frequent, and the communication functions between parent and child components and non-parent and child components are relatively perfect. However, the only difficulty is data sharing among multi-components, which is handled by vuex.
Next we need to achieve a shopping cart effect, first configure a bottom navigation bar:
In the mine component, two new components are created, one is the cart car page, the other is the shopping list page. In the mine routing, the second-level routing is configured.
//Configuration of secondary routing
    children:[
        {path:"",redirect:"list"},
        {path:"list",component:()=>import("@/views/Mine/List"),name:"list"},
        {path:"car",component:()=>import("@/views/Mine/Car"),name:"car"},
    ]
router-view is used to display secondary component pages in mine, tabbar bottom navigation component in mint-ui is introduced and registered in main.js.
//Introducing mint-ui related modules
import { Lazyload, InfiniteScroll, Header, Button, Tabbar, TabItem } from "mint-ui"
Vue.component("mt-tabbar", Tabbar);
Vue.component("mt-tab-item", TabItem);
Introduce in mine page, load item data dynamically on the page, add router-link to realize click-jump function
<mt-tabbar>
           <mt-tab-item
            v-for="nav in navs"
            :key="nav.id"
           >
            <router-link :to = "{name:nav.name}" active-class = "active">
              <img :src = "nav.src">
              {{nav.title}}
            </router-link>
           </mt-tab-item>
 </mt-tabbar>
You can install the Vue Devtools plug-in to see the status of vuex

(2) the creation of vuex
- Create store:
import Vue from 'vue'
import Vuex from 'vuex'

Vue.use(Vuex)

import state from "./state"
import getters from "./getters"
import mutations from "./mutations"
import actions from "./actions"
export default new Vuex.Store({
    state,
    getters,
    mutations,
    actions
})
- Setting state
State is a pure object with some state mounts declaring a shared data
export default {
    num:0//Declare a shared data
}
- Configure store in the root instance
In this way, we can use the api for store in any component through this.$store

- Using state in components
Because the store can be accessed through this.$store in the component
So we can also use this.$store.state to use the data managed in state and write it in data.
data(){
        return{
            num:this.$store.state.num
        }
    }
Data can then be obtained by {{num}}.
However, we found that in this way, the vue component would not be re-rendered when the state data changed.
That is to say, if we want to use responsively in components, we need to use computed attributes.
computed:{
    num(){
        return this.$store.state.num
    }
}
This is a very interesting way to write, and if you use more states, it will create a sense of redundancy, so vuex provides a mapState auxiliary function to help us get and use the state stored in the store of vuex in components, but mapState is also an object, and objects can not nest objects.
computed:{
        mapState({
            num:state => state.num
        })
    }
So we can write as follows:
computed:mapState(["num"])
Or expand mapState with...
computed:{
        ...mapState({
            num:state => state.num
        })
    }
But if num is already in the component, and the name of the data in the state is also called num, it will conflict. At this time, we can give the state an individual name when the component uses state:
computed:{
        ...mapState({
            _num:state => state.num //The equivalent of getting num through this.$store.state.num
        })
    }
- getters
Sometimes, we need to derive a new state according to a state in the state. For example, we have a num in the state. In some components, we need to use a state twice that of num. We can create it through getters.
export default{
    doubleNum(state){
        return state.num*2
    }
}
Once created, the data in the component is retrieved through this.$store.getters.doubleNum
Of course, vuex also provides mapGetters auxiliary functions to help us use the state in getters in components, and the method used is the same as mapState, which can be expanded and assigned.
import {mapState,mapGetters} from "vuex"
export default {
    computed:{
        ...mapState({
            _num:state => state.num //The equivalent of getting num through this.$store.state.num
        }),
        ...mapGetters(["doubleNum"])
    }
Write method names directly in double parentheses when using
{{doubleNum}}
- Change state using mutations
We can't change state directly in the component: this.$store.state.num=2. Instead, we need to use mutations, which are also pure objects and contain many ways to change state.
export default{
    changeNum(state) {
        state.num++
    }
}
The parameters of these methods receive state and change in the body of the function. At this time, the data used by the component will also be changed to achieve response.
But we can't call mutations directly either. We need to call mutations using this.$store.commit. The first parameter is the method name of the call, and the second parameter is the passing parameter.
methods:{
        changeNum(){
            this.$store.commit("changeNum")
        }
    }
vuex provides a mapMutations method to help us call mutations in components, using the same method as mapState and mapGetters, but it is written in methods.
methods:{
        ...mapMutations(["changeNum"])
    }
- Define a method name as a constant
To prevent the method name from being changed, we usually define it separately in a constant file const.js, which is introduced when used.
import { CHANGE_NUM} from "./const"
export default{
    CHANGE_NUM(state) {
        state.num++
    }
}
But after this definition, we can only use the name CHANGE_NUM. When the name of a constant changes, it will not change synchronously. So we need to wrap a middle bracket around it to make it a variable [CHANGE_NUM], which is convenient for us to maintain and manage.
//Introduce
import {CHANGE_NUM} from "@/store/const"
//register
methods:{
        ...mapMutations([CHANGE_NUM])
    }
//Use
<button @click = "CHANGE_NUM">click NUM!</button>
- Use actions to handle asynchronous operations
Action is similar to mutation, except that it submits mutation rather than changing state directly. Action can contain any asynchronous operation.
That is to say, if there is a requirement to change state after an asynchronous process, we should call actions first in the component to do the asynchronous action, and then the actions call mutation to change the data.
import { RANDOM_NUM } from "./const"
export default{
    getNumFromBackend(store){//actions usually make asynchronous requests to get data and then dispatch specific methods of changing state in mutations.
        setTimeout(()=>{
            //Get a random value of 100
            let randomNum = Math.floor(Math.random()*100)
            store.commit(RANDOM_NUM, randomNum)//The store parameter in actions is used to dispatch the specific method in mutations to change the value of state.
        },1000)
    }
}
mutations receive random numbers from actions and assign them to States
import { CHANGE_NUM, RANDOM_NUM} from "./const"
export default{
    [CHANGE_NUM](state) {
        state.num++
    },
    [RANDOM_NUM](state,randomNum){
        state.num = randomNum//Assigning random numbers to States
    }
}
Click button to trigger event in front page
<button@click="getRandom">num value appears randomly! </button>
After the state changes, execute render and render the view again to get the latest state
getRandom(){
            //Dispatch action
            this.$store.dispatch("getNumFromBackend")
        }
Call the actions method in the component through this.$store.dispatch method
Of course, mapActions can also be used as an aid.
...mapActions(["getNumFromBackend"])
Write the method name in actions directly when you use it.
<button @click= "getNumFromBackend"> num value appears randomly! </button>
- modules for modular partitioning
When there is more data information, we put files belonging to the same module into a module to manage, create myNum folder, and put actions, const, getters, mutations, state directly into myNum to manage.
Create index.js file in myNum file to export each module
import state from "./state"
import mutations from "./mutations"
import actions from "./actions"
import getters from "./getters"
export default{
    state,mutations,actions,getters
}
Re-introduction in index.js
import myNum from "./myNum"
export default new Vuex.Store({
    modules:{
     myNum
    }
})
Now let's change the reference path in the front-end page
import {CHANGE_NUM} from "@/store/myNum/const"
We can't get the num value through state.num.

We need to nest another layer of myNum outside.
...mapState({
            _num:state => state.myNum.num
        })
(3) Next we will achieve the effect of a shopping cart.
First create the myCar folder in the store, and then create it in turn
- state.js: Store shared data
- actions.js: Asynchronous requests
- const.js: Constant name
- mutations.js: A way to change state
- getters: Delivery of a new state based on a state
- index.js: Summary
Introduce these files in index.js in turn
import state from "./state"
import mutations from "./mutations"
import actions from "./actions"
import getters from "./getters"
export default{
    state,mutations,actions,getters
}
Introduce index in myCar in store/index.js
import myNum from "./myNum"
import myCar from "./myCar"
export default new Vuex.Store({
    modules:{
        myNum,
        myCar
    }
})
Define an empty array cars in state.js
export default {
    cars:[]//Declare a shared data
}
In this way, we can get the car data in the state, which is empty by default.

Here we use cell components in mint-ui to build pages, carrying each item of shopping. Register in main.js first
import { Lazyload, InfiniteScroll, Header, Button, Tabbar, TabItem,Cell} from "mint-ui"
Vue.component("mt-cell", Cell);
Then we can use it through mt-cell.
<mt-cell
            title = 'Title text'
            value = 'Linked'
            label = "Descriptive information"
        >
        <img slot = "icon" src = "" alt = "">
        </mt-cell>
Put the shopping data we get into goods.json in the api under the static folder of public
{
    "dealList":[
        {
            "firstTitle": "Single person",
            "title":"46oz One barrel of original popcorn+22oz Coke 1 cup",
            "price": 33,
            "dealId": 100154273,
            "imageUrl":"https://p0.meituan.net/movie/5c30ed6dc1e3b99345c18454f69c4582176824.jpg@388w_388h_1e_1c",
            "curNumberDesc": "Selling 379"
        },
        {
            "firstTitle": "Single person",
            "title": "46oz One barrel of original popcorn+22oz Sprite 1 cup",
            "price": 33,
            "dealId": 100223426,
            "imageUrl": "https://p0.meituan.net/movie/5c30ed6dc1e3b99345c18454f69c4582176824.jpg@388w_388h_1e_1c",
            "curNumberDesc": "Saled 12"
        },
        {
            "firstTitle": "Single person",
            "title": "One portion of imported food",
            "price": 8.89,
            "dealId": 100212615,
            "imageUrl": "https://p1.meituan.net/movie/21f1d203838577db9ef915b980867acc203978.jpg@750w_750h_1e_1c",
            "curNumberDesc": "Selling 8"
        },
        {
            "firstTitle": "Double person",
            "title": "85oz One barrel of original popcorn+22oz Two Cokes",
            "price": 44,
            "dealId": 100152611,
            "imageUrl": "https://p0.meituan.net/movie/bf014964c24ca2ef107133eaed75a6e5191344.jpg@388w_388h_1e_1c",
            "curNumberDesc": "Saled 647"
        },
        {
            "firstTitle": "Double person",
            "title": "85oz One barrel of original popcorn+22oz Sprite two cups",
            "price": 44,
            "dealId": 100223425,
            "imageUrl": "https://p0.meituan.net/movie/bf014964c24ca2ef107133eaed75a6e5191344.jpg@388w_388h_1e_1c",
            "curNumberDesc": "Selling 6"
        },
        {
            "firstTitle": "Many people",
            "title": "85oz One barrel of original popcorn+22oz Coke 2 cups+Glacier Age Water Bottle",
            "price": 55,
            "dealId": 100152612,
            "imageUrl": "https://p1.meituan.net/movie/c89df7bf2b1b02cbb326b06ecbbf1ddf203619.jpg@388w_388h_1e_1c",
            "curNumberDesc": "Saled 89"
        }

    ]
}
First declare a data data store for goods.
data(){
        return{
            goods:[],
        }
    }
Define method getGoods asynchronous request data
methods:{
        getGoods(){
            this.$http.get("/api/goods.json").then(res=>{
                console.log(res)
            })
        }
    },
Call it in the life cycle hook function
created(){
        this.getGoods()
    }
You can get the data on res and assign it to goods
getGoods(){
            this.$http.get("/api/goods.json").then(res=>{
                // console.log(res)
                this.goods = res.data.dealList;
            })
        }
Cyclic rendering in mt-cell
<mt-cell
            :title="good.title"
            :label="'¥'+good.price"
            v-for="good in goods"
            :key="good.dealId"
        >
        <mt-button type = "danger" size = "small" @click = "addGoodInCar(good)">purchase</mt-button>
        <div class = "firstTitle">{{good.firstTitle}}</div>
        <img width ="70" height = "70" slot="icon" :src="good.imageUrl" alt="">
        </mt-cell>
The real request for shopping cart information should be asynchronous from the background. Now we rely on the local storage as the background to simulate the background database and store our cars data.
function getCar(){
    return JSON.parse(localStorage.cars ? localStorage.cars : "[]")
}
Now write the addGoodInCar method to add goods to the shopping cart in action.js
addGoodInCar(store,goodInfo){//Add merchandise to shopping cart
        setTimeout(()=>{
            //Get the shopping cart back in the background
            let cars = getCar();//[{}]
            let isHas = cars.some(item => {//Determine whether the original shopping cart has this item
                if (item.dealId === goodInfo.dealId){//If equal representation is added to the same commodity
                item.num++//Number of Goods +
                return true;}
            })
            if (!isHas) {//Shopping cart does not have this item
                goodInfo.num = 1;//The number of commodities assigned to 1
                cars.push(goodInfo)//Adding goods to cars data
            }
            //Notify background to change cars
            localStorage.cars = JSON.stringify(cars)
            //The previous section needs to change cars in the state by mutations.
            store.commit(SYNC_UPDATE, cars)
        },1000)
    }
Declare a constant in const
const SYNC_UPDATE = "SYNC_UPDATE"
export { SYNC_UPDATE }
Define the method of updating data in mutations
import { SYNC_UPDATE} from "./const"
export default{
    [SYNC_UPDATE](state,newCar){
        state.cars = newCar;
    }
}
Call this method in actions
store.commit(SYNC_UPDATE, cars)
Call this method in the front page
import {mapActions} from "vuex"

methods:{
        ...mapActions(["addGoodInCar"])
    }
Add a click event to the mt-button and pass the good parameter to the past
<mt-button type = "danger" size = "small" @click = "addGoodInCar(good)">purchase</mt-button>
Click on the button in the page, and after a second, the car gets a product information, click again, num attribute ++, becomes 2.

Write a way to get a shopping cart in actions
initCar(store){
        //Get a shopping cart
        let cars = getCar()
        store.commit(SYNC_UPDATE,cars)
    }
Called in the create hook function of global App.js, so that other components can get the data on cars, and the data shared by multiple components can be managed in vuex.
created(){
      //Let the page go to the front page and trigger the router. beforeEast function in the Header, otherwise the Header will appear again.
      this.$router.push("/")
      //Initialize shopping cart
      this.$store.dispatch("initCar")
    }
Refer to list, start writing car.vue page, it does not need to request data, just need to display data, you can use mapState to assist in displaying data in state.
import {mapState} from "vuex"
export default {
    computed:{
        ...mapState({
            cars:state=>state.myCar.cars
        })
    }
}
The v-for loop above fetches data directly from cars
v-for="good in cars"
Change button to "+" and "-"
<mt-button type = "danger" size = "small" @click = "addGoodInCar(good)">+</mt-button>
<mt-button type = "danger" size = "small" @click = "addGoodInCar(good)">-</mt-button>
Introducing addGoodInCar Method
import {mapState,mapActions} from "vuex"
export default {
    computed:{
        ...mapState({
            cars:state=>state.myCar.cars
        })
    },
    methods:{
        ...mapActions(["addGoodInCar"]])
    }
}
Writing methods to reduce commodities in actions
reduceGoodInCar(store,goodInfo){
        //Get the shopping cart back in the background
        let cars = getCar();
        cars = cars.filter(item=>{
            if (item.dealId === goodInfo.dealId){
                item.num--
            }
            return true;
        })
        //Notify background to change cars
        localStorage.cars = JSON.stringify(cars)
        //The previous section needs to change cars in the state by mutations.
        store.commit(SYNC_UPDATE, cars)
    }
Add a judgment after item -- when the number is less than or equal to 0, direct return false to organize subsequent operations
if(item.num<=0) return false
Next, we add a function to calculate the total price on the page. Because we have to rely on the change of quantity and unit price to calculate the total price, we need to write this method in getters.
export default{
    computedTotal(state){
        let cars = state.cars;//In the same module, you can get it directly from state.cars
        let total = {price:0,num:0} //Declare a total object to store the total price and quantity
        cars.forEach(item=>{
            total.price += item.price * item.num; //The total price is equal to the price of the commodity multiplied by the quantity.
            total.num += item.num //Total accumulation
        })
        return total //Returns the total object
    }
}
Introducing Computer Total Method with the Aid of mapGetters
import {mapState,mapActions,mapGetters} from "vuex"
export default {
    computed:{
        ...mapState({
            cars:state=>state.myCar.cars
        }),
        ...mapGetters(["computedTotal"])
    },
    methods:{
        ...mapActions(["addGoodInCar","reduceGoodInCar"])
    }
}
Click to increase the number of items, and you will find that the total number sometimes appears in many decimal places. We need to process the data of the price we get.
total.price = total.price.toFixed(2)//Integrate upwards and keep two decimal places
On the front page, we control the display and hiding of commodity information through v-if and v-else. When there is no commodity, we display a p-label, which indicates that the user has no commodity, and provides a router-link to jump back to the commodity list page.
<p v-if = "cars.length === 0">
            //There's no merchandise left.
            <router-link to = "/mine/list">Click here to buy goods</router-link>
        </p>
        <div v-else>
            <mt-cell
                :title="good.title"
                :label="'¥'+good.price+'*'+good.num"
                v-for="good in cars"
                :key="good.dealId"
            >
            <mt-button type = "danger" size = "small" @click = "addGoodInCar(good)">+</mt-button>
            <mt-button type = "danger" size = "small" @click = "reduceGoodInCar(good)">-</mt-button>
            <div class = "firstTitle">{{good.firstTitle}}</div>
            <img width ="70" height = "70" slot="icon" :src="good.imageUrl" alt="">
            </mt-cell>
        </div>
Shopping cart operation effect:

15. Packing on-line
(1) Modify configuration files
Find the Vue-config.js configuration file for the project, and in module.exports change publicPath: to:'/v-douban/'

At the same time, the path of the local request also needs / v-douban

(2) Packing documents
Execute yarn build packaged into dist file packages
(3) Connect FTP server and modify nginx
Enter the / usr/local/nginx/conf directory and transfer the nginx.config file to the local location.

Modify the nginx.config file to configure the data interface agent.
location /api/db {
            proxy_pass http://47.96.0.211:9000/db;
        }

        location /data/my {
            proxy_pass http://118.31.109.254:8088/my;
        }

        location /douban/my {
            proxy_pass http://47.111.166.60:9000/my;
        }
Upload a new nginx.config file to the server to overwrite the original file.

Connect the database at the terminal and restart the nginx server.
./nginx -s reload

Since we used the https path in this configuration, we need to start the SSL function.
Refer to this article:
https://www.cnblogs.com/pisce...
After installation, check whether the configuration file is updated:

Enter the / usr/local/nginx/html directory to create a v-douban folder
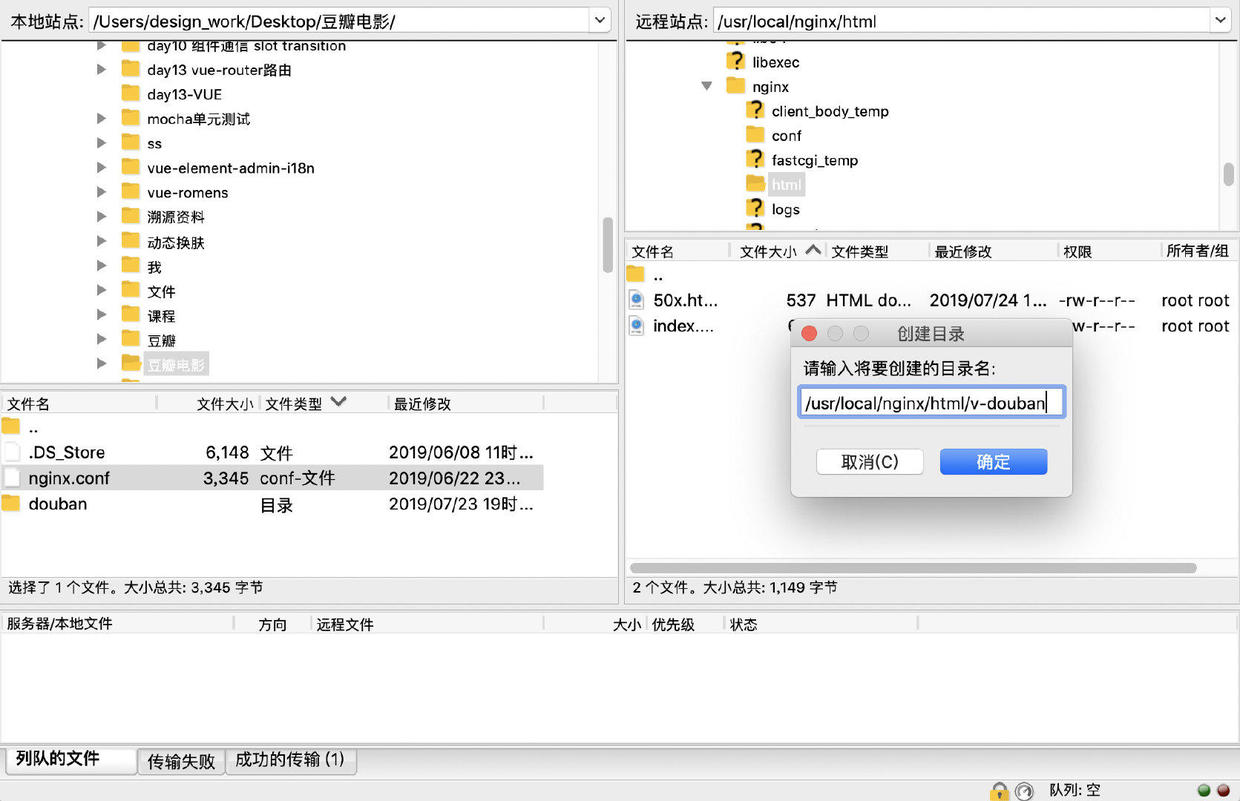
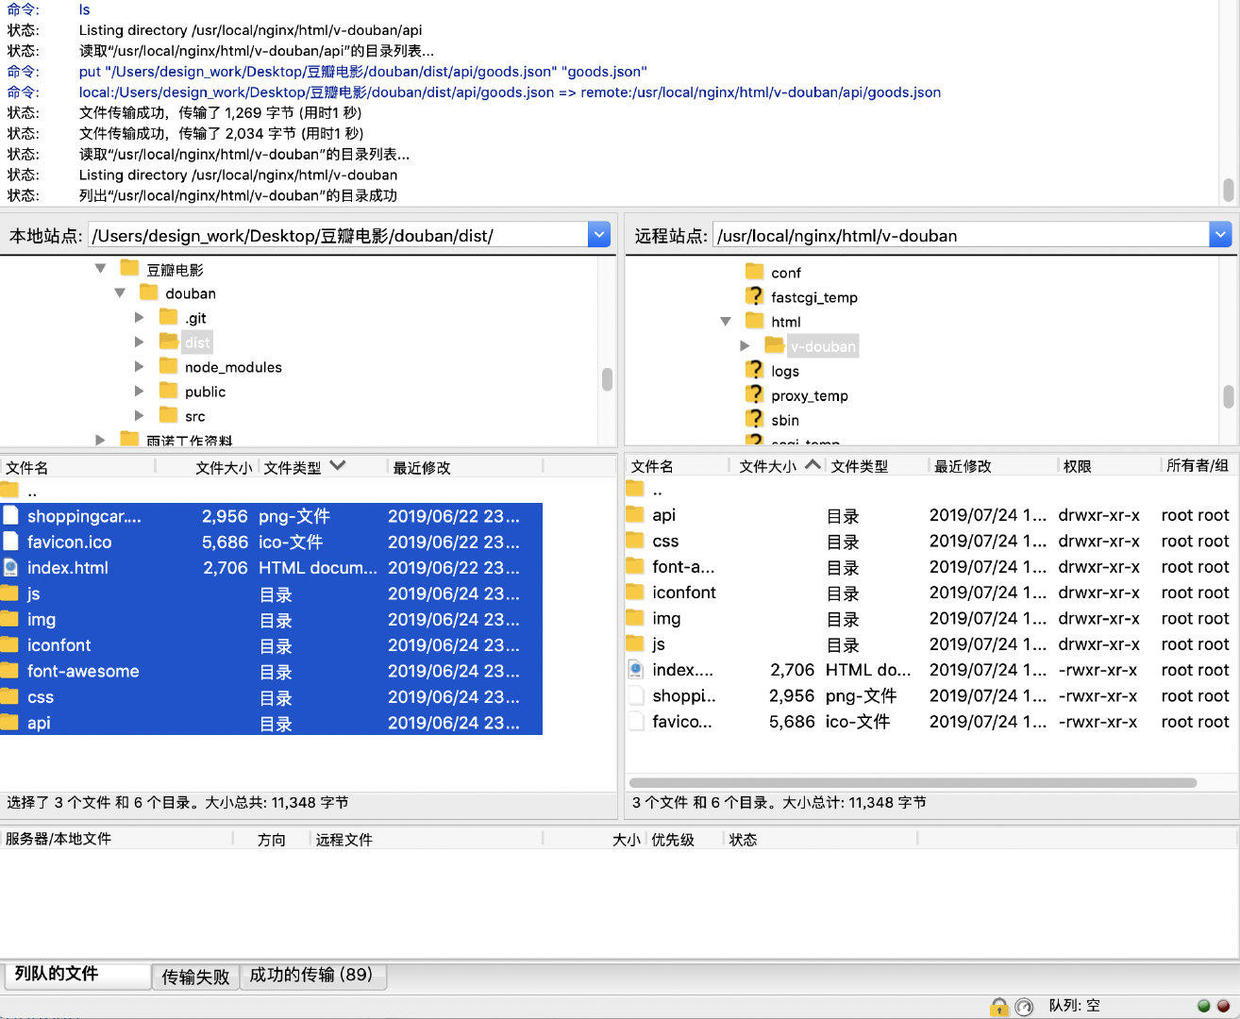
Upload all files in the packaged dist folder to the server

Once the transmission is completed, the online project can be accessed in the web page. http://39.96.84.220/v-douban
Online browsing effect:


Epilogue
Although it is a simple copying project, but also encountered many problems in the process of writing, thanks to the help of friends, the road of learning has never been smooth, constantly surpassing the self can grow stronger slowly. As for the problems encountered in the project, you are welcome to discuss them together. Your support is my greatest motivation.