Since we've been working on several Ceph projects recently, basically 50 nodes, we often use PXE technology in our projects to automate system installation and improve efficiency. It might be said that PXE technology is too old to understand, but I think it's very useful, especially in project-based projects.So today's experiment is to deploy the PXE remote installation service in the SLES15SP virtual machine environment, using AutoYast tools, to automate the installation of SLES15SP1 system in another virtual machine.
Experimental environment
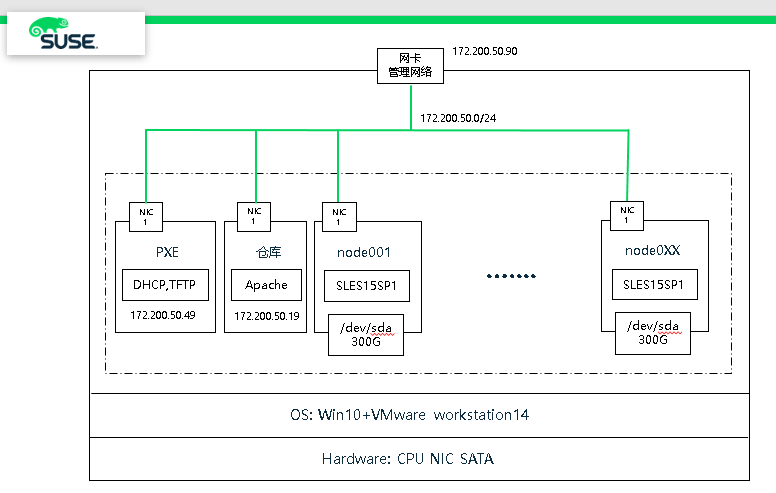
This environment still deploys virtual machines in win10 + VMware workstation, starting with a PXE server, DHCP and TFTP services, and an SLES system warehouse.Then the SLES15SP1 system is automatically installed by PXE technology.
Environment Setup
1. PXE Server Environment Setup and System Installation
Refer to these two articles:
(1)Detailed steps for setting up the SUSE Storage6 environment - Win10 + VMware WorkStation(
(2)SUSE Linux Enterprise 15 SP1 System Installation
- PXE Virtual Machine: 30GB system partition settings, system partition recommended as follows partition table
|
Partition name |
Device File Name |
Partition capacity |
file system |
|
/boot |
/dev/sda1 |
1 GB |
XFS |
|
vg00 |
/dev/sda2 |
29 GB |
-- |
|
/ |
/dev/vg00/lvroot |
28 GB |
XFS |
|
swap |
/dev/vg00/lvswap |
1 GB |
Swap |
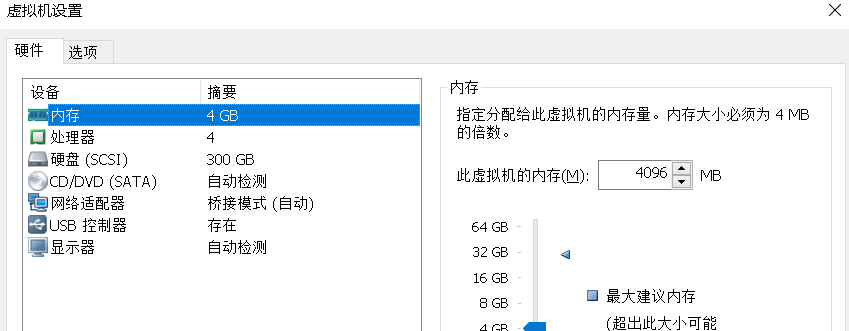
- PXE client: 300GB system partition, simulate physical environment
|
Partition name |
Device File Name |
Partition capacity |
file system |
|
/boot |
/dev/sda1 |
1 GB |
XFS |
|
vg00 |
/dev/sda2 |
200 GB |
-- |
|
/ |
/dev/vg00/lvroot |
184 GB |
XFS |
|
swap |
/dev/vg00/lvswap |
16 GB |
Swap |
Note: 300GB disk space, we only use 200GB, not use all disk space mainly because automatic partitioning under PXE environment does not allow more than 1 byte, try to use less than 300GB space size to partition, it is not enough to expand online through LVM.
II. SLES15 PXE Deployment
1. Configuring DHCP services
(1) DHCP Installation
# zypper -n in dhcp-server
(2) Configuring dhcp services
Note: Configure according to your own server address segment
# vim /etc/dhcpd.conf
option domain-name "";
option routers 172.200.50.1;
default-lease-time 14400;
ddns-update-style none;
########### Here are TFTP Server Address and Startup File#####################
next-server 172.200.50.49;
filename "pxelinux.0";

subnet 172.200.50.0 netmask 255.255.255.0 {
  range 172.200.50.200 172.200.50.210;
  default-lease-time 14400;
  max-lease-time 172800;
}
(3) Modify the network interfaces that support dhcp services, and modify the parameters in the configuration file to the ports that actually provide services:
# vim /etc/sysconfig/dhcpd
DHCPD_INTERFACE="eth0"
(4) Start the service
# systemctl enable dhcpd.service
# systemctl start dhcpd.service
# systemctl status dhcpd.service
2. apache installation
(1) Installation
# zypper -n in apache2
(2) Configuration
# vim /etc/apache2/default-server.conf
DocumentRoot "/srv/www/htdocs"
<Directory "/srv/www/htdocs">
....
 Options Indexes FollowSymLinks
....
</Directory>
(3) Create warehouses
# mkdir /srv/www/htdocs/repo/SUSE/Products/SLES15-SP1-Installer-Pools -pv
# mount SLE-15-SP1-Installer-DVD-x86_64-GM-DVD1.iso \
  /srv/www/htdocs/repo/SUSE/Products/SLES15-SP1-Installer-Pools -r
(4) Start the service
# systemctl start apache2
# systemctl enable apache2
(5) Access to apache2
http://172.200.50.49/repo/SUSE
3. Production of autoyast.xml file
(1) First, we choose a 300GB virtual machine to manually deploy SLES15SP1
By installing manually, the autoyast.xml file is automatically generated by command, and then we modify it on top of it.
(2) Add warehouses
## Pool
zypper ar http://172.200.50.19/repo/SUSE/Products/SLE-Product-SLES/15-SP1/x86_64/product/ \
  SLE-Product-SLES15-SP1-Pool
zypper ar http://172.200.50.19/repo/SUSE/Products/SLE-Module-Basesystem/15-SP1/x86_64/product/ \
  SLE-Module-Basesystem-SLES15-SP1-Pool
zypper ar http://172.200.50.19/repo/SUSE/Products/SLE-Module-Server-Applications/15-SP1/x86_64/product/ \
  SLE-Module-Server-Applications-SLES15-SP1-Pool
zypper ar http://172.200.50.19/repo/SUSE/Products/SLE-Module-Legacy/15-SP1/x86_64/product/ \
  SLE-Module-Legacy-SLES15-SP1-Pool
(3) Generate autoyast.xml file
# zypper in autoyast2 autoyast2-installation
# yast clone_system
- Auto-generate/root/autoyast.xml file

(4) Edit the profile
- Add warehouse files
<profile xmlns="http://www.suse.com/1.0/yast2ns" xmlns:config="http://www.suse.com/1.0/configns">
  <add-on>
    <add_on_products config:type="list">
      <listentry>
        <media_url><![CDATA[http://172.200.50.19/repo/SUSE/Products/SLE-Module-Basesystem/15-SP1/x86_64/product/]]></media_url>
        <product>SLE-Module-Basesystem-SLES15-SP1-Pool</product>
        <product_dir>/</product_dir>
      </listentry>
    </add_on_products>
  </add-on>
- Add <general> before <keyboard> after </bootloader>. If <general> is missing, PXE needs to be confirmed manually after partitioning the disk.
<bootloader>
<global>
.......
<xen_kernel_append>vga=gfx-1024x768x16 crashkernel=189M\<4G</xen_kernel_append>
<general>
<mode>
<confirm config:type="boolean">false</confirm>
</mode>
</general>
.........
</global>
<loader_type>grub2</loader_type>
</bootloader>
- Deleted autoyast2 autoyast2-installation, which is not required for subsequent PXE installations
  <software>
    <image/>
    <packages config:type="list">
      .......
      <package>autoyast2-installation</package>
      <package>autoyast2</package>
      .......
    </packages>
- Format partitions, all modified to true
<initialize config:type="boolean">true</initialize>
- Copy to PXE server after modifying configuration file
4. Configure TFTP
(1) Install tftp service first
# zypper -n in tftp  tftpboot-installation-SLE-15-SP1-x86_64 tftpboot-installation-common
# systemctl enable tftp.socket
# systemctl restart tftp.socket
# systemctl restart tftp.service
(2) Configure the TFTP directory with the following structure:
mkdir /srv/tftpboot
mkdir /srv/tftpboot/{config,pxelinux.cfg}
cp /root/autoinst.xml /srv/tftpboot/config/sles15sp1_300G.xml
cp /usr/share/syslinux/pxelinux.0 /srv/tftpboot/
cp /srv/www/htdocs/repo/SUSE/Products/SLES15-SP1-Installer-Pools/boot/x86_64/loader/isolinux.cfg \
    /srv/tftpboot/pxelinux.cfg/default
chmod 644 /srv/tftpboot/pxelinux.cfg/default
cp /srv/www/htdocs/repo/SUSE/Products/SLES15-SP1-Installer-Pools/boot/x86_64/loader/message \
    /srv/tftpboot/
chmod 644 /srv/tftpboot/message
cp /srv/www/htdocs/repo/SUSE/Products/SLES15-SP1-Installer-Pools/boot/x86_64/loader/initrd \
    /srv/tftpboot/
cp /srv/www/htdocs/repo/SUSE/Products/SLES15-SP1-Installer-Pools/boot/x86_64/loader/linux \
    /srv/tftpboot/
(3) The directory structure is as follows:
# tree /srv/tftpboot/
/srv/tftpboot/
|-- config                  ----  Notes A
|   `-- sles11sp3.xml
|-- message                 ----  Notes B
|-- pxelinux.0              ----  Notes C
|-- pxelinux.cfg
|   `-- default             ----  Notes D
|-- initrd                  ----  Notes E
|-- linux
- Note A:config directory contains the definition file for the default configuration of the operating system, autoyast.xml file, in network auto-deployment.This will cover the detailed creation process later.
- Note B: This file is from the system installation disc and is used for the prompt information that the client sees when the PXE network is started.General writing can be obtained and modified from/boot/x86_64/loader/message on the operating system installation disc.
- Note C: This file is from the system itself, location/usr/share/syslinux/pxelinux.0.This file is provided by syslinux-xxx-xxx.rpm.
- Note D: In this file source system installation CD: boot/x86_64/loader/isolinux.cfg
- Note E:initrd, linux both files are from the system installation disc: boot/x86_64/loader/
(4) For the simple content of message and default files, it is introduced.Determine which kernel and root file system to get mirrored
# vim /srv/tftpboot/message
  harddisk    - Boot from Hard Disk (this is default)
  linux       - Installation
  sles15_300g - Installation
  upgrade     - Upgrade
  rescue      - Rescue System
  systemboot  - Boot Linux System
  mediachk    - Check Installation Media
  memtest     - Memory Test
As above: The above prompt will appear on the client side.The real control file is inside the default file.
# vim /srv/tftpboot/pxelinux.cfg/default
default harddisk

# hard disk
label harddisk
  localboot 0x80

# install
label sles15_30g
  kernel linux
  append initrd=initrd install=http://172.200.50.49/repo/SUSE/Products/SLES15-SP1-Installer-Pools/ \
   autoyast=http://172.200.50.49/repo/sles15sp1_30G.xml splash=silent showopts textmode=1

#ui         gfxboot bootlogo message  <== Comment out
implicit    0
display     message
prompt      1
timeout     300
3. Deploy PXE client operations
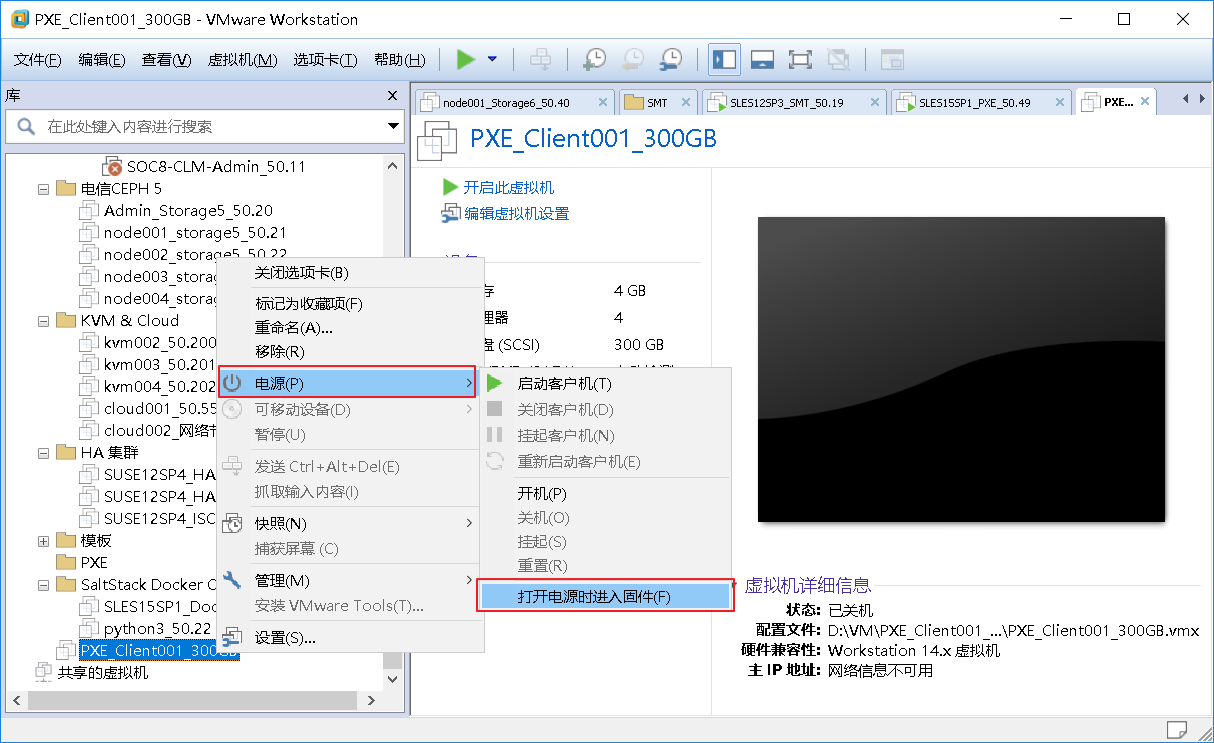
1. Configuration of virtual machines
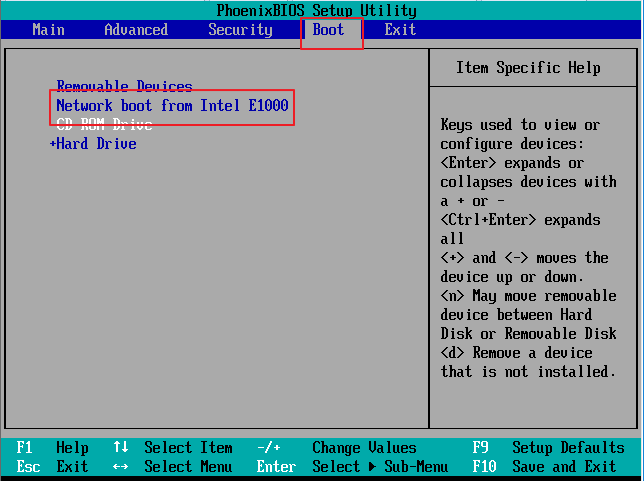
2. Turn on the virtual machine and enter the BIOS
3. Select the Boot menu with network boot as the first option
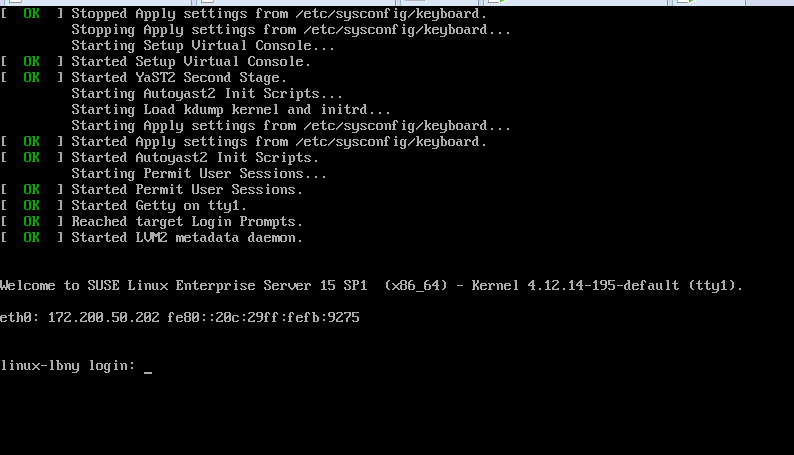
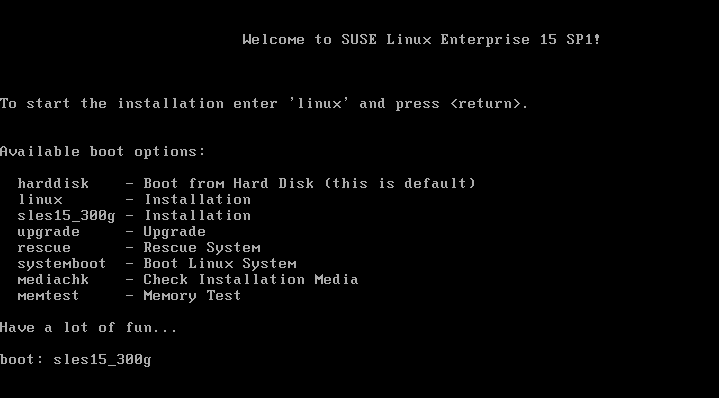
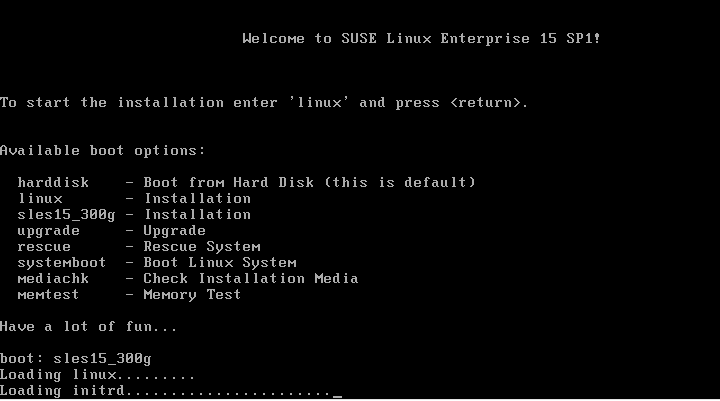
4. Enter sle15_300g to start installation of the system
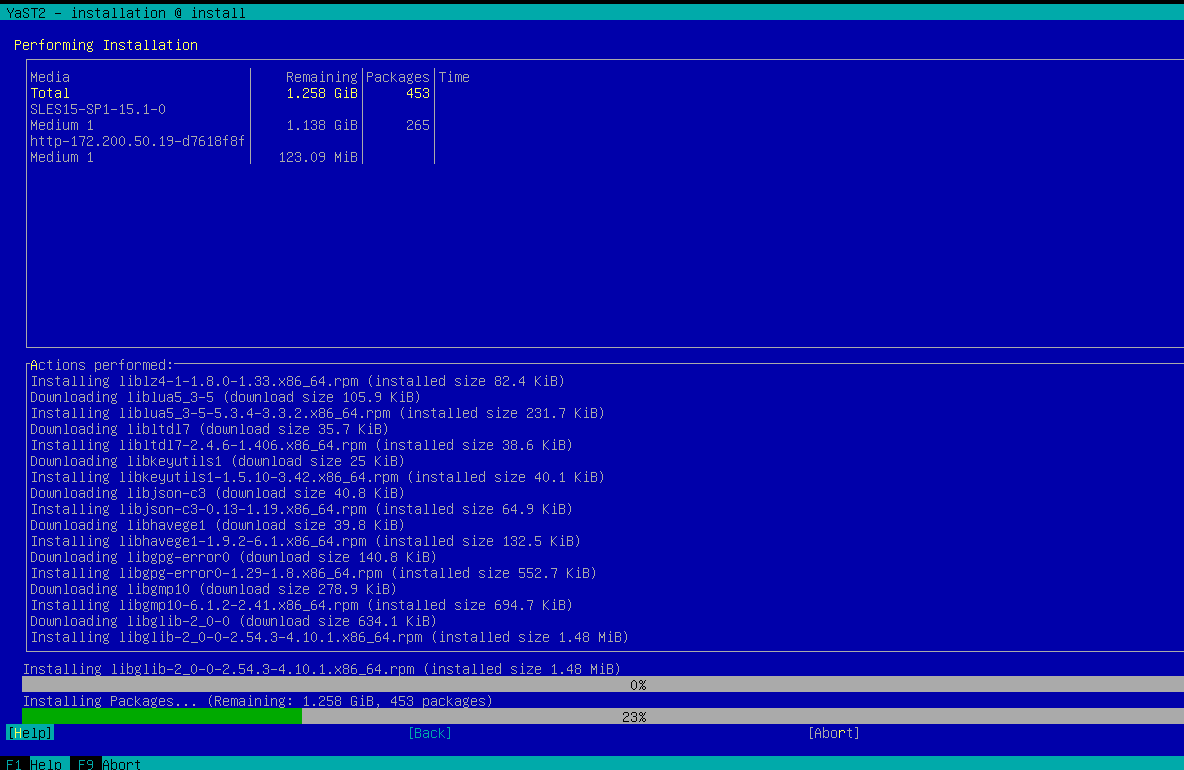
5. This will complete the installation smoothly