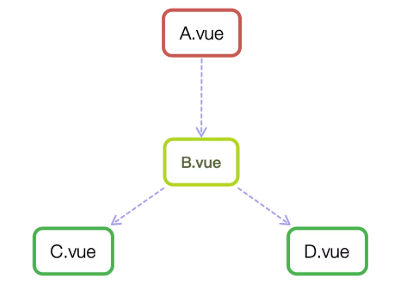
Components are one of the most powerful functions of vue.js, and the scopes of component instances are independent, which means that data between different components cannot be referenced. In general, components can have the following relationships:

As shown in the figure above, A and B, B and C, B and D are paternal-child relationships, C and D are brotherly, A and C are intergenerational (possibly intergenerational).
How to choose an effective communication method for different usage scenarios? This is the subject we are going to discuss. This article summarizes several ways of communication between vue components, such as props, $emit/$on, vuex, $parent / $ children, $attrs/$listeners and provide/inject, explain the differences and use scenarios with easy-to-understand examples, hoping to help your little buddy a little.
Stamp the code for this article github blog , you will always feel shallow on paper, so you can hit the code more!
Method 1, props/$emit
Parent component A is passed to child component B by props, and B to A by $emit in B component and v-on in A component.
1. Parent component passes value to child component
Next, we show an example of how a parent component passes values to a child component: how to get data from the parent component App.vue in the child component Users.vue users:["Henry","Bucky","Emily"]
//App.vue parent component
<template>
  <div id="app">
    <users v-bind:users="users"></users>//The former customizes the name for easy subcomponent invocation, the latter passes the data name
  </div>
</template>
<script>
import Users from "./components/Users"
export default {
  name: 'App',
  data(){
    return{
      users:["Henry","Bucky","Emily"]
    }
  },
  components:{
    "users":Users
  }
}
//users subcomponents
<template>
  <div class="hello">
    <ul>
      <li v-for="user in users">{{user}}</li>//Walk through the passed values and render them to the page
    </ul>
  </div>
</template>
<script>
export default {
  name: 'HelloWorld',
  props:{
    users:{           //This is the child label custom name of the parent component
      type:Array,
      required:true
    }
  }
}
</script>
Summary: Parent components pass data down to child components through props. Note: There are three types of data in the component: data, props, computed
2. Child components pass values to parent components (via event form)
Next, we show an example of how a child component can pass values to a parent component: when we click "Vue.js Demo", the child component passes values to the parent component, and the text changes from "Pass a value" to "Pass a value from the child to the parent" to achieve the transfer of values from the child component to the parent component.
// Subcomponents
<template>
  <header>
    <h1 @click="changeTitle">{{title}}</h1>//Bind a click event
  </header>
</template>
<script>
export default {
  name: 'app-header',
  data() {
    return {
      title:"Vue.js Demo"
    }
  },
  methods:{
    changeTitle() {
      this.$emit("titleChanged","Child passes value to parent component");//Custom Event Delivery Value "Child to Parent Component"
    }
  }
}
</script>
// Parent Component
<template>
<div id="app">
<app-header v-on:titleChanged="updateTitle" ></app-header>//Consistent with subcomponent titleChanged custom event
// updateTitle($event) accepts the text passed in
<h2>{{title}}</h2>
</div>
</template>
<script>
import Header from "./components/Header"
export default {
name: 'App',
data(){
return{
title:"Pass a value"
}
},
methods:{
updateTitle(e){ //Declare this function
this.title = e;
}
},
components:{
"app-header":Header,
}
}
</script>Summary: When a child sends a message to a parent component through events, it essentially sends its own data to the parent component.
Method 2, $emit/$on
This method uses an empty Vue instance as the central event bus (event center) to trigger events and listen for events, and intelligently and lightly enables communication between any component, including parent-child, sibling, and cross-level. When our projects are large, we can choose a better state management solution, vuex.
1. Specific implementation:
    var Event=new Vue();
    Event. $emit (event name, data);
    Event. $on (event name, data => {});
2. Take an example
Assuming there are three sibling components, components A, B, C, how component C obtains data from component A or B
<div id="itany">
    <my-a></my-a>
    <my-b></my-b>
    <my-c></my-c>
</div>
<template id="a">
  <div>
    <h3>A Components:{{name}}</h3>
    <button @click="send">Send data to C assembly</button>
  </div>
</template>
<template id="b">
  <div>
    <h3>B Components:{{age}}</h3>
    <button @click="send">Send Array to C assembly</button>
  </div>
</template>
<template id="c">
  <div>
    <h3>C Components:{{name}},{{age}}</h3>
  </div>
</template>
<script>
var Event = new Vue();//Define an empty Vue instance
var A = {
    template: '#a',
    data() {
      return {
        name: 'tom'
      }
    },
    methods: {
      send() {
        Event.$emit('data-a', this.name);
      }
    }
}
var B = {
    template: '#b',
    data() {
      return {
        age: 20
      }
    },
    methods: {
      send() {
        Event.$emit('data-b', this.age);
      }
    }
}
var C = {
    template: '#c',
    data() {
      return {
        name: '',
        age: ""
      }
    },
    mounted() {//Execute after template compilation is complete
     Event.$on('data-a',name => {
         this.name = name;//There will be no new this inside the arrow function, this side refers to Event if you don't use=>.
     })
     Event.$on('data-b',age => {
         this.age = age;
     })
    }
}
var vm = new Vue({
    el: '#itany',
    components: {
      'my-a': A,
      'my-b': B,
      'my-c': C
    }
});
</script>
$on Custom events data-a and data-b were listened on because sometimes the event is not certain when it will be triggered and is typically listened on a mounted or created hook.
Method 3. vuex

1. Briefly introduce the Vuex principle
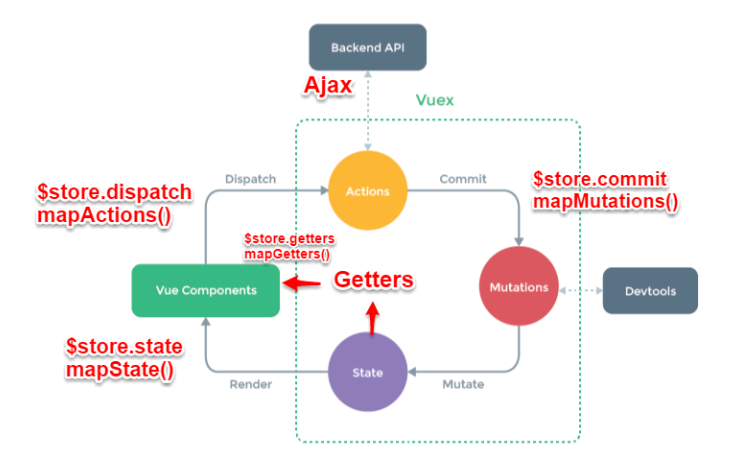
Vuex implements a one-way stream of data, has a State to store data globally, and must be Mutation when a component wants to change data in a State. Mutation also provides subscriber mode for external plug-in calls to update the State data. When all asynchronous operations (typically invoking back-end interfaces to obtain updated data asynchronously) or batch synchronous operations require Action, the Action cannot directly modify the State, or the State data needs to be modified through Mutation. Finally, depending on the State changes, render to the view.
2. Briefly introduce the function of each module in the process:
- Vue Components: Vue components. On HTML pages, responsible for receiving user actions and other interactive behaviors, executing the dispatch method triggers the corresponding action to respond.
- dispatch: The action trigger method is the only method that can execute an action.
- Actions: An action behavior processing module triggered by $store.dispatch('action name', data1) in the component. commit() then triggers the call to mutation, updating the state indirectly. Responsible for handling all interaction behaviors received by Vue Components. Contains synchronous/asynchronous operations, supports multiple methods with the same name, triggers in the order registered. The operations requested from the background API are performed in this module, including triggering other actions and committing mutations. This module provides an encapsulation of Promise to support chain triggering of actions.
- Commit: State change commit operation method. Committing a mutation is the only way to execute it.
- mutations: The state change action method triggered by commit('mutation name') in actions. It is the only recommended way for Vuex to modify the state. This method can only be synchronized and the method name can only be globally unique. Some hook s are exposed during the operation for state monitoring, etc.
- State: Page state management container object. Centrally stores scattered data of data objects in Vue components, globally unique, for unified state management. The data needed for page display is read from this object, and Vue's fine-grained data response mechanism is used for efficient status updates.
- getters:state object read method. This module is not listed separately in the diagram and should be included in render, where Vue Components read global state objects.
3.Vuex and localStorage
Vuex is the vue's state manager and the stored data is responsive. However, it will not be saved. After refreshing, it returns to its original state. You should save a copy of the data in the local store when the data in vuex changes. After refreshing, if there is data saved in the local store, take it out and replace the state in the store.
let defaultCity = "Shanghai"
try {   // The user turns off local storage and adds a try...catch to the outside.
  if (!defaultCity){
    defaultCity = JSON.parse(window.localStorage.getItem('defaultCity'))
  }
}catch(e){}
export default new Vuex.Store({
  state: {
    city: defaultCity
  },
  mutations: {
    changeCity(state, city) {
      state.city = city
      try {
      window.localStorage.setItem('defaultCity', JSON.stringify(state.city));
      // Save a copy of the data in the local store when the data changes
      } catch (e) {}
    }
  }
})
It is important to note that in vuex, the state we save is an array, whereas localStorage only supports strings, so we need to convert with JSON:
JSON.stringify(state.subscribeList);   // array -> string
JSON.parse(window.localStorage.getItem("subscribeList"));    // string -> array
Method 4, $attrs/$listeners
1. Introduction
When nesting multilevel components requires data to be passed, the common method used is through vuex. But if you just pass the data and don't do intermediate processing, using vuex processing will be a bit of a waste. Another way to do this is with Vue2.4 --$attrs/$listeners
- $attrs: Contains attribute bindings (except classes and styles) in the parent scope that are not recognized (and obtained) by prop. When a component does not declare any props, all parent-scoped bindings (except classes and styles) are included and internal components can be passed in via v-bind='$attrs'. Usually used with the interitAttrs option.
- $listeners: a v-on event listener that contains the parent scope (without the.native modifier). It can be passed in to internal components via v-on="$listeners"
Next let's look at an example of cross-level communication:
// index.vue
<template>
  <div>
    <child-com1
      :foo="foo"
      :boo="boo"
      :coo="coo"
      :doo="doo"
      title="Front end craftsmen"
    ></child-com1>
  </div>
</template>
<script>
const childCom1 = () => import("./childCom1.vue");
export default {
  components: { childCom1 },
  data() {
    return {
      foo: "Javascript",
      boo: "Html",
      coo: "CSS",
      doo: "Vue"
    };
  }
};
</script>
// childCom1.vue
<template class="border">
<div>
<p>foo: {{ foo }}</p>
<p>childCom1 Of $attrs: {{ $attrs }}</p>
<child-com2 v-bind="$attrs"></child-com2>
</div>
</template>
<script>
const childCom2 = () => import("./childCom2.vue");
export default {
components: {
childCom2
},
inheritAttrs: false, // You can turn off properties that are not declared in props that are automatically mounted on the root element of a component
props: {
foo: String // foo bound as props property
},
created() {
console.log(this.$attrs); // {boo:'Html','coo':'CSS','doo':'Vue','title':'Front End Craftsman'}
}
};
</script>// childCom2.vue
<template>
<div class="border">
<p>boo: {{ boo }}</p>
<p>childCom2: {{ $attrs }}</p>
<child-com3 v-bind="$attrs"></child-com3>
</div>
</template>
<script>
const childCom3 = () => import("./childCom3.vue");
export default {
components: {
childCom3
},
inheritAttrs: false,
props: {
boo: String
},
created() {
console.log(this.$attrs); // {coo:'CSS','doo':'Vue','title':'Front end craftsman'}
}
};
</script>// childCom3.vue
<template>
<div class="border">
<p>childCom3: {{ $attrs }}</p>
</div>
</template>
<script>
export default {
props: {
coo: String,
title: String
}
};
</script>
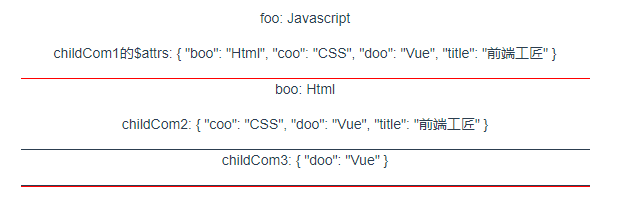
As shown in the figure above, $attrs denotes an object that does not inherit data in the format {attribute name: attribute value}. Vue2.4 provides $attrs , $ listeners To transfer data and events, communication between cross-level components becomes simpler.
Simply put: $attrs vs. $listeners Are two objects, $attrs Stores non-Props properties bound in the parent component and non-native events bound in the parent component in $listeners.
ps: inheritAttrs
Last rendered result: Elements
Default value is true

false

Summary:
As can be seen from the above examples, the premise is that the properties passed by the parent component are not registered in the props of the child component.
1. When inheritAttrs: true (default) is set, the attributes passed in by the parent component are rendered in the top-level tag element of the child component (div element in this example) (aaa="1111" in this example).
2. When inheritAttrs: false is set, the attributes passed in by the parent component are not rendered in the top label element of the child component (the div element in this example) (aaa="1111" in this example).
3. Whether inheritAttrs is true or false, attributes passed in from the parent component can be obtained from the $attrs attribute in the child component.
Method 5. provide/inject
1. Introduction
Vue2.2.0 adds an API, which needs to be used together to allow an ancestor component to inject a dependency into all its descendants, regardless of how deep the component hierarchy is and for as long as the upstream and downstream relationship is established. In other words, a variable is provided through a provider in an ancestor component, then injected into a descendant component by an inject.
The provide / inject API mainly solves the communication problem between the cross-level components, but its usage scenario is that the sub-components get the state of the parent components, and a relationship between active provisioning and dependent injection is established between the cross-level components.
2. Take an example
Assume there are two components: A.vue and B.vue, B is a subcomponent of A
// A.vue
export default {
  provide: {
    name: 'hello'
  }
}
// B.vue
export default {
  inject: ['name'],
  mounted () {
    console.log(this.name);  // hello
  }
}
As you can see, in A.vue, we set up a provide: name, which is a sailing boat in the waves. It serves to Name This variable is provided to all its subcomponents. In B.vue, by Inject Injected from component A Name Variable, then in Component B, you can pass directly through the this.name Visit this variable, and its value is also boating in the waves. This is the core use of the provide / inject API.
It is important to note that the provide r and inject bindings are not responsive. This is intentional. However, if you pass in a listenable object, the object's properties are responsive--the official vue document
So if the name of A.vue above changes, B.vue's this.name It won't change, it's still sailing in the waves.
// Ancestor component provides foo
// First
export default {
  name: "grandfather",
  provide(){
    return{
      foo:'halo',
      msg: this.msg   // When you pass on objects to future generations
    }
  },
}
// Second
export default {
  name: "grandfather",
  provide:{
    foo:'halo~~~~'
  },
}
The difference between the two above is that if you just pass in a string like'halo'above, there is no difference and future generations can read it. If you need to pass an object (code shown below), the second is not, and future components will not get the data. So only the first is recommended
//Descendant component injection foo
export default {
  inject:['foo'],
}

//Second
export default {
  inject:{
    foo: {
      default: 'defaalt foo'
    }
  },
}
Note: Once you inject some data, such as msg, foo in the example above, you can no longer declare msg, foo in this component because it is already owned by the parent.
3. How providers and inject s implement data response
Generally speaking, there are three ways:
- provide an instance of an ancestor component and then inject dependencies into the descendant component, which allows you to directly modify the properties of the ancestor component's instance in the descendant component, but one drawback of this approach is that it mounts many unnecessary things such as props, methods
- Optimize responsive provide using 2.6 latest API Vue.observable (recommended)
- provide returns a function that retrieves the dynamic data of the component.
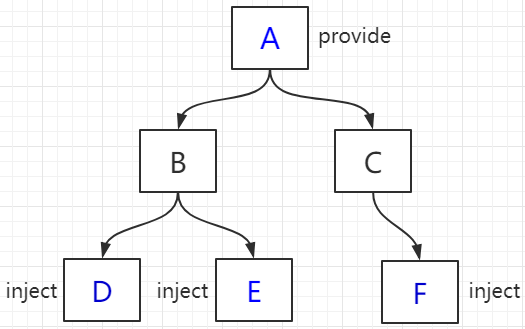
Let's take an example: Sun Components D, E, and F get the color value passed by A Component and can make data-responsive changes, that is, when the color of A Component changes, components D, E, F change with each other (the core code is as follows:

// A Component
<div>
      <h1>A assembly</h1>
      <button @click="() => changeColor()">change color</button>
      <ChildrenB />
      <ChildrenC />
</div>
......
  data() {
    return {
      color: "blue"
    };
  },
  // provide() {
  //   return {
  //     theme: {
  //       color: this.color //Data bound this way is not responsive
  //     } // Components D, E, F do not change when the color of component A changes
  //   };
  // },
  provide() {
    return {
      theme: this//Method 1: Provide an instance of an ancestor component
    };
  },
  methods: {
    changeColor(color) {
      if (color) {
        this.color = color;
      } else {
        this.color = this.color === "blue" ? "red" : "blue";
      }
    }
  }
  // Method 2: Optimize the responsive provide using 2.6 latest API Vue.observable
  // provide() {
  //   this.theme = Vue.observable({
  //     color: "blue"
  //   });
  //   return {
  //     theme: this.theme
  //   };
  // },
  // methods: {
  //   changeColor(color) {
  //     if (color) {
  //       this.theme.color = color;
  //     } else {
  //       this.theme.color = this.theme.color === "blue" ? "red" : "blue";
  //     }
  //   }
  // }
// F Component
<template functional>
<div class="border2">
<h3 :style="{ color: injections.theme.color }">F assembly</h3>
</div>
</template>
<script>
export default {
inject: {
theme: {
//Functional components have different values
default: () => ({})
}
}
};
</script>Method 3: provide returns a function to get the dynamic data of the component.
In practice, what we need is to share the dynamic data within the parent component, which may come from data or store. That is, after the data inside the parent component has changed, it needs to be synchronized into the descendant component. What should I do at this time?
What I want to do is assign a function to a value of a provide r that returns the dynamic data of the parent component and then calls the function from within the descendant component. This function actually stores references to instances of parent components, so every time a child component gets the latest data. The code looks like this:
// Parent Component
export default {
  data () {
    return {
      name: 'hello'
    }
  },
  methods: {
    changeName (val) {
      this.name = 'hi'
    }
  },
  provide: function () {
    return {
      // The first hello is from a non-responsive provide r variable
      nameFromParent: this.name,
      // This function is called in the second descendant component and changes as the ancestor component changes
      getReaciveNameFromParent: () => this.name
    }
  },
}
export default {
inject: [
'nameFromParent',
'getReaciveNameFromParent'
],
computed: {
reactiveNameFromParent () {
return this.getReaciveNameFromParent()
}
},
watch: {
'reactiveNameFromParent': function (val) {
console.log('Come from Parent Component's name The value has changed', val)
}
},
mounted () {
console.log(this.nameFromParent, 'nameFromParent')
}
}
Although provide and inject provide use cases mainly for high-level plug-ins/component libraries, you can achieve twice the result with half the effort if you are proficient in your business!
Method 6, $parent / $ children and ref
- ref: If used on a common DOM element, the reference points to the DOM element; If used on a subcomponent, the reference points to the component instance
- $parent / $ children: access parent/child instances
It is important to note that both of these are direct instances of components that can be used to directly invoke a component's methods or access data. Let's start with Example of ref accessing components:
// component-a subcomponent
export default {
  data () {
    return {
      title: 'Vue.js'
    }
  },
  methods: {
    sayHello () {
      window.alert('Hello');
    }
  }
}
// Parent Component
<template>
<component-a ref="comA"></component-a>
</template>
<script>
export default {
mounted () {
const comA = this.$refs.comA;
console.log(comA.title); // Vue.js
comA.sayHello(); // Popup
}
}
</script>However, the disadvantage of these two methods is that they cannot communicate across levels or between brothers.
// parent.vue
<component-a></component-a>
<component-b></component-b>
<component-b></component-b>
In component-a, we want to access two component-b components on the page that refers to it (parent.vue in this case), in which case we have to configure additional plug-ins or tools, such as solutions for Vuex and Bus.
summary
Common usage scenarios can be divided into three categories:
- Parent-Child Communication:
The parent passes data to the child through props and the child to the parent through events ($emit); Communication is also possible through parent/child chains ($parent) / $ children; ref can also access component instances; provide / inject API; $ attrs/$listeners
- Brotherly communication:
Bus;Vuex
- Cross-level communication:
Bus;Vuex;provide / inject API,$attrs/$listeners