Android UI components
Preface
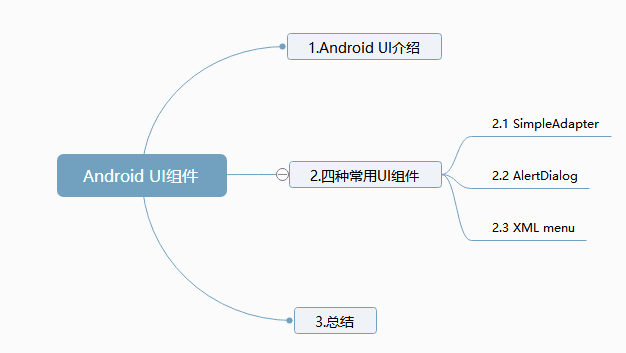
Today we will briefly introduce Android's UI components and the use of four common UI components.
Catalog

1. Introduction to Android UI
All user interface elements in Android applications are made up of View or ViewGroup objects, which can be used to draw the UI after defining the hierarchy of objects by using View or ViewGroup.
2. Four common UI components
2.1 SimpleAdapter
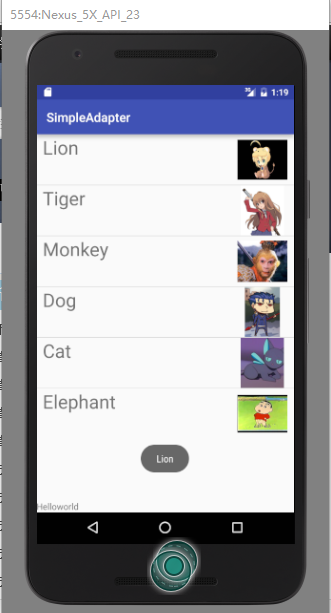
Simple Adapter is a simple adapter by name, but it is not very simple to use, and the functions that can be implemented are not simple, and the functions are quite powerful. Most application scenarios of ListView can be implemented with SimpleAdapter.
Create a new Listview with screen width and height determined by content.
<ListView
        android:layout_width="match_parent"
        android:layout_height="wrap_content"
android:id="@+id/listView" />- 1
- 2
- 3
- 4
After defining ListView, the implementation content is implemented in Activity.
public class MainActivity extends AppCompatActivity {

    String [] animalname=new String[]{"Lion","Tiger","Monkey","Dog","Cat","Elephant"};
    //Create Listname
    int [] images = new int[] {R.drawable.lion,R.drawable.tiger,R.drawable.monkey,R.drawable.dog,R.drawable.cat,R.drawable.elephant};
    //Select List image
    @Override
    protected void onCreate(Bundle savedInstanceState) {
        super.onCreate(savedInstanceState);
        setContentView(R.layout.activity_main);
        //Create a List collection with Map elements
        List<Map<String,Object>> listItems=new ArrayList<Map<String,Object>>();
        for(int i=0;i<animalname.length;i++)
        {
            Map<String,Object> listItem=new HashMap<String,Object>();
            listItem.put("name",animalname[i]);
            listItem.put("image",images[i]);
            listItems.add(listItem);
        }
        //Create SimpleAdapter
        SimpleAdapter sim=new SimpleAdapter(this,listItems,R.layout.simple_item,
            new String[] {"name","image"},
            new int[]{R.id.name ,R.id.header});
            ListView l=(ListView)findViewById(R.id.listView);
            l.setAdapter(sim);
            l.setOnItemClickListener(new AdapterView.OnItemClickListener(){
            public void onItemClick(AdapterView parent, View view,int position,long id){
                Toast.makeText(MainActivity.this,animalname[position],Toast.LENGTH_LONG).show();
            }
        });
    }

}
- 1
- 2
- 3
- 4
- 5
- 6
- 7
- 8
- 9
- 10
- 11
- 12
- 13
- 14
- 15
- 16
- 17
- 18
- 19
- 20
- 21
- 22
- 23
- 24
- 25
- 26
- 27
- 28
- 29
- 30
- 31
- 32
- 33
- 34
After setting up Activity, write an item in the layout folder to configure the simple control.
<LinearLayout xmlns:android="http://schemas.android.com/apk/res/android"
    android:layout_width="match_parent"
    android:layout_height="match_parent"
    android:orientation="horizontal">
       //Set up the text first
       <TextView
           android:layout_width="wrap_content"
           android:layout_height="wrap_content"
           android:id="@+id/name"
           android:textSize="30dp"
           android:paddingLeft="10dp"/>

    <LinearLayout
        android:layout_width="match_parent"
        android:layout_height="wrap_content"
        android:gravity="right">
        //Post-set Pictures
        <ImageView
            android:id="@+id/header"
            android:layout_width="80dp"
            android:layout_height="80dp"
            android:layout_marginRight="10dp" />
    </LinearLayout>
</LinearLayout>- 1
- 2
- 3
- 4
- 5
- 6
- 7
- 8
- 9
- 10
- 11
- 12
- 13
- 14
- 15
- 16
- 17
- 18
- 19
- 20
- 21
- 22
- 23
- 24
Screenshots of code results 
2.2 AlertDialog
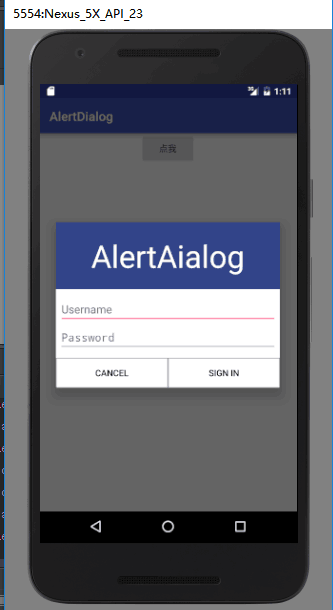
Alert Dialog is very powerful and can implement various dialog boxes.
Implementation steps:
Create the AlertDialog.Builder object.
(2) Call the setTitle() method of AlertDialog.Builder to set the title.
(3) Call the SetIcon() method of AlertDialog.Builder to set the icon.
(4) Call AlertDialog.Builder to set the dialog content.
(5) Call AlertDialog.Builder's set to add buttons.
(5) Call the create() method of AlertDialog.Builder to create an object and then show() the dialog box.
Setting Activity
public class MainActivity extends AppCompatActivity {

    @Override
    protected void onCreate(Bundle savedInstanceState) {
        super.onCreate(savedInstanceState);
        setContentView(R.layout.activity_main);
        Button bn=(Button)findViewById(R.id.clickme);

        LayoutInflater inflater=MainActivity.this.getLayoutInflater();
        View v= inflater.inflate(R.layout.alerdialog,null,false);
        Context context=MainActivity.this;
        AlertDialog.Builder builder=new AlertDialog.Builder(context);
        //Create an AlterDialog object
        builder.setView(v);
        //Input text
        builder.setCancelable(false);
        final AlertDialog alertDialog=builder.create();
        //create object
        bn.setOnClickListener(new View.OnClickListener() {
            @Override
            public void onClick(View view) {
                alertDialog.show();
            }
        });

        v.findViewById(R.id.cancle).setOnClickListener(new View.OnClickListener() {
            @Override
            public void onClick(View view) {
                Toast.makeText(MainActivity.this,"cancle",Toast.LENGTH_LONG).show();
                alertDialog.dismiss();
            }
        });
        v.findViewById(R.id.signin).setOnClickListener(new View.OnClickListener() {
            @Override
            public void onClick(View view) {
                Toast.makeText(MainActivity.this,"Sign in",Toast.LENGTH_LONG).show();
                alertDialog.dismiss();
            }
        });
    }
}
- 1
- 2
- 3
- 4
- 5
- 6
- 7
- 8
- 9
- 10
- 11
- 12
- 13
- 14
- 15
- 16
- 17
- 18
- 19
- 20
- 21
- 22
- 23
- 24
- 25
- 26
- 27
- 28
- 29
- 30
- 31
- 32
- 33
- 34
- 35
- 36
- 37
- 38
- 39
- 40
- 41
- 42
Activity.xml
<Button
        android:layout_width="wrap_content"
        android:layout_height="wrap_content"
        android:text="Point me"
        android:id="@+id/clickme"
android:layout_gravity="center_horizontal" />- 1
- 2
- 3
- 4
- 5
- 6
AlterDialog.xml
<LinearLayout
    xmlns:android="http://schemas.android.com/apk/res/android" android:layout_width="match_parent"
    android:layout_height="match_parent"
    android:orientation="vertical">
    <LinearLayout
        android:layout_width="match_parent"
        android:layout_height="wrap_content">
    <TextView
        android:layout_width="match_parent"
        android:layout_height="wrap_content"
        android:text="AlertAialog"
        android:textSize="50dp"
        android:textColor="#fff"
        android:gravity="center"
        android:background="#334488"
        android:paddingTop="20dp"
        android:paddingBottom="20dp"/>
</LinearLayout>
    <LinearLayout
        android:layout_width="match_parent"
        android:layout_height="wrap_content"
        android:orientation="vertical"
        android:layout_marginTop="10dp">
    <EditText

        android:layout_width="match_parent"
        android:layout_height="wrap_content"
        android:hint="Username"
        android:layout_marginLeft="5dp"
        android:layout_marginRight="5dp"/>
    <EditText
        android:layout_width="match_parent"
        android:layout_height="wrap_content"
        android:hint="Password"
        android:inputType="textPassword"
        android:layout_marginLeft="5dp"
        android:layout_marginRight="5dp"/>
    </LinearLayout>
        <LinearLayout
            android:layout_width="match_parent"
            android:layout_height="wrap_content"
            android:orientation="horizontal"
            android:layout_marginTop="10dp">

            <Button
                android:id="@+id/cancle"
                android:layout_width="match_parent"
                android:layout_height="wrap_content"
                android:layout_weight="1"
                android:background="@drawable/shapdrawable"
                android:gravity="center"
                android:text="Cancel"
                android:textColor="#000" />
        <Button
            android:id="@+id/signin"
            android:layout_width="match_parent"
            android:layout_height="wrap_content"
            android:text="Sign in"
            android:background="@drawable/shapdrawable"
            android:textColor="#000"
            android:gravity="center"
            android:layout_weight="1"/>
        </LinearLayout>

</LinearLayout>
- 1
- 2
- 3
- 4
- 5
- 6
- 7
- 8
- 9
- 10
- 11
- 12
- 13
- 14
- 15
- 16
- 17
- 18
- 19
- 20
- 21
- 22
- 23
- 24
- 25
- 26
- 27
- 28
- 29
- 30
- 31
- 32
- 33
- 34
- 35
- 36
- 37
- 38
- 39
- 40
- 41
- 42
- 43
- 44
- 45
- 46
- 47
- 48
- 49
- 50
- 51
- 52
- 53
- 54
- 55
- 56
- 57
- 58
- 59
- 60
- 61
- 62
- 63
- 64
- 65
- 66
Screenshots of code results 
2.3 XML menu
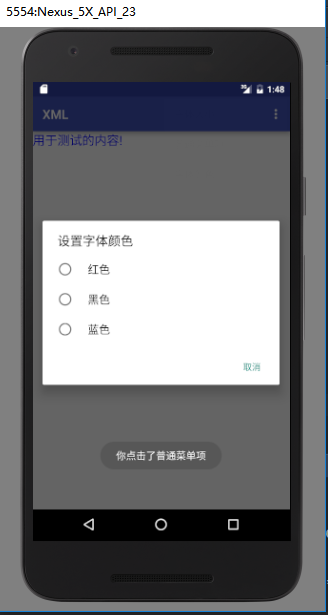
Android provides two ways to create menus, one is to write directly in a java file, the other is to use a broader definition of an XML resource file in Android development. The author uses an XML method that does not make the code bloated.
<TextView
        android:id="@+id/textid"
        android:layout_width="wrap_content"
        android:layout_height="wrap_content"
android:text="Contents for testing!" />- 1
- 2
- 3
- 4
- 5
public class MainActivity extends AppCompatActivity {

    private final int size=110;
    private final int common=111;
    private final int color=112;
    private TextView textId;
    @Override
    protected void onCreate(Bundle savedInstanceState) {
        super.onCreate(savedInstanceState);
        setContentView(R.layout.activity_main);
        textId=(TextView)findViewById(R.id.textid);
    }

    @Override
    public boolean onCreateOptionsMenu(Menu menu) {
        menu.add(1,size,1,"font size");
        menu.add(1,common,2,"Common menu items");
        menu.add(1,color,3,"Font color");
        return super.onCreateOptionsMenu(menu);
    }

    @Override
    public boolean onOptionsItemSelected(MenuItem item) {
        int id=item.getItemId();
        switch (id){
            case size:
                final AlertDialog.Builder builder=new AlertDialog.Builder(this);
                builder.setTitle("Set font size");
                builder.setSingleChoiceItems(new String[]{"10 Font number","16 Font number","20 Font number"},-1,new DialogInterface.OnClickListener(){
                    @Override
                    public void onClick(DialogInterface dialogInterface, int i) {
                        switch (i){
                            case 0:textId.setTextSize(10);
                                dialogInterface.dismiss();
                                break;
                            case 1:textId.setTextSize(16);
                                dialogInterface.dismiss();
                                break;
                            case 2:textId.setTextSize(20);
                                dialogInterface.dismiss();
                                break;
                        }
                    }
                });
                builder.setNegativeButton("cancel",null);
                builder.show();
                break;
            case common:
                Toast.makeText(this,"You clicked on the normal menu item", Toast.LENGTH_LONG).show();
                break;
            case color:
                final AlertDialog.Builder builder2=new AlertDialog.Builder(this);
                builder2.setTitle("Setting font color");
                builder2.setSingleChoiceItems(new String[]{"gules","black","blue"},-1,new DialogInterface.OnClickListener(){
                    @Override
                    public void onClick(DialogInterface dialogInterface, int i) {
                        switch (i){
                            case 0:textId.setTextColor(Color.RED);
                                dialogInterface.dismiss();
                                break;
                            case 1:textId.setTextColor(Color.BLACK);
                                dialogInterface.dismiss();
                                break;
                            case 2:textId.setTextColor(Color.BLUE);
                                dialogInterface.dismiss();
                                break;
                        }
                    }
                });
                builder2.setNegativeButton("cancel",null);
                builder2.show();
                break;
        }
        return super.onOptionsItemSelected(item);
    }
}
- 1
- 2
- 3
- 4
- 5
- 6
- 7
- 8
- 9
- 10
- 11
- 12
- 13
- 14
- 15
- 16
- 17
- 18
- 19
- 20
- 21
- 22
- 23
- 24
- 25
- 26
- 27
- 28
- 29
- 30
- 31
- 32
- 33
- 34
- 35
- 36
- 37
- 38
- 39
- 40
- 41
- 42
- 43
- 44
- 45
- 46
- 47
- 48
- 49
- 50
- 51
- 52
- 53
- 54
- 55
- 56
- 57
- 58
- 59
- 60
- 61
- 62
- 63
- 64
- 65
- 66
- 67
- 68
- 69
- 70
- 71
- 72
- 73
- 74
- 75
- 76
- 77
Screenshots of code results 
3. summary
When loading layout resources in an application, Android initializes each node of the layout as a runtime object for you to define other behaviors, query object status, or modify the layout.
Author: Huang Yi
Links to the original text: click here
        <link rel="stylesheet" href="https://csdnimg.cn/release/phoenix/template/css/markdown_views-ea0013b516.css">
            </div>