Configuring the experimental environment
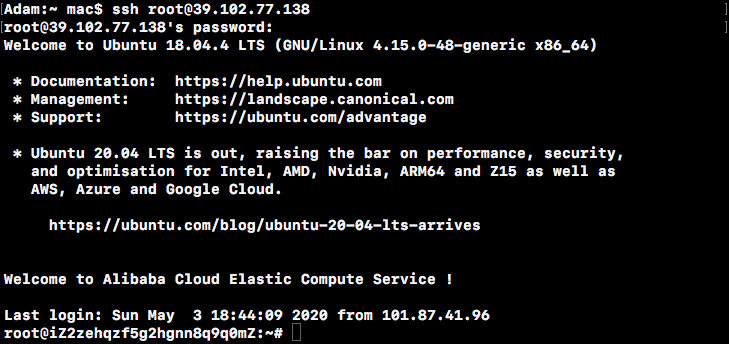
Because my computer does not have enough storage space to bear the cost of installing a virtual machine, I applied for a cloud server on Ali Cloud for this experiment.
The server configuration is as follows:
- 1 Core - 2GB Memory - 40GB System Disk
- Operating System: Ubuntu 18.04
Modify Ubuntu Source
Looking at/etc/apt/sources.list found that Ali Source has been configured and will not be modified.If necessary, you can change to Ali Source or Tsinghua Source to improve the download speed of the installation package.
Install Lamp
-
Install Apache 2 Web server
sudo apt install apache2 -y -
Install and protect MySQL database
sudo apt install mysql-server libmysqlclient-dev mysql-client autoconf libtool -y sudo mysql_secure_installation -
Install PHP Hypertext Preprocessor
sudo add-apt-repository ppa:ondrej/php
sudo apt-get update -y
sudo apt-get install -y libapache2-mod-php5.6 php5.6 php5.6-common php5.6-gd php5.6-cli php5.6-xml php5.6-mysql
sudo apt-get install -y php-pear libphp-adodb
When executing the first command, sudo: add-apt-repository: command not found error was reported. After consulting the data, you know you need to install software-properties-common (below) before executing the above command.
sudo apt-get install software-properties-commonFinally, restart the Apache Web server.
sudo systemctl restart apache2 -
Test PHP
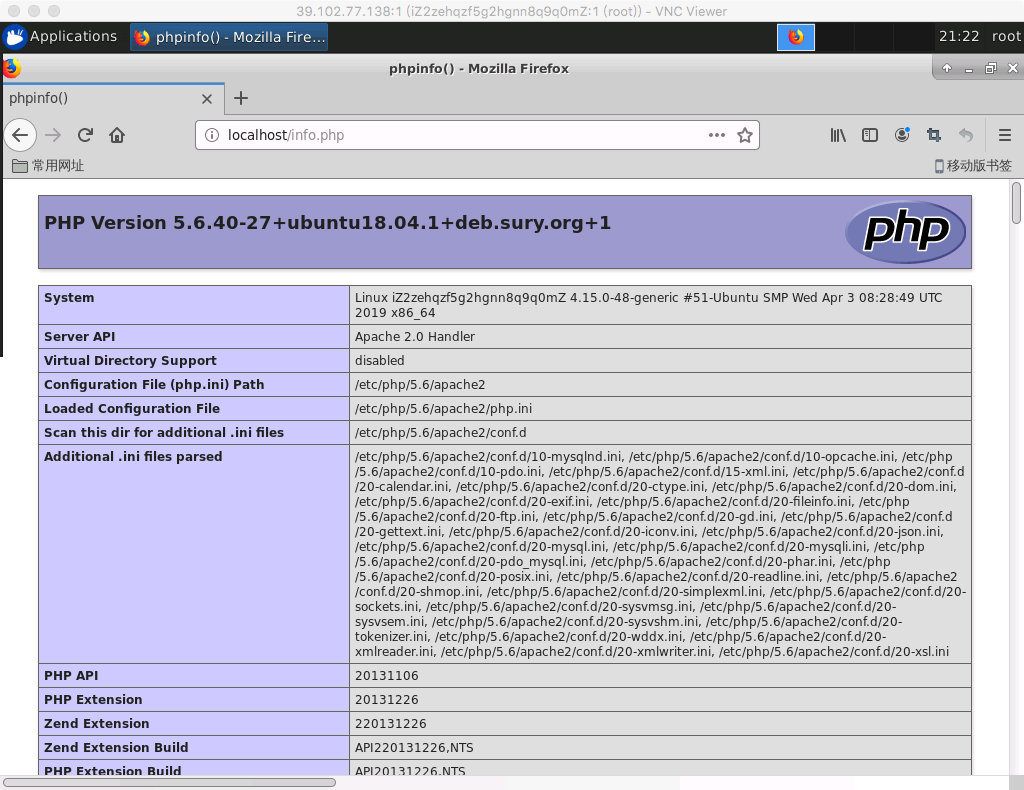
Create a new file named info.php in /var/www/html, write the following, save and exit.
<?php
phpinfo();
?>
Now browse http://localhost/info.php , you can see the PHP information page, indicating that PHP is working properly.
Install Snort
-
Install DAQ, decompile
tar -xvzf daq-2.0.6.tar.gz
cd daq-2.0.6
./configure
sudo make & make install
However, the. /configure command did not generate the Makefile successfully, and checking the output information found the following errors:
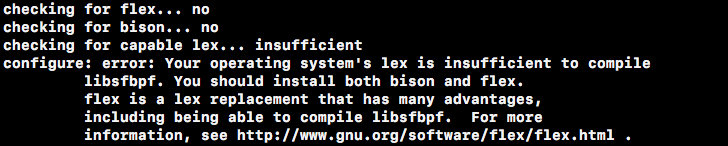
This means you are missing some dependencies, so install flex and bison first.
sudo apt-get install flex
sudo apt-get install bison
Executing the. /configure again indicates that the libpcap version is too low:

Reinstall libpcap.
sudo apt-get install libpcap-devAt this point, the first command is executed and the DAQ is compiled successfully.
-
Install Snort, uncompress and compile
tar -xvzf snort-2.9.12.tar.gz
cd snort-2.9.12
./configure --enable-sourcefire
sudo make & make install
During the execution of. /configure, errors also occurred due to the lack of some dependent libraries, requiring the installation of libpcre, dumbnet, luajit, libnghttp.
sudo apt-get install libpcre3-dev
sudo apt-get install libdumbnet-dev
sudo apt-get install liblua5.2-dev
sudo apt-get install libnghttp2-dev
Finally, fix the link.
sudo ldconfig -
Test whether Snort was installed successfully
snort -V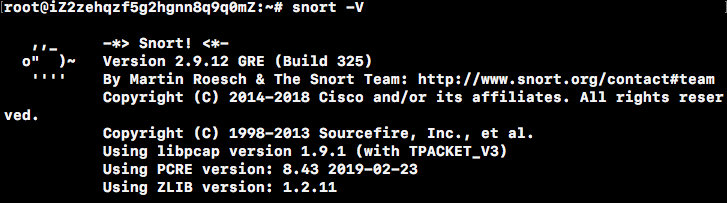
-
Configure users and directories
Create users and user groups:
sudo groupadd snort
sudo useradd snort -r -s /sbin/nologin -c SNORT_IDS -g snort
Create a Snort directory:
sudo mkdir /etc/snort
sudo mkdir /etc/snort/rules
sudo mkdir /etc/snort/rules/iplists
sudo mkdir /etc/snort/preproc_rules
sudo mkdir /usr/local/lib/snort_dynamicrules
sudo mkdir /etc/snort/so_rules
Create a file to store rules:
sudo touch /etc/snort/rules/iplists/black_list.rules
sudo touch /etc/snort/rules/iplists/white_list.rules
sudo touch /etc/snort/rules/local.rules
Create a log directory:
sudo mkdir /var/log/snort
sudo mkdir /var/log/snort/archived_logs
Modify file permissions:
sudo chmod -R 5775 /etc/snort
sudo chmod -R 5775 /var/log/snort
sudo chmod -R 5775 /var/log/snort/archived_logs
sudo chmod -R 5775 /etc/snort/so_rules
sudo chmod -R 5775 /usr/local/lib/snort_dynamicrules
User who modified the file:
sudo chown -R snort:snort /etc/snort
sudo chown -R snort:snort /var/log/snort
sudo chown -R snort:snort /usr/local/lib/snort_dynamicrules
Copy profile:
cd /opt/snort-2.9.12/etc/ sudo cp *.conf* /etc/snort sudo cp *.map /etc/snort sudo cp *.dtd /etc/snort cd /opt/snort-2.9.12/src/dynamic-preprocessors/build/usr/local/lib/snort_dynamicpreprocessor/ sudo cp * /usr/local/lib/snort_dynamicpreprocessor/ -
Modify Profile
sudo vi /etc/snort/snort.conf# ipvar HOME_NET modified to local internal network ipvar HOME_NET 172.25.45.23/18 # Set the following profile path var RULE_PATH /etc/snort/rules SO_RULE_PATH /etc/snort/so_rules PREPROC_RULE_PATH /etc/snort/preproc_rules WHITE_LIST_PATH /etc/snort/rules/iplists BLACK_LIST_PATH /etc/snort/rules/iplists # Add after output unified2: filename merged.log, limit 128, nostamp, mpls_event_types, vlan_event_types output unified2: filename snort.u2, limit 128 # Enable the local.rules file, and subsequent include files are commented out include $RULE_PATH/local.rules -
Add Rule
tar -xzf community-rules.tar.gz
cp community-rules/* /etc/snort/rules/
Check rules.
snort -T -c /etc/snort/snort.conf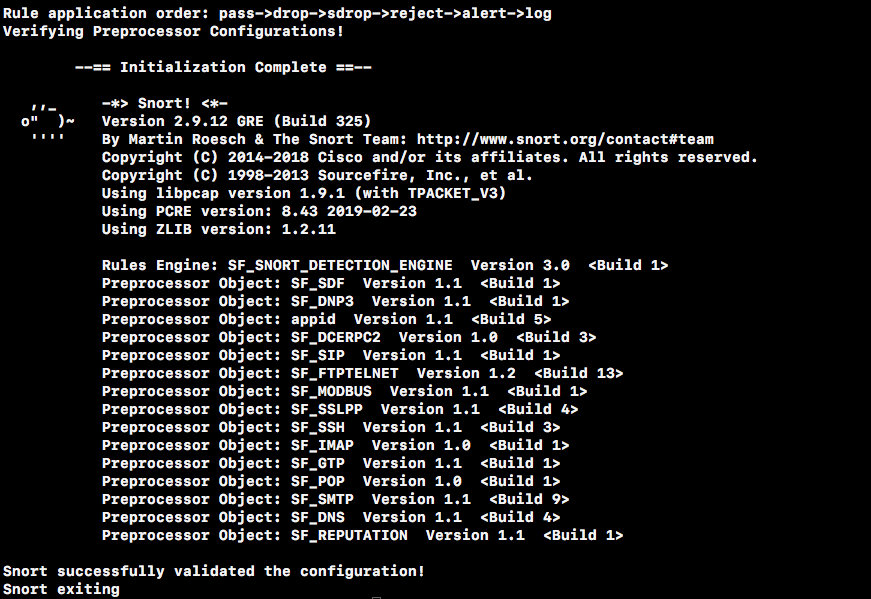
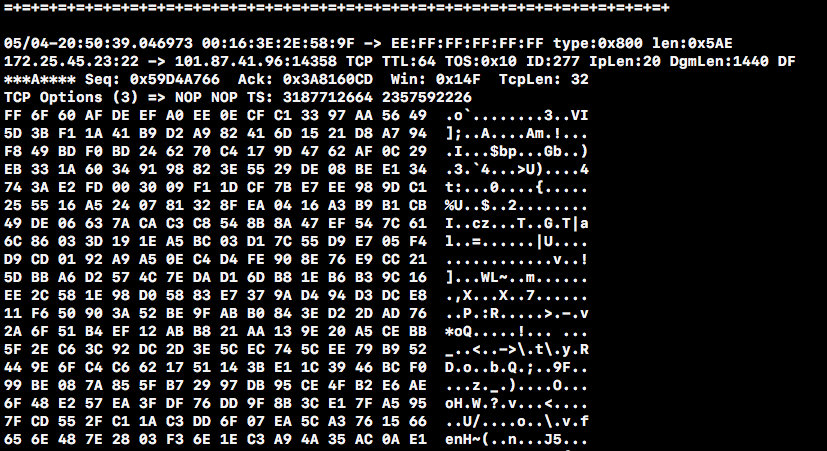
Add a rule to the rule for ICMP packages to test.
sudo vi /etc/snort/rules/local.rulesalert icmp any any -> $HOME_NET any (msg:"ICMP Test detected!!!"; classtype:icmp-event; sid:10000001; rev:001; GID:1; )Set Sid corresponding information, add sid-msg file.
sudo touch /etc/snort/sid-msg.map
sudo vi /etc/snort/sid-msg.map
1 || 10000001 || 001 || icmp-event || 0 || ICMP Test detected || url,tools.ietf.org/html/rfc792 -
Test Profiles and Functions
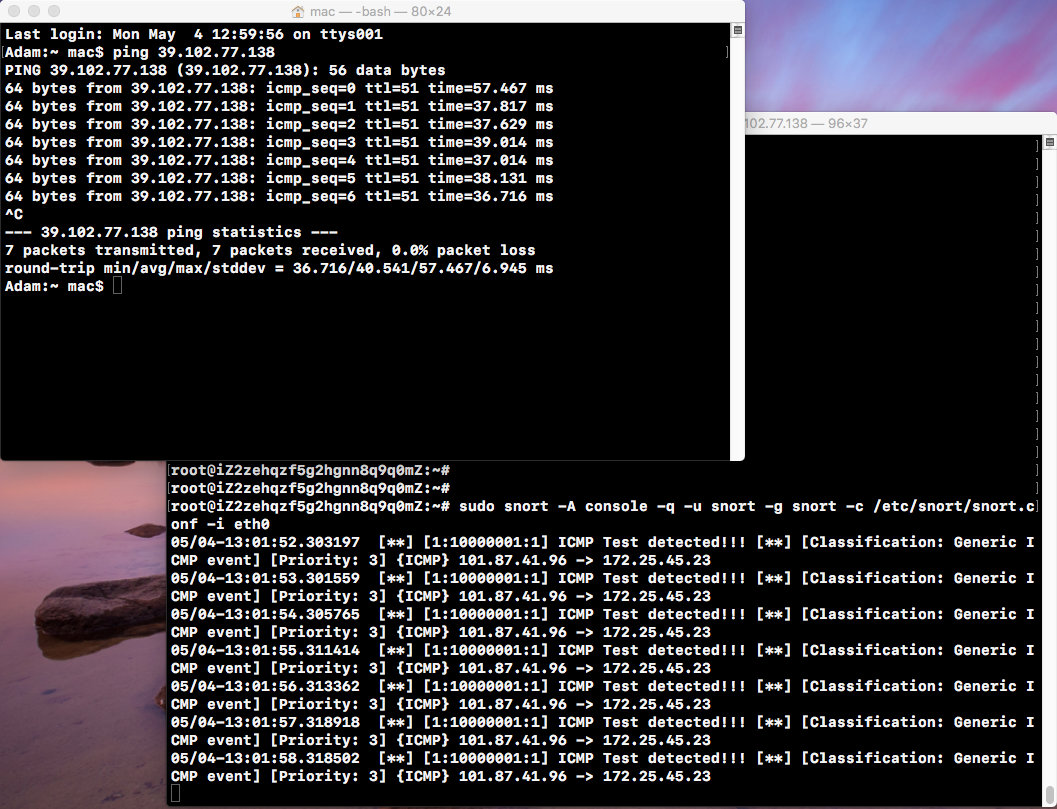
sudo snort -T -c /etc/snort/snort.conf -i eth0
sudo snort -A console -q -u snort -g snort -c /etc/snort/snort.conf -i eth0
Close the firewall.
ufw disableWith the IP of eth0 on the local ping server, you can see that Snort on the server prints alert alerts in the console, indicating that the added ICMP rules have taken effect.
Install Barnyard2
-
Install Barnyard2, decompile
tar zxvf barnyard2-2-1.13.tar.gz
cd barnyard2-2-1.13
autoreconf -fvi -I ./
./configure --with-mysql --with-mysql-libraries=/usr/lib/x86_64-linux-gnu
sudo make & make install
There was an error making here:
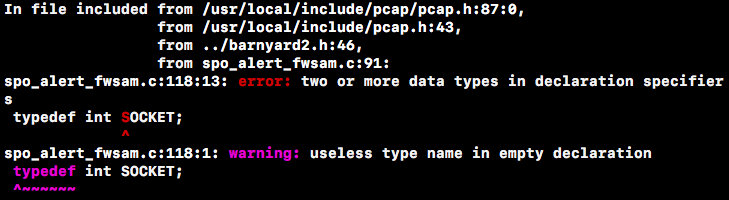
This means that there is a duplicate definition of the SOCKET type in spo_alert_fwsam.c.After consulting a large amount of data, we know that this is a bug in the source code and a solution has been given on GitHub: replace all SOCKETs in this file with BARNYARD2_SOCKET.Specific reference https://github.com/Gerjo/barnyard2/commit/cc53c5573ba016489518bcda69ca64ca7acee2e8#diff-c1f3b2342b04cc7ae2df530b1a871cbeL122
The instructions above are then executed again and the compilation is successful.
-
test
barnyard2 -V
-
Set Profile
sudo cp /opt/barnyard2-2-1.13/etc/barnyard2.conf /etc/snort/ sudo mkdir /var/log/barnyard2 sudo chown snort.snort /var/log/barnyard2 sudo touch /var/log/snort/barnyard2.waldo sudo chown snort.snort /var/log/snort/barnyard2.waldo -
Configuration database
mysql -u root -pmysql> create database snort; mysql> use snort; mysql> source /opt/barnyard2-2-1.13/schemas/create_mysql; mysql> CREATE USER 'snort'@'localhost' IDENTIFIED BY '123456'; mysql> grant create, insert, select, delete, update on snort.* to 'snort'@'localhost'; mysql> exit; -
Add Database Configuration
sudo vi /etc/snort/barnyard2.confAdd the database configuration at the end:
output database: log, mysql, user=snort password=123456 dbname=snort host=localhost sensor name=sensor01Modify the permissions of barnyard2.conf to prevent it from being modified.
sudo chmod 644 /etc/snort/barnyard2.conf -
test
Start MySQL.
service mysql startOpen Snort and send a ping packet to eth0.
sudo snort -q -u snort -g snort -c /etc/snort/snort.conf -i eth0Open Barnyard2 and save the log information to the database.
-
Continuous processing mode, set barnyard2.waldo as bookmark
sudo barnyard2 -c /etc/snort/barnyard2.conf -d /var/log/snort -f snort.u2 -w /var/log/snort/barnyard2.waldo -g snort -u snortThe console prints out the record you just ping ed.
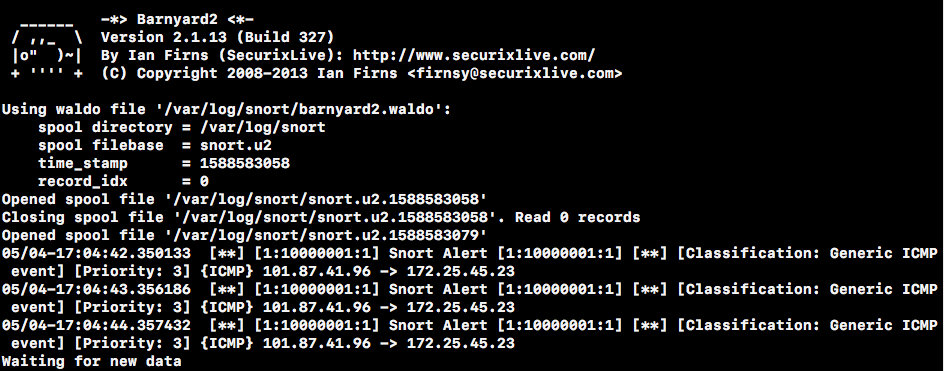
Log files are also generated in the /var/log/snort directory.

-
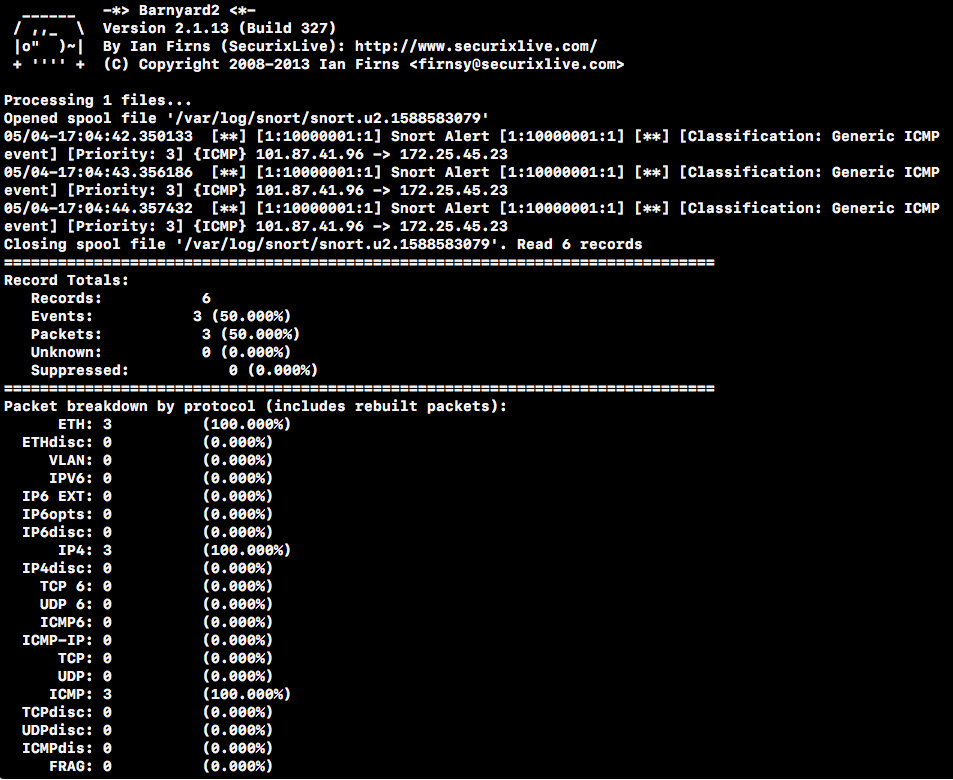
File processing mode, processing a single log file
sudo barnyard2 -c /etc/snort/barnyard2.conf -o /var/log/snort/snort.u2.1588583079Select one of the log files to process, and you will see the record you just made.
Check again the number of database entries, which has increased.
mysql -u snort -p -D snort -e "select count(*) from event"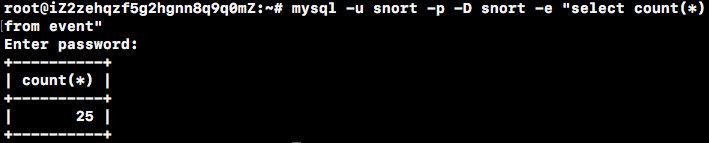
-
Install BASE
-
Install ADOdb
sudo tar zxvf adodb-5.20.14.tar.gz -C /var/www/html sudo mv /var/www/html/adodb5 /var/www/html/adodb -
Install BASE
sudo tar zxvf base-1.4.5.tar.gz -C /var/www/html sudo mv /var/www/html/base-1.4.5 /var/www/html/base sudo /etc/init.d/apache2 restart -
To configure
Modify/etc/php/5.6/apache2/php.ini.
error_reporting = E_ALL & ~E_NOTICERestart Apache for the configuration to take effect.
sudo /etc/init.d/apache2 restartSet directory permissions.
chown -R root:root /var/www/html
chmod 755 /var/www/html/adodb
open http://localhost/base/setup/index.php .

On the settings page, it is best to have each item green to indicate passage.This shows that the installation directory of BASE is not writable by the Web server.As prompted, you can create base_conf.php when the setup is complete.
Now click Continue and follow the guide to complete the setup step by step.
Step 1: Select the language simplified_chinese and fill in the directory where ADOdb is located/var/www/html/adodb.
Step 2: Fill in the information in the database as previously configured (Archive database information may not be filled in).
Step 3: Fill in the administrative account: snort, password: 123456.
Step 4: Create a data table.
Step 5: Tip to copy the displayed information to / var/www/html/base/base_conf.php.
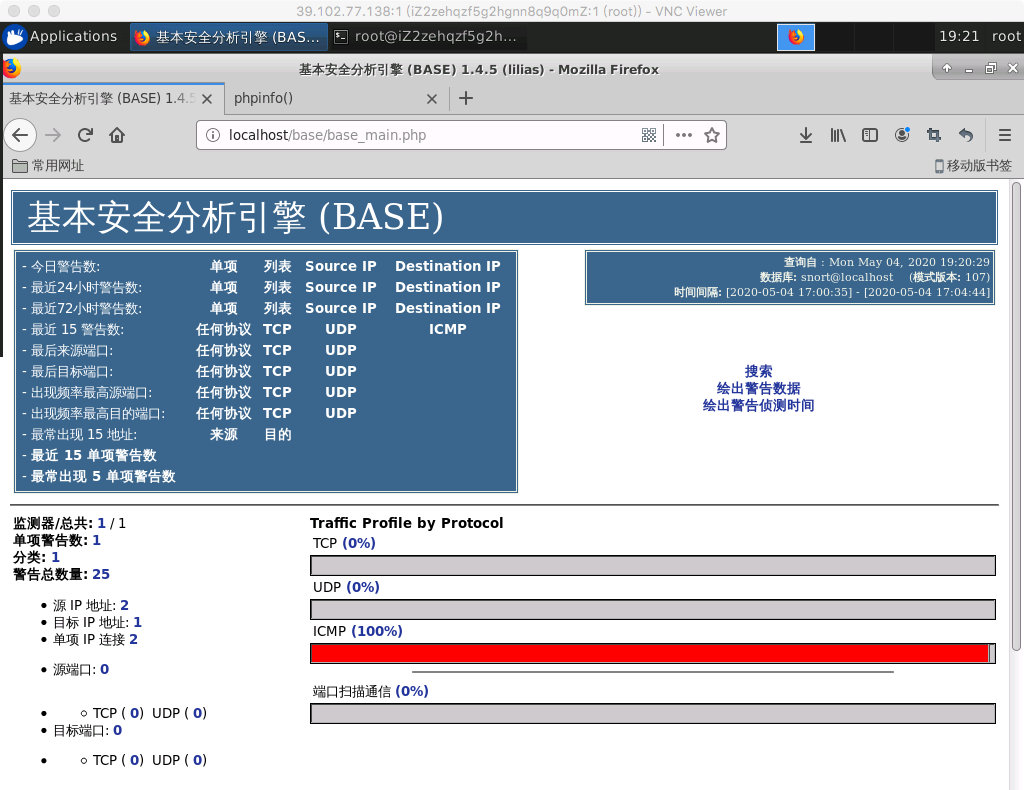
When the setup is complete, the above page appears, indicating that the BASE installation was successful and you can see the data in MySQL.
Use Snort
Snort has three working modes: Sniffer, Packet Logger, and Network Intrusion Detection System.
-
Sniffer mode simply grabs packets from the network and displays them on the terminal.
If you just want to print the header information of IP and TCP/UDP/ICMP packets on the screen, you can use:
snort -v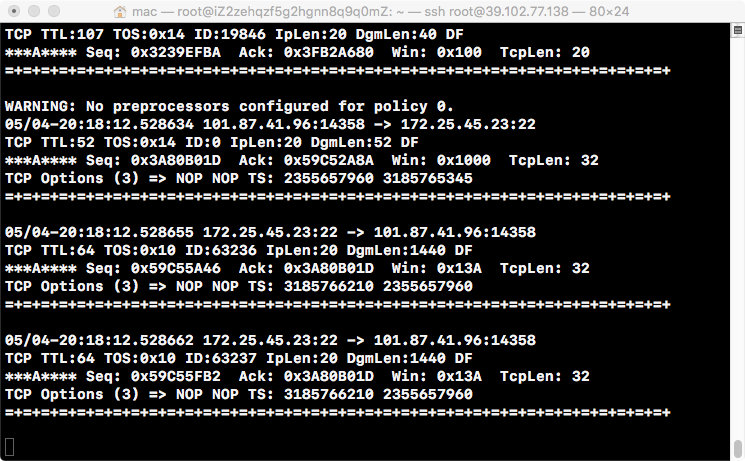
-
Packet Logger mode saves data packages to disk.
Packet Logger Mode is used if you want to store package information on disk.Snort can automatically save the package information to disk using the following commands:
snort -vde -l log_directoryWhen Snort runs in this mode, it stores all captured packets in log_directory by IP classification.The local network can be specified with -h to enable Snort to record packets related to the local network:
snort -vde -l log_directory -h 192.168.1.0/24If you are on a high-speed network, or want to record data packets for analysis, you can record data packets in binary mode, where -vde is not specified, because binary mode records information for the entire package.For example:
snort -l log_directory -bBinary mode stores the data package in tcpdump format and prints the information in the binary file to the screen using the following commands:
snort -dv -r snort.log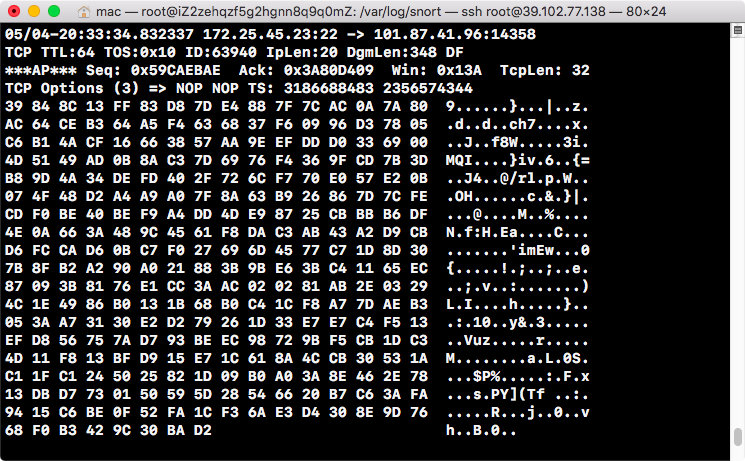
-
Network Intrusion Detection mode is the most complex and highly configurable.It enables Snort to analyze and respond to network traffic based on user-defined rules.
Turn on NIDS mode with the following commands:
snort -dev -l log_directory -h 192.168.1.0/24 -c snort.confsnort.conf is a rule set configuration file.An alter log is generated in the log_directory directory to record alert information for intrusion detection.
After executing the command, there is a series of initialization information.

Initialization succeeded.
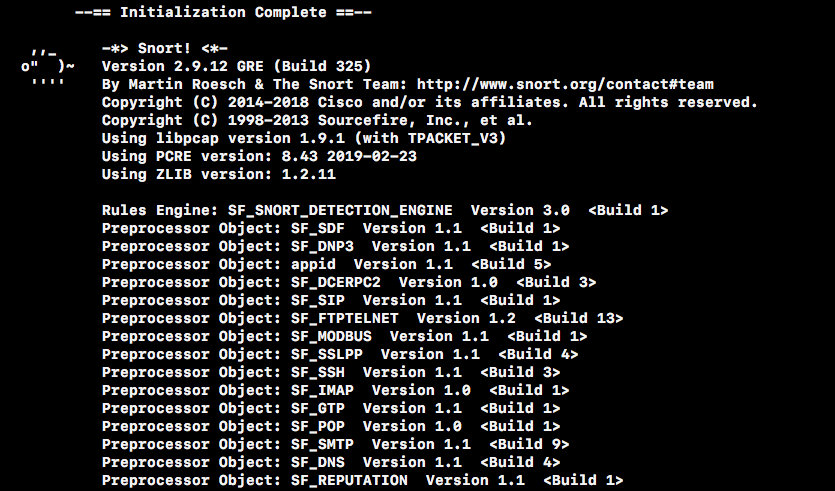
The package information is then printed.