When I was again toyed with various outbound and inbound rules, and after the search engine helped me out of the mud, I decided to write down this experience.
1. Deployment of FTP Server
1.1 Installation of vsftpd
_The author uses Aliyun's ECS server (this is not an advertisement, but a reminder: P), the operating system is CentOS7. First, install vsftp (very secure FTP daemon), an open source ftp server software.
# Install vsftpd
yum install vsftpd
# Set up boot start
systemctl enable vsftpd
vsftpd processes can be managed with system ctl:
# Start, terminate, restart, view the running status
systemctl [start|stop|restart|status] vsftpd
# Set boot-up self-startup, close boot-up self-startup
systemctl [enable|disable] vsftpd
1.2 Fill in the configuration file
1.2.1 Configure vsftpd.conf
vim /etc/vsftpd/vsftpd.conf
# Remove comments and rewrite
anonymous_enable=YES
anon_upload_enable=NO
anon_mkdir_write_enable=YES
chown_uploads=NO
async_abor_enable=YES
ascii_upload_enable=YES
ascii_download_enable=YES
ftpd_banner=Welcome to FTP service.
chroot_local_user=YES
# Add to
use_localtime=YES
listen_port=21
idle_session_timeout=300
guest_enable=YES
guest_username=vsftpd
user_config_dir=/etc/vsftpd/vconf
data_connection_timeout=1
virtual_use_local_privs=YES
pasv_min_port=10000
pasv_max_port=10020
accept_timeout=5
connect_timeout=1
1.2.2 New User Files
vim /etc/vsftpd/virtusers
# The following is the example content, two actions in a group, the first action username, the second action password.
qdh
qdh
wb
wb
1.2.3 Generating User Data Files
db_load -T -t hash -f /etc/vsftpd/virtusers /etc/vsftpd/virtusers.db

chmod 600 /etc/vsftpd/virtusers.db
1.2.4 Modify/etc/pam.d/vsftpd file
vim /etc/pam.d/vsftpd
# First, annotate all the configuration lines of auth and account, add the following two lines. If the system is 32-bit, lib64 is changed to lib.

auth sufficient /lib64/security/pam_userdb.so db=/etc/vsftpd/virtusers

account sufficient /lib64/security/pam_userdb.so db=/etc/vsftpd/virtusers
1.2.5 New System Users
# New system user vsftpd, home directory is / home/vsftpd
# The login terminal is set to / bin/false so that it cannot login to the system
useradd vsftpd -d /home/vsftpd -s /bin/false
chown -R vsftpd:vsftpd /home/vsftpd
1.2.6 Create Virtual User Personal Profile
# New folder to store virtual user profile and enter it
mkdir /etc/vsftpd/vconf
cd /etc/vsftpd/vconf

# Establishing User Root Directory
mkdir -p /home/vsftpd/qdh/
mkdir -p /home/vsftpd/wb/

vim qdh
# New user qdh configuration file, as follows, similar to other users

local_root=/home/vsftpd/qdh/
write_enable=YES
anon_world_readable_only=NO
anon_upload_enable=YES
anon_mkdir_write_enable=YES
anon_other_write_enable=YES
1.3 Firewall Settings
1.3.1 Firewall of CentOS7
# View firewall status
firewall-cmd --state
# View Port Opening
firewall-cmd --query-port=21/tcp
# Open ports 20 and 21
firewall-cmd --zone=public --add-port=20/tcp --permanent
firewall-cmd --zone=public --add-port=21/tcp --permanent
# Open ports 10060 to 1090
firewall-cmd --zone=public --add-port=10000-10020/tcp --permanent
# Reloading Firewall
firewall-cmd --reload
1.3.2 Aliyun Security Group Rules (Always Forgotten)
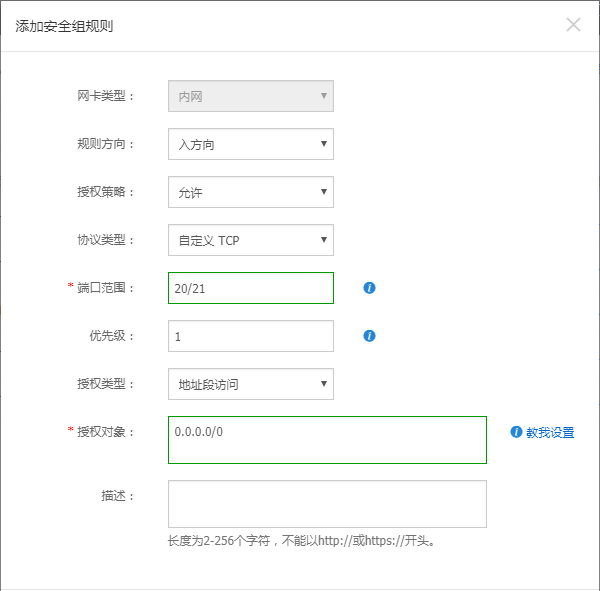
_In "Cloud Server ECS - > Instance - > Management - > Security Group - > Configuration Rules of this Instance", select "Add Security Group Rules". In this case, the first rule added is as follows:
2. Client Configuration
_In Windows 10, the author tried to connect the ftp server by using the ftp command of cmd and the resource manager, during which there were various problems. When doing the following, remember to click on buttons like "OK" or "Apply" to save the change results.
2.1 When using the ftp command, "425 Failed to establish connection" appears
_In "Control Panel - > System and Security - > Windows Firewall - > Allowed Applications", click Change Settings, and then select "File Transfer Program" according to the network used.
2.2 In the Explorer, there appears "Windows can't access this folder. Make sure that the folder you entered is correct and you have the right to access this folder."
_In "Control Panel - > Program - > Enable or Close Windows Function", find "Internet Information Service", check "FTP Service" and "FTP Extension" in "FTP Server" inside; find "TFTP Client" and tick.
_In "Control Panel - > Network and Internet - > Internet Advanced Options - > Advanced", cancel the check before "Using Passive FTP (Firewall and DSL Modem Compatibility)".
_In "Control Panel - > System and Security - > Windows Firewall - > Allowed Applications", click Change Settings, and then select "File Transfer Program" according to the network used.
2.3 "553 Can not create file" appears when uploading files
_Modify the access rights of ftp user folders in CentOS.