Preface
The purpose of this article is to document the problems and solutions encountered in setting up the Spring source environment for reference.
1. Required Resources
IDEA 2019.1
JDK 1.8
spring-5.2.8.RELEASE
gradle-5.6.4
2. Resource Download and Version Description
2.1 spring Source Download
Method 1: Use git clone to go local
git clone --branch v5.2.8.RELEASE https://github.com/spring-projects/spring-framework.git
Method 2: spring source directly downloads the zip file, and after the download is complete, it can be decompressed in the working directory.
ps: Why choose the RELEASE version, because the use of dependencies in the RELEASE version is also the RELEASE version, and in the maven library, there is no missing situation.
2.2 gradle Download, Install, and Configure
2.2.1 gradle Download
1) First determine the gradle version you need to download the Spring source
View files: spring-framework/gradle/wrapper/gradle-wrapper.properties

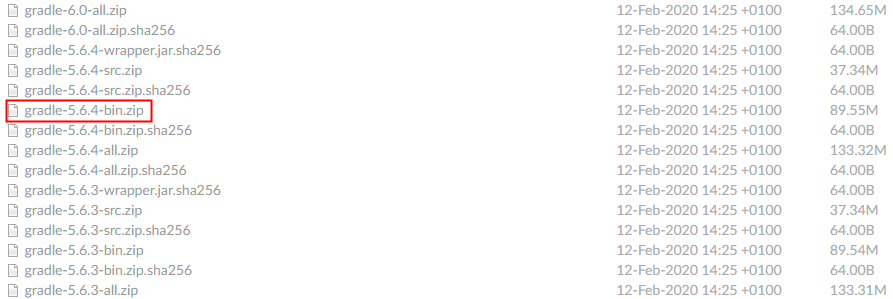
You can confirm that the gradle version is: gradle-5.6.4-bin.zip
The gradle versions should be consistent, otherwise there will be some cases when compiling functions that cannot be found.
2) Download gradle
gradle download address: https://services.gradle.org/distributions

Download to local machine and unzip to specified path.
2.2.2 gradle installation
1) gradle-5.6.4-bin.zip is decompressed to the specified path to complete the installation.

2) Configuration of environment variables
Add the GRADLE_HOME system variable, pointing to the installation path of gradle;

Configuring%GRADLE_HOME%\bin in PATH

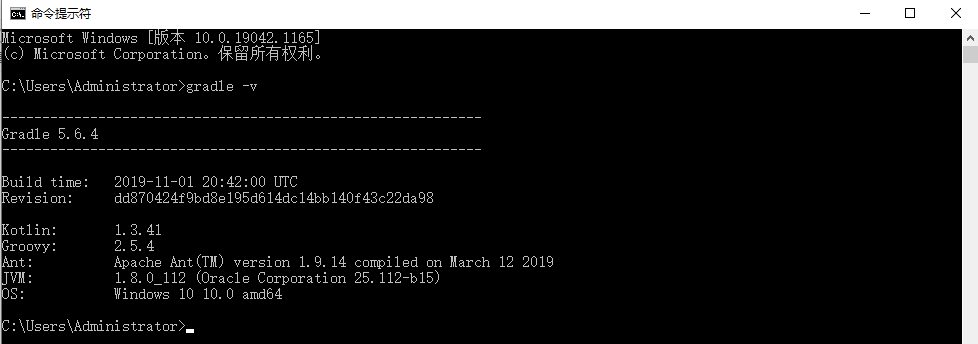
Open cmd and type gradle-v to verify that gradle was installed successfully.

ps: If you do not want the files downloaded by gradle to default to C drive, you can configure the GRADLE_USER_HOME system variable and customize the path specified by the gradle_repo file.

2.2.3 gradle configuration
Similar to maven's settings.xml, you can configure gradle's default configuration file.
stay gradle Under the installation path of: gradle-5.6.4/init.d/,Add a new file: init.gradle

The following is init.gradle:
allprojects {
    repositories {
        mavenLocal()
        maven { url "https://maven.aliyun.com/nexus/content/groups/public/" }
        mavenCentral()
    }

    buildscript {
        repositories {
            maven { url 'https://maven.aliyun.com/nexus/content/groups/public/' }
        }
    }
}
3. kotlin Version and Adjustment
4. Source Configuration Adjustment
4.1 Target file: build.gradle
1) Comment gradle-enterprise-conventions
The plugins failed to load and no comment will cause compilation to fail.
Comment out this line
//id 'io.spring.gradle-enterprise-conventions' version '0.0.2'

2) Add an Ali mirror to the warehouse to speed up resource downloads and compilation. Line number is about 280, repositories under dependency management are added:
maven { url 'https://maven.aliyun.com/nexus/content/groups/public/' }
4.2 Target file: gradle.properties
Increase memory, load on demand
1.Increase memory allocation
org.gradle.jvmargs=-Xmx2048m -XX:MaxPermSize=512m -XX:+HeapDumpOnOutOfMemoryError -Dfile.encoding=UTF-8
2.Configure on demand
org.gradle.configureondemand=true
3.Open Daemon
org.gradle.daemon=true
ps:gradle.properties can determine the version of spring.
5. idea Import spring Source
5.1 Import Source Step
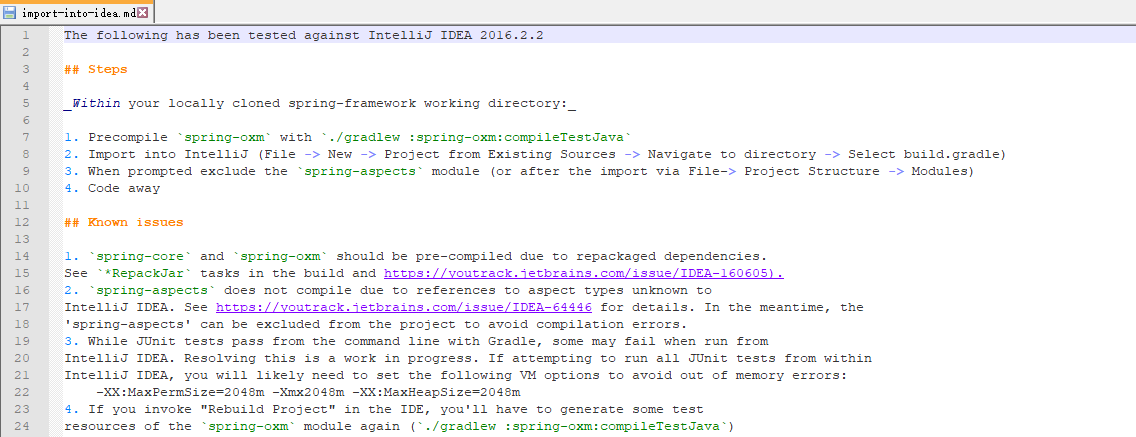
Locate the import-in-idea.md file in the spring-framework source root directory


Step 1: Enter the spring-framework source directory, command gradlew:spring-oxm:compileTestJava
Step 2: Import idea s, File - New - Project from Existing Sources
5.2 Pre-compile, compile test code
Enter the spring source directory, open cmd here, and type gradlew: spring-oxm: compileTestJava for precompilation. A BUILD SUCCESSFUL indicates successful compilation.

If compile time error: Execution failed for task': spring-oxm: compileTestJava'.JiBXException in JiBX
5.3 Importing idea s
File -> New -> Project from Existing Sources -> Navigate to directory -> Select build.gradle
Method 1: Select the build.gradle file directly

Method 2: Open the source project directly

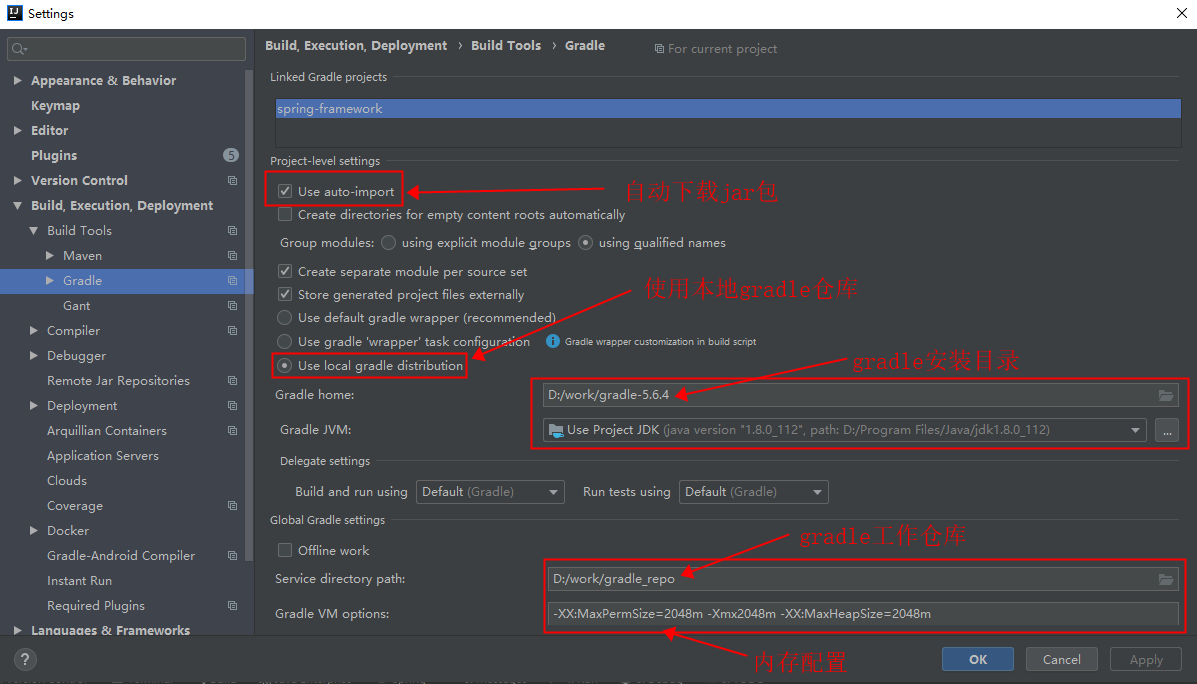
Enter idea for setup

Memory Configuration: When compiling with tools, memory overflow may occur, where we need to add parameters to the compilation
-XX:MaxPermSize=2048m -Xmx2048m -XX:MaxHeapSize=2048m
Click Refresh all Gradle projects
 This spring source has been successfully imported.
6. Debugging
6.1 Debug 1: Create a new module

Import spring's source module after module is built

Create a new test class, HelloSpring.java:
package spring.demo;

import org.springframework.stereotype.Service;

/**
 * HelloService
 * @date 2021/9/10 20:16
 */
@Service
public class HelloSpring {

	public void say(){
		System.out.println("Hello Spring");
	}

}
Register the HelloSpring class and start running:
package spring.demo;

import org.junit.Test;
import org.springframework.context.annotation.AnnotationConfigApplicationContext;

/**
 * Unit test for simple App.
 */
public class AppTest
{
    /**
     * Rigorous Test :-)
     */
    @Test
    public void test()
    {
		AnnotationConfigApplicationContext context = new AnnotationConfigApplicationContext();
		context.refresh();
		context.register(HelloSpring.class);

		HelloSpring helloSpring = (HelloSpring) context.getBean("helloSpring");
		helloSpring.say();
		System.out.println( "Executed AppTest.test() " );

    }
}
junit-4.10.jar needs to be introduced in maven
1) Run the test class with errors:

spring.spring-jcl.main needs to be introduced
2) Rerun with error:

Need to introduce spring.spring-aop.main
3) Rerun successfully.
If you have further problems, introduce the required modules until they run successfully.

OK, and eventually the created Hellspring class was successfully initialized.
6.2 Debugging 2: Creating test classes in the spring-context module
1) Add a test class to the spring-context to verify that it can be compiled and passed.
2) Create a test service class
package com.chenf.test;

import org.springframework.stereotype.Service;

/**
 * HelloWorld
 * @date 2021/9/11 0:49
 */
@Service
public class HelloWorld {

	public void say() {
		System.out.println("Hello World!");
	}
}
3) Create a configuration file
Under the test/resources directory, create a new spring-test.xml, which reads as follows:
<beans xmlns="http://www.springframework.org/schema/beans"
	   xmlns:xsi="http://www.w3.org/2001/XMLSchema-instance"
	   xmlns:context="http://www.springframework.org/schema/context"
	   xsi:schemaLocation="
	http://www.springframework.org/schema/beans
	http://www.springframework.org/schema/beans/spring-beans.xsd
    http://www.springframework.org/schema/context
    http://www.springframework.org/schema/context/spring-context.xsd
	">
	<context:component-scan base-package="com.chenf.test"/>
</beans>
4) Create test classes
Under the test directory, create a new package:com.chenf.test, and a new test class: HelloWorldTest
package com.chenf.test;

import org.junit.Test;
import org.springframework.context.support.ClassPathXmlApplicationContext;

/**
 * HelloWorldTest
 * @date 2021/9/11 0:50
 */
public class HelloWorldTest {

	@Test
	public void test() {
		ClassPathXmlApplicationContext applicationContext = new ClassPathXmlApplicationContext("spring-test.xml");
		HelloWorld helloWorld = (HelloWorld)applicationContext.getBean("helloWorld");
		helloWorld.say();
		System.out.println("Executed HelloWorldTest.test() ");
	}
}
5) Run Debugging
Right-click Run in the class HelloWorldTest method test() and wait for the results to run.

6) Running results
The operation was successful and expected.
Hello World!
Executed HelloWorldTest.test()
BUILD SUCCESSFUL in 3m 39s
50 actionable tasks: 29 executed, 21 up-to-date
0:13:41: Tasks execution finished ':spring-context:cleanTest :spring-context:test --tests "com.chenf.test.HelloWorldTest.test"'.

Finish.
Reference Blog:
Spring Source Compilation One-Time Pass &Encountered Pit Solution-Bing Hui-Blog Park
idea Imports spring Source and Debugs Blog-CSDN Blog Running _ROAOR1
spring Source Reading Environment (Minute Download Package)_lsz-CSDN Blog
Compile the spring5.x source_AN_ERA blog-CSDN blog using idea and gradle
