The first blog in Meng new Xiaobai's life will inevitably make mistakes. I hope you guys will forgive me a lot.
1. Introduction to Ajax technology
Ajax(Asynchronous JavaScript and XML) is a kind of web development technology to create interactive web applications. It is not a new technology. Its purpose is to achieve the local refresh of the page. Ajax technology can make the previous application not refresh the whole page every time it submits, so as to improve the performance of the operation.
2. Servlet concept
Servlet (server-side applet) is a server-side applet written in java, which can generate dynamic Web pages like JSP. However, servlet focuses on logic control, JSP focuses on view display. Servlet mainly runs on the server side and is called and executed by the server. It is a class developed according to the servlet standard. The biggest advantage of servlet is that it can process HTTP requests from customers and return a response.
3. Synchronous and asynchronous
Synchronization: the client sends a request to the server. During the period of waiting for the server to respond to the request, the client can't do anything else but wait. After the server is finished, it returns to the client. Then the client can do other things. Users may not be very friendly to use, but sometimes we have to get the data of the server to carry out the next operation. For example, if I call you, you have to connect me before I can talk to you.
Asynchronous: the client sends the request to the server. During the period of waiting for the server to respond to the request, the client can do other things without waiting. Save time. Improved efficiency. Like texting. After a text message is sent, no matter whether you read it or not, I can send another one. However, it may also cause SMS interference. So be careful. Of course, the premise of calling and texting is that there must be a mobile phone, and the mobile phone must have a call fee. (to utter a word of rubbish).
4. Servlet handles native Ajax requests (do not send data / send key/value data / send json format data)
Development environment: eclipse+tomcat+jsp+javascript+ajax+servlet
4.1 Servlet handles native Ajax requests (no data, return normal text)
(1) construction environment:
Create a new Java web project in eclipse (the JRE System Library package will be imported automatically). For example, I write the project name as AjaxDemo and deploy the project to tomcat server. The following is the directory structure of the project in Eclipse:
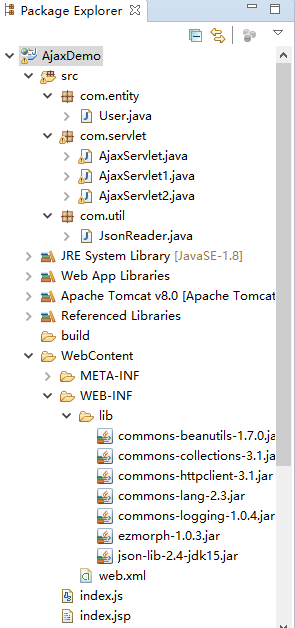
Let's ignore the jar package in lib first. I will analyze it step by step. Let's develop.
(2) write inedex.jsp page
Create a new index.jsp file in the WebContent root directory. The content of the file is as follows:
 1 <%@ page language="java" import="java.util.*" pageEncoding="UTF-8"%>
 2
 3 <%-- <%@ taglib uri="http://java.sun.com/jsp/jstl/core" prefix="c"%> --%>
 4 <%
 5     String path = request.getContextPath();
 6     String basePath = request.getScheme() + "://" + request.getServerName() + ":" + request.getServerPort()
 7             + path + "/";
 8 %>
 9 <!DOCTYPE html>
10 <html>
11 <head>
12 <base href="<%=basePath%>">
13 <title>I LOVE YOU</title>
14 <link rel="stylesheet" type="text/css" href="">
15 <script type="text/javascript" src="index.js"></script>
16
17 </head>
18 <body>
19
20 <button id="mybutton" value="Asynchronous request server" onclick="fun1()" >Send data in the format key/value Native ajax request</button>
21 <spand id="show" />
22
23 <br/>
24
25 <hr/>
26
27 <button id="mybutton1" value="Asynchronous request server" onclick="fun2()" >Send data in the format json Native ajax request</button>
28 <spand id="show1" />
29
30
31 <br/>
32 <hr/>
33
34 <button id="mybutton2" value="Asynchronous request server" onclick="fun3()" >Don't send data</button>
35 <spand id="show2" />
36
37 </body>
On this page, we have written three buttons and registered events. You can call the corresponding functions in js file to respond to the buttons. Here we look at the button id="mybutton2" (the third one), which does not send data. <span>Tags are mainly used to display the returned content. We notice that the jsp file references the javascript file. Next we write js file.
(3) write inedex.js file
 1 /**
 2  *
 3  */
 4 //Native ajax Submission key/value data
 5 function fun1(){
 6
 7     var value="username=wly&password=1314520";  //key/value type
 8     var x=new XMLHttpRequest();   //Establish ajax object
 9     x.onreadystatechange=function(){     //Yes ajax Object listening
10         if(x.readyState==4){         //4 Indicates the resolution is complete
11             if(x.status==200){            //200 Return for normal
12                 var data=x.responseText;   //Text content returned
13                 document.getElementById("show").innerHTML=data;
14                 console.log(data);  //web Console printing
15             }
16         }
17     }
18
19     //(1)Sending mode
20     //(2)Sending address
21     //(3)Asynchronous or not, true Asynchronous, false For synchronization
22     x.open("POST","AjaxServlet",true);
23     x.setRequestHeader("Content-type","application/x-www-form-urlencoded");
24     x.send(value);  //Send out
25 }
26
27
28 //Native ajax Submission json data
29 function fun2(){
30     var user={
31         "username":"wly",
32         "password":"1314521"
33     };
34     var x=new XMLHttpRequest();   //Establish ajax object
35     x.onreadystatechange=function(){     //Yes ajax Object listening
36         if(x.readyState==4){         //4 Indicates the resolution is complete
37             if(x.status==200){            //200 Return for normal
38                 var data=JSON.parse(x.responseText);   //hold json String resolved to javascript object
39                 document.getElementById("show1").innerHTML=data.message+" "+data.user.username+" "+data.user.password;
40                 console.log(data);
41                 console.log(data.meaasage);
42                 console.log(data.user);
43             }
44         }
45     }
46
47     //(1)Sending mode
48     //(2)Sending address
49     //(3)Asynchronous or not, true Asynchronous, false For synchronization
50     x.open("POST","AjaxServlet1",true);
51     x.setRequestHeader("Content-type","application/x-www-form-urlencoded");
52
53     //hold javascript Object to json Character string
54     x.send(JSON.stringify(user));
55 }
56
57
58 //Native ajax Request (do not send data)
59 function fun3(){
60
61
62     var x=new XMLHttpRequest();   //Establish ajax object
63     x.onreadystatechange=function(){     //Yes ajax Object listening
64         if(x.readyState==4){         //4 Indicates the resolution is complete
65             if(x.status==200){            //200 Return for normal
66                 var data=x.responseText;   //Text content returned
67                 document.getElementById("show2").innerHTML=data;//Show content in span Label
68                 console.log(data);  //web Console printing
69             }
70         }
71     }
72
73     //(1)Sending mode
74     //(2)Sending address
75     //(3)Asynchronous or not, true Asynchronous, false For synchronization
76     x.open("POST","AjaxServlet2",true);
77     //Set request header information
78     x.setRequestHeader("Content-type","application/x-www-form-urlencoded");
79     x.send(null);  //Send out    ,Don't send data,Use null
80 }
Let's look at the fun3() function. Here we use native ajax to submit requests. Here we don't send data, so the parameter in send is null. There are comments in the code. I won't explain too much here.
Now that the request is submitted, we have to write server-side code to handle the ajax request. Next, the servlet comes on the stage.
(4) compile Servlet file
 1 package com.servlet;
 2
 3 import java.io.IOException;
 4
 5 import javax.servlet.ServletException;
 6 import javax.servlet.http.HttpServlet;
 7 import javax.servlet.http.HttpServletRequest;
 8 import javax.servlet.http.HttpServletResponse;
 9
10 public class AjaxServlet2 extends HttpServlet {
11
12     protected void doGet(HttpServletRequest request, HttpServletResponse response)
13             throws ServletException, IOException {
14
15         // Set the content type of the response sent to the client to be html,The coding method is UTF-8
16         response.setContentType("text/html;charset=UTF-8");
17         // Return content
18         response.getWriter().write("I miss you!");// Returns a normal string
19     }
20
21     protected void doPost(HttpServletRequest req, HttpServletResponse resp) throws ServletException, IOException {
22         this.doGet(req, resp);
23     }
24 }
At this point, servlet processing Ajax request is very simple, because there is no need to accept data, so just return normal text. Note that response.getWriter() returns PrintWriter, which is a printout stream. Call its write method to output the text content. Next let's configure the servlet with web.xml.
(5) web.xml configuration Servlet
Why configure the servlet in web.xml? Because when we input the url address in the browser, we send the request to the tomcat container. tomcat must load the corresponding servlet and call the servlet to process the request, so we must configure the servlet in web.xml. If it is not configured, the corresponding servlet will not be found for processing.
 1 <?xml version="1.0" encoding="UTF-8"?>
 2 <web-app xmlns:xsi="http://www.w3.org/2001/XMLSchema-instance" xmlns="http://java.sun.com/xml/ns/javaee" xsi:schemaLocation="http://java.sun.com/xml/ns/javaee http://java.sun.com/xml/ns/javaee/web-app_3_0.xsd" id="WebApp_ID" version="3.0">
 3   <display-name>AjaxDemo</display-name>
 4   <welcome-file-list>
 5     <welcome-file>index.html</welcome-file>
 6     <welcome-file>index.htm</welcome-file>
 7     <welcome-file>index.jsp</welcome-file>
 8     <welcome-file>default.html</welcome-file>
 9     <welcome-file>default.htm</welcome-file>
10     <welcome-file>default.jsp</welcome-file>
11   </welcome-file-list>
12
13
14   <servlet>
15       <servlet-name>AjaxServlet</servlet-name>
16
17       <servlet-class>com.servlet.AjaxServlet</servlet-class>
18   </servlet>
19
20   <servlet>
21       <servlet-name>AjaxServlet1</servlet-name>
22
23       <servlet-class>com.servlet.AjaxServlet1</servlet-class>
24   </servlet>
25
26
27    <servlet>
28       <servlet-name>AjaxServlet2</servlet-name>
29
30       <servlet-class>com.servlet.AjaxServlet2</servlet-class>
31   </servlet>
32
33
34
35
36
37
38   <servlet-mapping>
39
40       <servlet-name>AjaxServlet</servlet-name>
41       <url-pattern>/AjaxServlet</url-pattern>
42
43   </servlet-mapping>
44
45
46   <servlet-mapping>
47
48       <servlet-name>AjaxServlet1</servlet-name>
49       <url-pattern>/AjaxServlet1</url-pattern>
50
51   </servlet-mapping>
52
53
54   <servlet-mapping>
55
56       <servlet-name>AjaxServlet2</servlet-name>
57       <url-pattern>/AjaxServlet2</url-pattern>
58
59   </servlet-mapping>
60
61 </web-app>
We see that Ajax servlet 2 is configured. Explain. The configuration servlet has two tags. The first is < servlet > < servlet > in which we configure the servlet name and the full class path. The second
< servlet mapping > < servlet mapping > configures the servlet name (consistent with the servlet name of the first label) and the mapping path. Here I use slash / add my own path.
We noticed that the < welcome file list > tag configuration has an index.jsp file, which is equivalent to a welcome page. When we write the url request address, we don't need to write the file name. (convenience)
Let's run the program.
(5) operation procedure
Start tomcat and enter the request address url in the Google browser address bar: localhost/AjaxDemo /.
ok. Click the button (do not send data) to run. Effect display:
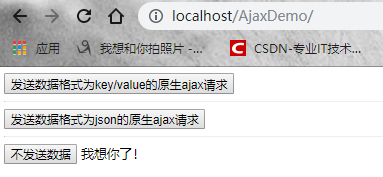
Note: the general request address is localhost: port number / project name / jsp file name. Localhost means local host, which is this computer. The default port number of tomcat is 8080. I changed the port number of tomcat to 80, and 80 is the default port number of HTTP protocol. So I can omit the 80 port number. In fact, when you input the website, the browser (not IE) has already helped you input the protocol. I saved the following jsp file names because of the configuration of the tag < welcme file list > above. Ha-ha. It's much more convenient. The same principle. We can implement other instances.
4.2 Servlet processes native Ajax requests (sends key/value data and returns normal text)
(1) write jsp file
There is index.jsp code on it. Just look at the first button. The same principle.
(2) write js file
There is an index file on it. Just look at the first function fun1(). There are notes. Note that the key/value format is data = "username = wly & password = 1314520". Multiple key value pairs can be connected with & and then send data using the send(data) method.
(3) write Servlet file
1 package com.servlet;
2
3 import java.io.IOException;
4
5 import javax.servlet.ServletException;
6 import javax.servlet.http.HttpServlet;
7 import javax.servlet.http.HttpServletRequest;
8 import javax.servlet.http.HttpServletResponse;
9
10 public class AjaxServlet extends HttpServlet {
11
12 protected void doGet(HttpServletRequest request, HttpServletResponse response)
13 throws ServletException, IOException {
14
15 response.setContentType("text/html;charset=UTF-8");
16 String username = request.getParameter("username"); //Get the contents of username
17 String password = request.getParameter("password"); //Get the content of password
18 System.out.println(username + " " + password);
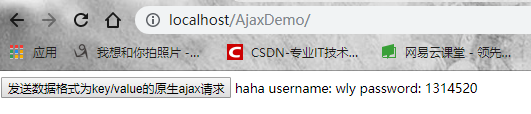
19 response.getWriter().write("haha " + "username: " + username + " password: " + password); //Connect a normal string to return
20
21 }
22
23 protected void doPost(HttpServletRequest req, HttpServletResponse resp) throws ServletException, IOException {
24 this.doGet(req, resp);
25 }
26 }
At this point, the servlet should do something to accept the data and return content from the foreground. To get the content from the foreground, use the request.getParameter(String paramString) method. You can get the corresponding content according to the name of the parameter. This method is very important. After getting it, we only return a normal text string.
(4) web.xml configuration servlet
The same thing. web.xml has been configured above. The Ajax servlet is configured. There's not much to explain here.
(5) operation procedure
Start tomcat and enter the request address url in the Google browser address bar: localhost/AjaxDemo /.
ok. Click the first button to run. Effect display:
4.3 Servlet processing native Ajax requests (sending json data, returning json data)
(1)Json
JSON (JavaScript object notation) is a lightweight data exchange format. For Ajax applications, JSON is faster and easier to use than xml. Human beings are easy to read and write. Machines are easy to parse and generate. It is based on a subset of the JavaScript programming language (standard ECMA-262 third edition December 1999). JSON is a text format that is completely language independent. These properties make JSON an ideal data exchange language. Commonly used JSON libraries in the project: gson (Google R & D), fastjson (Alibaba R & D), Jackson (simple and easy to use, less dependent packages), and JSON lib (widely used, more dependent packages).
(2) import jar package
Because it involves the processing of JSON data format, we must import JSON related packages and dependency packages for processing. We use the JSON lib class library which is widely used. There are seven jar packages (under LIB) in the above project structure. It can be found that the core jar package of the above JSON lib library is json-lib-2.4-jdk15.jar, and other several are dependent packages. JSON lib is a Java class library used to convert beans, collections, Java arrays and XML to JSON, and then to beans and DynaBeans again.
(3) create a new entity class (User)
Because it involves converting json objects to java objects and java objects to json objects. So to create a User object, there are two properties, username and password. It also provides setter and getter methods, and toString() methods.
package com.entity;

public class User {

    private String username;

    private String password;

    public String getUsername() {
        return username;
    }

    public void setUsername(String username) {
        this.username = username;
    }

    public String getPassword() {
        return password;
    }

    public void setPassword(String password) {
        this.password = password;
    }

    @Override
    public String toString() {
        return "User [username=" + username + ", password=" + password + "]";
    }

}
(4) prepare index document
The same thing. Just look at the second button.
(5) write js file
The same thing. The fun2() function in the index.js file above. Here's an explanation. Note the data format var user={"username":"wly", "password":1314521}. Here we write the data value directly. (for convenience). In actual development, we should get the value of the username of the page. The value of password. You can use document.getElementById("id").value to get page data. Also note that there are two ways. Observe fun2(). We found that when sending, we did some processing, using JSON.stringify(user). The function is mainly used to convert javascript objects into JSON strings, because the defined user is a VAR type, which is a javascript object, but the content definition is in accordance with the format of JSON number parsing to javascript object according to the specification. So it can be transformed. It can only be sent after being converted to JSON string. Send the parameter in the send() method. The same principle. There is also a method, json.parse (the returned JSON string), which is used to parse the returned JSON characters into javascript objects, and then display the front page data.
(6) write servlet file
Step 1: write a json tool class to accept the json string from the foreground, and convert the json string into a json object.
 1 package com.util;
 2
 3 import java.io.BufferedReader;
 4 import java.io.IOException;
 5 import java.io.InputStreamReader;
 6 import java.io.UnsupportedEncodingException;
 7
 8 import javax.servlet.http.HttpServletRequest;
 9
10 import net.sf.json.JSONObject;
11
12 public class JsonReader {
13
14     public static JSONObject receivePost(HttpServletRequest request) throws UnsupportedEncodingException, IOException {
15
16         // Read request content
17         BufferedReader br = new BufferedReader(new InputStreamReader(request.getInputStream(), "UTF-8"));
18
19         String line = null;
20         StringBuilder sb = new StringBuilder();
21
22         while ((line = br.readLine()) != null) {
23             sb.append(line);
24         }
25
26         // take json String to json object
27         JSONObject json = JSONObject.fromObject(sb.toString());
28         return json;
29     }
30
31 }
Second, write the servlet class.
1 package com.servlet;
2
3 import java.io.IOException;
4
5 import javax.servlet.ServletException;
6 import javax.servlet.http.HttpServlet;
7 import javax.servlet.http.HttpServletRequest;
8 import javax.servlet.http.HttpServletResponse;
9
10 import com.entity.User;
11 import com.util.JsonReader;
12
13 import net.sf.json.JSONObject;
14
15 public class AjaxServlet1 extends HttpServlet {
16
17 protected void doGet(HttpServletRequest request, HttpServletResponse response)
18 throws ServletException, IOException {
19
20 // response.setContentType("text/html;charset=UTF-8");
21
22 response.setContentType("application/json;charset=UTF-8"); //Set the content type and encoding of the response
23 JSONObject json = JsonReader.receivePost(request);
24 System.out.println(json);
25
26 // take json Object to java object
27 User user = (User) JSONObject.toBean(json, User.class);
28
29 JSONObject result = new JSONObject();
30
31 // take user Object to json Objects, saving user
32 result.put("user", JSONObject.fromObject(user));
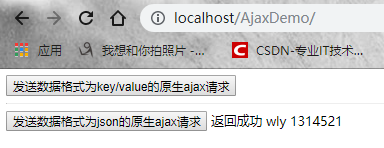
33 result.put("message", "Return to success");
34 response.getWriter().print(result);
35 }
36
37 protected void doPost(HttpServletRequest req, HttpServletResponse resp) throws ServletException, IOException {
38 this.doGet(req, resp);
39 }
40 }
BufferedReader can be used to read files or receive information from the keyboard (console). It is faster than Scanner and can greatly shorten the running time of the program. The readLine () method below it can read one line of text (String) at a time, which is very convenient. Note that the readline() method of the BufferedReader object must handle java.io.IOException exceptions. Also, after using BufferredReader, you need to close the stream with the close() method. Above we use the BufferedReader object to accept the requested content. And use StringBuilder object to store StringBuilder is a String variable, which is more efficient under single thread. The JSONObject class is an important class in the JSON lib core library. Here we use two methods. Others look at the source code.
One is public static JSONObject from Object (Object object). This is a static method of JSONObject class, which converts Object type data (or java Object) to JSONObject Object to return. The other is the public static Object to bean (JSONObject jsonobject, class bean class) method, which is mainly used to convert json objects to Object types (or java objects). Note that the print () method of printwriter above, in fact, the bottom layer still calls the write method. In fact, the final return is the json string. If you are interested, you can study the source code yourself.
(7) web.xml configuration servlet
The same thing. It has been configured above. AjaxServlet1 is configured.
(8) operation procedure
The same thing. Enter the url address. Just click the second button. The renderings are as follows:
5. summary
(1) pay attention to the path problem of introducing js files into jsp files. Here we can put both files in the WebContent root directory.
(2) note that the address submitted by ajax cannot be found. To check whether the web.xml is configured correctly, you can also use the mapping address configured by ${pageContext.request.contextPath} /. It's a full path.
(3) when Ajax is passed to the background JSON data, you need to use JSON.stringify(data) to convert javascript objects to JSON strings. The corresponding method is JSON.parse(data).
(4) when Ajax uses the JSONObject class to process json data, pay attention to the integrity of the jar package and dependency package of json lib.
(5) performance analysis of json lib class library: the first and most widely used json parsing tool is json lib. The bad part of json lib really depends on many third-party packages. For the conversion of complex types, json lib has defects in the conversion of json to beans. For example, there will be a list or map set of another class in one class, and the conversion of json lib from json to bean will be completed. There will be problems. json lib can not meet the needs of Internet in function and performance.
Source code link of this blog: https://pan.baidu.com/s/1fTR0mpfmj9-D7tPrONOu8g Extraction code: swsa
Author: I want to take a picture with you
Source: https://www.cnblogs.com/1314520wly/
The copyright of this article belongs to the author. Welcome to reprint and share. Work hard!
json lib is the first and most widely used json parsing tool. The bad part of json lib really depends on many third-party packages. For the conversion of complex types, json lib has defects in the conversion of json to beans. For example, there will be a list or map collection of another class in one class, and the conversion of json lib from json to beans will cause problems. json lib can not meet the needs of Internet in function and performance.